|
Eastern Airlines 727-200
by Don
Hinton
|
|
|
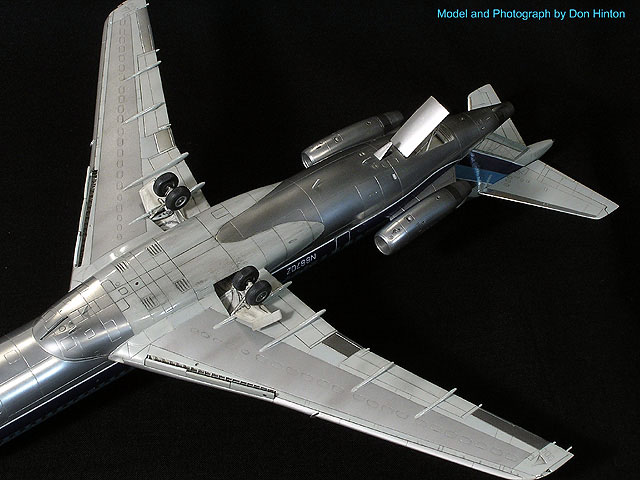
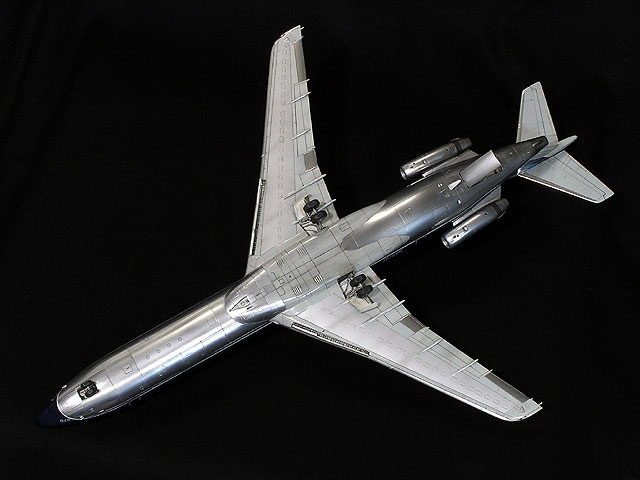
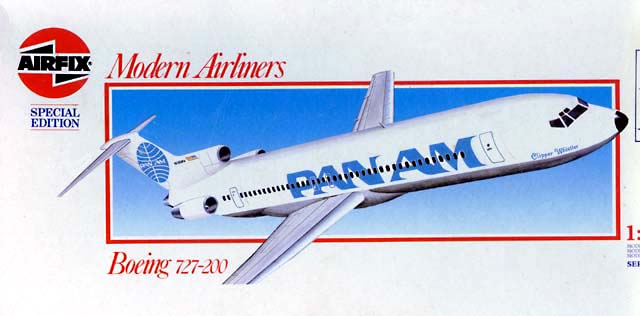
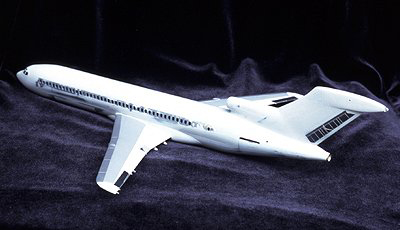
Boeing 727-200 |

Airfix's
1/144 scale Boeing 727-200 is available online from Squadron.com for
less than $9.00
The elegant Boeing 727 was introduced into service in February 1964
and became an immediate hit with the world’s airlines. With
sophisticated triple-slotted trailing edge flaps and new leading-edge
slats, the 727 had unprecedented low-speed takeoff and landing
performance for a commercial jet. The improved 727-200 was introduced in
December 1967 and incorporated a 20-foot stretch to accommodate up to
189 passengers in an all-tourist configuration. The 727 became the
best-selling airliner in history with 1,831 produced, eventually being
surpassed by the 737.
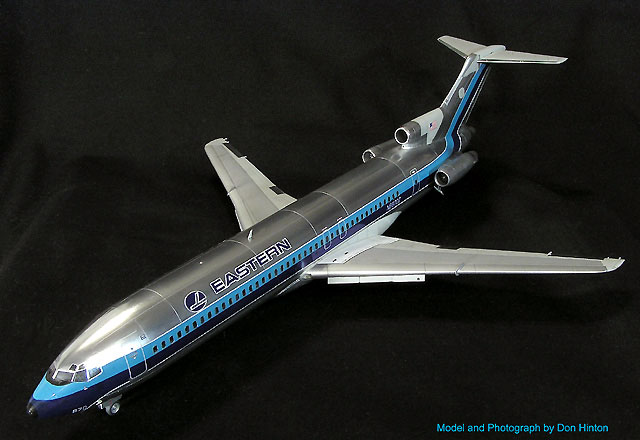
Eastern Airlines was the first of the “Big Four” US airlines to begin
using the 727, with their first 727-revenue flight taking place on the
Philadelphia-Washington-Miami route on February 1, 1964. Managerial and
financial problems led to Eastern’s bankruptcy in January 1991.
I was fortunate to have flown on several Eastern 727s in the same
livery as this model.
Airfix released its 1/144 scale 727-200 in 1982 and it is fairly
standard for airliner models from that period—very basic with toy-like
landing gear, thick features, and a “drop-in” windscreen that falls into
the fuselage. The plastic is typical Airfix—silver and hard though
somewhat brittle.
My desire was to make this old kit into a model that you want to get
close to, a model with realistic trailing edges and full of details like
real airliners actually are. And I wanted it posed as you normally see
it at airports— dropped leading edge Krueger flaps and “D.B. Cooper”
airstairs down.
Construction
and Modifications
|
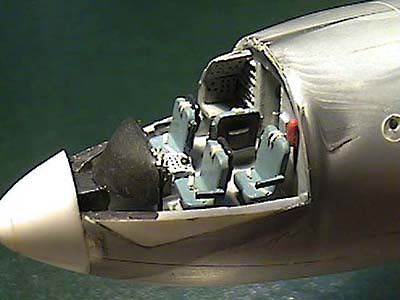
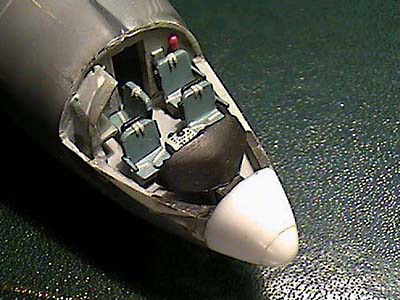
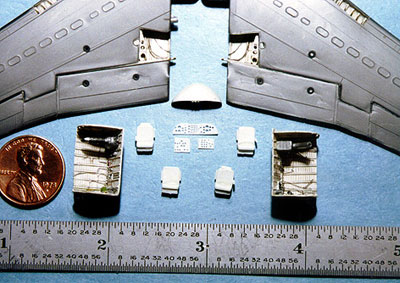
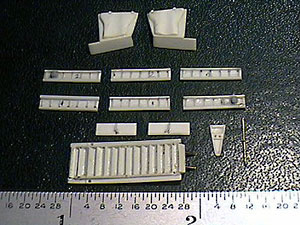
Cabin and Cockpit
Originally I was just going to glue simple seatbacks to the fuselage
interior sides to prevent the “empty cabin see-through effect”, but
eventually wound up with a full interior, fully aware 99% of my work
would be invisible. I added a complete cockpit and airstair well as well

Click the thumbnails below
to view larger images:
The “Pinocchio” nose
The “Pinocchio” nose was cut off and replaced with the more accurate
Revell 727-100 nosepiece. I cut away the fuselage section over the
cockpit and replaced it with the clear Minicraft 737 cockpit “roof”
section. The center air intake was inaccurate so I filed and sanded it
to get the nice, graceful curve going down the fin, rather than the
“shelf” going straight back as molded in the box.
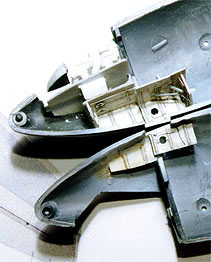
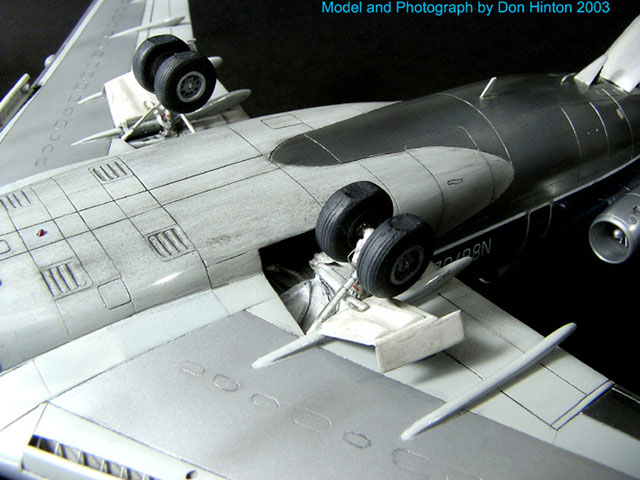
Landing Gear
The nose and main gear wells were boxed in and detailed, and the
landing gear and wheels turned on my lathe. All landing gear doors were
made from Evergreen sheet plastic with detailed inner surfaces.
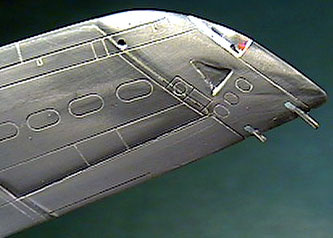
Wings
The kit wings were very thick so I thinned them down, both on the
upper and lower surfaces as well as the trailing edge.
The leading edge Krueger flap wells were cut out, boxed in and
detailed, with the Krueger flaps made from more Evergreen plastic.
The flap track fairings were glued on and filled prior to painting,
as were all the additional humps and dumps on the trailing edge.
Click the thumbnails below
to view larger images:
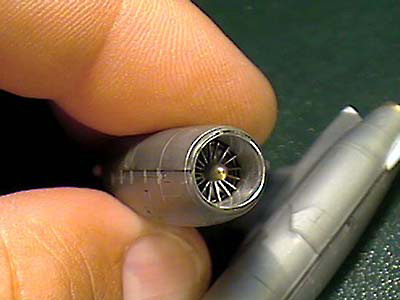
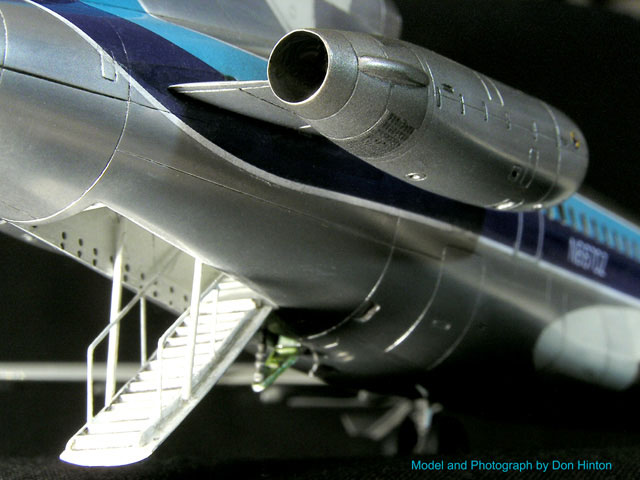
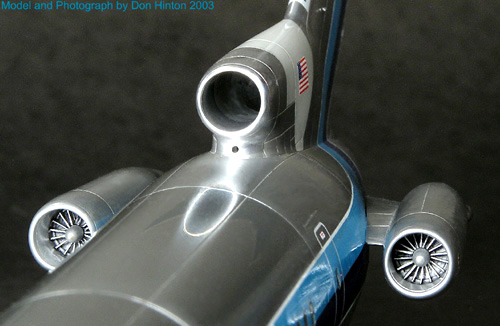
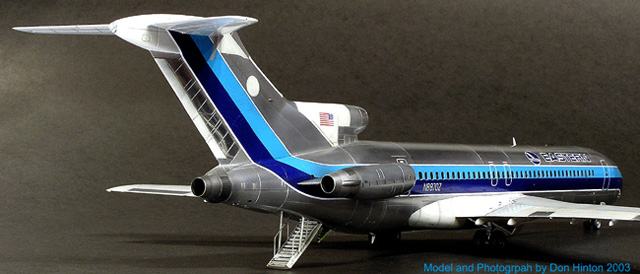
Engine Nacelles
Engine nacelles are fitted with brass and aluminum tubing for the air
intakes and exhausts, with scratchbuilt turbine and exhaust faces.
Click the thumbnails below
to view larger images:
Miscellaneous
I cut out sections of a clear toothbrush for the taxi light and
navigation light housings and superglued them in place, then sanded to
fit and polished until clear. The actual navigation lights are #80 holes
gently drilled in the acrylic from the backside (before gluing in place)
and painted Tamiya Clear Red or Blue prior to gluing in place.
All surface details were scribed using a needle in a pin vise.
Painting, in the order I painted it:
I masked the open cabin windows with Microscale Krystal Klear applied
with a toothpick (this will be removed later on.)
 The
entire model was primed with Model Master gloss Voodoo Gray (same as
Boeing Gray). Let dry for 1-2 weeks and then polish to a high gloss. The
entire model was primed with Model Master gloss Voodoo Gray (same as
Boeing Gray). Let dry for 1-2 weeks and then polish to a high gloss.
Control surfaces, which were highly polished ALCLAD on the real
aircraft, were painted with ALCLAD II Chrome (G), a wonderful paint that
went on top of the enamel Voodoo Gray with no problems, though I
understand the Chrome is a different formula than other ALCLAD II
paints, so ensure your primer will not lift when sprayed with other
ALCLAD II paints.
Corrogard wing spar panels were sprayed next. The real Corrogard is a
gray epoxypolymide paint (requires a hardener) with aluminum particles
added, creating a hard-to-capture look that varies wildly depending on
the light source and even the altitude you are at. Sometimes it looks
like flat gray, other times it looks like aluminum lacquer paint. I made
a mixture of Model Master Metalizer non-buffing Aluminum with 20-percent
Model Master Flat Light Ghost Gray and sprayed the wing spar panels, top
and bottom. Then I topped it off with a light spray of Model Master
Metalizer Sealer mixed with 10-percent Model Master Metalizer
non-buffing Aluminum, dusted on from a distance for a flat finish, and I
think the effect is marvelous.
 Now
for the Natural Metal Finish (NMF). Mainly for the ease of masking, I
prefer Model Master Metalizer buffing paints. These buffing paints can
be sprayed over Microscale Micro Mask (a non-latex, water-based mask
that is water soluble, even after it dries). When rinsed in warm water,
the Micro Mask will wash away even when coated with Model Master
Metalizer buffing paints—note I said buffing, as if you try this with
the Model Master Metalizer non-buffing paint the Micro Mask will not
wash off. The trade-off is, the Model Master Metalizer paints are
fragile and require very careful handling, but the benefit is you can
mask anything you want quickly and easily, even the most difficult
contoured panel line or the smallest access panel is easy to mask with
Micro Mask applied with various size paint brushes. Now
for the Natural Metal Finish (NMF). Mainly for the ease of masking, I
prefer Model Master Metalizer buffing paints. These buffing paints can
be sprayed over Microscale Micro Mask (a non-latex, water-based mask
that is water soluble, even after it dries). When rinsed in warm water,
the Micro Mask will wash away even when coated with Model Master
Metalizer buffing paints—note I said buffing, as if you try this with
the Model Master Metalizer non-buffing paint the Micro Mask will not
wash off. The trade-off is, the Model Master Metalizer paints are
fragile and require very careful handling, but the benefit is you can
mask anything you want quickly and easily, even the most difficult
contoured panel line or the smallest access panel is easy to mask with
Micro Mask applied with various size paint brushes.
First, I carefully hand painted the Micro Mask over all the
previously painted sections (Voodoo Gray panels, control surfaces and
Corrogard) and shot my first coat of Model Master Metalizer buffing
Aluminum, then polished with SNJ Aluminum Powder to the overall sheen I
wanted.
Second, I decided which panels I wanted to remain the first shade of
aluminum and masked these off with hand-painted Micro Mask. Since the
727 fuselage is all aluminum and I didn’t want drastically different
dissimilar panels, I added 20% Model Master Metalizer buffing Titanium
to Model Master Metalizer buffing Aluminum and sprayed the fuselage
again, spraying right over the panels masked with Micro Mask.
I repeated the process again to different panels, adding 10% more
Model Master Metalizer buffing Titanium to the mixture.
I finish painting by masking off the fuselage with more Micro Mask,
and shot the engine hot sections with Model Master Metalizer buffing
Titanium, then buffing Steel for a second darker color.
Now for the magic—I took the model to the tub and ran warm water over
it while gently brushing with a soft-bristled brush to wash off the
dried Micro Mask, and within minutes all the wonderful dissimilar panels
magically appeared.
At this stage, the second and third coats of Model Master Metalizer
will appear flat compared to the polished first coat. I toned this down
by polishing the entire fuselage with SNJ Aluminum Powder.
My NMF is now complete, I do not apply any overcoat as I find it
ruins the sheen you get from real aluminum powder polished into the
surface. Careful handling is required from here on out.
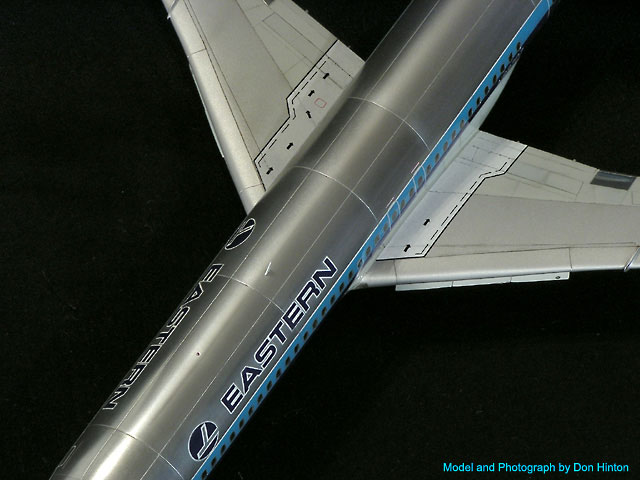
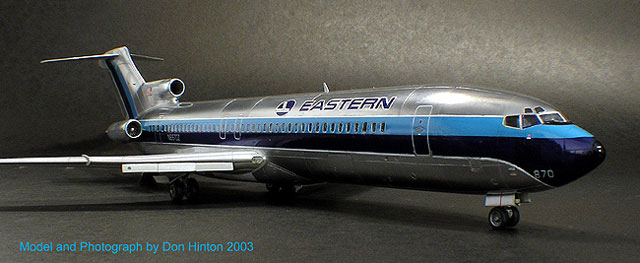
Decals
Flying Colors produces the beautiful Eastern Airlines livery I
wanted. The blue colors look perfect and the white cheat line was
perfectly registered. I cut off all clear transfer film prior to
applying, as any clear edge will show drastically against the NMF. Decal
application was standard, just be careful lining up the long “hockey
stick”, two sections per side, to ensure you match the height on both
sides. I did have a few rips, but they were easily repaired with the
extra blue patches thoughtfully provided with the decal sheet.
Since I wanted clear windows, but needed silver window frames, I used
Aviagraphics 727 Detail decal windows, though I had to cut them into
sections of three windows long to match the kit window spacing. Since
the clear decal film over the open windows is very fragile, I carefully
hand painted Future acrylic over the hock stick decals, but not the NMF.
Weathering
Airliners aren’t as clean as you might think they are. Go stand under
airliners approaching an airfield and see how dirty the bottoms can be.
I slightly weathered my 727 with a wash of various gray pastels mixed
with water and a touch of liquid detergent to break down the surface
tension. I lightly airbrushed old original Metalizer (not Model Master
Metalizer) “Graphite and Oil” on the bottom and around the reverse
thruster cascades. Additional highlighting of the wings was done with a
sharpened 0.5mm pencil.
I attached the engine nacelles after decaling was finished, though
Flying Colors comes with the nacelle area cut out of the decal in order
to add the decals after the nacelles. I epoxied the landing gear in
place, constantly checking alignment as it dried. Antennas and pitot
tubes come from the excellent Skyline 1/144 737 photoetch sheet that
came with the Skyline 737 kit some years ago.
I must say, the photoetched details are so fine and beautifully in
scale that even a #80 hole is too large for some of them, you almost
loose them in the hole.
I did not measure the model, I don’t do that so don’t ask me if it is
accurate in dimension. The nose and #2 duct are not right and don’t
require measurements to tell you so. Fellow airliner enthusiasts should
catch the rounded wing tips on my model—this was my fault, I incorrectly
rounded them off and to me they look like VC-10 wing tips - my bad.
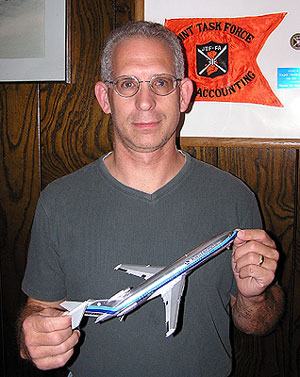 I
began this model in 1997 and worked on it off and on (usually “off”, as
I finished six models for myself and six for others in this timeframe)
with a move overseas and back to the states, finishing it up the morning
I flew to the 2003 IPMS USA Nationals. I
began this model in 1997 and worked on it off and on (usually “off”, as
I finished six models for myself and six for others in this timeframe)
with a move overseas and back to the states, finishing it up the morning
I flew to the 2003 IPMS USA Nationals.
Talk about close.
I don’t add up the hours I spend modeling, after all it is a hobby
and not work, but I do know it took me a very long time--too long.
Though I like the clear cockpit and cabin windows I won’t do this
again, as from any distance the windows look black, so next time I’ll
use dark window decals.
But I had fun and I really enjoy the finished product. It is my
favorite model in my display case.
|
 Home |
What's New |
Features |
Gallery |
Reviews |
Reference |
Forum |
Search
Home |
What's New |
Features |
Gallery |
Reviews |
Reference |
Forum |
Search