|
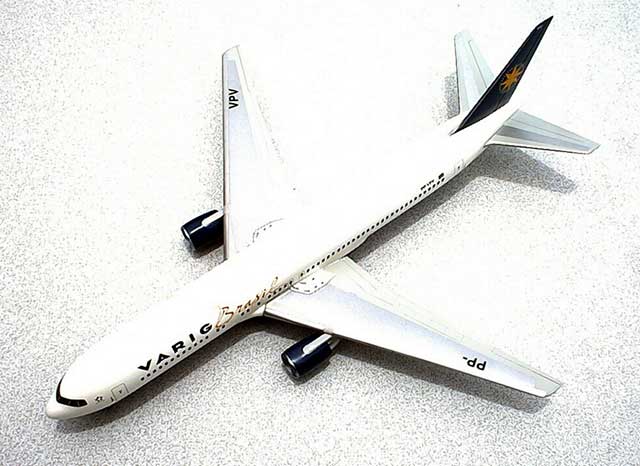
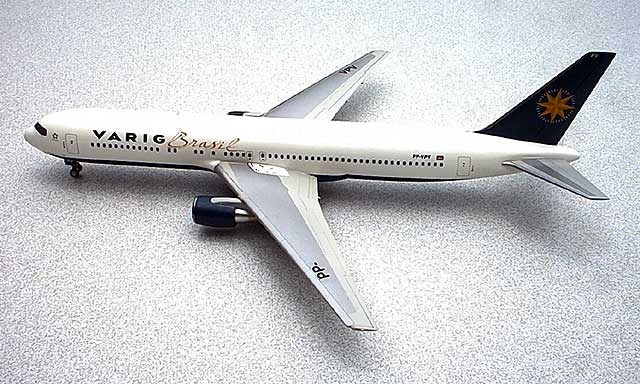
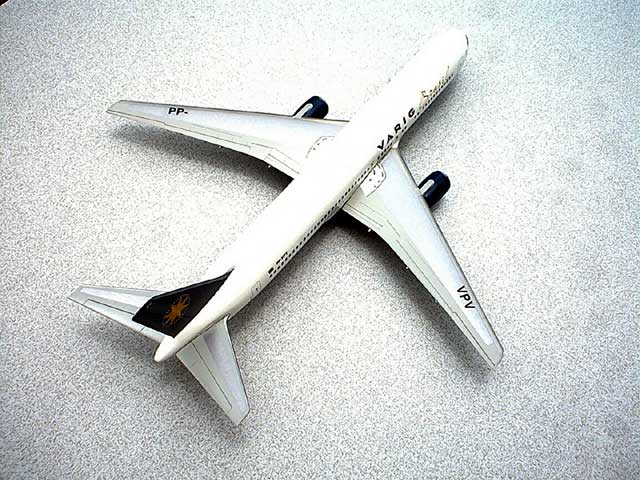
Varig Boeing 767
by Lee Coll
|
|
|
Varig Boeing 767 |

HyperScale is proudly supported by Squadron
What motivates modelers to
start a particular project ranges from the predictable attraction towards
things dear and familiar to the spontaneous satisfaction of random whims.
For this project, it was a bit of both, as I have recently become
enthusiastic towards airliner subjects, and with a chance encounter
fingering through boxes of decal sheets at Phil’s in Dallas, it was indeed
a whim that led me to choose the subject described in the following
feature.
|
Varig Boeing 767 |
|
1/200 Hasegawa kit 10135 |
|
Liveries Unlimited Sheet
A2-091 (Varig 767s) |
|
Liveries Unlimited Sheet
A2-G04 (Coroguard Panels for 767s) |
|
Braz Models Engine set
BZ2KG26 (GE CF-80 engines) |
I was already familiar with
Liveries Unlimited fine selection of airliner decals, and in fact was
searching Phil’s inventory to supplement several –737 projects I’d
planned. When Sheet No. A2-091 was encountered, I knew vary little about
Varig and didn’t even own a 767 kit.
The artwork, packaging, and
quality of images was typical of Jennings’ line, and this subject fit in
with my leanings towards what modeling friends have called “your fixation
on stark, utilitarian schemes.” White over Deep Blue. Whatever.
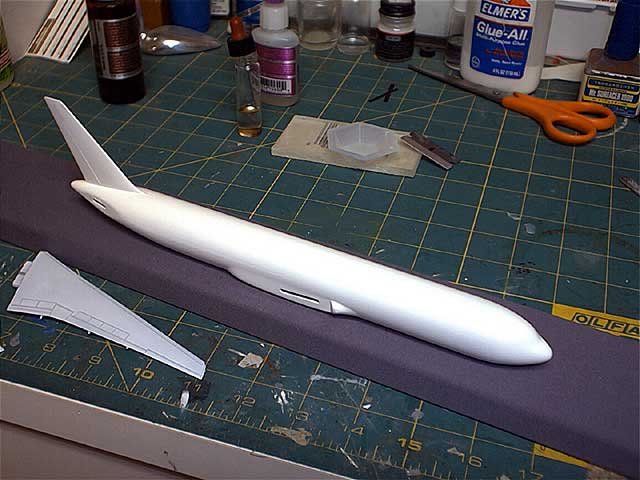
A 1/200 airliner model has
very few parts.
Hasegawa’s kit is an
excellent molding, providing accurate shapes for the –300 version I’d
selected as my subject. Even in 1/200 scale however, they do provide
plenty of little holes in the fuselage that are supposed to represent
windows. Since not all carriers configure their interior layout
identically, a few manufacturers, most notably Minicraft, have entered the
new millennium with the fuselage windows provided as decals. Nearly all
aftermarket decal manufacturers provide exacting window configurations in
both 1/200 and 1/144, the two most popular airliner scales.
The most time consuming portion of construction was filling these window
holes. I covered the outer fuselage halves with transparent tape and
dribbled medium-viscosity CA into each hole from the inside. I sprayed
some accelerator onto this and added more super-glue to build up a
thickness. An hour later, as I peeled off the tape, the results were
inferior to what I’d expected. Virtually every other window had little
pockets of oily, uncured CA that resulted in lots of filling from the
outside. I hadn’t intended to do a lot of sanding on the outer fuselage
surface, but as it ended up, by the time I’d fixed every little hole, I’d
managed to reduce the adjacent panel lines significantly. Some rescribing
was necessary, but eventual surface preparation and painting reduced all
the panel lines to near-invisibilty.
The cockpit “bulkhead” that accommodates a metal screw (for a nose weight)
was sandwiched between both fuselage halves. My advice is to add some
additional weight beyond what the kit provides. I took measurements and
made notes of the location of various antennae along the fuselage seams,
cutting each off, and saving the blade-type aerials for later
re-installation.
The wings went together without any problems and at this stage, before
painting was initiated, these were test fitted to the fuselage to make
sure alignment and gaps could be dealt with before finishing.
Another archaic feature was evident when addressing the engines provided
with the kit. Most contemporary kits nowadays eliminate the internal
nacelle seams by offering a ring-style forward nacelle. It would behoove
Hasegawa and Revell of Germany to pay those mold designers a bit of
overtime to engineer the nuisances out of their intakes, but there are
alternatives such as those provided by Braz Models of Italy, who just
happened to have a nice resin set for the B-767 in 1/200 scale. While the
surface texture (especially the rear pylons) is not as crisp as Hasegawa’s
parts, the fan face is fine, and there’s no seam to deal with. These went
together easily although I slightly mis-aligned the front of one of the
engines – there is a “top” that is slightly forward of the lower inlet.
After I was satisfied with
the seamwork and had sanded the surface down with 600 wet-and-dry, I
primed the fuselage, wings, and engines with Mr. Surfacer-1000 from the
spray can (B-505). I really prefer this over the white Mr. Surfacer or
Tamiya primers, as it’s easier to see your mistakes with the gray primer.
The wings were easiest, but the fuselage took multiple applications after
sanding each coat nearly back down to the plastic. As the upper fuselage
would be white, I did use the MS-1000 white primer (B-511), again from a
spray can as the final pre-coat before dealing with (quickly avert your
eyes!) gloss white.
The nicest gloss white finishes I’d seen recently result from application
of Tamiya Pure White (TS-26) in the spray can. I applied a mist coat and
waited 10 minutes before covering the entire fuselage nearly to the point
of “wet coat” application. This was allowed to dry overnight, and I wet
sanded it with 1200 through 4000 grit MicroMesh sanding cloths, rinsed and
allow it to dry. The next day I sprayed another coat of white and repeated
the process. It took two more applications to apply just enough paint to
allow the pigment density to adequately cover the fuselage.
The wings were no problem to
paint, with Testor’s Canadian Voodoo Grey used for the Boeing Grey common
to most wings. The leading edges were treated with Alclad Stainless Steel.
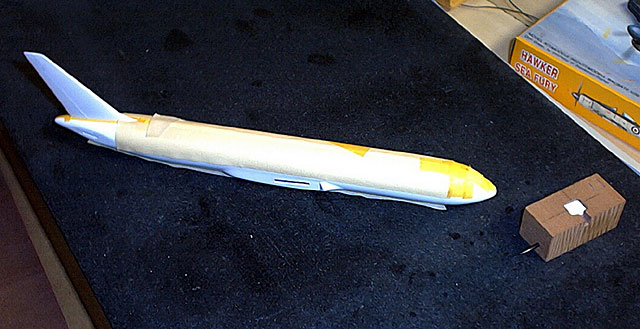
The masking of the fuselage to expose only the tail was straightforward
with the use of thin strips of Tamiya masking tape, backed up with wider
adjacent sections. The demarcation between the upper white and the lower
blue slowed the process down a bit. Not only did it have to be clean,
neat, and at the same elevation around the entire lower portion of the
plane, but it also had to accommodate Varig’s “elongated cheat line”
marking supplied with the Liveries Unlimited decal sheet.
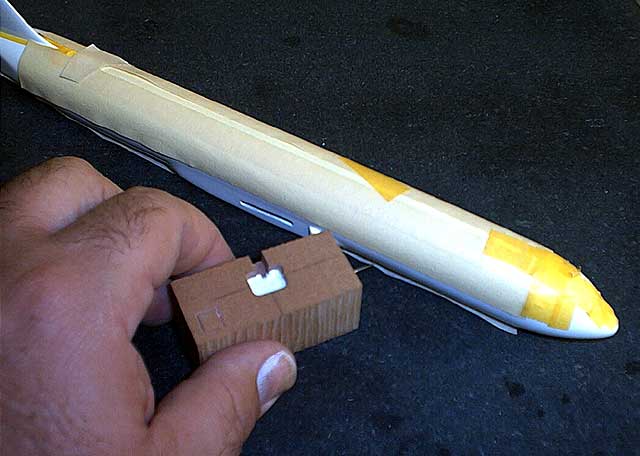
The elevation was easy to determine; it is just about the center of the
airfoil shape of the wings. To mark this line, I placed the fuselage on a
flat surface (I use a machinist’s standard surface) and measured up to the
point where the line would be from that surface. I used a spare chunk of
Ren-Shape and drilled a hole that would allow a sharpened pencil lead to
be inserted at that height from the bottom of the block. I was then able
to lightly mark the line at the same elevation around the fuselage, and
lay the edge of the masking tape here before spraying the lower fuselage
Testor’s Blue Angels Blue. The nose and aft sections were masked to the
line with multiple widths of tape cut carefully through the appropriate
ellipses template. It took one coat only to cover, and a few touch-ups
with a brush were necessary to get it just right after the tape was
removed.
The wings and fuselage were
mated, aligned, and a coat of Future was applied prior to the application
of the decals.
I was in the home stretch at
this point. Yeah, right. While the Liveries Unlimited decals are very
thorough, with excellent image printing and registration, the sheet I’d
started with had carrier film so thin that I had an extremely difficult
time placing and aligning the windows on the fuselage. After fighting
through the port side, I chose to section the strips into no more than 10
windows at a time to manage and control their placement. The most
frustrating thing was the tendency for each decal to fold back under
itself as it was being coaxed off the backing sheet. I ending up losing
one of the elegant script “Brasil” logos and ordered another sheet from
Airline Hobby Supply to complete the project. Lo and behold, the second
sheet behaved nothing like the first – each transfer slid off the sheet
without any fuss.
I also took the opportunity to order the Coroguard panels for this
aircraft, also from Liveries Unlimited, that offer the gray Coroguard
inspar areas as decals, which preclude the modeler from having to paint
these on. The nacelles were then attached with CA after the Coroguard
decal was scraped out of the slot that accepted the rear pylons. As the
Braz replacement nacelles don’t have a guide pin to insert in the wing
slot, I found one engine about a 10th of an inch ahead of the other. I
eventually fixed it by detaching and repositioning it, trimming part of
the pylon near the leading edge of the wing.
I believe only I could make
such a seemingly simple project extend into months. The results however
are close to what I’d set out to accomplish, despite how long it took. The
combination of having a nice base kit to start from, with excellent
aftermarket decals and resin engines, has provided the mix of modeling
satisfaction and challenge most of us rely upon to obtain enjoyment from
the hobby. I would encourage all modelers to follow a whim now and then;
the results achieved here have been satisfying.
Click the
thumbnails below to view larger images:
Model, Images and Text Copyright ©
2003 by Lee Coll
Page Created 21 July, 2003
Last Updated
17 March, 2004
Back to
HyperScale Main Page |
 Home |
What's New |
Features |
Gallery |
Reviews |
Reference |
Forum |
Search
Home |
What's New |
Features |
Gallery |
Reviews |
Reference |
Forum |
Search