|
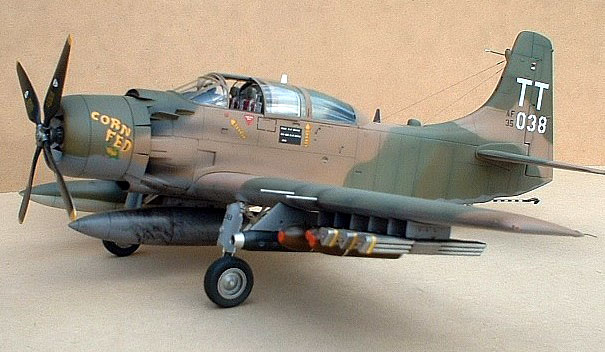
A-1E Skyraider
1/48th Tamiya
A-1J/Matchbox AD-5 Conversion
by Jonathan Squires
|
|
|
A-1E Skyraider |

Tamiya's
1/48 scale A-1J Skyraider is available online from Squadron
Many months back I came
across a Hyperscale article by Eli Raphael on making an A-1E Skyraider out
of the Tamiya A-1J and the relatively old Matchbox AD-5. The idea appeared
really simple – cut the two fuselages in half and glue one end to the
other…and voila: an A-1E.
At the end of the day it turned out to be quite a lot harder than I
thought. Whenever I solved one problem another one immediately
materialised, and the more fastidious I became in solving problems of
accuracy and detail, the more determined [read bloody minded] I was to
make sure it was as accurate as I could possibly make it.
Using the articles written
by Eli Raphael & Tom Cleaver as a starting point, I carefully marked out
where the two fuselages should be cut and joined. [I will have to refer
you to these articles as I took no construction photos myself – I hope Eli
& Tom do not mind]. Essentially the cuts I made were in exactly the same
places, however the horizontal cut [the one parallel to the bottom of the
cockpit sill] was slightly lower than in the other two articles. My main
priority was to ensure that the front and top of the Matchbox fuselage
[the plastic where the windscreen meets/bridges the fuselage] was kept
intact as I was not confident in my ability to re-shape the fuselage
contours to meet either the original Matchbox canopy or a vacuform
replacement [more on that debacle later].
After a significant amount of dry fitting & sanding, including making sure
the Cobra cockpit would fit, I super glued all the fuselage components
together. I attached the bulkheads and side panels of the cockpit set, and
dry assembled the whole package numerous times to ensure it would all fit.
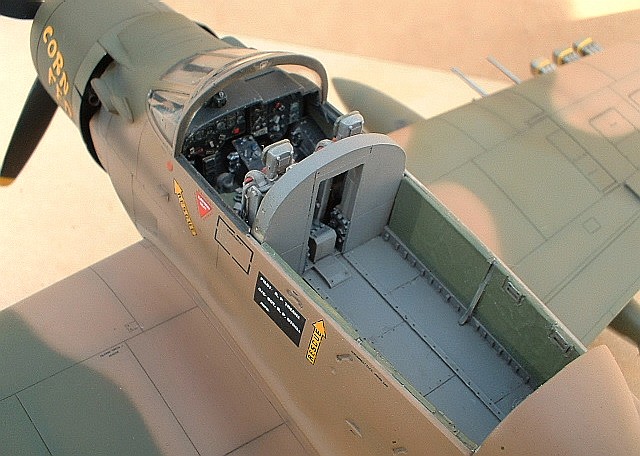
Once satisfied it would, I painted the cockpit using a combination of the
colours quoted in the Cobra Company set [based on the A1 at the USAF
museum] and the Squadron “Skyraider in Action” book. All the colours were
ever so slightly toned down with greys & whites to try and achieve an old
and used look to the cockpit, except for Tamiya Nato Black – which just
rocks as an interior/scale black. Finally, the cockpit received a wash &
light drybrushing with Aeromaster light gull grey.
On the underside of the
fuselage, I measured the length of the ventral airbrake [which is part of
the Tamiya wing] against the Matchbox fuselage. This was to ensure that
the Tamiya wing would fit the new hybrid fuselage, and at the same time
make sure the hole that I cut was not going to be too big for the airbrake
to fill.
The instrument panel was a challenge, as it is so big it really needs to
be the feature of the cockpit. So, lacking a punch & die set, I used a
scalpel to individually cut out instruments from the Tamiya Skyraider
decal sheet and place them in the conveniently located and sized holes on
the Cobra instrument panel. A drop of PVA was put on top of each
instrument to hold it in place and represent the instrument glass. The
whole instrument panel was then given a light mist of Gunze flat clear so
as to knock the gloss off it.
The completed cockpit was now glued into place, as was the rear wheel well
[once again from the Tamiya kit]. After a final dry fit, the fuselage was
cemented together [without the instrument panel in place]. I left it out
because at this point it was necessary to fill the underside of the upper
Tamiya fuselage immediately in front of the cockpit [the original intake
for an A-1J] with plastic card and super glue, because, if I didn’t I
would have sanded right through the ‘roof’ of it [Eli Raphael pointed this
out in his article].
The fuselage was left to dry
for a few days as I prepared for what I thought was the most challenging
part of the conversion…fairing the Tamiya & Matchbox in together. I
started by sanding as much offending plastic off, thus leaving a very
clear impression of where the gaps were. However this did not completely
address the key problem - the large ‘bumps’ on each side of the cockpit
created where the Matchbox fuselage stands proud [this is much wider at
the top than the Tamiya one]. These gaps would require filling…I tackled
them with Tamiya two part epoxy putty, initially using my finger dipped in
water to smooth the putty out. After leaving for a day or so, I sanded it
back and was almost surprised at how easily it was smoothed in. At this
point I focused on trying to finish the fuselage off, including spending
several days filling joint & panel lines with super glue and sanding,
polishing and re-scribing the Matchbox fuselage to match the Tamiya one.
Progress, however, was to become a rare commodity due to the realisation
that I had to do a bit more than just glue the two halves together. In
particular, my ‘background reading’ taught me that:
-
The A-1E I was to make had
no armour on it [armour is moulded onto the Tamiya kit – it’s the ‘panels’
that appear stuck onto the fuselage below the cockpit and on the
underside]. So, out with the sanding stick, and away with the armour. The
resulting smoothed out areas were polished back and re-scribed in line
with the drawings/photos in the Squadron book.
-
A-1E’s had slightly
different wheel wells to an A-1J – they had no doors, just a round hole in
the bottom of the wing. So, to achieve this, the Tamiya wheel well walls
and doors were cut so just the wall remained. These were glued in place as
per the instructions, while the circular hole was made by tracing around a
small French copper coin and then cutting it out. These panels were then
measured and cut to fit the existing wheel well hole in the bottom of the
wing and glued in [using superglue due to its strength and gap filling
properties].
-
The oil cooler on an A-1E
is on the sides of the fuselage [adjacent to the leading edge of the
wing], not the bottom as with the A-1J. So, time to retrieve the Matchbox
fuselage from the bin, cut the oil coolers out of the sides, mark the
correct locations on the side of the now complete A-1E fuselage [ahhhhhhh!]
and cut 2 big holes for the oil cooler pieces. These were then super glued
in place and sanded until smooth.
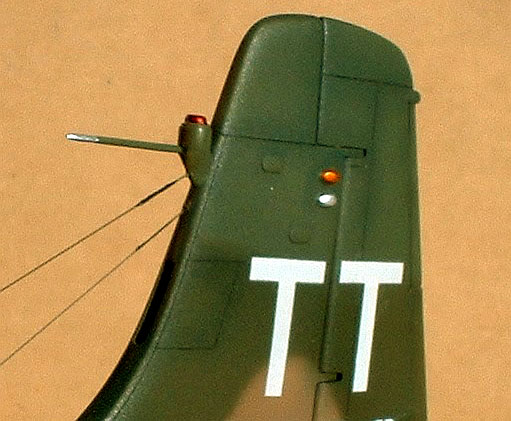
-
Many A-1E’s had a unique
rotating beacon light on the top of the tail. This was made using the red
beacon chopped off the top of the dismembered Tamiya tail, epoxy putty
[for the fairing] and Tamiyas pitot head. At the same time this was
installed I added the antenna wires as they appeared to be integral to
this fitting.
-
The tail & rudder as
supplied by Matchbox is a nice approximation of the real thing, so I spent
some time adding improved rudder hinges made from plastic card.
-
A-1E’s had an intake in the
tail for the air-conditioning unit. This was made by drilling two holes at
the top and bottom of where the intake should be, and then joining them up
with a scalpel. The resulting hole was squared up using an oblong file.
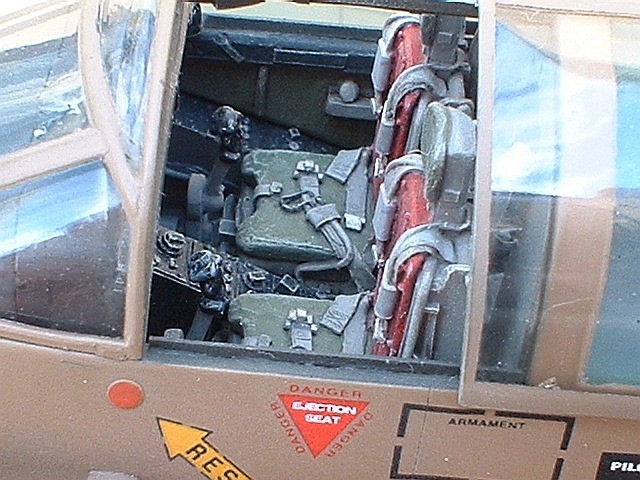
I also realised [relatively
late in the piece] that USAF A-1E’s in Vietnam were mostly equipped with
Yankee seats. The pilots seats [as supplied in the Cobra kit] were
replaced with items supplied by Cutting Edge [thanks]. These were
excellent, although slightly too large for the Cobra cockpit, and were
‘made’ to fit by removing some detail from the side. They also received
some additional work on the back of the seats to incorporate the rocket
system that fired them.
At some stage during all of
the above I attached the wings & stabilisers to the fuselage in order to
see some evidence of progress. This went without a hitch, although it was
necessary to remove some plastic from the hybrid fuselage near the
trailing edge of the main wing so it would fit without fowling.
Furthermore, about 3mm of plastic was removed from the front of the lug
used to locate the stabiliser so that the trailing edge lined up with the
front of the rudder. The ventral airbrake [part of the Tamiya wing] nearly
fitted perfectly, but in the end required a piece of plastic card across
the back of the recess for the brake so that the brake would square up to
the end. I also realised that the Tamiya airbrake no longer fitted [I
never figured out why] so I made a new one from plastic card.
All along I had been absolutely dreading the installation of the canopy. I
had purchased a Vacuform one as a replacement for the Matchbox ‘clear
things’ supplied with the original kit. I totally and utterly can’t stand
vacuform canopies. No matter how careful I am, how long I take, how sharp
the blade is, how lightly I score the plastic, I always ruin them. And,
true to form, I ruined not one but two of these canopies, so, in the end,
conceded defeat and used the Matchbox windscreen and after compartment
canopy. These were somewhat improved by dipping them in Klear, but they
will forever remain about 1 metre thick if measured in 1/48th scale [I did
manage to salvage the sliding panels from the vacuform carnage, but that
was it]. The distinctive ‘blue room’ panels were achieved by first dipping
the canopy in Klear, leaving it to dry, and then lightly misting it with
Tamiya clear blue in an effort to preserve some opacity – however in the
end it was a waste of time. Regardless, the canopies were masked using
Tamiya tape and then glued on in preparation for painting [immediately
before this the completed instrument panel was located and tacked in place
with superglue]. Unfortunately the canopies are the one thing about the
finished kit that really disappoints me – they just don’t look right no
matter how hard I try to convince myself that they are acceptable.
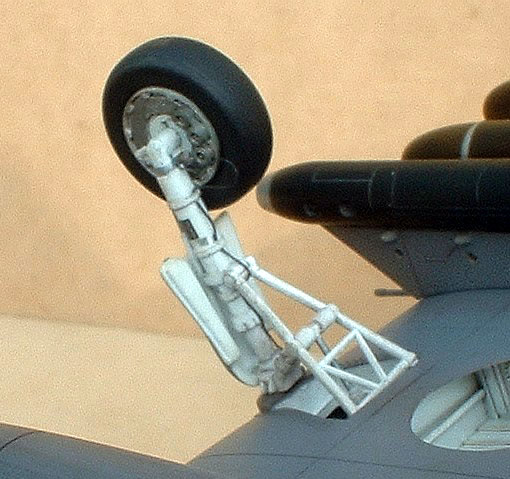
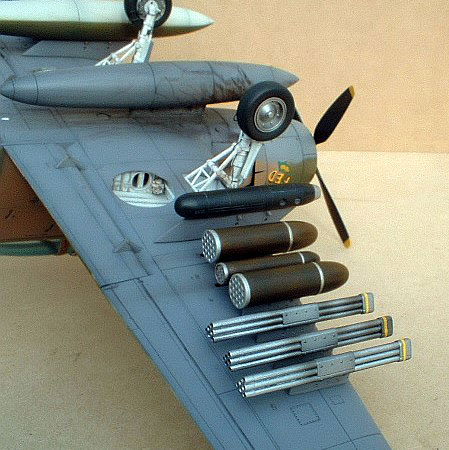
Essentially the model was now ready for paint, with the exception of
engine, undercarriage and ordnance. The undercarriage was made as per the
instructions but for the addition of brake lines, some extra detailing on
the front of the u/c leg and the prominent data plates [these were
borrowed from a Hasegawa A4 decal sheet]. Also, the undercarriage for an
A-1E requires a different door than that supplied with the Tamiya kit, so
the ones from the Matchbox kit were cleaned up, detailed, and installed.
The taxiing light on the left leg door was improved with the addition of a
light and clear lense made from a drop of PVA.
 Prior
to doing anything, I washed and then rubbed down the whole model with a
worn out piece of 1200 grit sandpaper. This nicely polished the surface
ready for paint. Painting was completed according to the following
sequence: Prior
to doing anything, I washed and then rubbed down the whole model with a
worn out piece of 1200 grit sandpaper. This nicely polished the surface
ready for paint. Painting was completed according to the following
sequence:
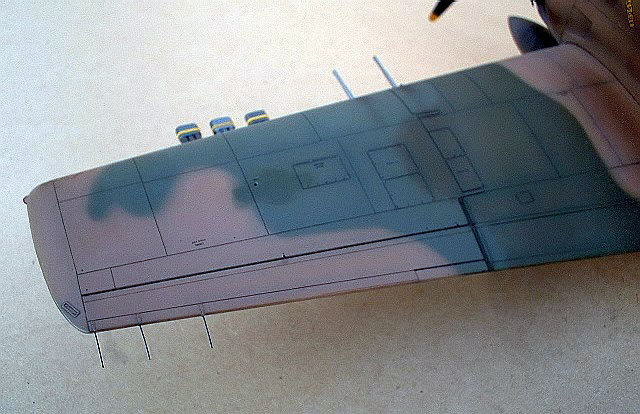
-
The plane was carefully
pre-shaded along all the panel lines using Tamiya Nato black. This
highlighted a few blemishes in my filling and sanding that were dealt
with.
-
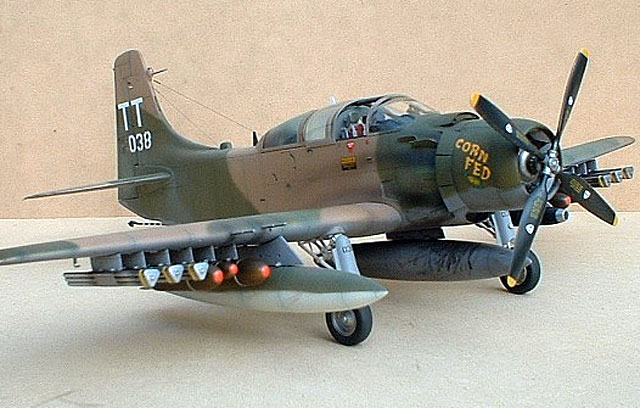
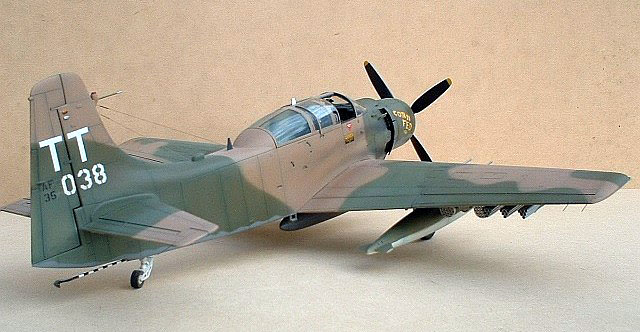
Camouflage colours were
applied – first Aeromaster acrylic Tan, medium green, then dark green.
Lastly Gunze H305 [FS36118] was used for the undersides heavily thinned
with Gunze H311 [36622] to get a more subtle grey tone. [not sure why it
was not FS36622 for the bottom, but the Aeromaster instructions were
clear]. I made camouflage pattern ‘templates’ based on photos and the full
size template that comes with the Tamiya kit, and these were held about
3-5mm off of the surface of the model using blu-tack ‘snakes.’ This gave
me a very soft, slightly fuzzy edge more in line with reality than the
capabilities of my airbrush. However one thing I did learn is DON’T leave
the blu-tack on any longer than you have to as it will leave oily stains
behind [as it turned out, these disappeared underneath the flat coat].
-
It appears that this
particular aircraft had its national insignia painted out – I wanted to
represent this so I made a star & bar shaped template out of paper,
located where it would have been on the wing, and once again using the blu-tack
‘snakes’, sprayed a slightly darker green through the template. The goal
here was to try and get the effect that it had been painted on at a later
date.
-
The complete airframe was
given a gloss coat [Gunze].
-
A wash of Testors burnt
umber [10%] and thinner [90%] was applied to the panel lines. The excess
was wiped off a few minutes after application with a tissue lightly dipped
in thinner [in the direction of the airflow].
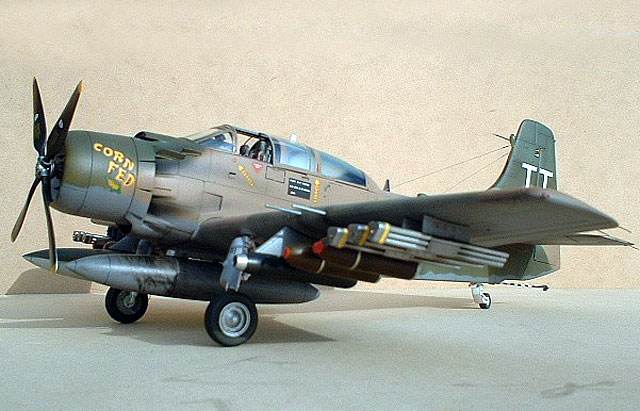
The model was now ready for
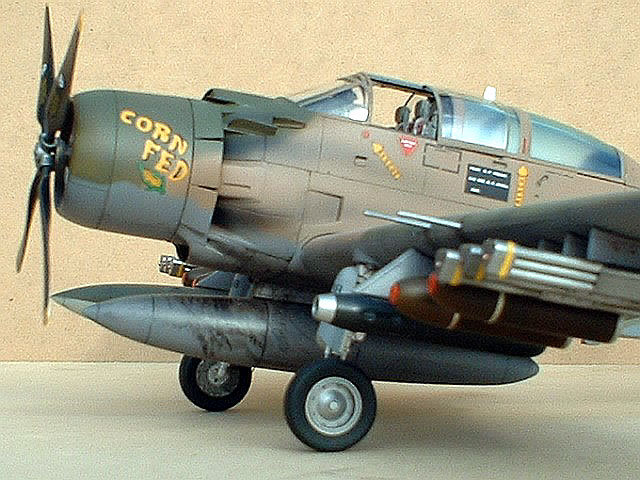
decals. I had searched in vain for the now long out of production
Aeromaster Air War Over Vietnam Pt. IX, however Darren Howie [Australia]
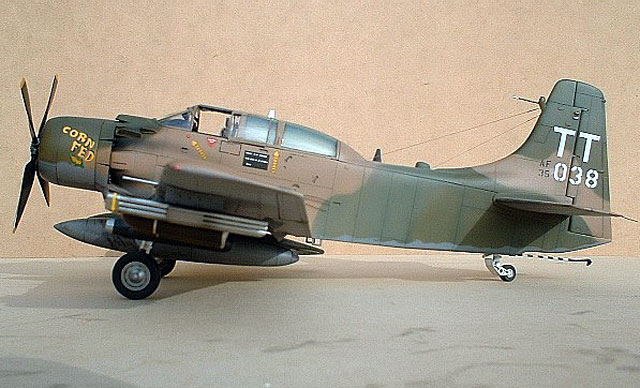
came to the rescue and was kind enough to donate the decals for 53-0538
[“Corn Fed”, flying with the 602nd SOS squadron, 52nd Special Operations
Wing, Nakhon Phanom, Vietnam, 1970] from that sheet. As expected, the
decals were of excellent quality and I had no problem with them.
After the decals had dried, I sealed them in with another coat of Gunze
clear.
My weathering skills are
still developing as they say, so this A-1E is probably cleaner than it
should in reality be. However, the key weathering attempted was:
-
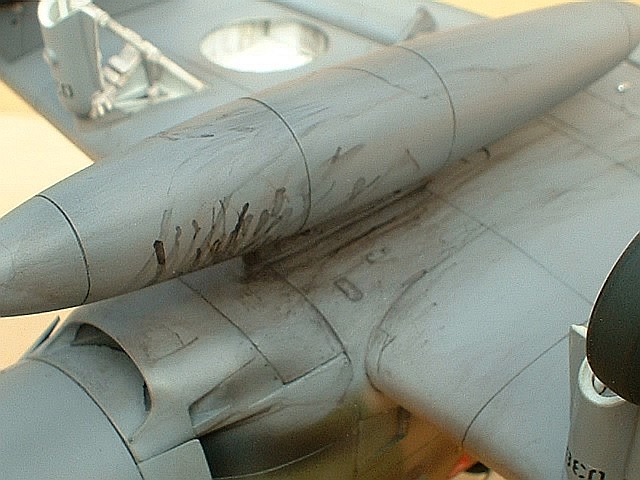
The prominent exhaust
stains were simulated using an airbrush and combinations of Tamiya smoke,
nato black, soot and black. The closer I got to the exhaust pipe, the
darker the colour I used. Once dry, they were over brushed with pastels.
My goal here was to make a reasonably large but subtle stain. Lots of
Skyraider shots I have seen show this effect quite clearly. I didn’t want
to overdo it.
-
The entire undersides [and
upper surfaces to a lesser extent] were dry-brushed with a huge soft
artists brush [the brush I wanted was $230 so I settled for one that cost
$1] with ground up pastels in it [they were ground on a piece of
sandpaper]. The pastels I used were burnt umber, dark brown, charcoal and
grey. This creates, once again, a relatively subtle but grubby look with
little chance of doing too much.
-
A silver artists pencil was
used sparingly to simulate paint chipping.
-
Pastels were used to
simulate the gun stains.
The airframe was now
essentially complete – all that remained were the little ‘bits’ that I
usually never manage to add.
-
Navigation lights were
painted appropriate clear colours over a silver base coat.
-
Gun barrels were drilled
out, painted with Alclad II, and attached.
-
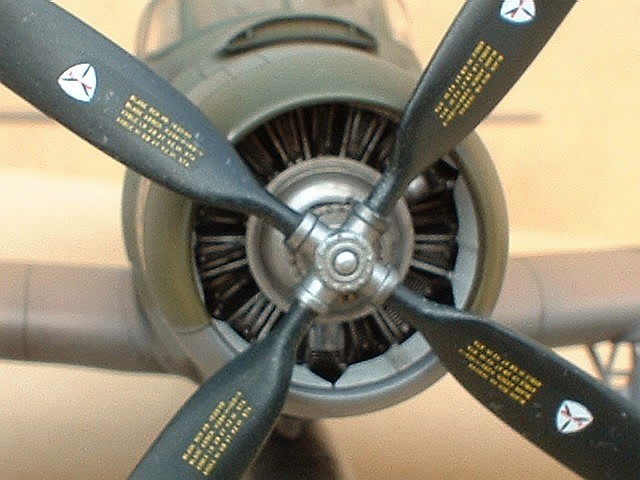
The propeller hub was
painted Tamiya gloss black and then Alclad II. The blades were painted
Nato Black while the tips were painted orange yellow.
-
The pre-painted and
assembled undercarriage was added, being particularly careful to make sure
it all lined up and was symmetrical.
So, finally, my “simple”
conversion was finished. While not something I would do again, it is
probably the best model I have made to date and certainly the most
rewarding. This conversion is achievable, however the Matchbox kit is hard
to find and probably getting quite expensive. Add to this the cost of the
Cobra Company cockpit, Cutting Edge Yankee seats and long OOP decals, it’s
neither a cheap or simple conversion to complete [in my opinion].
It is for the moment the
only way I know of to get an A-1E in 1/48th scale, and requires
considerable determination and in my case perseverance.
My final note is, as I was struggling through the middle of this project,
I said to myself, “the next model I do will be OOB and easy.”
And the one I picked out of the cupboard last weekend?
The Special Hobby XF-85
Goblin.
That should be easy [not!].
Click the
thumbnails below to view larger images:
Model, Images and Text Copyright ©
2003 by Jonathan Squires
Page Created 25 April, 2003
Last Updated
17 March, 2004
Back to
HyperScale Main Page |
 Home |
What's New |
Features |
Gallery |
Reviews |
Reference |
Forum |
Search
Home |
What's New |
Features |
Gallery |
Reviews |
Reference |
Forum |
Search