|
Nakajima A6M2-N ‘Rufe’
by Stuart Hurley
|
 |
|
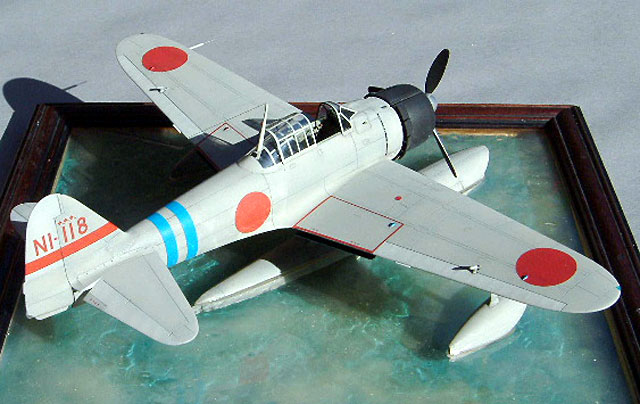
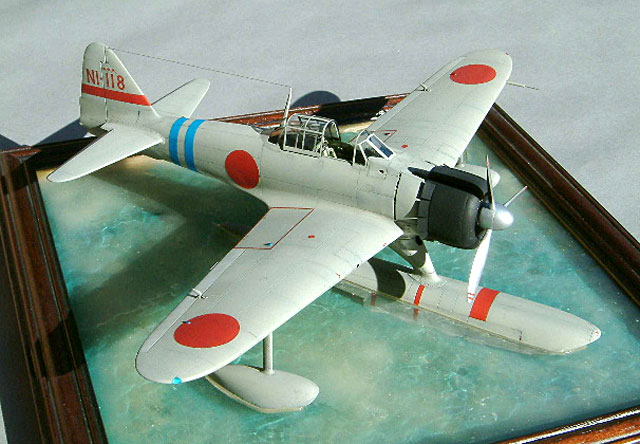
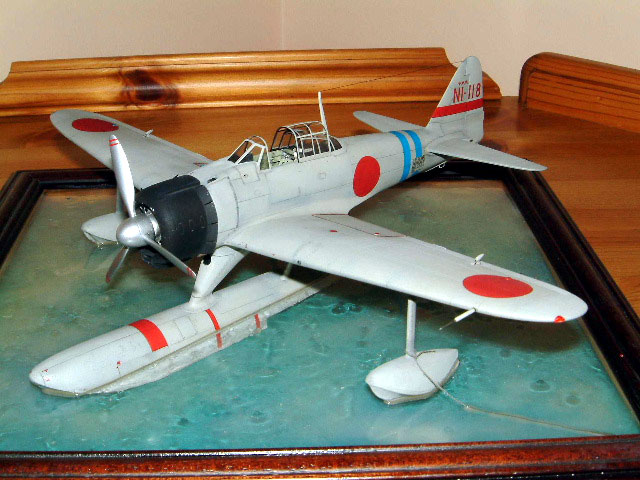
Nakajima A6M2-N ‘Rufe’
802 Flying Group flown by Lt. (J.G.) Keizo Yamasaki |

Hasegawa's 1/48 scale Rufe is available online from Squadron.com
The Hasegawa 1/48 scale RUFE kit is, as you would
expect, the A6M2 with extra parts.
Indeed, all the original parts to make a wheeled
aircraft are in the box, with the exception of the fuselage, which has
tooling inserts to cater for the different marks of Zero. This kit has
the extended rudder and ventral fin peculiar to the floatplane.
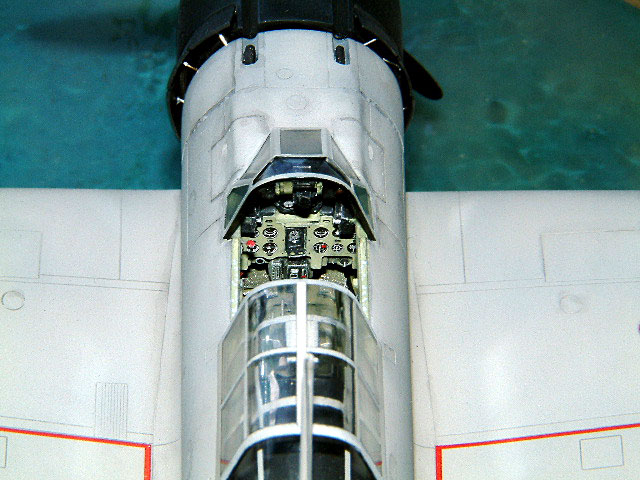
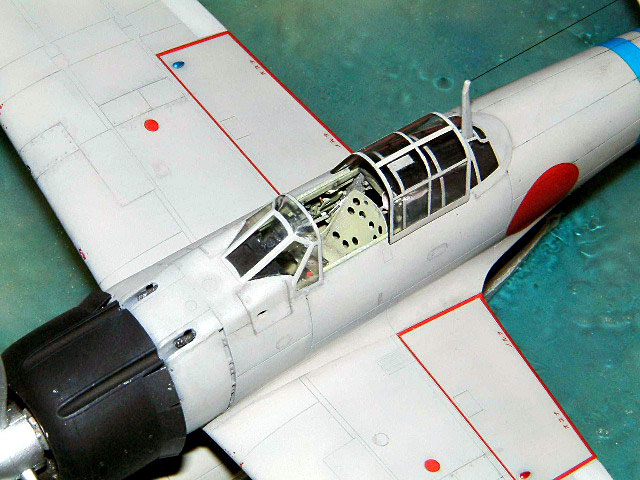
I used the Eduard etch brass set for the interior,
as this has a far superior seat and rudder pedals, although the Hasegawa
cockpit is adequate if you drill out the holes in the seat. The etched
instrument panels and acetate instruments are superb. I trawled through
all the expert knowledge on j.aircraft.com to research the colours for
this project, and came up with a yellow -green mix for the cockpit.
Photos of the model subject and other RUFEs in the grey scheme showed
that the decking underneath the canopies was black.
Early on in the build, I had an idea for a waterline model. Studying
photos, I determined the water ‘sit’, and then proceeded to cut the
floats down so the aircraft could sit on a base. Mistake (more later).
I cut out the cowl flaps and detailed the engine. Hasegawa supply the
exhaust ring, which is visible with the flaps open. I also drooped the
elevators to add a bit of life, remembering to place the stick forward.
I found one or two fit problems with the wings, so glued the top
surfaces on to the fuselage sides and when these had set, tackled the
one piece bottom section. The fit of this was troublesome around the
lower cowl and under the fuselage, requiring lots of sanding and copious
amounts of filler.
The fuselage suffered some blemishes where the tooling inserts fitted,
around the tail and behind the cowl. The fit of the rear canopy was poor
and required filler also. The canopy track area was filled, as the
fuselage is moulded to take the sliding canopy in the closed position,
and new tracks made up from strip. The canopies are very thin and clear,
and the sliding hood fits over the rear section with no problems. The
floats went together well but some panel lines did not meet up at the
join. The Eduard set supplies some very nice flaps so these were cut out
and the replacements made up and painted ‘aotake’.
The model subject was in the light Nakajima grey.
In photos of this aircraft it appears very pale and looks quite matt.
Aeromaster produced an IJN grey, but this is closer to the bluer
Mitsubishi colour. Hasegawa suggest ‘grey-Nakajima’ which isn’t much
help.
The experts on J.aircraft.com suggest light grey with a yellow-brown
hue, a little darker than FS.36496. I decided to mix my own brew using
Humbrol medium sea grey, white and dark stone, pre shaded with black.
The fabric control surfaces were painted in a lighter shade. I risk
getting flamed for the colour, but at least tonally it is right compared
with black and white pictures.
I initially used Eduard express masks for the canopies, as I have had
good results with them on a VAL, but this time they were a disaster. It
was back to the Bare Metal foil and all the resultant goo.
There aren’t any after market decals available for RUFEs as far as I
know, so as I had photos of the kit subject, the kit decals were used.
They were very good and settled into all the details perfectly.
And now, the mistake.
Waterline models that I have made in the past have been limited to
small-scale warships sailing on a sea of painted ‘Pollyfilla’, a white
plaster like substance, which is ideal for small navies and filling
cracks in your walls. I soon realised that opaque painted ‘Pollyfilla’
wasn’t going to work, and what I needed was a clear lagoon, but I had
cut off the float bottoms that would be visible in the water. Idea! I
mounted the model on a thin piece of clear plastic. To the bottom of
this, I glued the float bottoms (reduced in depth) in line with the
model.
So far so good.
Epoxy resin was poured around the aircraft, spread out and left to set,
adding a few ripples, some rope, and a branch along the way. Another
piece of plastic was painted a blue- green, mounted underneath, and the
whole lot stuck into a frame. Final details were fitted and some
touching up done and that was it. I left off the detachable boarding
ladder.
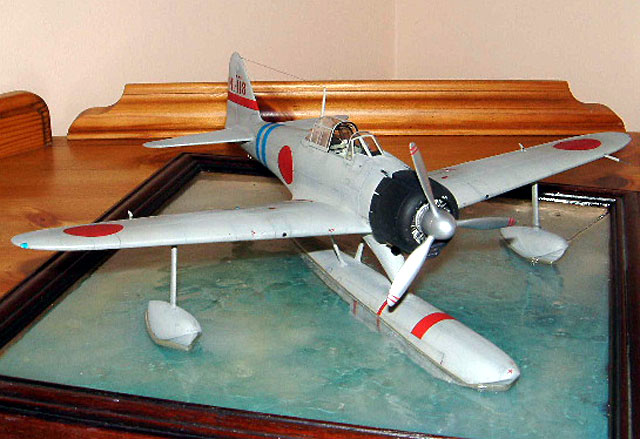
I am fairly happy with the base, as reducing the depth of the floats
reproduces the refraction effect of water, although I would probably
just use deep resin next time and support the model in it until set.
Some of the photos are in sunlight as the effect in the water is quite
realistic I think.
Click
the thumbnails below to view larger images:
Model, Images and Text Copyright ©
2003 by Stuart
Hurley
Page Created 07 August, 2003
Last Updated
17 March, 2004
Back to
HyperScale Main Page |
 Home |
What's New |
Features |
Gallery |
Reviews |
Reference |
Forum |
Search
Home |
What's New |
Features |
Gallery |
Reviews |
Reference |
Forum |
Search