|
AD-5 Skyraider
by
Lance Braman
|
 |
|
AD-5 Skyraider |

HyperScale is proudly supported by
Squadron
1/72 Hasegawa/Monogram
AD-5 Skyraider
Why?
I’ve wanted to build an AD-5 for quite a few years. The original impetus
came when I was in VMA-331 and used to look at the pictures in the hallway
outside the admin offices of all the planes 331 had flown in its history.
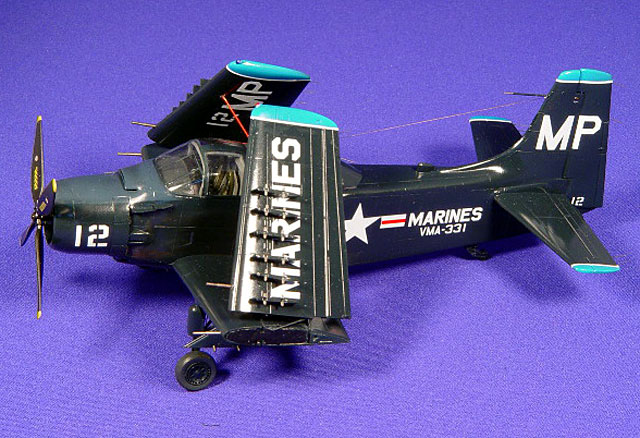
There, sandwiched in between the Corsairs and the Gull Gray and White
AD-6s, was a picture of Gloss Sea Blue AD-5s with 331’s original tail
codes of “MP” (331 changed to VL with the AD-6, and kept that code through
AV-8Bs and the Gulf War, after which the squadron was decommissioned). At
around that time, I built the Monogram AD-6 kit and made up some 331
markings, but never got around to buying the Matchbox AD-5 that was in the
hobby shop.
Fast forward a dozen years
to Shizuoka 2002.
I was able to buy a bagged,
instruction-less and decal-less Monogram AD-5 for 100 yen from the
Hasegawa booth. A quick look at the parts convinced me that the kit needed
a lot of details added for me to be happy with it, so I went back and
bought Hasegawa’s AD-6 as well. I forget how much I paid for it, but it
was pretty heavily discounted.
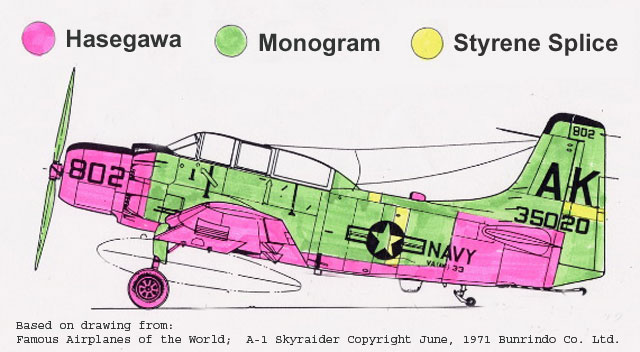
My first thought was to just stick the Monogram fuselage and Hasegawa
wings together, then perhaps slap on the Hasegawa cowling. My first
inkling that this was going to involve a little more work than that came
when our club president kept telling me “The Monogram kit isn’t 1/72, that
won’t work.” I checked the wings against each other – they were the same
span and chord, OK there…
I checked the tailplanes – same size and planform. So far so good…
I laid the fuselage halves together. And proceeded to mutter curses. The
Hasegawa fuselage was about 3-4mm deeper than the Monogram. When I lined
the two up at the front end, putting the exhausts in line with each other,
they came out to almost exactly the same length. Our club president, by
coincidence, bought the Skyraider In Action book while we were in
Shizuoka. I borrowed it, took a quick look at the stated measurements, and
as I had thought the –5 was longer than the –6. However, when I put the
Hasegawa fuselage halves together and then the Monogram fuselage halves
and compared, the two fuselages were the same width. Perhaps this project
could be saved after all! I photocopied the three-views of the –5 and –6
from the In Action and threw everything in my pack for the trip home.
Once home, I started digging around on the Internet and found Tom
Cleaver’s article on bashing the Matchbox and Tamiya kits. I thought,
“Hey, if TC can do it, so can I.” I also found an old edition of the
Famous Airplanes of the World volume on the Spad. This had good –5
drawings (the newer edition doesn’t have them, unfortunately), and armed
with two sets of drawings, a printed-out copy of TC’s article, both kits,
saws, knives, sheet styrene, old sections of sprue, adhesives, putties,
garlic, holy water and a large wooden stake and hammer set, I rolled up my
sleeves and went to work.
The initial stage of building up the fuselage halves went a little easier
than I expected. I pretty quickly determined that the –5 and –6 were the
same length from the cowl to the rudderpost. The extra length was due to
the bigger rudder and the tail extension under it. This meant I could use
the Hasegawa fuselage as a “base” and adjust/tack on bits of the Monogram
fuselage to fit. I started by cutting vertically through one Hasegawa
fuselage half just behind the depressions for the exhausts, stopping about
4mm short of the belly. I then cut horizontally back towards the tail,
stopping just in front of where the horizontal stabs would fit. I then cut
vertically down just in front of where the stabs would go and removed this
section. I then cut off the vertical stab just above where the horizontal
stabs would go, and removed the entire rudder.
This left me with the nose and cowl, the belly and about 4mm of the lower
sides, and the area around the horizontal stabilizers. I then proceeded to
cut up a Monogram fuselage half to fit. I cut the nose off just behind the
exhaust depressions. I then cut off the belly, being careful to remove
only the belly section and leaving the sides intact. The rudder was
carefully removed, then the triangular tail extension under it. Using some
of the raised panel lines as guides, I cut the fuselage sides vertically
about halfway between the aft edge of the cockpit opening and the
horizontal stabs and then cut through the spine at the panel line in front
of the vertical cut and connected the two with a horizontal cut. Doing it
his way enabled me to “slide” the tail section back while using the spine
overlap as an alignment guide. I then focused on lining up the front half
of the Monogram fuselage half within the Hasegawa “frame”, then lining up
the back half of the Monogram fuselage half using the rudderpost as a
guide. After much dry fitting, trimming, dry fitting again, trimming and
filing again and so on, I got the two Monogram fuselage pieces lined up
with the Hasegawa “frame” and with each other. Even better, the
“Frankenraider” was matching the drawings! I then glued everything
together adding sheet styrene reinforcements on the inside of the joints
and set a badly mangled looking port fuselage half aside to dry. And it
had only taken me about 3 hours!
The next day, once I was sure all the joints had set, I set about making
the starboard fuselage half. This went much faster as I had the previous
night’s experience to draw on as well as a built-up port fuselage half to
align things against. I was able to get things cut up, repositioned and
glued back together in only about an hour and a half. Since things went so
quickly, I turned my attention to the wing.
Three things need to be done to the Hasegawa wing to backdate it to –5
standards: the wheel wells need to be redone as –5s didn’t have the
clamshell-like doors over the wheel. The opening was just a round hole a
little bigger than the wheel itself, and the front opening (around the
strut) was a little narrower. Sheet styrene and putty fixed this. Next,
the catapult bridle hooks need to be filled in and sanded smooth. Finally,
the armor plate on the belly needs to be sanded off. I was hoping this
third step wouldn’t really be necessary, but after consulting with He Who
Knows Things Gloss Sea Blue, Snake, I realized the armor would have to go.
Now, at this point true Skyraider fans will be saying, “What about the oil
cooler exhaust doors?!?” Yes, they have to go as well, but since they are
represented by depressions in the armor plating, when you remove that you
solve the problem. I filled in the depressions around the catapult bridle
hooks with superglue and as soon as it had set I broke out the coarse
sandpaper and started sanding. After about half an hour sanding with
progressively finer grits, the wing center section was fixed.
About this time it began to occur to me that the Spad is a BIG plane, even
in 1/72. After thinking things over and taking a look at a bunch of pics,
I became convinced that it would not be too much work to scratch build
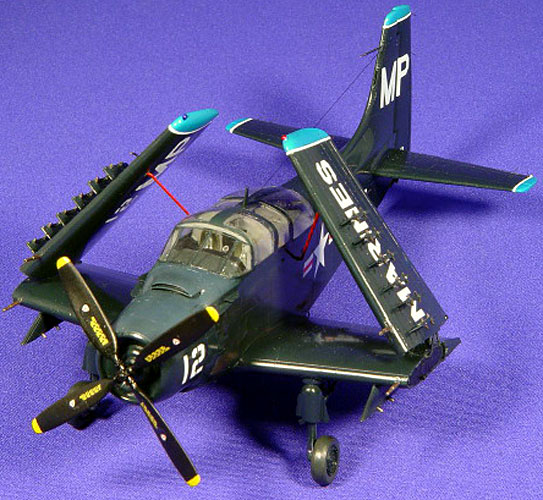
wing interiors and fold things up. So I cut the wing pieces along the fold
lines, routed the edges thinner and cut and shaped some sheet to fit the
openings. I backed up the sheet with epoxy putty on the inner sections so
I would have a base to stick the brass rod I was going to use as hinges
into. Some more thin sheet was added to detail up the area, and the canvas
covers on the inner wing sections were made out of crinkled lead foil cut
to shape. Pretty effective, I think.
OK, back to the fuselage – after the intake in the vertical stabilizer
leading edge was filed out, the halves were joined, gaps between all the
pieces were filled with sheet styrene and putty and the area in front of
the windscreen and around the nose intake was built up with Milliput. The
tail extension that goes under the rudder was cut from what was left of
the Monogram fuselage and attached to the “Frankenraider.” I also replaced
the ADF fairing on the spine with the more accurate (IMHO) one cut from
the Hasegawa kit. After sanding everything back out I scribed new panel
lines and primed. Pinholes everywhere! Oh well, more Mr. Surfacer was
slathered on, and when dry sanded smooth again and reprimed. Pinholes in
whole new places! This went on for over a week before I finally got
everything looking OK.
In the meantime I had broken down and bought the Cobra Company interior,
and Rex Barker had kindly provided me with a Falcon canopy set that
included a replacement for the Monogram canopy. Things were looking up!
I painted and installed the new cockpit – only a little bit of grinding
was needed as well as a small amount of Milliput around the front of the
coaming. A gunsight reflector was added from a small disc of clear sheet.
I carefully cut out the Falcon canopy pieces, briefly debated opening the
sliding pilot’s and NFO’s sections, decided against it and test fit. The
canopy fit the fuselage fine, but there was a large gap between the top of
the cockpit bulkhead and the canopy! What happened? Then it dawned on me –
the cockpit set was designed for the Monogram kit with the Monogram
canopy. I had originally test-fit the cockpit tub to the fuselage using
the kit canopy, and though I found the bulkhead needed a shim under it to
fit tight I hadn’t shimmed it up to fit the Falcon canopy (which I didn’t
have at that stage anyway). This is not a flaw in the Cobra Company set by
any means – I was using it in a way it wasn’t intended to be used. What I
finally settled on was to cut the glass sections out of the Monogram
canopy and attach the frame to the fuselage, then trim and file the frame
to fit inside the Falcon canopy. Actually, this made things look more
realistic as the AD-5 had a large beam running down the center of the
canopy.

Once the canopy problem was worked out I attached the wing center section
– only a tiny amount of puttying and sanding was needed at the aft edge on
the belly and around the nose. I also attached the horizontal stabs and
landing gear. The main struts were detailed with bits of wire, rod and
styrene to represent the brake lines and retraction mechanisms a little
better, and bent and shaped brass rod was attached to the front of the
struts to represent the catapult bridle hooks. I also replaced the cannon
barrels at this point with new ones made up from telescoped brass tube,
and once I was sure most of the sanding was done I used more brass tube
and wire to make a new pitot for the vertical stabilizer.
Only one more bit of rework needed before final assembly and painting: the
rudder. Since I had made the fuselage about 3mm deeper, the rudder was now
3mm too short! I cut the left and right halves apart and inserted a splice
to lengthen them, then taped the halves to a sheet of glass to keep them
flat while the glue set up. When they were dry, I glued them together,
built up a new leading edge from Milliput and filed and sanded away until
everything looked OK. New trim tab actuators were made from bits of
stretched sprue.
Apparently I went wrong somewhere on the tail end, because the rudder
ended up slightly narrower in chord than the extension under it was long.
I finally decided to just mount the rudder deflected to effectively
camouflage the disparity. Brass wire was inserted into holes drilled in
the rudder’s leading edge to add strength to the joint.
Now the canopy was installed and faired in, the blade antenna on top was
taken from the Hasegawa scraps and installed, centerline and inner wing
pylons installed and landing gear strut covers installed (these were taken
from the Monogram kit after I filed off the USAF-style landing lights).
After carefully drilling very tiny holes in the aileron, elevator and
rudder trailing edges, static discharge wires were added from fine
monofilament and trimmed to length. Then the horizontal stabilizers were
installed. I left off the cowl flaps to ease painting of the drilled-out
exhausts later. I also left off the outer wing pylons for now – you can’t
apply the decals with them in place.
Once the canopy was masked
off with Scotch tape, I gave it a quick shot of black, and then began
painting the whole model Gloss Sea Blue (Gunze’s “Midnight Blue”). The
anti-glare panel was painted Gunze’s “Navy Blue” to represent the Non-specular
Sea Blue actually used. Some areas required a light sanding with 2000 grit
to smooth out imperfections and were then touched up. Detail painting of
the exhausts, pylon sway braces, lights and so on was also done with Gunze
paints, and the whole model was given several light gloss topcoats (except
for the anti-glare panel).
In between paint sessions, while everything was drying, I turned my
attention to the propeller. Hasegawa got the blades all wrong – they
narrow towards the tips, whereas Skyraider props were of more-or-less
constant chord all the way out. What I eventually settled on was using the
Hasegawa hub (which was much better detailed) with slightly reshaped
Monogram blades. The Monogram blades were thinned towards the tips and
slightly squared off. It really didn’t take much, and yes, the propeller
is now a teensy bit too small in diameter – sue me! When everything was
smoothed out the prop was painted black and glossed.
Decals came mostly from Superscale Corsair sheets. Some rearrangement was
needed to make the “MP” and “VMA-331” codes. The modex number was chosen
because frankly, that’s what I had enough of the same-size numbers on-hand
of!
Once the decaling was done, another gloss topcoat was shot to seal
everything, and the masking was taken off the canopy and glare shield.
Final bits were installed (cowl flaps, wheels, arrestor hook and outer
wing pylons, the underwing pitot was replaced with shaped brass wire as
the original went to the Antipodes somewhere along the line). Then the
outer wings were installed while checking the wing-fold angle against
drawings. Jury struts were made out of brass wire and installed. Hinge and
actuator detail was added to the wingfold areas with more brass wire, and
the radio aerial added from monofilament.
Finished!
And just in time for
Shizuoka 2003!
Granted, my “Frankenraider”
was not the most attention-grabbing model on our club’s table. That honor
went to a motorized Miss America P-51 (hint: spinning flashy things pull
people in). Still, there were a few people who knew that Hasegawa has
never released an AD-5 in 1/72, let alone one with a folded-wing option,
and those people spent a lot of time dodging Miss America’s propeller to
get a closer look at the “Frankenraider”.
One of the higher-ups from
Hasegawa even came and spent about 15 minutes looking it over and
repeating “But it looks like it’s just one kit, and one of ours!”
That made the whole thing
worth it.
Model, Images and Text
Copyright © 2003 by Lance
Braman
Page Created 05 August, 2003
Last Updated
17 March, 2004
Back to
HyperScale Main Page |
 Home |
What's New |
Features |
Gallery |
Reviews |
Reference |
Forum |
Search
Home |
What's New |
Features |
Gallery |
Reviews |
Reference |
Forum |
Search