|
Arado Ar 234B
by
Floyd S. Werner Jr.
|
|
|
Arado Ar 234B |

Hasegawa's
1/48 scale Arado Ar 234B-2 is available online from Squadron.com
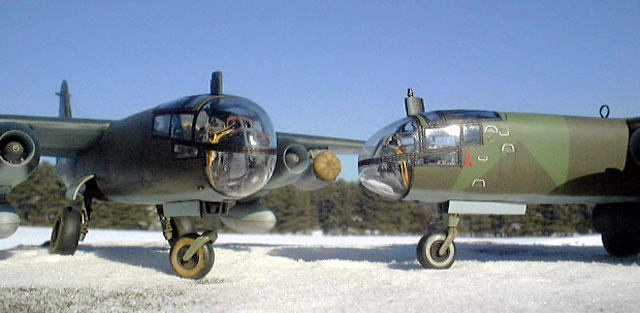
I often build multiple models of the same aircraft at the same time
as a time saving measure and a way to thin my ever-growing collection.
This system works well if, and only if, you have a quality model.
Someone told me how nice this kit was so I thought this would be a good
kit to double up. Boy was I misled.
When Hasegawa listed the Ar-234 I was ecstatic. I had the Hobbycraft
offerings, five actually, and I had bought all the detail sets for each
one. I vowed I would build one some day. I was not looking forward to
the bad fit and the simplistic look of the kit, not to mention that it
was under scaled. I figured with the Hasegawa kit I could finally build
this aircraft and enjoy the building process. I expected the Hasegawa
kit to be up to the usual standards, but I was wrong.
I wanted to build a bomber and photo recon version. The photo recon
pilots and aircraft are often overlooked in the history books. This
would make my third photo recon bird, a Bf-109G-8 and a Do-335V3 being
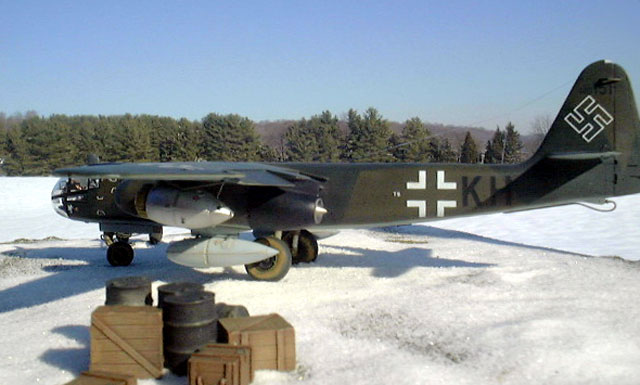
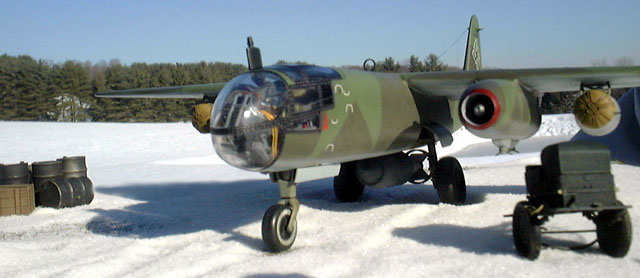
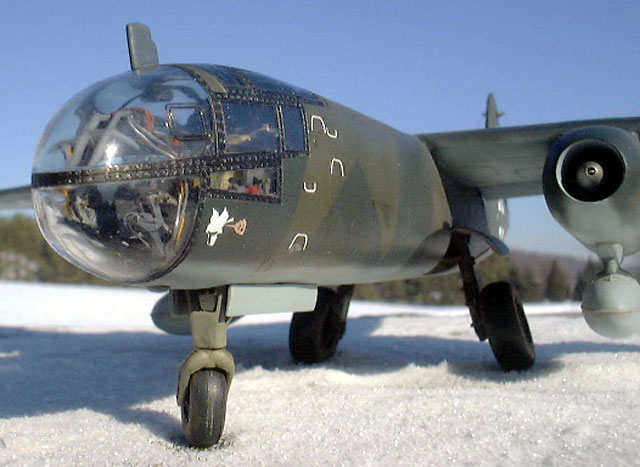
the others. I chose to model an early aircraft of Oblt. Werner Muffey
from Kommando Sperling. I liked his name and the fact that the aircraft
had a unit emblem on the nose. It isn’t everyday you get to build an
aircraft with a farting bird on it. Last time it was a farting flea
(Me-163). What is up with the farting thing? I think it stunk to be a
German pilot at that phase of the war. Okay, so I’m not a comic.
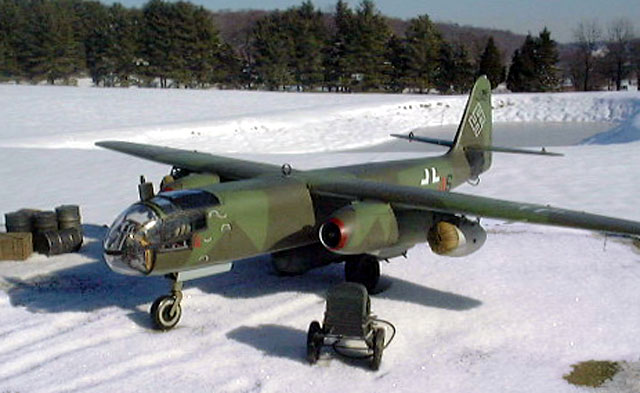
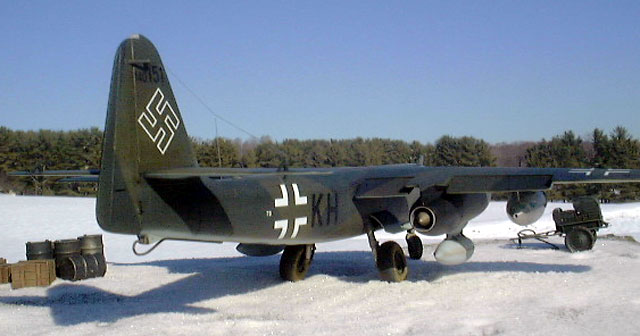
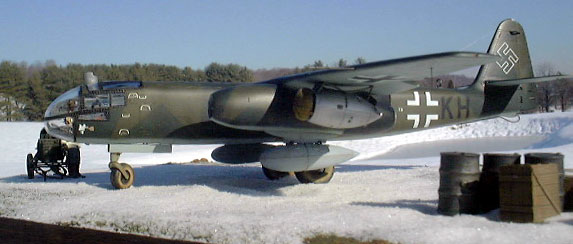
The bomber aircraft I chose to model was the one flown by Ofw. Bruchlos
against the bridge at Remagen. He was shot down in this aircraft and
reported missing for 50 years. His remains and the remains of the
aircraft were recovered in 1975.
Hasegawa's 1/48
Scale Ar 234B-2
|
The Bad
For those of you who turn to the back of a book read on. If not skip
this section. I will now tell you the problems I had.
What I found out upon opening the box looked nice enough and held great
promise. During the building process I found some flaws that would make
this kit a bear, at least for me. First off the engraved panel lines on
the bottom of the kit were uneven in thickness and depth, heck, they
weren’t even straight. It was not up to the usual Hasegawa quality, it
wasn’t even limited run quality. This all needed to be filled and
rescribed. What a pain and time consuming. Now a friend has told me that
she bought another kit later in the production run and that it had none
of the problems I mention here, so we’ll see.
The second part that got to me was the locator pins on the wings. If you
use them your wings will not line up at the tip or the fuselage joint.
The best way to handle this is to sand them off and align the wing tips.
This will take care of a lot of problems that I had at the tip and the
wing root.
Thirdly, something that I noticed upon opening the box, was a lot of
mold release oil on my copies. I thought I got all of it off but I
didn’t and it manifested itself in the paint stage. Very frustrating.
The last thing was the fit of the cockpit aft bulkhead. It is too large
to fit into the fuselage assembly and mount the cockpit assembly to but
if you just sand it down a little bit, especially on the sides the
cockpit will fit flush. The bulkhead should be sanded just to the point
that it does not spread the fuselage.
The Kit
The kit is molded in the standard gray plastic with a noticeable film
of oil on them. Not what you expect from Hasegawa. The recessed lines
were inconsistent, especially on the bottom of the fuselage. The entire
nose section is molded in clear styrene. This will become a main area of
concentration and I found the clear parts to be nice and fit well. There
is a mold line on the nose piece that goes from top to bottom. This
ensures that the canopy is fully molded, but will have to be removed.
The decals were typical quality and well within register.
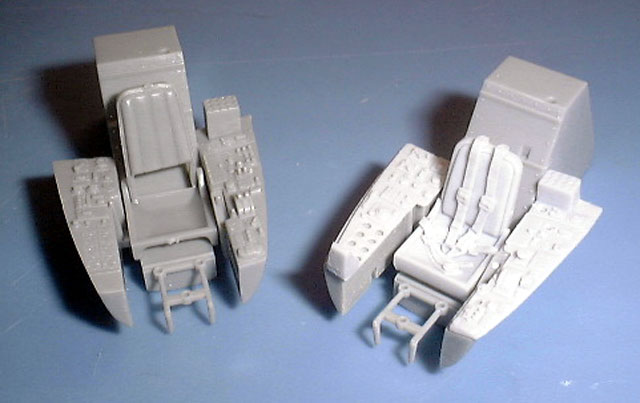
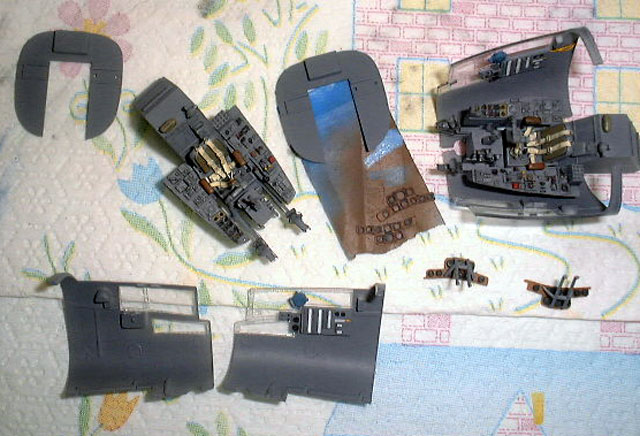
The Cockpit using the Cutting Edge Upgrade
The kit cockpit is very nice right out of the box, but I wanted to
add the Cutting Edge set as I thought it was nicer and brought out some
great detail. The Cutting Edge set utilizes the kit cockpit floor. You
are required to sand off the details on the sidewalls and add the resin
panels. These panels are sanded down and the dial films are added from
underneath. Prior to putting the film on I sprayed the panels Model
Master Gunship Grey.
Wait Floyd, isn’t the interior suppose to be RLM 66?
Yes and no. The painting manual stated it should be, but on the only
surviving example at the NASM the interior is noticeably lighter than
RLM 66. Cutting Edge makes mention of this on their instruction sheet.
You will have to decide. I liked the effect of the Gunship Grey. It was
easy to weather with a wash of black artist oils and a dry brush of RLM
02 and silver. The interior was quite convincing. The best part was the
seat, which was far and away better than the Hasegawa part.
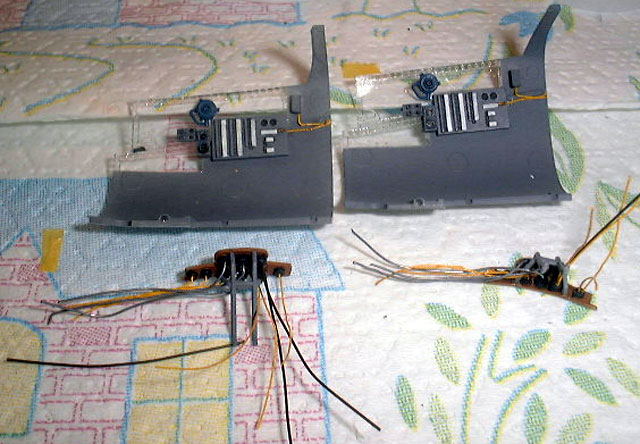
The instrument panel is a three-piece affair, the front, back and middle
film piece. I should have sanded these parts thinner but when assembled
they look very nice. On the back of the gauges, which are very visible
on the kit, I drilled holes for solder and electrical wire. The
electrical wire that I used was for wiring model railroads and it had a
yellow coating on it already. The wiring and plumbing were wrapped
around the backside of the panel and ran down to the floor. I added
additional wiring to the rudder pedals. When viewed together the whole
assembly looked really good to me.
Click the thumbnails below
to view larger images:
Some of the parts have to be added to the interior of the canopy so
you have to play with clear parts early in this model. I used a
Micromesh set to remove the upper line on the forward canopy. The real
thing has a small line on the bottom so I left mine there. Once the
canopy was polished on the inside and out, yes you will have to remove
the interior mold line as well, the canopy was quite nice. All five
pieces were dipped in Future and allowed to dry thoroughly prior to
adding any parts. This helps prevent fogging and makes the canopy
resistant to scratches.
I then added all the small bits in the cockpit and dry fit everything. I
was pleasantly surprised that everything fit like a champ. I painted the
interior color on the sidewalls, you will have to mask the inside of the
sidewalls. If you chose not to do it this way it is no big deal as you
can paint it later from the outside. I don’t think that you will lose
anything either way. After cleaning off all mating surfaces I attached
all the clear parts with Tamiya Liquid Cement. This glue does not fog
and the little brush that comes with the cement is actually useable. The
whole assembly was neat when finished. I wish I hadn’t closed up the
upper hatch, thanks Brett you were too late with that suggestion.
Conclusion? The Cutting Edge set and some scratch building add a lot to
the cockpit.
Highly Recommended.
The Fuselage
The kit fuselage consisted of the two sides and to tell you the truth
these parts fit very well. Inside the fuselage are two cameras if you
are building a photo recon bird. Since one of mine would be a recon
plane I built up the cameras. They are little gems. I loved them so much
that I asked all my friends for theirs if they didn’t need them. They
will look great in a Bf-109G-4/R2. The assembly of the cameras
themselves is no big deal. The assembly of the support structure is a
little tricky so test fit the whole assembly, leaving off one side to
put the cameras in. If you build the support structure first and then
try to put the cameras in you will have to break the support to mount
the cameras. It is a little tricky but not a big deal. Don’t forget to
paint the interior of the camera bay your choice of color. I used RLM 66
but it could have easily been RLM 02. I was unable to find any color
pictures of the area from the NASM aircraft.
You must cement the wheel wells inside the fuselage prior to sealing
everything up. It is recommended to insert the landing gear legs in the
wheel wells prior to installing the wells. This makes it difficult to
handle the model but it is very difficult to install the landing gear
later. So follow the instructions and put the gear in before you insert
the wells. I painted my wells Humbrol 94 which is a buff color. The NASM
aircraft had this previously unknown color in its wheel well area so I
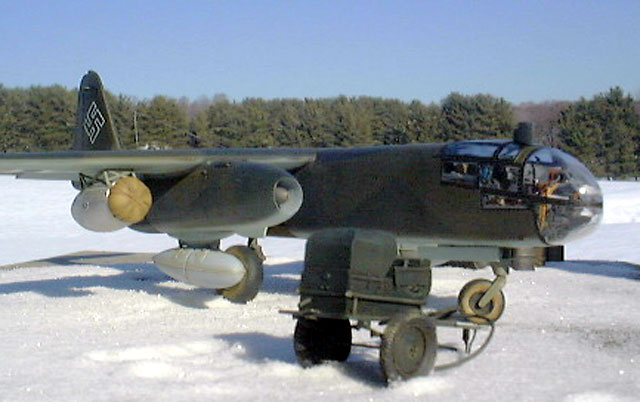
included it because it is colorful and accurate. I painted the nose
wheel well with Alclad Aluminum. I noticed in a lot of photos that the
nose wheel was swiveled backwards and in other abstract positions. This
neat little feature was real easy to do. I just cut the front strut at
the lower part and pinned the gear in the position I wanted. You won’t
confuse my model on the display tables.
As this kit is molded for future releases (B-2n Night Fighter [now
available] and the C-3) there are clear parts for the top piece, as well
as, a clear bottom piece for the photo recon versions. These two clear
pieces were a major pain. They were not quite wide enough to fit
properly and had to be filled with superglue (carefully) and rescribed.
Normally this was not an issue but for some reason I had trouble and
ended up doing it three times before deciding it was good enough. If you
do the photo recon bird don’t forget to dip that part in Future.
The Wings
The wings should have been an easy thing to do, but because I was on
a learning curve I did it the hard way, TWICE. The easiest way to make
the wings is to remove all locating tabs and just line up the wing tips.
This will take care of a lot of issues. If you are like me and stuck
with the pins then you will have a gap (about 1/8”) at the wing roots
that has to be filled and the wing tips will have to be reshaped. If you
cut out the flaps like I did then you have even more issues because the
cuts weren’t lined up. What a pain those pins caused.
I used the Cutting Edge Flap Set to make the airplanes a little
different. I had some pre-production flaps and one had a slight blemish
that was easily taken care of with a little bit of putty. No problem.
The wing trailing edges have to be thinned. Take care to get it even and
there is no big problem. Overall I liked the way the flaps fit and they
add to the look of the kit. I should have thinned the trailing edge more
but they look good enough for me. I highly recommend the flap set as a
simple way to “change” the look of the kit. The rest of the trailing
edge is fairly thick and should be thinned down.
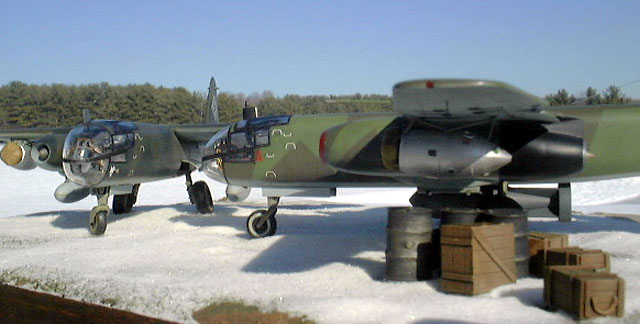
One other thing on the wings, check the airplane you are building and
determine if you need to put in the direction finder panel, the blanking
panel or the blanking plate for the loop antenna. You will notice that
my two aircraft are different. The earlier photo bird had the loop
antenna in the back and the bomber had it mounted on the plate.
Engines and Things
The engines actually go together rather well. The exhaust nozzle is a
separate piece, as is the nose intake. The intake presents a small
challenge in the painting stage. How do you get the paint all the way
down the intake? It took patience and lots of cursing. I did like the
turbine wheel as a separate item. I painted this part and the exhaust
area with Alclad II Dark Aluminum and added a wash to bring out the
details.
The engine mounting to the wing was a little troublesome. The front was
difficult to clean up where the wing and engine nacelle meet. Mounting
the nacelle to the wing required me to insert a balsa support in the
wing to raise it up to meet the nacelle. Once this was done the fit was
beautiful. Don’t forget to remove this plug once the glue dried. I’m not
sure if this is caused by using the locating pins or not. Before you
attach the nacelle remember to open the hold for the drop tank rack if
you decide to use it.
For those of you thinking of using the True Detail Wheel set like I was.
You can’t, well you can but be advised that the nose wheel is too big
and the main wheels are too small. The other thing with the nose wheel,
which is close, is that the hole in the center of the hub will have to
be enlarged a lot.
I loved the Walter Ri202 rocket units. They went to together well and
looked real nice. I painted mine with Alclad White Aluminum and Aluminum
on the aft side. I thought that these were essential to both aircraft.
There are more decals on the rocket units than on the whole aircraft.
The Hasegawa decals reacted very well with Micro Sol.
The drop tanks had a difficult mold pour line on the lip of the lower
part but with patience it can be done.
The landing gear is very nice and very convincing. It can only go on one
way and there is very little room to adjust.
Attaching the nose section to the fuselage is no big deal as long as you
remembered to trim the bulkhead piece. I did notice that there are two
stiffeners one on the nose and another on the fuselage. After looking at
the NASM and photos of actual aircraft I didn’t notice these doublers so
I filled the seam and just rescribed a single line, which I did notice.
Canopy
I used the Cutting Edge canopy masks. These little gems made the
whole process quick and easy. I did have to add just a little extra
material to the top piece but other than that they worked well. If you
build the photo recon aircraft don’t forget to use the masks for the
camera bay windows.
Paint
Now that I had everything together it was time to paint. I washed and
sanded the model to get rid of the oily residue that I mentioned
earlier. I thought I got all of it but as I found out later I was wrong.
I decided to use Model Master Paints, as I liked the colors and
pigments. Because of all the rescribing and work that had to be done I
decided to paint the whole model RLM 66. There were a few areas that
needed some rework but I was ready to go. I painted the aft portion of
the engine areas with Model Master Semi-Gloss Black and after it was dry
I masked it off.
Much has been written on the camouflage colors of the Ar-234. Was it
65/70/71 or 76/81/82 or a combination of these six colors? Well I can
only tell you that after looking at the photo from the period it is
difficult, at best, to determine the correct color. I did look hard at
the color photo fold out on page 243-245 of the Monogram Monarch book
(see references) and that aircraft appears to have a 76/81/82 appearance
to me. I reasoned that an early Ar-234 could have had the early war
colors and that down the production line it could have changed to the
late war colors. Either way I quess what I’m trying to say is prove me
wrong.
First I’ll describe the photo recon machine, I used Model Master Acrylic
RLM 65 for the bottom. For the upper surface I didn’t like the look of
the Model Master RLM 71 Dark Green so I used Floquil. I loved this color
but the pigments tend to pebble so I did end up having to sand it before
the next color.
 Utilizing the Cutting Edge Masks for the camouflage color I masked as
appropriate. Then I sprayed the Model Master Acrylic RLM 70 Black Green.
When I pulled off the masks there was one area that pulled off most of
the nose section. At first I cursed the Black Magic, but I was wrong.
After sanding the area down I repeated the process using Tamiya masking
tape and quess what? Same results. Again I sanded and used alcohol to
get the area correct except this time I used Post-it Notes to mask the
area and then I was okay. To add some more color to this aircraft I
painted the drop tanks RLM 76. My rationale was that they would have
been manufactured at a different site and would have been painted for
fighter types. Anyway it looks nice and it points out the difference in
the two colors. Utilizing the Cutting Edge Masks for the camouflage color I masked as
appropriate. Then I sprayed the Model Master Acrylic RLM 70 Black Green.
When I pulled off the masks there was one area that pulled off most of
the nose section. At first I cursed the Black Magic, but I was wrong.
After sanding the area down I repeated the process using Tamiya masking
tape and quess what? Same results. Again I sanded and used alcohol to
get the area correct except this time I used Post-it Notes to mask the
area and then I was okay. To add some more color to this aircraft I
painted the drop tanks RLM 76. My rationale was that they would have
been manufactured at a different site and would have been painted for
fighter types. Anyway it looks nice and it points out the difference in
the two colors.
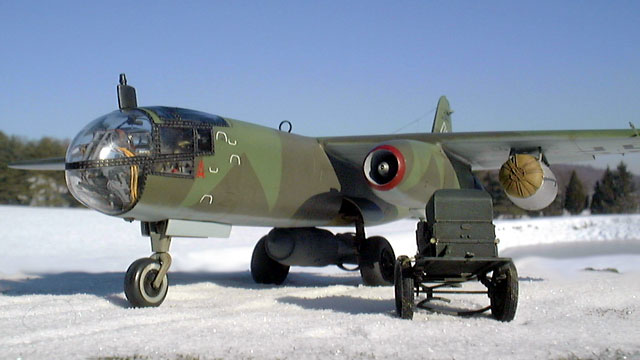
For the bomber version, I used Model Master Acrylic RLM 76 as a base
coat. After looking at the Model Master colors I decided that I liked
the look of the Gunze line better. I did not spray the Model Master to
find out how the colors would have looked after the whole weathering
process but I liked the Gunze right from the bottle. With that said a
coat of Gunze RLM 81 was sprayed over the whole model. The Cutting Edge
masks were used again. This time no real problem some very small areas
pealed up, but again that was attributed to the oily residue that I
didn’t clean very well. I’ve since purchased some of the Polly Scale
Plastic Prep so that this won’t happen again. The Gunze 82 was sprayed
over the model and touch ups were done as necessary.
I did paint white walls on my nose wheels utilizing a mask provided in
the Cutting Edge masking set for the direction finder and a circle
template. I noticed that most 234s had these whitewalls so it was
relatively easy to do. It just meant that the wheels are grounded.
When I was done I was happy with the results of both aircraft. A coat of
Future was applied in anticipation of the decals.
Decals
I decided to use the Cutting Edge decals CED48201 and CED48202. There
are some issues that you should remember. On the photo recon aircraft
the loop antenna is aft on the aircraft. The other thing is that I
believe that the bird “fart” is a different color. Note 1
I just added some brown pastels to the decal after it set. Also on
the photo recon bird it has an early style of periscope.
For the bomber version Cutting Edge suggests using the early war
style of underwing cross, but the Monogram book has a photo of the
aircraft I modeled and it looks like it wears the late war simplified
cross in black.Note 2
Other than those three little things the decals are beautiful. They are
very thin and snuggled down nicely with Micro Sol.
Note 1: Tom Tullis has made the following observation about
these markings: "The 'fart' is gray in some 'artist
conceptions', but these also have a fully rendered brown bird in those
conceptions. The aircraft just had a stenciled bird with a couple of
black details added. In the photos, the fart looks a little darker than
the bird, but this appears simply due to the photo being slightly
blurred and the black details blurring out. The guys who do the
Monographie series also depict it as we do and they're usually
pretty good with their photo interpretations."
Note 2: Both styles of cross are supplied on the decal sheet.
Before everything was given another coat of Future I attached all the
little pieces and then I applied a coat of Model Master Semi-gloss
finish. Most Ar-234s were glossy in appearance so semi-gloss was close
enough for me.

I applied a wash of burnt umber artist oils to the aircraft. A little
bit of silver pencil was added to the wing leading edge and some steps.
Most 234s were pretty clean even for late war conditions. The dirtiest
part was the wheels. The photo recon bird got the mud treatment to the
wheels while the bomber got the airfield weathering. Just to add some
final difference between the models. Personally I liked the mud more.
One more coat of Semi-gloss and I was nearly done. I removed the Cutting
Edge canopy masks and even though I left the camera masks on for almost
a month they left no residue.
Attaching the RATO units was easy but I did have to open the holes a
little more. They fit well but there is still some hole showing but I
can live with it.
I’m happy with the finished product. I now had two distinctive
aircraft of this jet. This was not an easy build. It was well within the
limit of most modelers though. Just follow my suggestions and your
problems should be greatly diminished. Neither of the aircraft will win
a contest but who cares? Anyway, they will look great on the shelf of
the display case. Will I buy the night fighter or the C-3? You bet. I
will only build them one at a time though. You get a very good-looking
kit when you’re done, much better than the Hobbycraft and highly
accurate even out of the box. With that said I highly recommend all the
Cutting Edge products that I used they added a lot to the cockpit and
the masking material made that task real easy. The decals were the usual
quality that we’ve come to expect from Cutting Edge.
Buy this kit and build it, even if you have the problems I had you will
enjoy the finished product.
-
Monogram Monarch-1: Ar-234 Blitz, Smith &
Creek, ISBN0-914144-51-0
-
Aero Detail 16 Arado Ar-234 Blitz, ISBN
4-499-22659-7
provided by Dave Klaus from Meteor Productions
-
Cutting Edge Ar-234B Super Detail Cockpit
CEC48406
-
Cutting Edge Black Magic Canopy and Wheel
Masks CEBM48524
-
Cutting Edge Black Magic Camouflage
Pattern Masks CEBM48525
-
Cutting Edge Ar-234B-1 Blitz Bombers Part
1 CED48201
-
Cutting Edge Ar-234B
Click on the thumbnails
below to view larger images:
Model, Images and Text Copyright © 2003 by
Floyd S. Werner Jr.
Page Created 14 January, 2003
Last Updated 17 March, 2004
Back to HyperScale
Main Page
|
 Home |
What's New |
Features |
Gallery |
Reviews |
Reference |
Forum |
Search
Home |
What's New |
Features |
Gallery |
Reviews |
Reference |
Forum |
Search