|
Junior Modelling
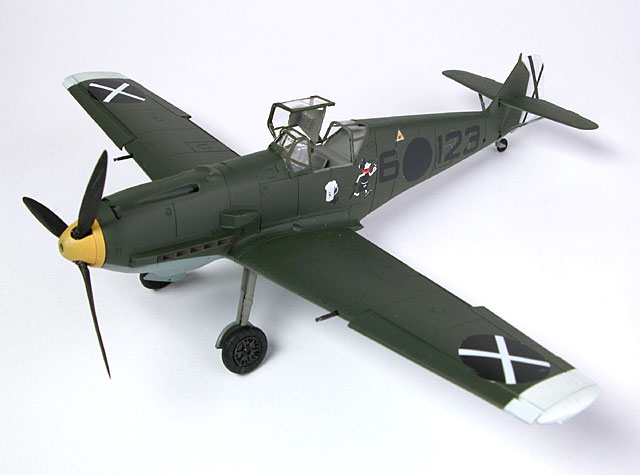
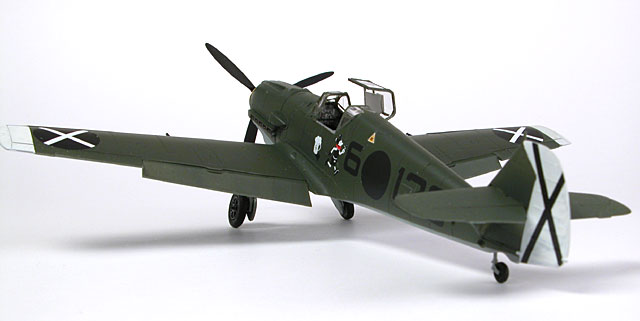
Messerschmitt Bf 109E-3
by Charlotte Green
images and text by Brett Green

Tamiya's
1/48 scale Messerschmitt Bf 109E-3 is available online from Squadron
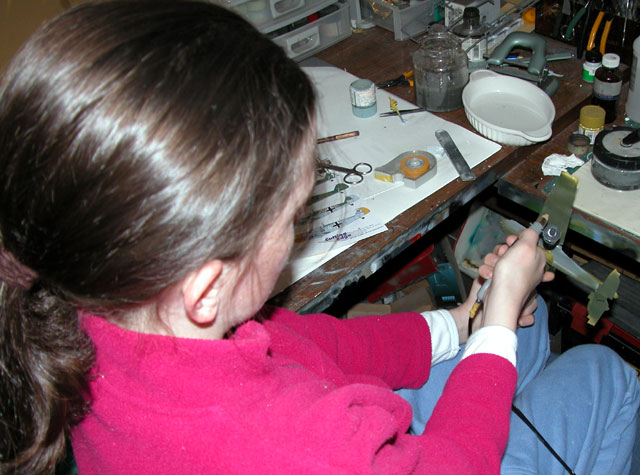
My 11 year old daughter,
Charlotte, had a school project on Aerodynamics this term. As part of this
project she had to build a plastic model aeroplane.
Charlotte had built a
plastic dinosaur some years ago, but this would be her first ever aircraft
scale model.
I wanted to suggest a kit
that she could build and paint mostly on her own, with only occasional
hands-on assistance from me. Not surprisingly, my thoughts turned toward
Tamiya.
My first preference,
Tamiya's 1/48 scale Spitfire, is not available in Sydney model shops at
the moment but their 1/48 scale Messerschmitt Bf 109E-3 is on the shelves.
Charlotte said that she liked the look of the kit, so we made the purchase
and headed home.
I was amused when Charlotte
wanted to tear off the shrinkwrap and check out the kit in the car on the
way home. That's my girl!
Once we were home, I offered
Charlotte a choice from a large range of after-market decals. To my
surprise, she selected a subject in Spanish Civil War markings.from
Cutting Edge's new sheet "Bf 109E The Augsburg Zoo", finished in
overall RLM 71 Dark Green upper surfaces.
The real appeal of this
subject was, to quote Charlotte, the "evil Mickey Mouse" on the fuselage
side. Intentionally or otherwise, she also managed to choose one of the
simplest schemes ever to adorn a Bf 109 - a sensible selection for a first
modelling effort
Now that we had the kit and markings, we could start
building.
I cleared a space on my workbench and supplied Charlotte
with a basic set of tools. These were:
-
Sprue cutters
-
Hobby knife
-
Emery board (sanding stick)
-
Small scissors
-
Tweezers
-
Revell polystyrene cement with
needle applicator
-
Tamiya Extra Thin Liquid Cement
-
Super glue
-
Tamiya Masking Tape
-
Plastic clamps
-
Two paint brushes (one fine, one
medium)
-
Paints (RLM 02 Grey, RLM 65 Light
Blue, RLM 71 Dark Green, Flat Black, Gloss Black; Red Brown, Flat Yellow,
Flat White)
-
A water filled jar (for rinsing
paint brushes)
-
A shallow dish filled with water
(for decals)
-
Decal setting solution
Charlotte first pre-painted cockpit, undercarriage,
wheels, hubs, propeller and interior components. I pointed out the parts
on the instruction sheets and marked the sprues adjacent to the pieces to
be painted. Charlotte used a medium paintbrush (No.2 Synthetic) to coat
these parts.
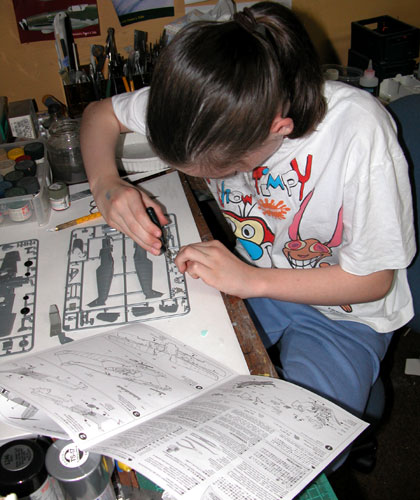
 Next
came a demonstration of removing parts. I showed how to cut the plastic
pieces close as close as possible to the part using the sprue cutter to
minimise further cleanup. When parts were removed from the sprue,
Charlotte tidied up any remaining sprue connector with a hobby knife and
sanding stick. Next
came a demonstration of removing parts. I showed how to cut the plastic
pieces close as close as possible to the part using the sprue cutter to
minimise further cleanup. When parts were removed from the sprue,
Charlotte tidied up any remaining sprue connector with a hobby knife and
sanding stick.
When the cockpit parts were ready for assembly, Charlotte
applied the dial decals to the instrument panel. Setting solution was
lavished on the decals once they were applied to help it conform to the
raised dials and switches. The results were quite good.
There were only a few areas where Charlotte needed help on
basic construction. The interior of the oil cooler proved to be a bit
tricky, and I also checked that all major parts were free of sprue or
flash before the main components were assembled.
Charlotte now clamped the fuselage halves together and I
showed her how to flow Tamiya Extra Thin Liquid Cement into the top and
bottom joins. The beauty of this cement is that even if it does get on the
surface of the model (and it did), it can be easily removed with
light sanding. Charlotte got the hang of it by the time the fuselage was
secured.
The wings were glued using conventional Revell cement,
then clamped. After allowing these sub-assemblies to dry for a few
minutes, the wings were mated to the fuselage and glued with the liquid
cement.
Horizontal tailplanes, flaps and slats were added, but the
rudder and small details were not glued into place yet. One of the few
mistakes that Charlotte made was to cut the bottom off the tailplane
reinforcement struts. We simply glued the strut slightly higher on the
empennage to avoid a more complicated remedy.
We had spent a total of around 3½
hours on the model to date. Remarkably, not a single gap was to be
seen anywhere on the assembled airframe.
 Next
afternoon I brought out the Aztek airbrush and gave Charlotte a spraying
demonstration on some scrap paper. She took over and quickly picked up the
technique. Next
afternoon I brought out the Aztek airbrush and gave Charlotte a spraying
demonstration on some scrap paper. She took over and quickly picked up the
technique.
I really did show her how to operate the trigger
conventionally with the index finger, but she seemed to prefer my weird
method of cupping the airbrush in the hand and operating the trigger with
the thumb.
Several people have unkindly suggested that it looks more
like I am going to stab something rather than paint it when I am using
this grip.
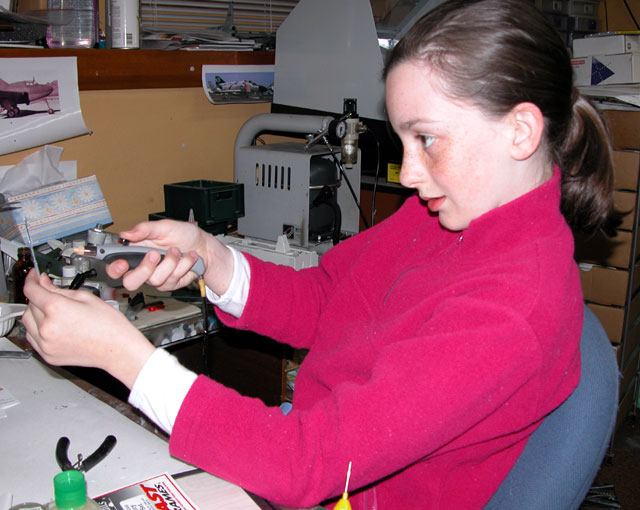
I mixed the paint and thinner in the paint cup and then
Charlotte commenced the paint job by spraying the wing tips and rudder
white. I painted the spinner yellow (because, for whatever reason, yellow
is a pain to spray); while Charlotte masked the newly painted wingtips
with Tamiya tape. She painted the bottom of the airframe light blue before
I showed her how to mask the demarcation on the lower fuselage - I did one
side then she finished the other. The cockpit and lower tailplanes were
also masked before Charlotte sprayed the top and sides of the model in two
thin coats of RLM 71 Dark Green.
Her paint coverage was very even and opaque with no lumps
or runs - terrific for a first airbrushing attempt. I simply gave the
leading edges of the wings a squirt where the paint was a little thin.
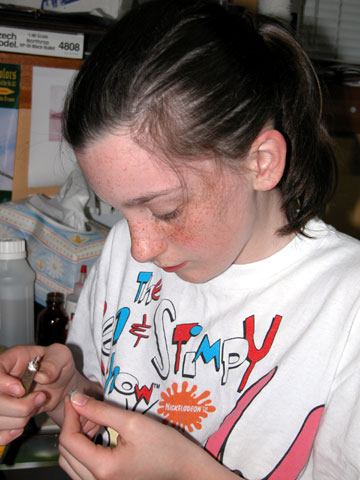
Decals were sourced from Cutting Edge's recent 1/48 scale
release "The Augsburg Zoo", CED48215, with four subjects featuring
different animals. The decals were in perfect register and performed
extremely well.

I initially demonstrated decalling technique by brushing
on some Micro Set and applying the first couple of markings, then left
Charlotte to carry on with the job. Even though she lifted one of the
bigger decals after it was applied, it settled down again under a further
coat of Micro Set.
Finishing Touches
We used True Details Fast Frames as a quick and
neat alternative to painting the canopy frames. The set was designed for
the Tamiya Bf 109E-4 so the frames did not really match the canopy layout
of the earlier E-3 variant, but it looks okay from a distance!
The model was destined to be transported to school so I
thought we should leave off mass balances and the pitot tube. We can add
these delicate items when the plane comes home again.
I sealed the paint and decals with a coat of Polly Scale
Flat Clear and glued the canopy in place with watch makers' cement. With
the addition of the previously painted rudder, undercarriage and exhaust
parts, the model was now ready for Charlotte to take to school.
I think the results of this project are a great credit to
both Charlotte and to Tamiya. All the parts are well aligned, there are no
gaps and Charlotte did 90% of the work herself.
It was also a quick build. We spent no more than 7½
hours on the entire construction and painting of the model.
With her interests in drama and music, I do not expect my
daughter to take up plastic modelling as a long term interest, but it was
fun to share some time building Tamiya's Messerschmitt Bf 109E-3.
Model by Charlotte Green
Images and Text
Copyright © 2003 by
Brett Green
Page Created 18 September, 2003
Last Updated
17 March, 2004
Back to
HyperScale Main Page |
 Home |
What's New |
Features |
Gallery |
Reviews |
Reference |
Forum |
Search
Home |
What's New |
Features |
Gallery |
Reviews |
Reference |
Forum |
Search