|
Blohm und Voss Bv 155
by
Bryan "Tuck" Tucker
|
|
|
Blohm und Voss Bv 155 |

HyperScale is proudly sponsored by
Squadron
The Blohm und Voss BV 155
was designed to combat the arrival of Allied high altitude bombers over
the continent. Designed with an operational ceiling of 60,000 ft.
(18,000m), it could have been a major thorn in the side of the U.S.A.A.F.
|
Kit Summary |
|
Kit |
Blohm und Voss BV 155 |
|
Scale |
1/48 |
|
Manufacturer |
ARBA Resin from England |
|
Cost |
USD$80 including
shipping from Hannants (England) |
The Luftwaffe did not
possess an adequate fighter to combat the anticipated arrival of the B-29,
so the BV 155 design was undertaken. Initially designed by Messerschmitt,
the project was taken over by Blohm und Voss when it became apparent
Messerschmitt did not have the resources to complete the design.
Unfortunately, Blohm und Voss decided to completely re-design the
aircraft. This began a well-documented downward spiral of design changes,
role refinements, etc. that resulted in a complex, failure-prone aircraft.
The aircraft employed a
Heinkel-Hirth supercharger mid-fuselage, and exhaust gasses from the
engine were piped along the fuselage. This supercharger arrangement
dictated the location of the large under wing radiators, one being for
coolant and the other for oil. Two prototypes were completed and flown
(one by the British post-war). Both encountered numerous mechanical
problems that prevented full testing. The BV 155 V2 now resides at the
Paul Garber Restoration Facility awaiting restoration (perhaps someday?).
ARBA resin kits from England
offer conversions and full resin kits.
Their 1/48 scale Bv 155
offering has tan colored resin that is high quality with no air bubbles.
The castings are superb. Panel lines are finely recessed and surface
details are adequate. The subassemblies are well thought out for ease of
construction. Locator tabs are cast into the parts for positive alignment
and strength. The propeller blades, landing gear, instrument panel,
control stick and gun sight are all white metal and are superbly cast. No
decals are provided. Instructions consist of a step-by-step construction
process with no exploded views or diagrams (the parts are not numerous and
the construction steps fairly obvious). No painting diagrams are provided,
so references are a must. I have built 3 of their kits now and they are
top notch in ease of construction and quality. They are rather pricey, but
I feel you get a quality (and obscure) product for the price.
Construction
The parts breakdown is well
thought out to simplify construction.
The solid cast fuselage is
split into front and rear sections that join via a keyed joint. This joint
is conveniently where a panel line is, so no need to erase all hints of a
seam. The cockpit is adequately detailed, but super detailers will have
plenty of room to add if they so wish. The cockpit insets through the
bottom of the fuselage and fits like a glove. The white metal seat,
instrument panel and control stick were painted and installed.
The wings are a 5-piece
affair, separated into under wing radiators, a solid cast center wing
section, and outer wing panels that also have keyed joints. The outer
wings require dihedral, so check your references. The outer wings and
radiator housings were super glued in place. I painted the interior of the
radiators and the radiators themselves at this stage as they would be very
hard to reach after attachment to the main wing. I used small sections of
plastic coated paper clips to reinforce joints that looked fragile. The
completed wing assembly was then attached the keyed joint in the bottom of
the fuselage, and reinforced with more plastic coated paper clips.
At this point, the weight of
this resin kit becomes apparent. The horizontal stabilizers were added.
The joint of the horizontal stabilizers to the vertical stabilizer
required a little filler to smooth things out. Again, paper clips were
used to strengthen and align these parts. The prop blades were cleaned
slightly, then glued to the resin spinner using paper clip wire to
strengthen it. The blades were aligned by hand and left to dry. I
recommend using brass rod or wire to attach the prop to the fuselage, as
the completed prop weighs quite a bit.
The sturdy landing gear was
painted and attached to the wings with wire and superglue.
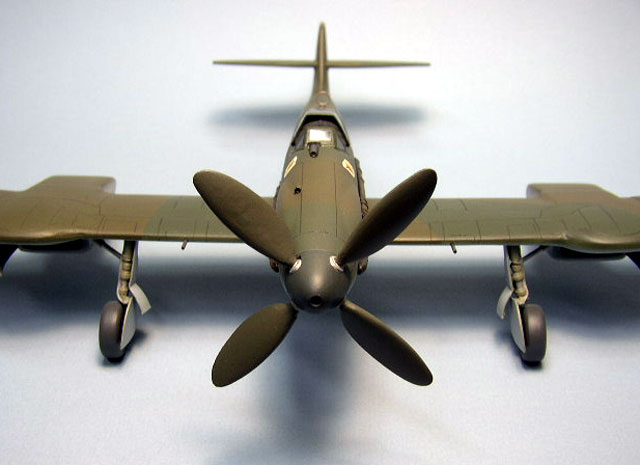
The canopy is vac-u-formed,
and was rather opaque. Two are provided, in case of accident with one. I
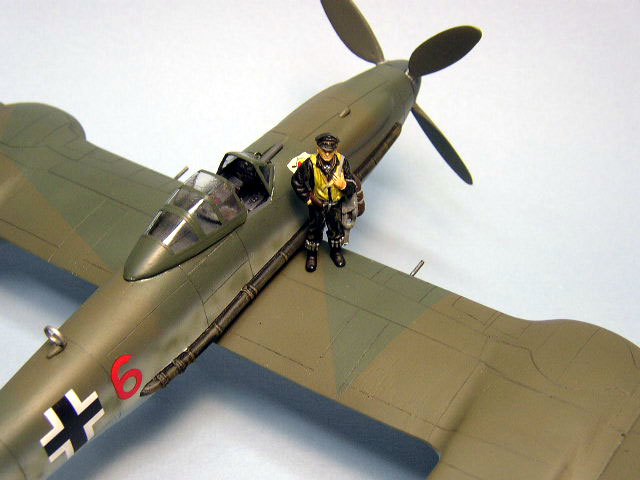
chose to have an open canopy, as the opaqueness of the hood would hide
most of the detail.
 All
paints were Model Master Acrylics. All
paints were Model Master Acrylics.
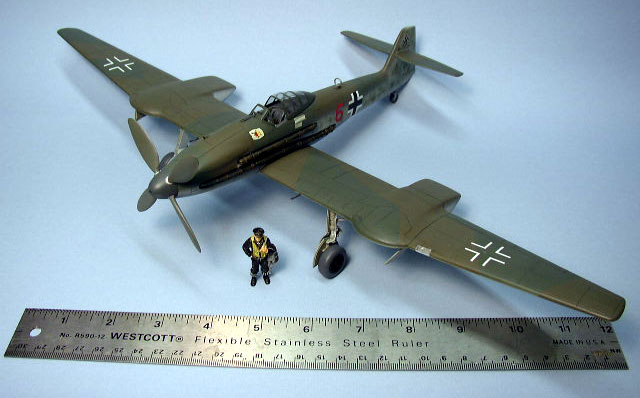
I painted the upper surfaces
in RLM 81/82 over RLM 76. I softly mottled RLM 81/82 randomly on the
fuselage sides and vertical stabilizer. I masked camouflage pattern using
standard masking tape.
The propeller blades were
wooden and therefore painted RLM 71 with the spinner RLM 70.
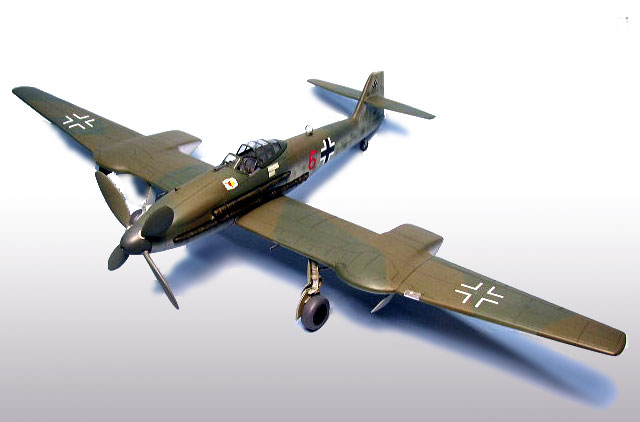
The cockpit was painted RLM
66 with dry brushing of RLM 76 to bring out details. Dials, switches, etc.
were painted according to standard Luftwaffe practice. Decals were taken
from the spares box and put on over a coat of Model Master Gloss. I
decided to do a fictitious operational Bv 155, complete with unit markings
and kill marks.
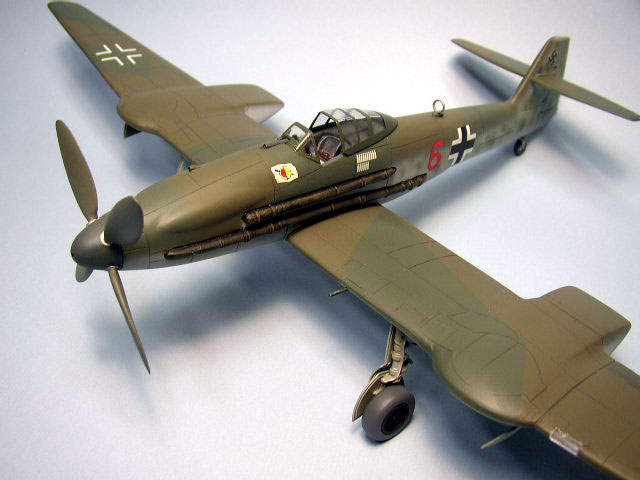
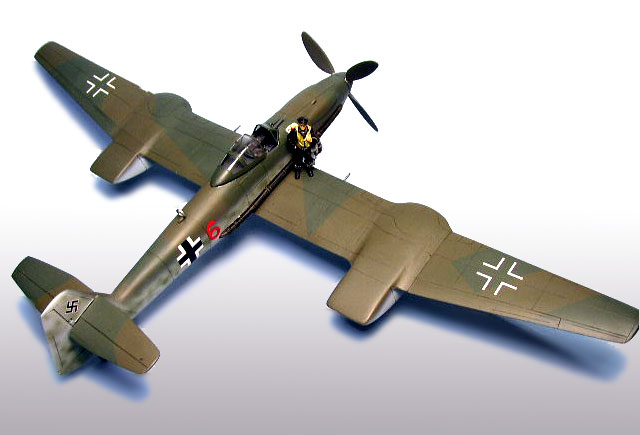
The prominent exhaust gas
piping was painted flat black and dry-brushed with RLM 02 to bring out the
details. A sharp No. 2 pencil was used to highlight all panel lines. Model
Master Flat was sprayed and the kit was finished! I highly recommend the
Monogram Close-Up of the Bv 155 (if you can find it) for details,
camouflage, etc.
This aircraft is my personal
favorite. Who knows how it would have performed had it entered production
or combat. One thing is sure, there was nothing else even remotely like it
in the sky - the finished kit is a behemoth!
I took my Bv 155 to the 2002
IPMS Nationals in Virginia Beach, not with the intention of taking home a
trophy, but to let people see something different than a bunch of P-51s
and Me 109s (apologies to P-51 and Me 109 lovers everywhere). However, the
51’s and 109’s conspired against me, and my kit had to be displayed in the
“Other Axis” category (but it did look funny surrounded by Japanese
aircraft!).
So much for my vision of my
huge BV 155 surrounded by 109s!
Click on the thumbnails
below to view larger images:
Model, Images and Text Copyright ©
2003 by Bryan "Tuck" Tucker
Page Created 26 February, 2003
Last Updated
17 March, 2004
Back to
HyperScale Main Page |
 Home |
What's New |
Features |
Gallery |
Reviews |
Reference |
Forum |
Search
Home |
What's New |
Features |
Gallery |
Reviews |
Reference |
Forum |
Search