|

Airfix's
1/144 scale Space Shuttle is available online from
Squadron.com
Call it morbid fascination or whatever, but I
became, like many others I suspect, caught up in the tragedy of the
Columbia disaster of 1st February 2003 as the Space shuttle
catastrophically broke up on re-entry into the earths atmosphere over
Texas. I am often inspired to build a particular model when the real
thing features in an event or sometimes a movie.
So after a bit of exploring on the internet to find
out which space shuttle kits were available and which was best (I had
already decided to opt for a kit with the solid rocket boosters etc) it
seemed that, by general concensus, the 1/144 scale Airfix kit was the
best overall although all available had some shortcomings.
The worst features of the Airfix kit was a lack of
a cockpit interior and a poor cargo bay. I did not see this as too much
of a problem as I figured you wouldn't see much through the main windows
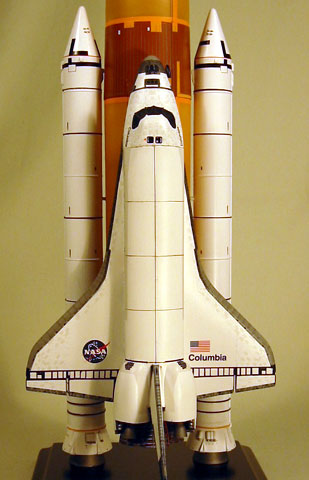
anyway and I planned to have the cargo bay doors closed. The Airfix kit
had a fairly accurate shape overall and very well detaled SRBs and
external tank.
I planned to build the kit in four sub-assemblies:
external tank 2 x SRB's and the orbiter itself, and bring them all
together on completion after painting etc was completed.
 The
kit itself built up fairly quickly and I worked on each of the four
sub-assemblies simultaneously. The fit of the parts was extremely good. The
kit itself built up fairly quickly and I worked on each of the four
sub-assemblies simultaneously. The fit of the parts was extremely good.
I briefly toyed with the idea of scratchbuilding a
cockpit (flight-deck??) but decided it wasn't worth the effort
considering how little would be seen once the windscreens were fitted.
In hindsight I was absolutely right! All I did was paint the interior
black.
I also fitted the cargo bay interior but this was
more to add strength than anything since the bay doors would be closed
on the completed model as were the undercarriage doors which were also
glued in the closed position.
Incidentally, one of the worst fitting parts of the
kit was the clear windscreen part and I ended up using C.A. (superglue)
to both glue it in place and fill all the gaps around it, followed by
lots of sanding and polishing.
During my research on the internet I discovered a
company called Realspace models which did a set of resin engine nozzles
and more accurate decals so, not being one to build anything straight
from the box these days, I proceeded to multiply the cost of the kit.
Painting,
Masks and Decals
|
Originally, I had fully intended to paint the kit
white, mask it up, and spray the tiled areas matt black and so I
proceeded to aid this process by sanding off the raised panel lines on
the orbiter and rescribing. This was relatively simple as they are
mostly straight lines.
 Also,
while I was at Tamiyacon someone there was selling the Space Shuttle
Walkaround book and, fatally, I bought it. I say fatally because this
was originally going to be a quck build (is there such a thing?) At
about the same time Cutting Edge released a set of decals which had
extra bits that the Realspace ones didn't include, a set of Black Magic
masks for the tile shapes (I wasn't looking forward to all that masking
anyway), followed by (oh lucky me) a set of decals to replicate the
actual tiling. And so AMS immediately kicked in and the various bits and
pieces are soon in the mailbox and I'm working on another $200+ kit. Also,
while I was at Tamiyacon someone there was selling the Space Shuttle
Walkaround book and, fatally, I bought it. I say fatally because this
was originally going to be a quck build (is there such a thing?) At
about the same time Cutting Edge released a set of decals which had
extra bits that the Realspace ones didn't include, a set of Black Magic
masks for the tile shapes (I wasn't looking forward to all that masking
anyway), followed by (oh lucky me) a set of decals to replicate the
actual tiling. And so AMS immediately kicked in and the various bits and
pieces are soon in the mailbox and I'm working on another $200+ kit.
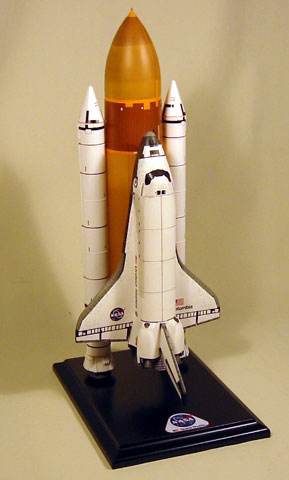
But of course what a difference all this made to
the completed model, it was no longer just a black and white piece of
painted plastic!
Masking the shuttle wouldn't have been too
difficult but the Black Magic vinyl masks speeded up the process
somewhat. The Realspace decal sheet had a beautiful decal of the
windscreen frame and the tiled area around it but no matter what I did I
couldn't make it fit! I guess that says something about the accuracy of
the shape of the Airfix windscreen.
The Black Magic tile decal, although a great
improvement over simply painting the kit, seemed to me a bit light in
colour and there were a few comments on HyperScale to this effect. I
considered this problem for a while before deciding to pain matt black
in the positions where the dark coloured tiles would be (ie únderneath
the decals') and to overspray heavily thinned matt black lightly over
the decals while they were still on the sheet just for good measure. I
believe this worked fairly well leaving the decals not too dark and not
too light.
The only other criticism I would make is that the
tiles carry on along the fuselage sides quite prominently and these are
not included in the tile decals so I replicated this with off-white
coloured paint.
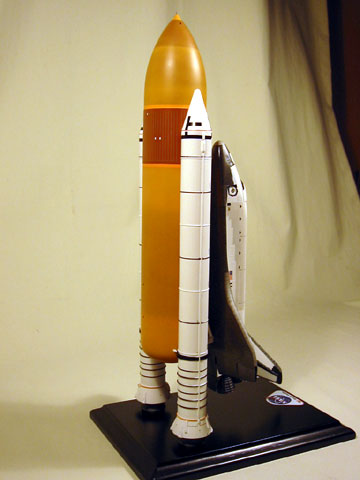
Painting the SRB's was easy - white all over then
apply decals, but the external fuel tank proved quite challenging,
mostly to obtain it's colour realistically as there is no dedicated
paint colour that I'm aware of.
Also, after studying various photos the external tank is not one solid
colour but has an almost shaded effect which I wanted to replicate. This
was mostly accomplished by trial and error so I cannot explain in any
detail how this was done.
Finishing
Touches and Display
|
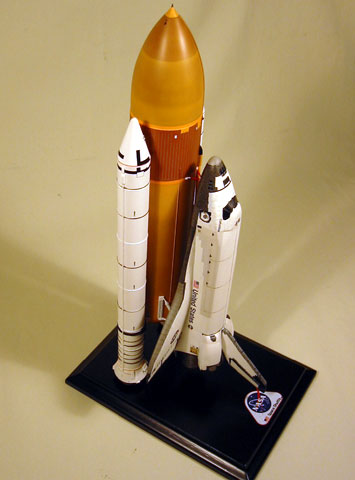
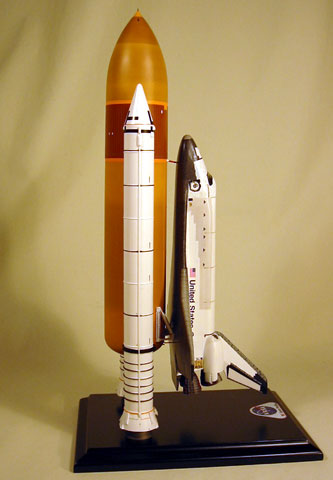
Once painting and decalling was complete, it was
time to bring all the various sub-assemblies together and this also
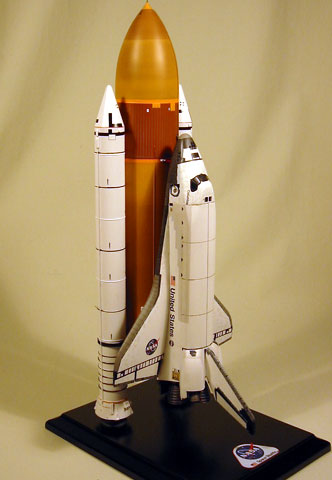
proved hassle-free. The next major hurdle was how to mount it for
display. Airfix supplied a plastic stand to display the model in a "flying"attitude
but I thought it looked a bit tacky and decided to go with a simple
painted base (someone at IPMS suggested I might scratchbuild a launch
platform..... yeah right!)
Even then, mounting it wasn't going to be such a
simple task. The only place to mount it is via the SRB nozzles so I
decided to drill a couple of holes inside the nozzle and superglue the
heftiest bit of sprue I could find inside which would the be inserted
into holes drilled into the base, sounds easy, right? Not quite, as the
holes must be drilled so that the model sits squarely on the base and is
also straight up and down vertically.
In conclusion, the Airfix is, arguably, the best
Space Shuttle kit in1/144 scale and with all the aftermarket accessories
now available you can really go to town on it.
Click on the thumbnails
below to view larger images:
Model and Text Copyright © 2003 by
John Darlington
Images Copyright © 2003 by Craig Sargent
Page Created 10 September, 2003
Last Updated 17 March, 2004
Back to HyperScale
Main Page
|
 Home |
What's New |
Features |
Gallery |
Reviews |
Reference |
Forum |
Search
Home |
What's New |
Features |
Gallery |
Reviews |
Reference |
Forum |
Search