|
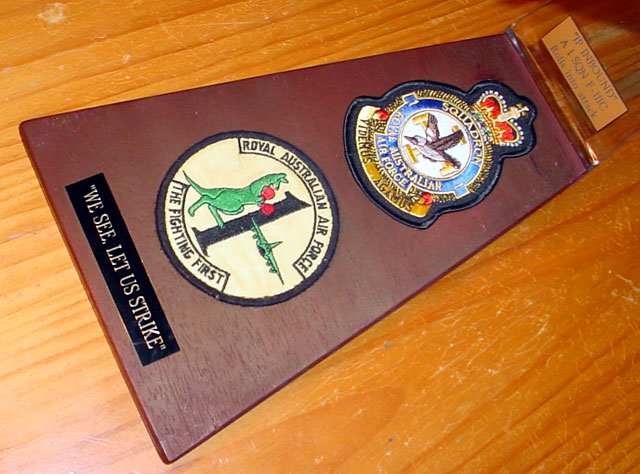
Videmus Agamus
“We see, let us strike”
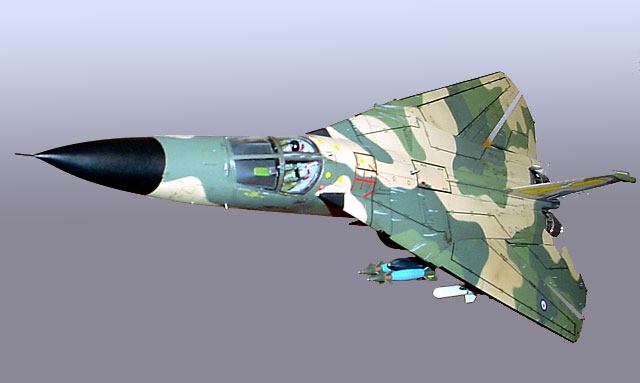
F-111C
|
|
|
F-111C |
by Anthony Papadis

HyperScale is proudly supported by Squadron.com
I was recently given a Hasegawa
1/72 F111C kit, as the previous owner had decided that after ten years
he was never going to finish it, and that I would probably appreciate
the kit, as I have a known soft spot for the “Pig”.
I will not review the kit here,
as the kit is neither new nor unknown, suffice to say that when care is
used, the kit assembles quickly and with few traps for the unwary. In my
opinion, the F-111 kits are some of the best detailed 1/72 kits Hasegawa
has produced and are easily the best kits on the subject in 1/72. Having
said that, there is always room for improvement in any kit, and I chose
to add a few extra touches during this build.
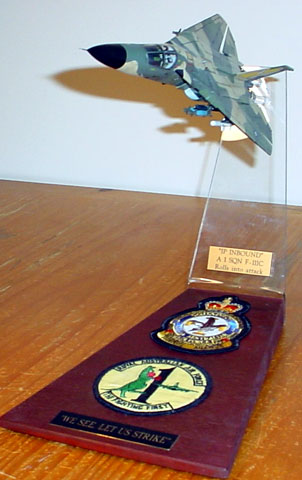
I had decided early on to mount
the kit ‘in-flight’ as this is really the only way to appreciate the
sleek lines of the F-111. I wanted my pig to carry a pretty tough
looking load and to be going quick, two things the Pig does well.
The kit’s previous owner had
already begun the kit when it was handed to me. The fuselage had been
assembled, but otherwise, the majority of the kit was intact and still
on the sprues. Unfortunately, the cockpit was poorly painted and the
instrument decals had been applied directly to flat paint without a
sealer coat, with the result that they had curled up. There was no other
option but to strip the cockpit. After carefully prying loose the seats,
control columns and instrument panel, the fuselage and other items were
all given a spray with Mr Muscle oven cleaner, and these parts were
slipped into a resealable plastic bag and set aside.
Note: Mr Muscle fumes are extremely
caustic, Make sure you work in a well ventilated area and use
appropriate skin and eye protection when using it!
Whilst I was waiting for Mr
Muscle to do its thing, I began to work on the other sub-assemblies. I
cleaned up the horizontal stabilisers, a few quick strokes with a
sanding stick was all that was required. Since this Pig would be
depicted in flight, I would not require the undercarriage components. I
cut the undercarriage components and put these into the spares box. This
reduced the parts count considerably and really only left the
afterburner and wings to assemble.
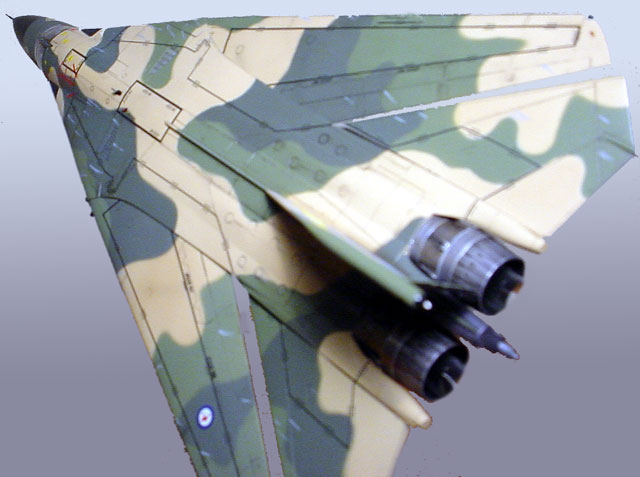
Wings
Since I wanted this F-111 to be
going like the proverbial cut cat, the wings would have to be swept back
to 72.5º and the flaps and slats would have to be tucked in. I t seems
ironic that we, as modellers are always complaining when things like
flaps and slats are not moulded separately, and yet here I am gluing
the separately moulded flaps and slats back in, there’s just no pleasing
some people!
The first problem was sweeping
the wings back. The Hasegawa F-111 kits do not (thankfully) feature
‘swinging’ wings. They instead have two slots in the wing root which
enable the builder to choose from one of two options, fully forward with
16º sweep-back or pinned fully back at 72.5º, as I wanted.
The instructions make no mention
of the fully swept back option, however the second slot corresponds with
this position. To allow the wings to fit however, part of the wing seals
will need to be removed. Hasegawa have thought of the modeller here and
there is actually a shoulder behind the wing seal portion inside the
fuselage. All that was required was for the plastic to be trimmed away
up to the shoulder, and there would be an opening corresponding to the
fully swept back position.
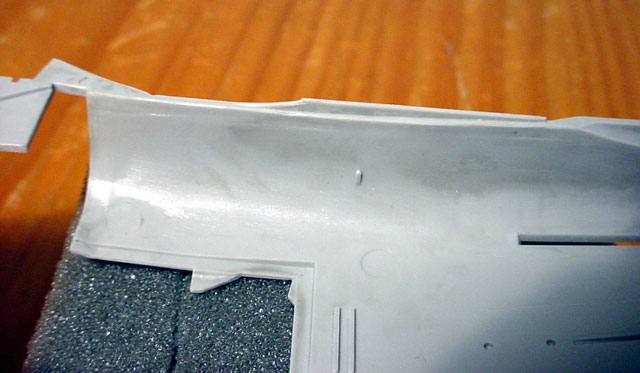
Pic 1 Wing seal shoulder
My next hurdle was fitting the
flaps/slats back into the wing. Hasegawa has done a brilliant job
depicting the slats and double-slotted Fowler flaps, however gluing
these back into the wing took some repeated filing and test fitting.
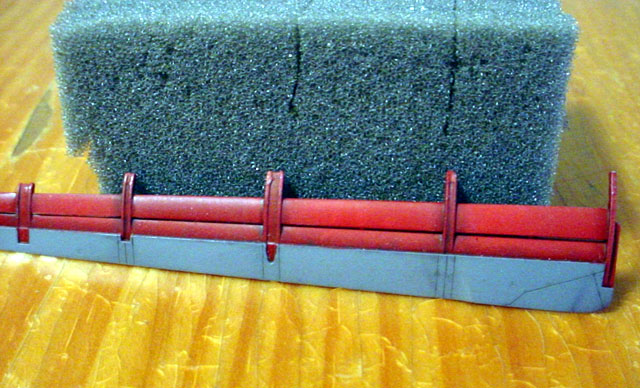
Pic 2 Wing flap portion to be
removed
I began by removing the upper
row of flap segments on parts E5 and E6 as these fold into the wing when
not deployed. After some careful sanding, the flaps fit into the wing.
The slat guides at the front of the wing were sliced off with a new
scalpel blade, as these prevented the slats from fitting flush with the
leading edge of the wing. After more test fitting, I discovered that the
slots at the front of the wing needed just the slightest sanding so that
the slats could sit flush. The wings were now assembled and set aside.
Fuselage
After about four hours, removed
the fuselage and other bits from the yucky jelly like mess that was the
dissolved paint/Mr Muscle. A few minutes scrubbing with an old
toothbrush and cold water rewarded me with some pristine plastic. Once
the fuselage was thoroughly dry, I sprayed the cockpit, seats and
instrument panel FS 36231 (Dark Gull Grey). I also sprayed the intakes,
intake cowlings and inlet spikes (D4, D8) semi-gloss white. I decided to
leave the inlet spikes and cowlings off until painting was finished.
I had a spare F-111C decal sheet
handy (‘gotta luv garage sales!) and I used cockpit decals from this
sheet. These were then sealed with a coat of matt varnish. The kit does
not include aircrew figures, so the spares box was robbed. I modified
the helmets to depict the more modern ‘lightweight’ items currently used
by sanding off the visor covers. Whilst I was at it I made a radar
indicator hood from some shaped sprue. RAAF F-111 seats have black
lamb’s wool covers. I painted the seat cushions black to depict this.
The control columns are also matt black with semi-gloss black grips. The
canopy bow part (B17) was painted and glued into the canopy. Once the
canopy sprue stubs were sanded off, the whole thing was dipped into a
tray of Future and set aside to dry.
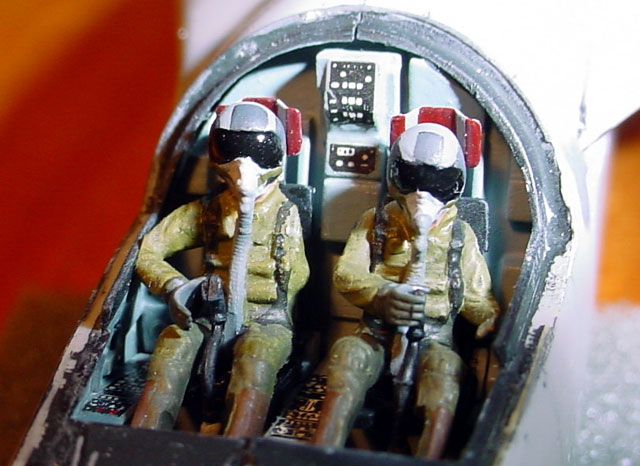
Pic 3 Cockpit
Wheels-Up
I glued some sprue strips along
the inside edges of the nosewheel bay to support the nosegear flipper
doors (A9, A10) when they were glued into the closed position. I also
glued some sprue inside both flipper doors themselves to re-enforce them
further.
The main gear door (B26), which
also functions as a speedbrake, was simply glued into place. The second
door (B28), will leave a gap through which some undercarriage detail
will be visible (this is how the real thing is too!). I used the rear of
the kit undercarriage well (A18) but cut the lower “V” shaped structure
away and repositioned it at 90º. The two long thin arms were also cut
off and replaced with some stretched sprue, also re-positioned at 90º to
their original position. Most of this will not be visible when the rear
door is glued on.

Pic 4 Rear main gear door gap
The final part was to glued the
tail bumper guard (B9) apart from its actuators and glue it flush into
its fairing between the engines at the lower rear fuselage. This unit
always extends and retracts in concert with the undercarriage.
Pic 5 Tail bumper guard
Final Assembly
I replaced the kit LCOSS (gunsight)
with thin clear acetate from some blister packaging. The canopy was now
attached and the masking applied. The ventral strakes and ‘figure 8’
panel (fuel dump panel) was added and seams filled. The vertical fin and
the stab fairings were next. I cut the rudder out and repositioned it
deflected to the right. I replaced the kit nose pitot probe with a
hypodermic syringe.

Pic 6 Rudder deflection
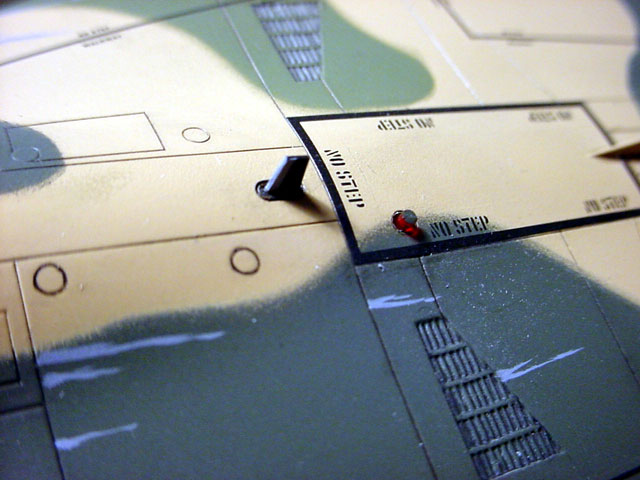
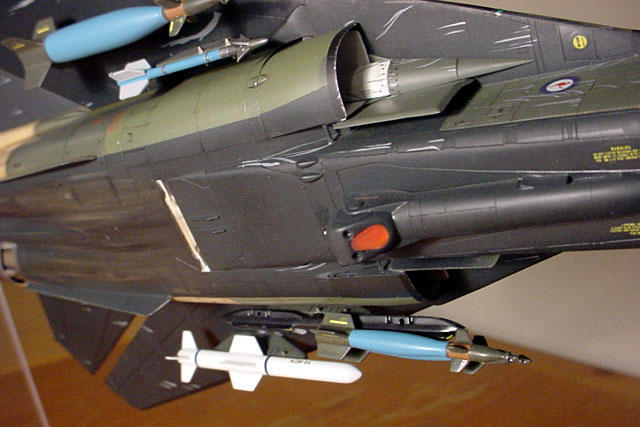
Ordnance
I wanted an interesting load,
but not necessarily one that is typically carried. This ‘Pig’ is
carrying practice ordnance, as evident by the blue bands and bomb
bodies. The ordnance was taken from the different Hasegawa weapons sets,
while the kits provided the pylons and the BRU-3 (bomb rack ) and LAU-7
(missile rail).
Although not typically carried
in multiples on the BRU-3, when used, Mk.82/GBU-12’s are usually carried
in the ‘slant 4’ configuration, which means that the inner shoulder
stations are not used. GBU-12’s are too long to allow more than 2 per
BRU-3.
The AGM-84 Harpoon is also used
in configuration with a data link pod. Since this is not a warshot
round, I saved myself the trouble of having to scratch-build one.
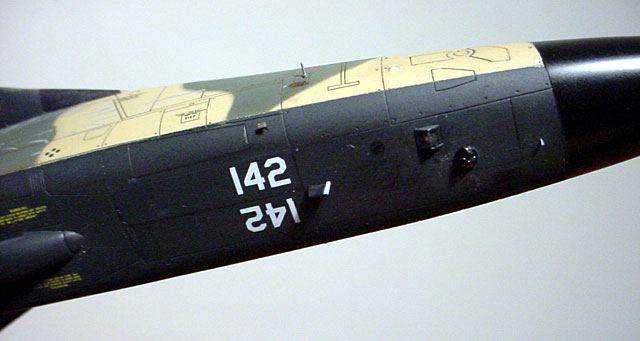
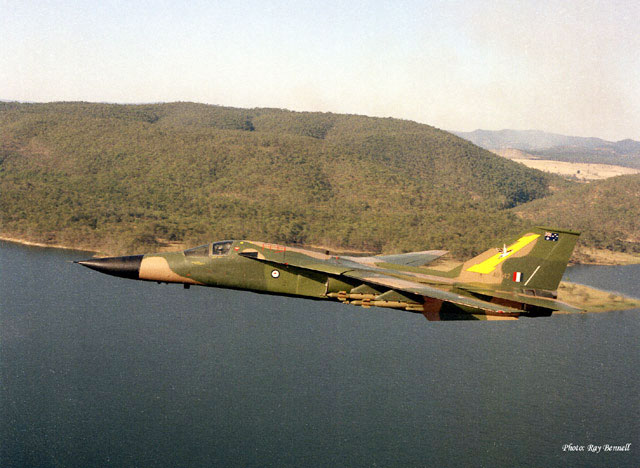
I wanted to depict a 1SQN
aircraft in the SEA (South East Asia) scheme, but with the big yellow 1
which some aircraft sported for a little while. I remembered that
Aussie Decals had issued these markings some time ago but these are no
longer available. Luckily, the ever helpful Dave Turner came to my
rescue with these decals. Whilst doing the research, I discovered that
the tail art varied depending on the aircraft. The stylised yellow one
features a Kookuburra (an Australian native bird) diving down its
length. The variation is with the orientation of the bird’s body. The
decals depict the bird’s body pointed down vertically. Most pictures
that I found showed that the Kookuburra’s body was rotated slightly
upwards instead of straight down. I came across a picture of A8-142
which had the Kookuburra shown as depicted in the decals, so that is the
aircraft I would build.
Aussie Decals 1/48 sheet
(48004) has the Kookaburra printed separately and a full complement of
tan and green numbers allowing the builder to make any tail number that
they want.
Pic 8, A8-142 in a very clean
state
I used Gunze Sanyo paints H309 &
H303 for FS34079, FS34102 but used the Light Tan H27, instead of the
FS30219 as this tan looked a little too red and dark. The black used was
Tamiya NATO black, as straight flat black would be too dark, and I
wanted to contrast the radome and glove antennas which were painted in
semi-gloss black.
I used the Aussie Decals tail
art as well as their wing and fuselage walkways. The Hasegawa decals
provided the RAAF roundels (the ‘rats’) and the flag, as well as all the
stencilling. I needed to have “A8-142” in white for the nosewheel
flipper doors and the same in tan and dark green for the fin, tan
letters on the dark green and vice versa.
Richard Chafer of Gekko Graphics
was able to help here by supplying the white door numbers.
Unfortunately, the Aussie Decals 1/72 sheet does not supply a full
complement of numbers in the tan/green colours. I found an old
Roodecals sheet that had what I needed and I was able to mix’n’match my
A8-142 using this sheet. Incidentally, this sheet also included 3 x
F/A-18 Sqn’s as well as 2 x F-111 Sqn’s as well as a FULL complement of
numbers so that you could make any tail number that you want, value for
money indeed!
I gave the panel lines a dark
brown wash using thinned oil paints. The area behind the main gear was
weathered with several light brown, black and grey streaks to simulate
the leaking oil, fuel and dirt which accumulates here
The kit had a coat of Testor’s
Dullcoat applied and the nav lights, formation lights and the wings and
ordnance were added. The cowl intakes as well as the stabs were also
glued into place.
I now added the ‘goop’ streaks
(anyone who has worked on the pig knows all about these!). ‘Goop’, or to
give it its formal name of ‘reversion’ is a two part caulking compound
used to seal panels on the aircraft. When subjected to the high skin
temperatures of supersonic flight (a “Mach Run”) the compound breaks
down or ‘reverts’ back to its uncured liquid state. It then oozes out of
gaps between panels or injection holes, creating ‘goop’ streaks all over
the airframe. I used some thin grey paint and a fine brush to reproduce
these in the usual locations.
Pic 9 “goop”
I added new VHF, IFF and UHF
antennas from plastic card. These antennas have protective tape at their
leading edge to prevent them delaminating (peeling apart). I also
drilled out the upper and lower rotating beacon locations and simulated
these with some clear rod painted Tamiya clear red. These beacons are
always on and extended when the aircraft is flying (in peace time
anyway) I also depicted the ECS cooling door, a small door behind the
AN/ASQ-26 PAVE TACK pod, using some aluminium sheet and stretched sprue.
This door is always fixed open. Finally some stretched sprue was used to
simulate the alpha/beta probes on each side and underneath the radome.
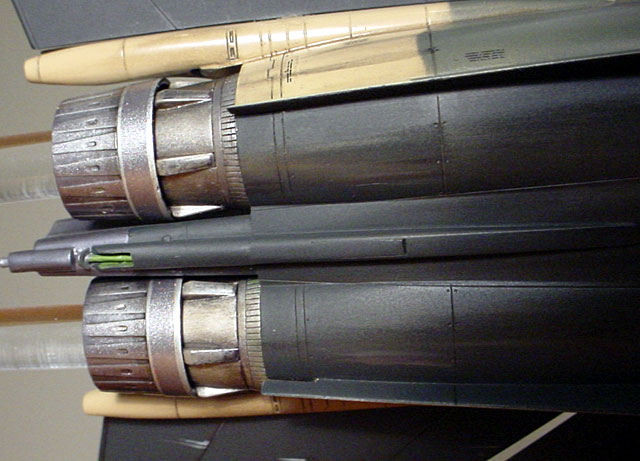
The kit has 8mm acrylic tubes
fed into the afterburners. The rods simply slide into 8mm holes drilled
into the 3mm Perspex stand, which in turn is screwed to the wooden base.
The whole thing can be dismantled for transport in under a minute.
When the F-111 has the wings
swept beyond 45º the spoiler panels in the wings are ‘locked-out’ and
the primary roll control comes from the horizontal stabilators (‘stabs).
I have deflected the rudder to the right in order to put in ‘top
rudder’, as if the aircraft is performing a knife edge pass at an
airshow whilst the ‘stabs have been deflected differentially to give the
model the impression of motion, in this case mid-roll.
As I have said, this is a sweet
kit which doesn’t have any really bad pitfalls for the unwary. The kit
is well detailed out of the box and is a real stunner when some extra
work is put in.
I cannot finish without thanking
the following people, without whose help this project could not have
been finished,
Take a bow:
Andrew Dunstone: The kit! And
info
Kevin Curtis:
Pictures and info
Dave Turner: The Tail
Art decals
Richard Chafer: The
nosewheel door decals
And my long suffering
girlfriend for putting up with me!
Enjoy!!
Click
the thumbnails below to view larger images:
Model, Images and Text Copyright ©
2003 by Anthony Papadis
Page Created 31 October, 2003
Last Updated
17 March, 2004
Back to
HyperScale Main Page |
 Home |
What's New |
Features |
Gallery |
Reviews |
Reference |
Forum |
Search
Home |
What's New |
Features |
Gallery |
Reviews |
Reference |
Forum |
Search