|
F-14D Tomcat
by Ingo Degenhardt
|
|
|
Grumman F-14D Tomcat |
images by Lutz Degenhardt

Hasegawa's 1/48
scale F-14D Tomcat is available online from
Squadron.com
This is Hasegawa’s F-14D, my latest model. It
replaced an old F-14A I built back in the late 1980’s and I knew this
model to be quite a challenge regarding its construction. Except for the
decals and a little detailing it was completely build out of the box.
Fortunately I had David W. Aungst’ excellent
articles about this kit’s construction, found here at HyperScale.
Although I did not use the BlackBox cockpit (I will next time) his
recommendations about building and painting the Tomcat cockpit were very
helpful.
The same goes for the airframe construction –
following the respective article avoids quite a lot of trouble during
the building of this model.
The fuselage front part with the cockpit included
is not much of a problem, contrary to building the rest of the fuselage
and connecting the two. I will not repeat all the useful information
found in the mentioned articles – I can only recommend them.
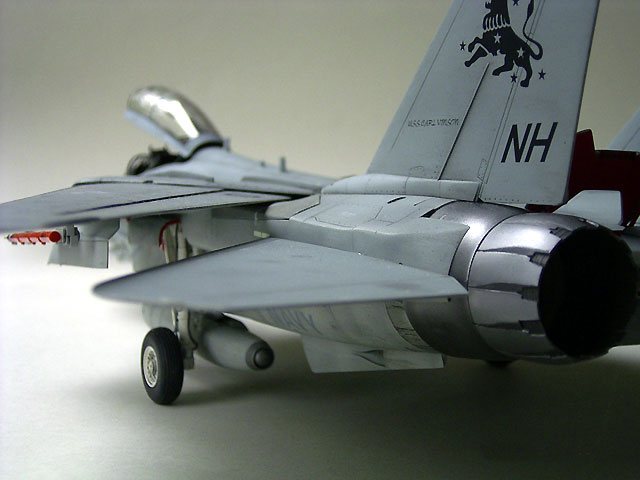
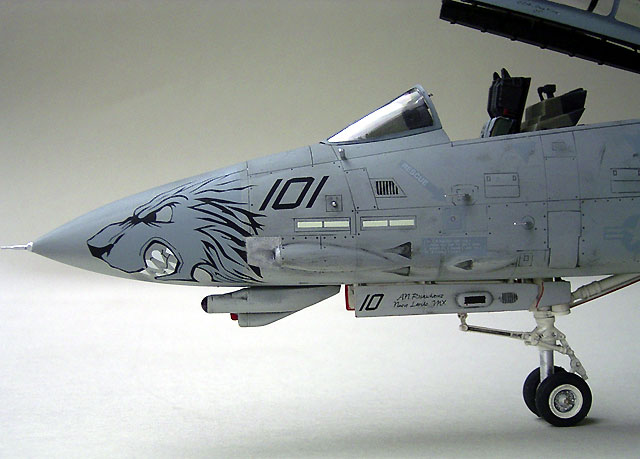
This Tomcat carries a TACT-pod (AN/APX-95), a
CATM-9 and a single ‘live’ AIM-54C Phoenix on the right glove pylon. All
from Hasegawa’s Weapons Sets (B & D)
Here image Rimg 0360jpg
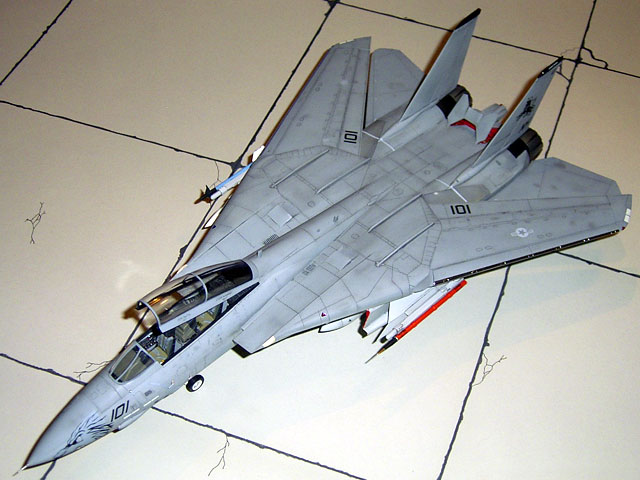
As most modern fleet Tomcats this F-14D has a
three-tone grey camouflage of FS 16375 for the undersides, FS 16320 for
the fuselage sides and vertical stabilizers and FS16237 for the upper
surfaces.
Many of these aircraft have a very worn look and are covered with a
multitude of spot painting, oil and who-knows-what streaks all over the
plane. Not to mention the influence of sunlight and salty air to the
paint scheme.
Of course once these aircraft were all-new painted
“showroom pieces” and building them as such is an option, but I wanted
my Turkey to have this look of intense use and all the wear and tear
that comes with it.
Paint
As usual, I used the appropriate gloss paints by
Xtracolor.
First I painted the undersides and tanks in FS
16375 and when dry, all the panel lines were sprayed with a thin coat of
FS16320. A good amount of cloudy spot painting was also done in this
color.
Next was FS16320, sprayed onto the fuselage sides and vertical
stabilizers. Treated the same way with darkened FS16320 and FS16375 –
panel lines and spots. There was no masking; the dividing line was
sprayed free-handed.
But to apply the topside color of FS16237, the
sides, undersides and vertical stabilizers were completely masked off.
This color was lightened a bit and sprayed over all
the upper fuselage and wings. The wings and horizontal stabilizers were
painted separately – this makes the whole procedure much more easy and
the wings are simply snapped into their position during the final stages
of construction. Nearly everything else was fitted before; from the
complete undercarriage to the engine nozzles. It is nice to have the
wings out of the way when attaching these sub-assemblies. Back to the
colors:
With the FS 16237 dry, the masking was removed and
the original (darker) color was used to repeat the panel line- and spot
painting thing for the upper fuselage and wings. It was also used for
spot painting on the two other colors.
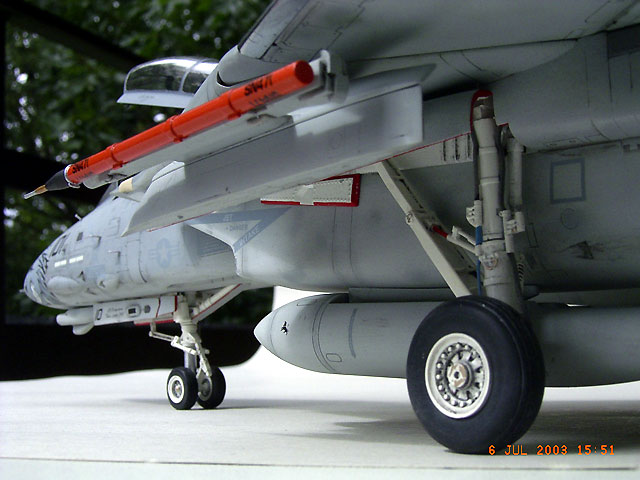
Everything thoroughly dry, the undersides received
a wash with a medium dark grey, the FS16320 areas with a slightly
darkened wash-color and everything in FS16237 got it’s wash in heavily
diluted flat black.
Some areas received a special treatment with the black wash – I had some
pictures of a real aircraft showing for example that right in front of
the natural metal parts of the engine nozzles the fuselage looks much
more ‘dirty’.
The oil streaks from all the openings (study
photographs) were made from that diluted flat black also. Wiping off the
washes leaves the already smooth surface (gloss paint) even smoother –
ideal for the next step, the decals.
I took matching Humbrol flat paints for some
limited drybrushing mostly on the upper surfaces.
The weathering was completed after the flat coat (see “Decals”) with
some very limited use of dark brown pastel chalk powder for the traces
of oil and/or grease stains on the aircraft.
Decals
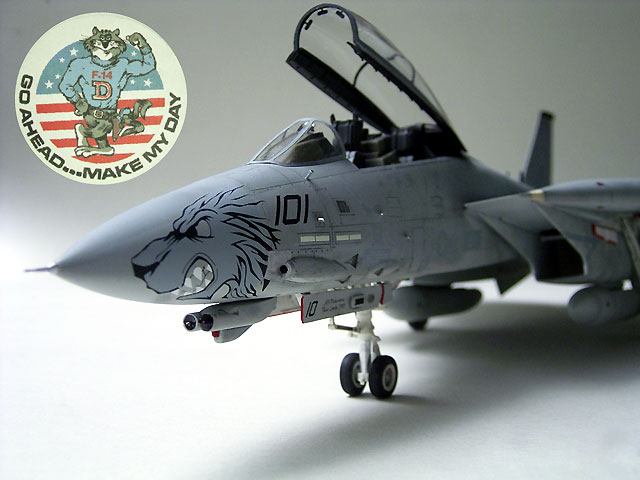
As mentioned, the only additional item for this kit
were the decals. I used Yellowhammer’s YHD 48020, because I liked the
lion’s head on the radome sides.
So this F-14D (Bu-No 164603) belongs to VF-213
‘Black Lions’ as it appeared at NAS Oceana in 2001.
The Yellowhammer decals are wonderful to work with.
They did an excellent job to support my efforts to apply the Lionheads
onto the conical radome. They reacted very well with Superscale’s Set &
Sol. As intended, it takes a while – but after some horrible-to-look-at
wrinkling (normal) – very few hours later they are perfectly bonded to
the fuselage, including panel lines. Working my way around the fuselage
some of the decals applied the day before showed a strange tendency to
loose contact to the surface at the edge of the carrier film. This was
dealt with either by cutting the carrier film off or use some Superscale
Set to reattach them.
With all the decals in place, the excess decal glue
was removed with water and no more decals got a chance to lift their
edges as a coat of Humbrol flat cote sprayed all over the model fixed
them into place.
As always, before applying the flat coat, all decals were carefully
checked for ‘silvering’ (not adhering carrier film – leaves a silvery
shine under the flat coat, a real decal killer) I exterminated that on
most of the (very few) befallen decals by piercing the decal and add a
drop of Sol, but as always too, some escaped me. I treated these with
carefully diluted flat paint of any matching color.
Regarding USN planes I am always torn between the
beauty of a colorful hi-visibility scheme and this special attraction of
a worn-out low-viz scheme like this. I like both. It is a good kind of
compromise if there is any larger nose art on a low-viz aircraft – just
like the angry lionhead on this one.
Yellowhammer’s 48020 contains some nice markings
for an F-14B also (VF-103 ‘Jolly Rogers’) with the skull and cross bones
in white.
I have no F-14B yet. But anyway there are some
others first in line.
Sources:
Click on the thumbnails
below to view larger images:
Images and Text Copyright © 2003 by
Ingo and Lutz Degenhardt
Page Created 26 February, 2004
Last Updated 17 March, 2004
Back to HyperScale
Main Page
|
 Home |
What's New |
Features |
Gallery |
Reviews |
Reference |
Forum |
Search
Home |
What's New |
Features |
Gallery |
Reviews |
Reference |
Forum |
Search