|
1/32 Hasegawa F-16C Conversion
F-16C Barak
by Michael Ibbotson
|
|
|
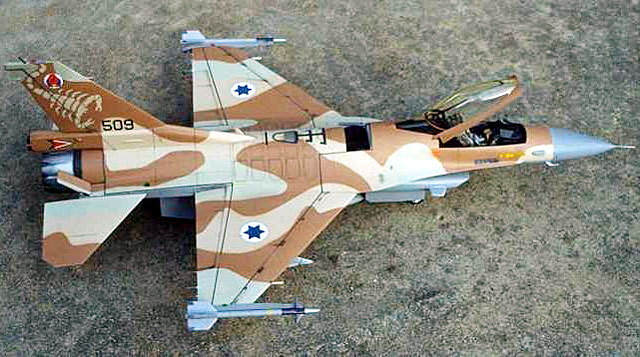
F-16C Barak |

Hasegawa's
1/32 scale F-16C is
available online from Squadron
You cannot be interested in
modern military history without reading a great deal about Middle Eastern
conflicts.
From a modelling
perspective, such conflicts offer a wealth of aircraft colour schemes. In
a world where most air forces paint their aircraft grey, Middle Eastern
countries persist with far more interesting two or three tone colour
schemes. In this regard, aircraft from the Israeli Air Force (IAF) have
always attracted me. The IAF use a striking paint scheme for their modern
aircraft involving light grey undersides and swirls of yellow/sand, brown
and green on the upper surfaces.
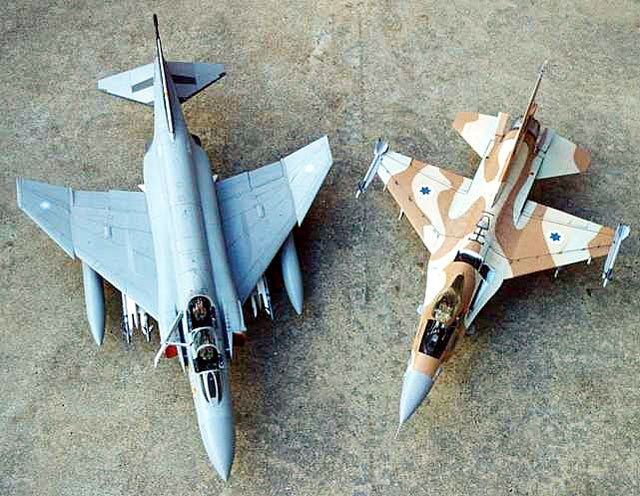
I chose to build an Israeli
F-16C ‘Barak’ using the 1/32 Hasegawa kit. Construction of the F-16 is
fairly straightforward, with the majority of parts fitting very well. On
the down side, the majority of panel lines are raised, so I was forced to
sand them off. As was the trend when the kit was first produced, there are
some recessed panel lines but they are very deep and somewhat unrealistic.
The cure for this was to sand the areas around the recessed lines until
they were very shallow, therefore producing a better scale effect. This is
particularly important for the panel lines on the spine of the aircraft.
The good news is that the plastic is very thick in these areas, thus
allowing a lot of sanding without going through the surface. Having
pointed out this bad area of the kit, it is worth noting that Hasegawa
most certainly got the overall shape of the jet correct. There is no doubt
that once built the Hasegawa F-16 looks like the real thing, which cannot
be said for the Revell kit.
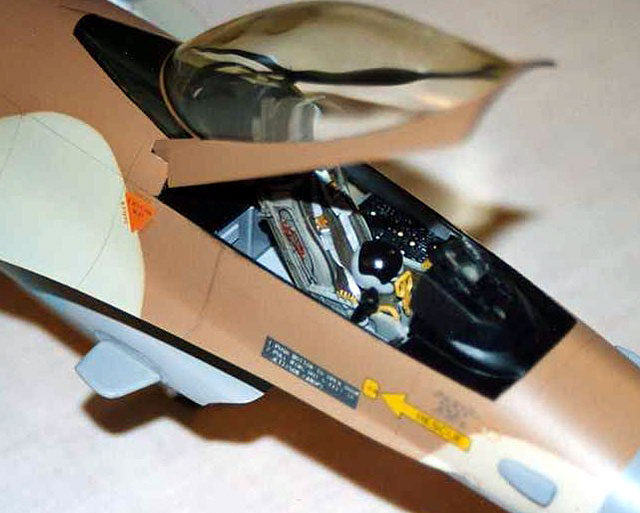
As normal, I started with cockpit construction and I had to make sure that
I chose the F-16C instrument panels because the F-16A instruments are also
supplied. I think the cockpit looks good and doesn’t need a resin
replacement. I used a spare ACES II ejector seat from a Tamiya F-15C kit,
which is far better than the white metal seat provided by Hasegawa.
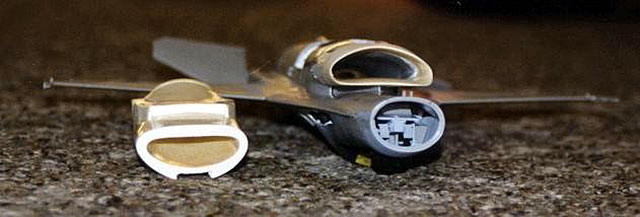
I cut some lead strips from
the top of a brandy bottle and some 1/32 scale etched-brass buckles from
Reheat to create the harnesses. I liked the helmet that came with the
original kit, so I made it and placed it on the ejector seat. The only
really hard work in the cockpit area was the canopy. I had to remove a
very large seam, which required a great deal of sanding. Toothpaste was
used to polish out all of the sanding scratches after the seam had been
removed. Once done, I sprayed the inside of the canopy with Tamiya clear,
which had been mixed with a drop of yellow. This gave the canopy an
authentic golden tint. The canopy was then dipped in Future and allowed to
dry in a very warm room. It is important that drying occurs quickly
because the Future will dissolve the Tamiya clear, thus generating yellow
streaks.
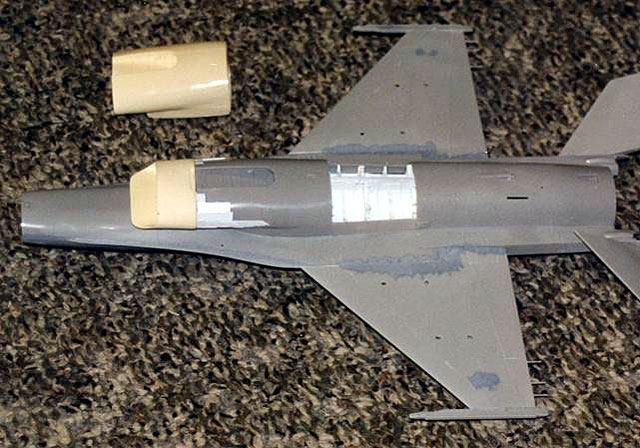
As I was building a late model Israeli F-16C, I used the ‘new tool’
exhaust components that come in the kit. They replicate the petals found
on the GE 110 engine, which requires more air than its predecessor and
consequently needs a wider air intake. To solve this problem on the model,
I purchased the Seamless Suckers wide-mouth resin update set. According to
the instructions, it should be possible to simply slot this resin part
into the kit to replace the plastic intake components. However, the resin
part is enormously over scaled in the vertical dimension and I couldn’t
work out how to modify it easily to fit. Having said that, the redeeming
feature of the resin component was that the mouth of the inlet did have
the correct width and height. So, what to do? After much thought, I cured
the problem by cutting off the rear of the resin component and discarding
it.
I used the inlet section from the plastic kit as a cutting guide such that
the resin part was the same length as the plastic component. I sanded the
top and bottom of the resin component until it had the correct vertical
size. The resin is so thick that I had no problems sanding many
millimetres of material away. The sanding process had the added advantage
that it removed all the ugly recessed and raised surface details from the
resin block. I then glued the resin part to the front of the inlet ducting
of the plastic kit using super glue. To my great joy, I discovered that
the inner dimensions of the resin part matched the diameter of the plastic
component. I glued strips of plastic onto the kit to match the width of
the fuselage to the width of the resin inlet.
Once done, I applied a lot
of putty both in and out of the inlet. Also, the upper splitter plate on
the inlet is way too long and needs to be carved and sanded into a more
accurate shape. I spent a lot of time sanding, washing, painting and
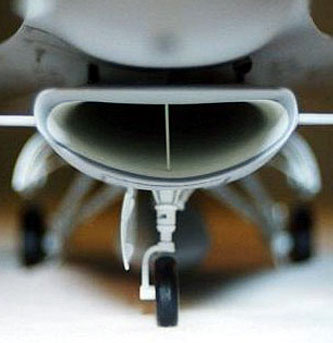
refilling to get a smooth finish (F-16C_intake_spray.jpg). Finally, you
end up with an air intake that you can look into without any apparent
seams. I also added the little ECM winglets to the sides of the intake,
which were scratch built from thick plastic strips (F-16C_intake.jpg).
Other scratch built additions included the slightly enlarged ECM bulges on
the nose (carved plastic), a small starter intake under the right wing
root (built up from plastic strip), the ECM probes on the wing leading
edges (plastic rod) and several parts on the tail (carved plastic and
brass rod). I had great fun finding the reference material!
Click the thumbnails below to view larger
images:
The fit of the nose cone to
the fuselage is not very precise. I had to do some careful filling and
sanding to get the nose to fit properly. I filled the nose cone space with
metal weights to prevent building a tail sitter, which isn’t a problem if
you use the white-metal seat provided by Hasegawa.
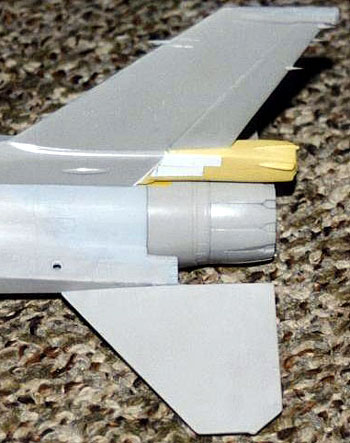 Two
tail planes are supplied in the kit and I used the ‘C’ version, which is
the one with the large base and the recessed panel lines. The Israeli
Barak has a parachute housing at the rear of the tail base and I used the
Seamless Suckers resin parachute housing as a way of modify the kit. Two
tail planes are supplied in the kit and I used the ‘C’ version, which is
the one with the large base and the recessed panel lines. The Israeli
Barak has a parachute housing at the rear of the tail base and I used the
Seamless Suckers resin parachute housing as a way of modify the kit.
The Seamless Suckers resin
part is a replica of the Norwegian F-16A tail extension. It has the
correct length, height and shape but is too narrow for the F-16C. I glued
the resin tail base extension onto the plastic kit component after
removing the short tail extension that comes as standard on the kit part.
I then thickened the resin part with plastic sheet and smoothed the
surface with putty. Again, the very roughly molded recessed panel lines
and ECM bulges on the resin component were filled and sanded and more
accurate parts scratch built from plastic strip and rod.
I shortened the front undercarriage strut slightly by cutting 2 mm from
the top and filing the wheel flat at the bottom. This gave the F-16C a
level appearance, which simply looks better! In doing this, I made the
centre-line fuel tank hang too low, so I sanded 1 mm from the base of the
pylon before attachment.
I did not add the large
under-wing fuel tanks but I think the kit offerings look very good if you
did want to attach them. I also chose not to add many weapons to my model
as they spoil the beauty of the F-16. The exceptions were the AIM-9Ls on
the wing tips, which I scavenged from a Tamiya F-15 kit.
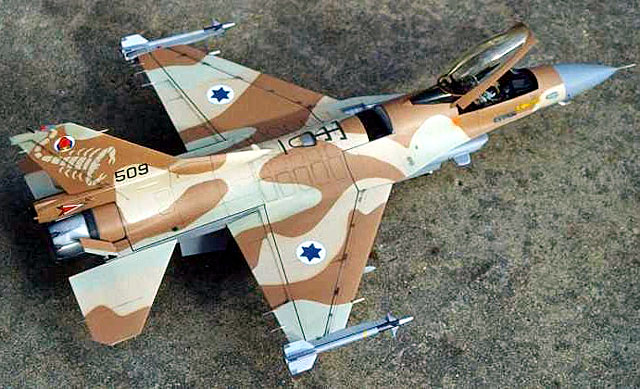
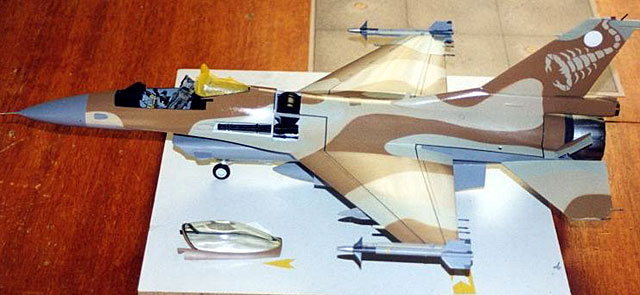
The F-16 has a three-tone
camouflage scheme on the upper surfaces and a light ghost grey underside
(F-16C_rear.jpg). The aircraft was painted using Gunze-Sangyo acrylics.
The grey underside was painted with light ghost grey (H308, FS36375) and
then the top surfaces were sprayed with yellow (H313, FS33531). The pale
green was concocted by mixing G-S duck-egg green (H74) with light ghost
grey and a drop of flat white. The quoted colour for the light green is
FS34424, which is supposedly the same as G-S H74. However, H74 is far too
bright and needed toning down with grey and lightening with white. The
exact mix is unknown as I played with the mixtures until I felt that I had
matched the colour to my references. The final colour for the camouflage
pattern was brown (H310, FS30219). The nose cone was painted neutral grey
(H306, FS36270), as were the flat side panels inboard of the horizontal
stabilizers, the wing tip pylons and the insides of the air brakes. All
the walkways were spray painted dark grey after masking (H333). This was
necessary because the walkways that come with the kit decal sheet are
light grey, which is appropriate for USAF aircraft but not IAF planes. I
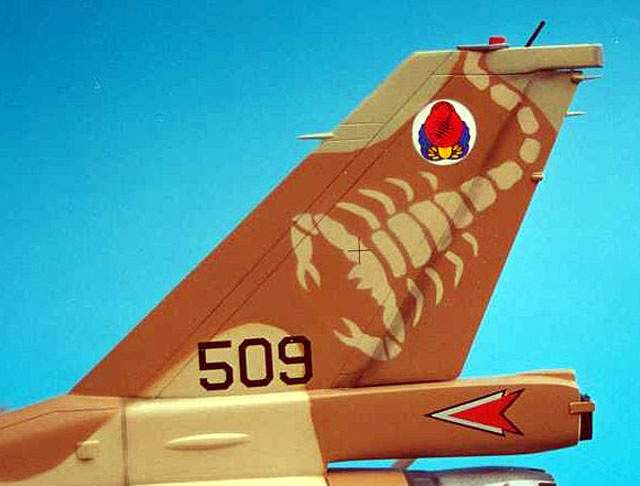
spray painted the large scorpion on the tail using a template constructed
by correctly scaling a photocopy of the tail plane and then cutting out
the shape of the scorpion. The small white disk at the top of the tail was
also sprayed using a circular mask. The model was then coated in gloss
prior to applying decals.
Most stencilling is in English so the decals from the kit can be used.
Stars of David, squadron insignia and tail codes are available on the
Cutting Edge F-4 decal set, which is excellent. The decals are very thin
and react with Set and Sol beautifully. Other features such as the red and
white chevrons on the tail base were made by cutting triangles of red and
white from the Cutting Edge decal sheet and placing them in layers onto
the model. I then drew black edges around the decals using a fine
permanent marker pen. After applying the first dull coat, I re-applied the
panel lines using a sharp HB pencil. Following from early modelling
experiences in which I tried to re-scribe panel lines into plastic, I
simply don’t do it any more. I personally think that fine pencil lines
give a far better scale effect than re-scribed lines. I guided the pencil
using Tamiya tape or the edge of a ruler (when I had access to flat
surfaces such as the wings).
Weathering was done using
overcoats of flat clear mixed with a drop of H313 and a little H308. This
flattened the surface, made the pencil lines blend into the model and
added colour balance. I then used pastels to add some grime in places.
So there it is, a 1/32 scale
replica of an IAF F-16C. I highly recommend the project. As far as 1/32
scale projects are concerned, the F-16 doesn’t even come out that large
when finished!
Click the
thumbnails below to view larger images:
Model, Images and Text Copyright ©
2003 by Michael Ibbotson
Page Created 17 October, 2003
Last Updated
17 March, 2004
Back to
HyperScale Main Page |
 Home |
What's New |
Features |
Gallery |
Reviews |
Reference |
Forum |
Search
Home |
What's New |
Features |
Gallery |
Reviews |
Reference |
Forum |
Search