|
F-16C Fighting Falcon
Block 40
by
Adrian Davies
|
 |
|
F-16C Fighting Falcon Block 40 |

Hasegawa's
1/48 scale F-16CJ is available
online from
Squadron
The F-16 hardly needs an
introduction to the readers of this website.
My goal was to use the
Hasegawa kit and detail it to a level I would be happy with. I started to
build this kit four years ago while living in London, but real life crept
in, and after emigrating to the States I finished the model in the first
six months of 2003. The hiatus allowed me to utilise the recently released
Czech Master interior and exterior detail sets, Eduard’s recent etched
brass set designed for this kit, and no less important was Danny Coremans’
superb book on the F-16.
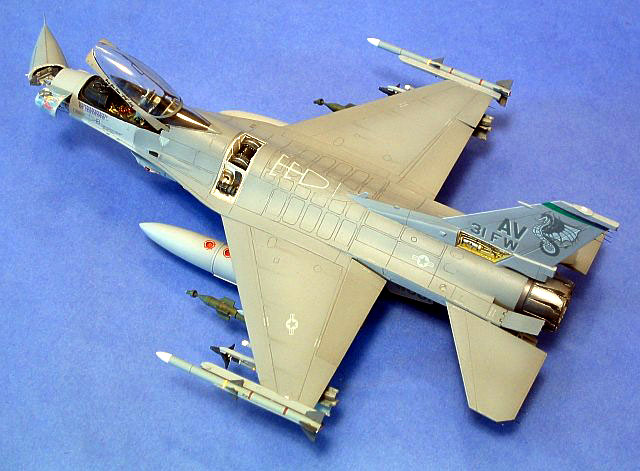
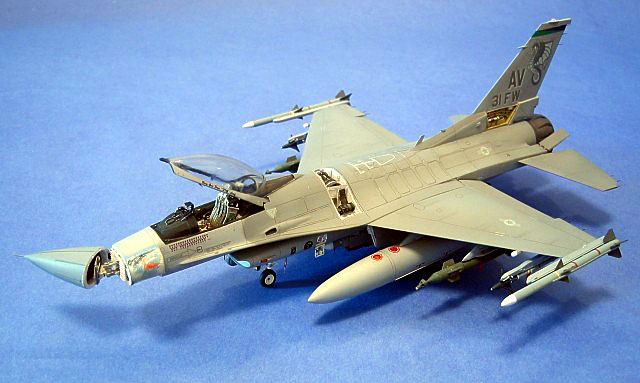
The aircraft I chose to model is the Wing Commander’s aircraft of the 31st
Fighter Wing based at Aviano AFB in Italy. The period I wanted to show is
the summer of 1999, after operation Allied Force, because the airframe was
still marked with its Purple bomb tally, and wears nose art on the radar
access panel and EPU door.
The Hasegawa F-16 is a bit
of an old war horse. About 11 years ago I built their F-16N release. After
all this time, it has stood the test of time pretty well. While building
the Hasegawa model I bought the recent Revell Monogram kit and was
impressed with it. The next time I build an F-16 I plan on using it.
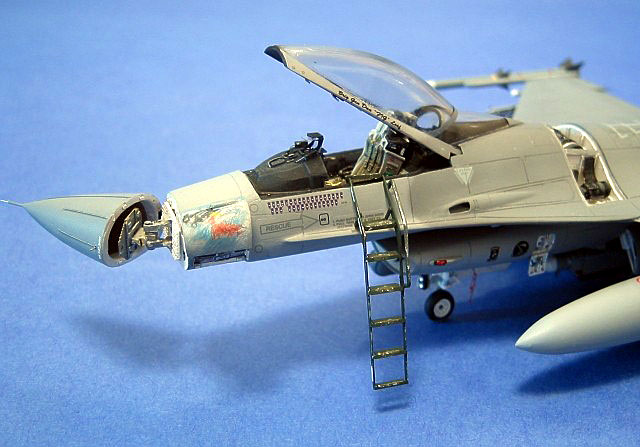
Czech Master Detail Set
The Czech Master details are
released in two sets--an interior and an exterior--and while finely
detailed and cast they are not without problems. To start with, the
cockpit detailing bears no resemblance to any F-16 I’ve seen. The
instrument panel is woefully inaccurate and, I know this is 1/72nd scale,
but other manufacturers get it right. The cannon bay is very good and
accurate enough for me. The radar is almost right and can easily be
modified to represent the current collection of black boxes carried by the
F-16. The exterior is better, with the “Big Mouth” intake, main landing
gear bay and engine exhaust all detailed (although the main gear bay shows
the battery in the wrong position and the green liquid Halon tank is
missing altogether). You also get dropped flaps, offset rudder, and
various wheel and nose door options, which I did not use.
Eduard Photo-Etched Set
The Eduard set is one of
their most impressive. With three brass frets, one acetate, one printed
piece and seven sides of instructions it is a truly comprehensive set. It
is one of the recent “pre-painted” sets, with colours screen-printed onto
the brass. This is a very impressive achievement, but to my eye a bit of a
waste. The cockpit side panels and instrument panel look little better
than decals.
Construction is pretty
straight forward and I won’t bore you with all the details. Instead I’ll
highlight a few of the things that I did.
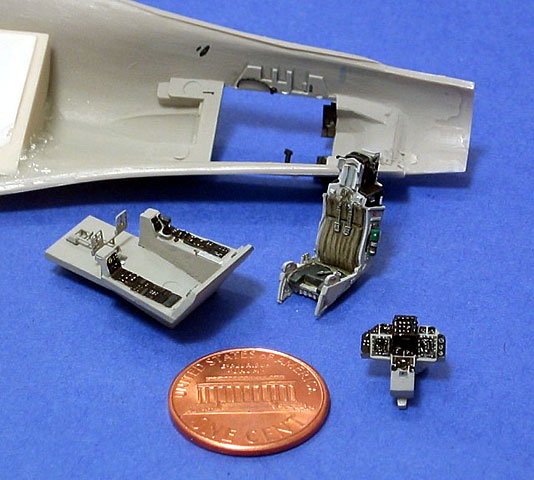
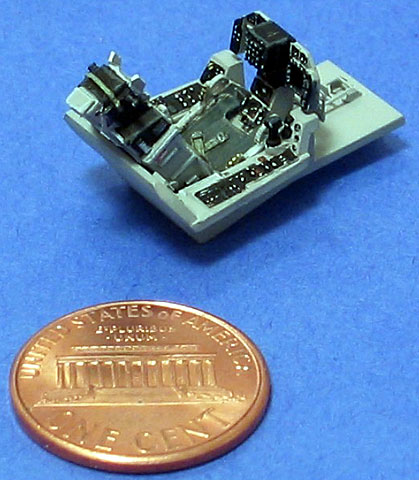
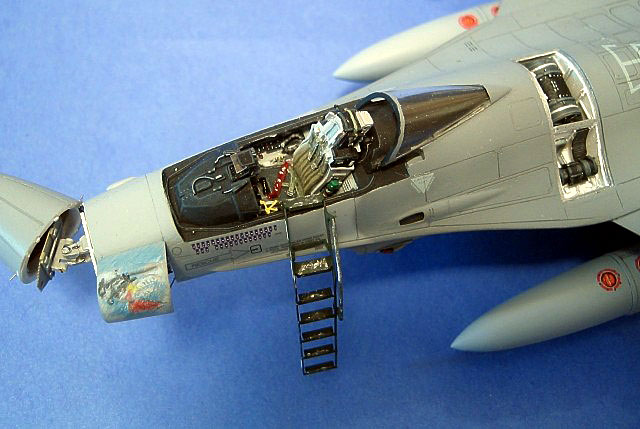
Most of the cockpit is
scratch-built. I used the tub from the Hasegawa kit, and fabricated all
the instrument and control panels from styrene. The seat is a Neomega item
with modified cushions and Eduard ejection handles, who also provide the
rudder pedals. I painted the cockpit with Humbrol enamels and did all the
detail painting with the excellent paints from Vallejo.
Both Hasegawa and Czech Master get the rear cockpit bulkhead wrong. It
should be vertical, not sloping to match the rear of the seat. I only
discovered this error when the cockpit was finished and decided to let it
go. The Revell kit is correct in this area.
Click the thumbnails below to view larger
images:
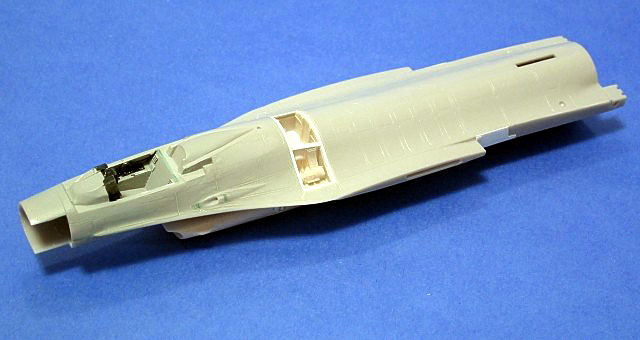
Before joining the fuselage
halves, I submitted the kit to some major surgery, including the removal
of the nose for the radar, the opening of the cannon bay, and removal of
the speed brakes. I also modified the cannon nozzle to better represent
the current configuration, added the Radar Absorbent Material panels to
the area between the flaps and the fuselage, and rebuilt the instrument
coaming, an area I feel that Hasegawa got completely wrong, it being too
small.
Moving to the underside of the fuselage, I used CMK’s intake and main
wheel bay, detailed with Eduard parts. I also removed the arrestor hook
detail, planning to show the hook lowered.
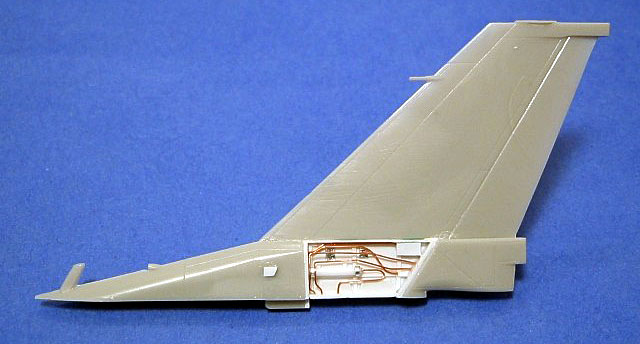
I couldn’t resist adding hydraulic details to the tail (there are far too
many detail photos in the Danny Coremans’ book not to use), so a couple of
hours with some styrene and copper wire, and here is what I produced.
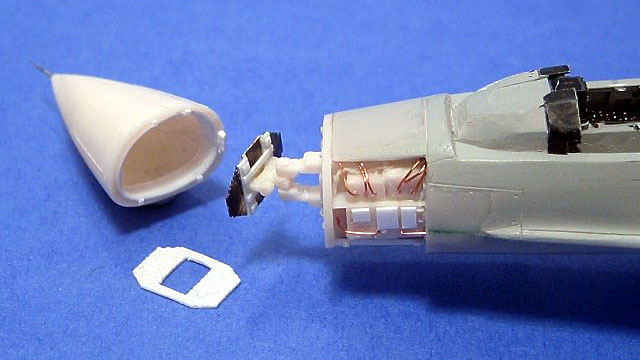
The CMK radar details are pretty good, but I didn’t think they truly
represented the real thing. Again using styrene and copper wire I modified
the parts, and built a new interior for the CMK nosecone, a new rear for
the radar panel and scratch-built the egg-crated RAM panel to sit in front
of the bulkhead. I did this by scoring a cross hatch pattern onto styrene
then cutting out the panel.
Click the thumbnails below to view larger
images:
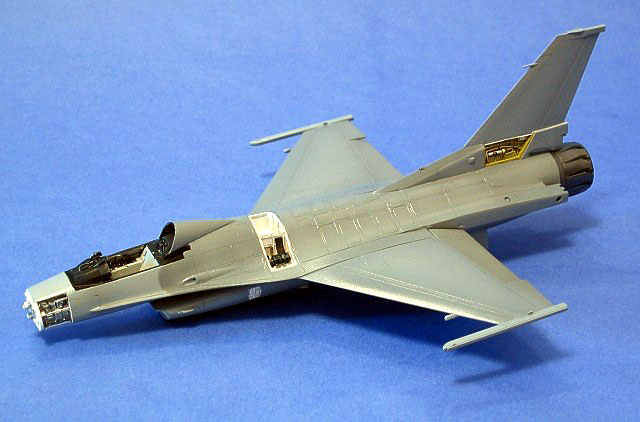
Moving on, I attached the
wings to the fuselage, drooped the flaps, and painted the interiors of the
radar, hydraulic and cannon bay. I also added the exhaust. (I further
detailed the coaming and used the canopy seal from Eduard.) During the
final push to get the fuselage ready for painting, I added various
intakes, exhausts, and from the Eduard set the plates that were
retrofitted to F-16s to strengthen the fuselage.
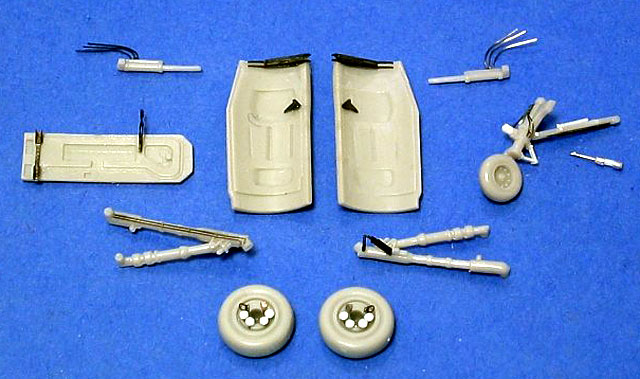
Other Details
During the construction of
the fuselage, work continued on other details, including the
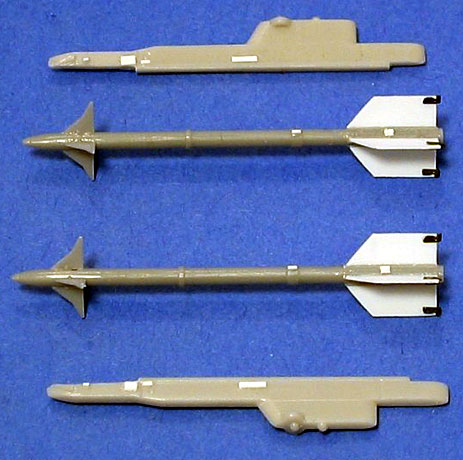
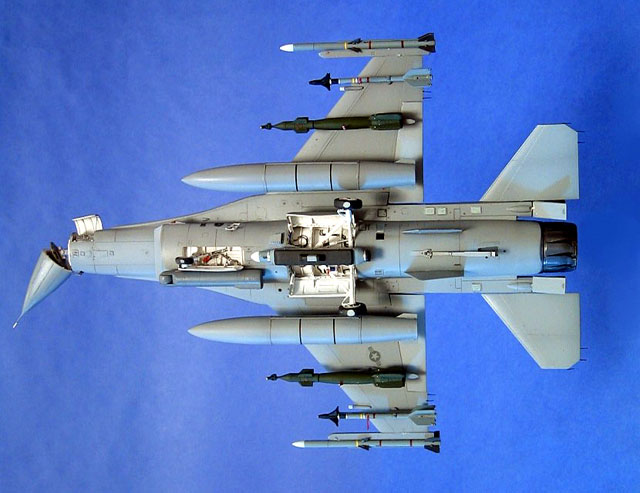
undercarriage, using Eduard parts. The under-wing pylons and stores, which
came from various Hasegawa weapons sets, were detailed and the fins
replaced with styrene. I also drooped the seeker heads of the laser-guided
bombs to represent how they look on the ground.
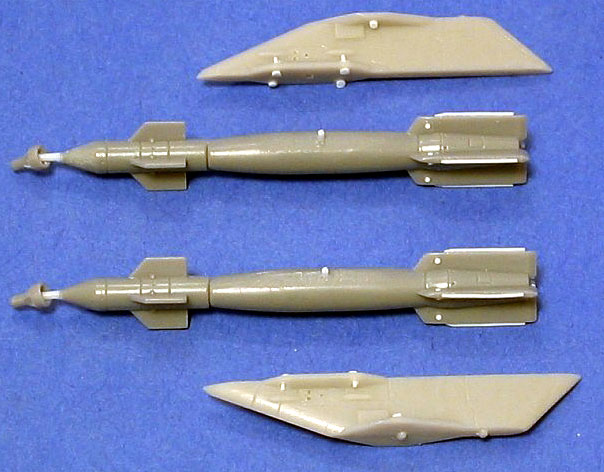
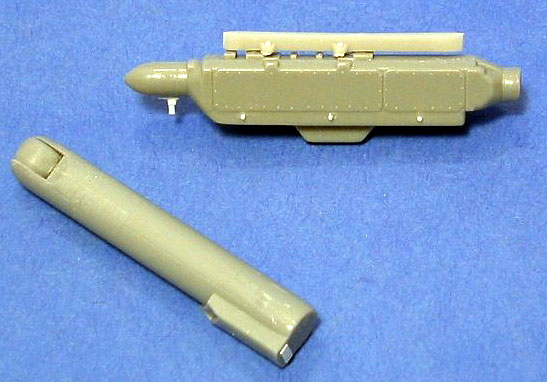
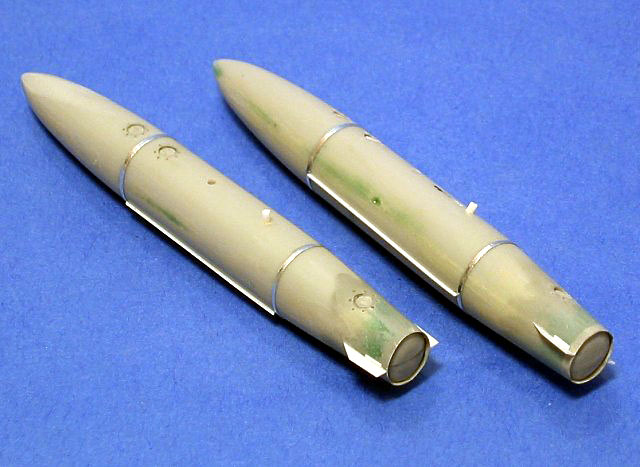
The most involved job on the
stores was the modifying and detailing of the kit-supplied drop tanks. I
added domed rear faces, the flange that curves around them, the
strengthening plates and new fuel filler caps.
Click the thumbnails below to view larger
images:
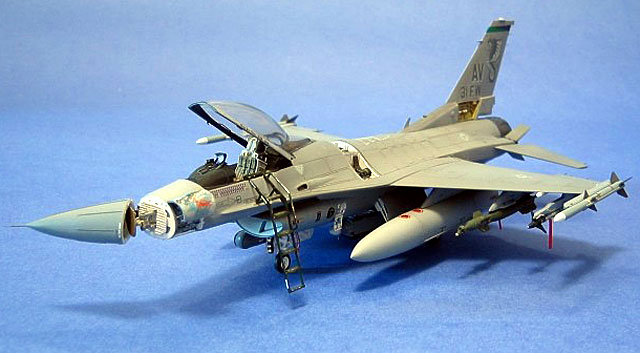
I decided to
show the speed brakes open. For this I used the Eduard parts with
scratch-built petals and hydraulic rams. During the building of these I
managed to lose both the actuator arms.
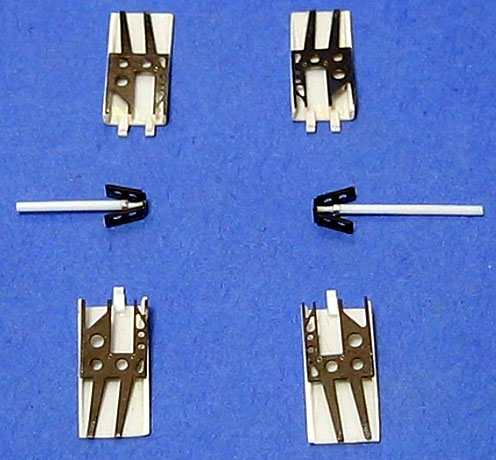
A quick plea
for help on the Hyperscale forum was answered by Roger Fabrocini, who was
kind enough to send me the two from his set. Thank you so much, Roger.
Before painting the main
camouflage colours, I sprayed the engine exhaust with Humbrol Metalcote
polished Steel, then when dry I polished the petals with a tiny amount of
aluminium powder from SNJ. Over this I applied the black decals provided
in the Daco decal sheet, and gave the whole exhaust a covering of Future
floor polish. This was then masked for the main painting.
 This
was the first time I finished a model using acrylics. Previously I had
always used either Xtracolor or Humbrol. I painted this model using Gunze
Sangyo, and have to say I was greatly impressed by its ease of use,
coverage, and drying speed. This
was the first time I finished a model using acrylics. Previously I had
always used either Xtracolor or Humbrol. I painted this model using Gunze
Sangyo, and have to say I was greatly impressed by its ease of use,
coverage, and drying speed.
I lightened the colours with about 20% white, for scale effect. When the
base colours were applied I sprayed over the centre of the panels with a
further lightened and much-thinned colour to break up the flatness and
give the colour a bit of depth. When dry the whole model was given a coat
of Gunze’s clear gloss for decaling. (I know that the paint is already
semi-gloss, but I fear decal silvering.)
To build the plane I wanted, I used the Daco Decals sheet. The research
that Danny puts into these is phenomenal. Two problems, though. Firstly,
the decal sheet doesn’t include nose art, which I remedied by drawing on
the model with coloured pencils. (The original was drawn with wax crayons
so coloured pencils worked quite well.) Secondly, the decals are printed
by Cartograph, and while the printing is superb, I found it difficult to
get them to adhere to the surface. (I read Randy Lutz’s article on his
Catalina, and agree with his assessment of Cartograph’s decals.)
Click the thumbnails below to view larger
images:
After finally getting the
decals to adhere, I airbrushed the entire model with another coat of
gloss, then a top coat of matte. I left this to dry, then using a
mechanical pencil with a 1H lead drew in the panel lines. I also used a
little dark grey pastel to show the graphite oil that streams back from
the wing slats. I tried to keep the weathering to a minimum. When finished
I sealed it all in with another coat of matte varnish. Then on with final
assembly.
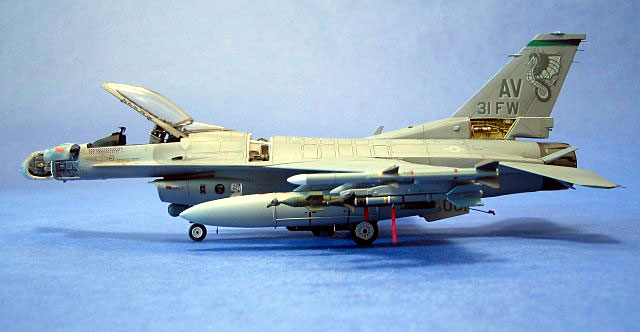
With everything painted, it
was time for final assembly, which was as straightforward as it was
enjoyable. I included the RBF tags from Verlinden, and a ladder from PP
Aeroparts (now there’s a name not often mentioned).
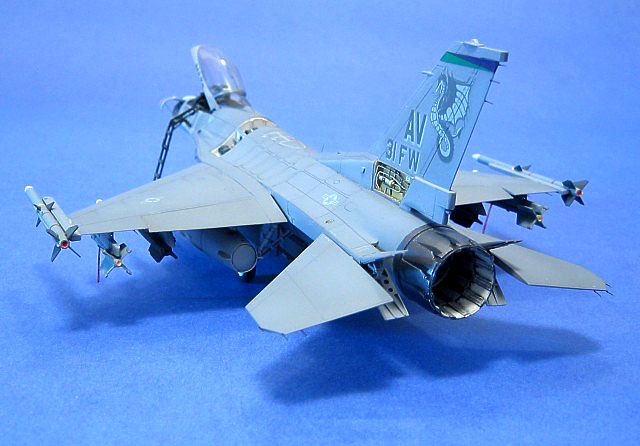
On the whole, this F-16 was
a very enjoyable model to build.
I could give a list of all
the references with which I started, including the Verlinden Lock On, the
Walk-around, and various other books and magazine articles. But as the
project progressed I relied mostly on one book, Uncovering the F-16 by
Danny Coremans and Nico Deboeck. I cannot praise the book enough. I found
one other book useful: Aviano by D. Mattiuzzo, F. Smith and M.Torcoli.
This little book provides a fascinating picture of Aviano during this
period.
Click the thumbnails below to view larger
images:
Model, Images and Text Copyright ©
2003 by Adrian Davies
Page Created 05 August, 2003
Last Updated
17 March, 2004
Back to
HyperScale Main Page |
 Home |
What's New |
Features |
Gallery |
Reviews |
Reference |
Forum |
Search
Home |
What's New |
Features |
Gallery |
Reviews |
Reference |
Forum |
Search