Squadron
This is another prototype model for the collector's toy company.
During the month of May (2002), I had to complete no less than three
1/48th scale F-4 Phantoms. Luckily, the versions they wanted were
readily available and easy enough to build. This model was number two in
the May Phantom Phrenzy.
I am going to state this early. I live in the US, and for me, the
Phantom FGR Mk.2 is an F-4M Phantom II. With respect and appologies to
all the British out there, I find the British system of aircraft
designations to be archaic. For the remainder of this posting, I will be
referring to this model as an F-4M Phantom II, even though I know it is
more accurate to refer to as a Phantom FGR Mk.2.
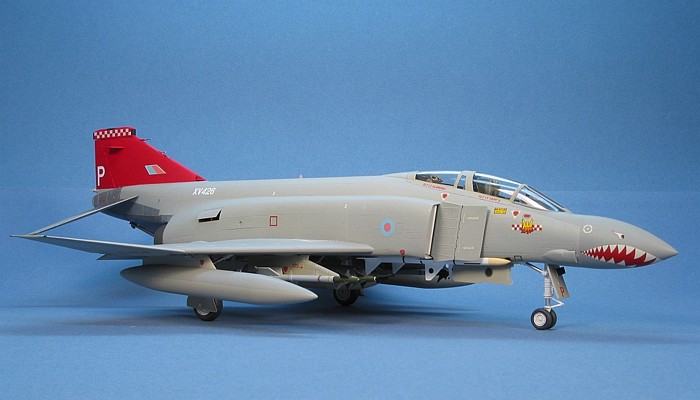
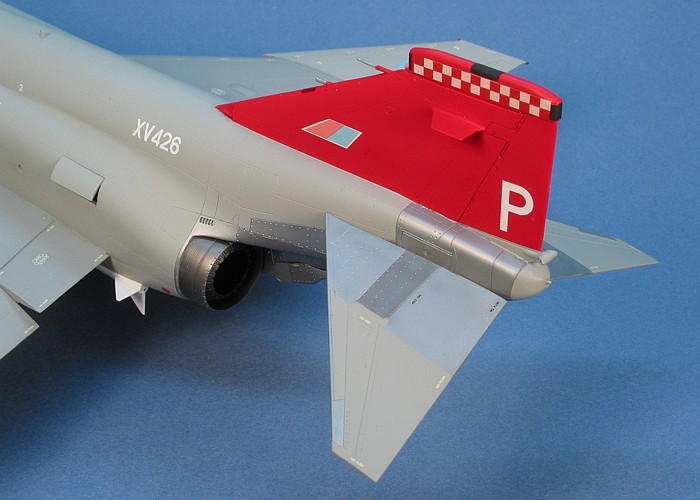
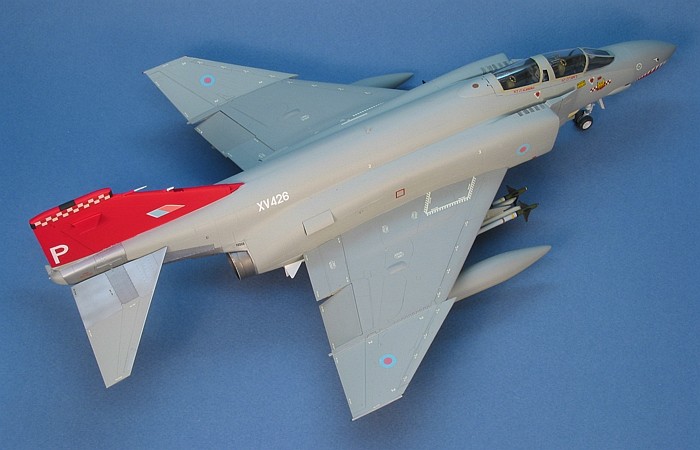
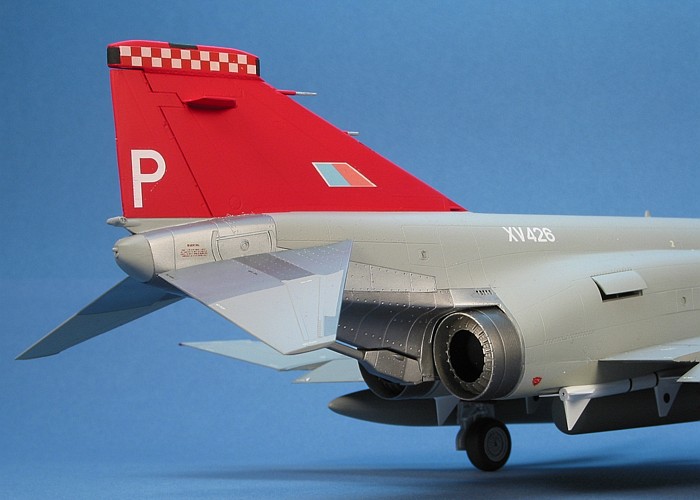
At the end of the line, the RAF started to come up with lots of colorful
(colourful?) Phantoms. 56 Squadron was no exception. For the units
retirement of the Phantom, they painted the tails of every aircraft in
the unit in red. Then they selectively picked aircraft letters and lined
the aircraft up on the phlight line so the aircraft tails spelled
"PHOENIX SQN". It made for a great photograph.
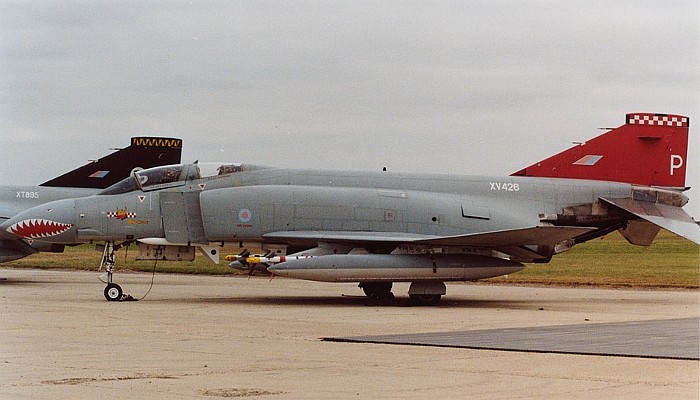
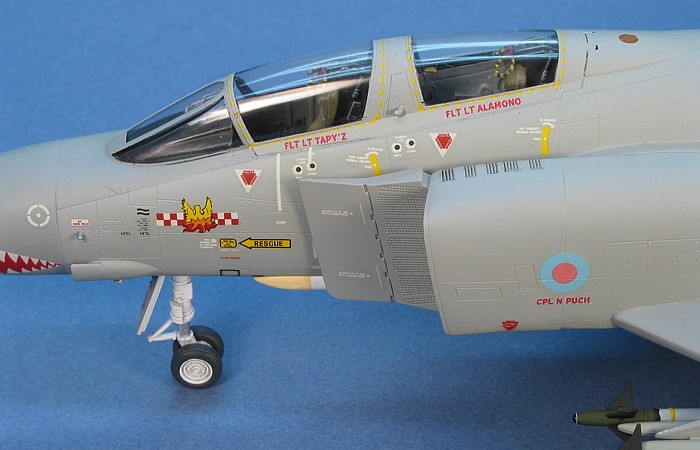
The aircraft in this posting was the "P" in "Phoenix". It was one of
a few aircraft in 56 Squadron to get a shark's mouth, although for the
actual retirement, I do not belive the mouth was applied. With the
permission of
http://www.f4phantoms.co.uk , I have a couple pictures that show the
aircraft in the exact marking the toy company wanted. I built my model
according to those pictures.
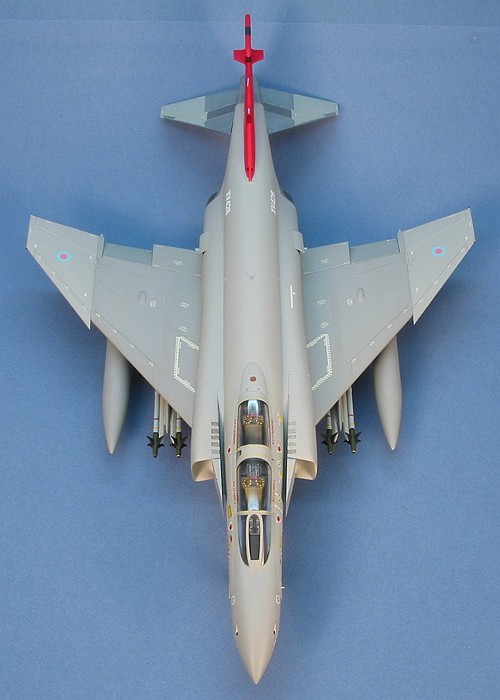
Hasegawa's British
Phantoms
|
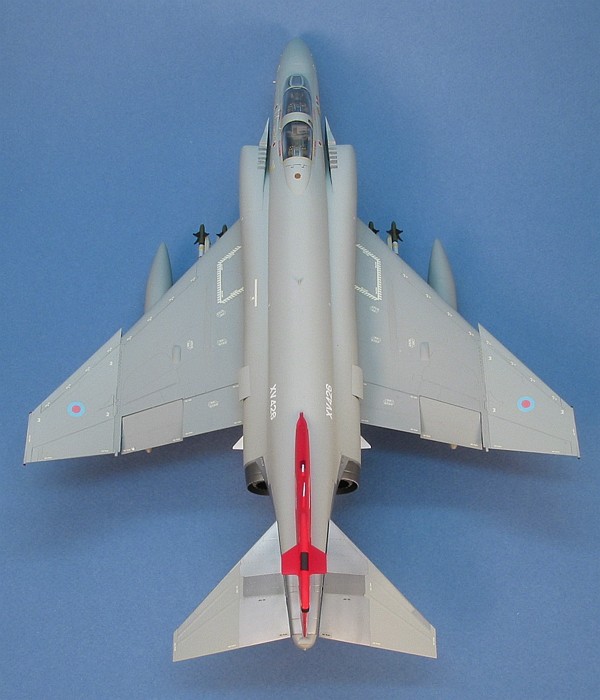
The is the Hasegawa Phantom FGR Mk.2 (F-4M Phantom II), kit number
07016 (P016). It is built right out of the box with no changes. For
years I had wanted to build a British Phantom, but I had not taken the
time to do it. I finally had a reason for it, so I dived in head first.
I concluded that the British Phantoms kits are probably the best
detailed and best engineered Phantom kits of all the Hasegawa Phantoms.
They are also, technically, different kits from the rest of the
non-British Phantoms. Besides the obvious airframe updates to make an
accurate British Phantom (which Hasegawa executes wonderfully), they
re-used the assorted parts tree letters that are assigned in the other
Phantom kits. The British Phantoms share the detail parts trees "D",
"E", and "F" with the other Phantom kits, but all the other trees are
completely different from the same lettered trees in the other Phantom
kits.

I was working on this F-4M at the same time as an F-4J kit (see my
"ShowTime 100" posting), so I was able to do a lot of cross
comparisons between the kits as I progressed through their construction.
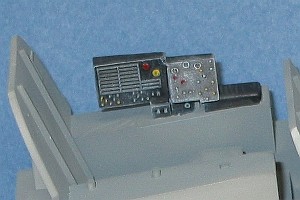
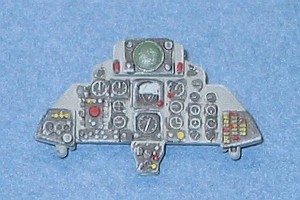
The British Phantom kits have fully engraved scribing, raised cockpit
detailing, drooped ailerons, and nicely molded engine exhuasts. The
cockpit detailing is actually better done then the retooled Hasegawa
F-4J kits.
Hasegawa started adding a lot of slightly raised panels on the F-4J kit.
They are not overdone (like on the Tamiya 1/32nd scale Phantoms), but
they are not really right. The F-4M kit has none of these. The surface
scribing is top notch. The bulges in the center of the upper wings are
correctly shaped (unlike the F-4J kit).
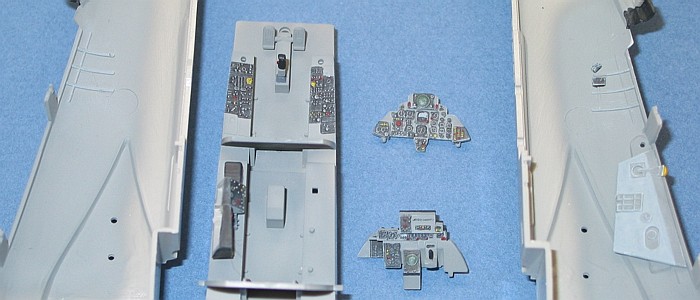
I started the project by assembling the cockpit, cleaning up all the
major airframe pieces, and assembling the wings in the first night. The
next night I painted the cockpit interior, painted the engine intake
interiors, and assembled the fuselage. On the third night I attached the
engine intakes and wings. With twenty minutes of attention to the seams,
I was ready to start camouflage painting. Yes, it is really that nice a
kit.
The horizontal tails are correct for the F-4M and have no leading
edge slots. As a side note, the F-4K kits are correct in providing a
slotted horizontal tail. There are reinforcing panels on the horizontal
tails that are unique to British Phantoms. Where US Phantoms have the
arrow-head reinforcing panels in the center of the tails, the British
Phantoms use reinforcing strips that run out the length of the tail
along the two main tail spars.
The engine exhausts and the fuselage paneling around the exhausts is a
thing of beauty. With a little metalizer on the surfaces, this area
really captures the feel of Rolls Royce engines and the look of the
British Phantoms.
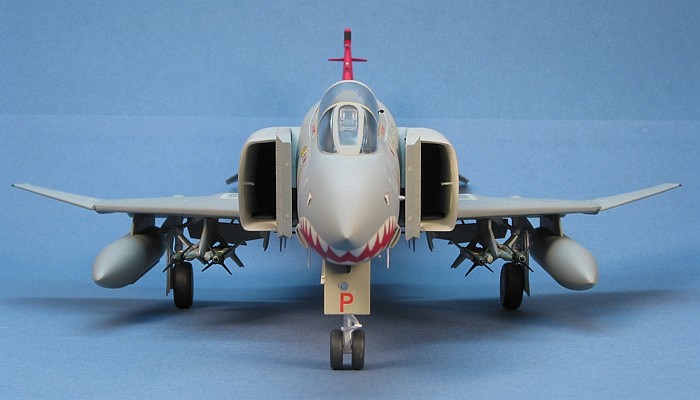
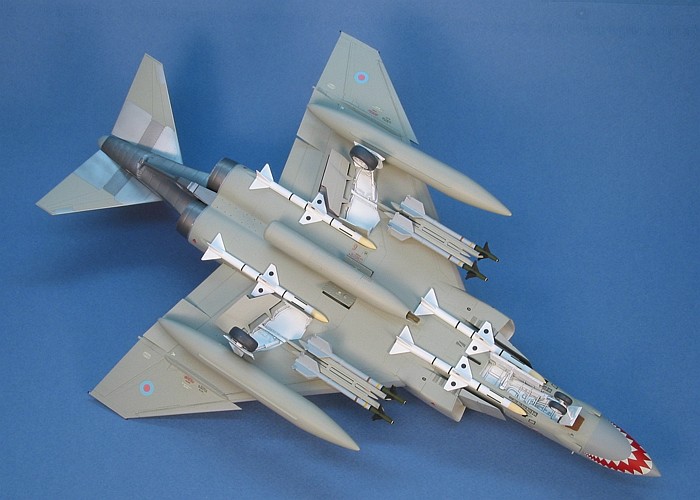
The weapons in the F-4M kit are similar to the F-4J with four
Sparrow/Sky Flash missiles. There are no Sidewinder missiles, and the
instruction sheet tells you to go buy the Hasegawa Weapons Set "C" to
obtain Sidewinder missiles. Since the British Phantoms were updated late
in their service careers to use AIM-9L Sidewinders, I chose to use a set
of four AIM-9L Sidewinder missiles that I liberated from an old Monogram
F-15 kit.
Additionally, the F-4M kit provides the British-style SUU-23A gun pod
frequently seen mounted on the centerline weapons pylon. There is also a
British-style reconnaissance pod for the centerline weapons pylon. These
two additional options are welcome additions to the kit as it is
unlikely to have either of these provided in any other places. I chose
to use the gun pod on my model.
There are a number of minor detail pieces in the kit. One that the
instruction sheet actually tells you to ignore for this kit looks to be
the left side periscope. Late in their service, most all British
Phantoms were updated to include this periscope on the left side so that
the Guy-In-Back (GIB) could have some forward view. I am unsure exactly
for what purpose the GIB used the periscope. As British Phantoms do not
have flight controls in the rear cockpit, the periscope was not used to
fly the aircraft. It is nice that Hasegawa chose to provide this detail.
As the aircraft I was building had the periscope, I attached it in place
on the left side of the canopy.
Colors
I painted the exterior camouflage using Humbrol enamel paints.
Surprise! I bet you thought I was going to say Testor's Model Master.
Sorry, Testor does not make these colors in their Model Master line.
 I
did use the Model Master paints and metalizers for every other
color on the model, though.
I
did use the Model Master paints and metalizers for every other
color on the model, though.
The camouflage colors are Medium Sea Gray (BS381C/637), Barley Gray
(BS4800/18B21), and Light Aircraft Gray (BS381C/627). These are Humbrol
colors 164, 165, and 166. I had squirreled away these colors some years
ago to wait for finally doing a British Phantom. In the intervening
years, the Light Aircraft Gray had thickened up to the point of being
un-usable. This is not the thing to find out when working on a time
limit. I was able to secure a new tin of this color from a friend
(thanks Buzz) and keep the project on track with no interruption.
On painting the model, the Light Aircraft Gray seemed way too dark as
compared to the other two colors. Hence, I cut the Light Aircraft Gray
with white in a 50:50 mixture. It still seemed too dark, but I was not
going to mess around any more with it.
The engine exhaust area is painted in two shades of metalizers. I
started with a base coating of Steel, then applied Magnesium to the
panels immediately behind the engine exhausts and to the center panels
on the horizontal tails. After a consultation with the toy company, they
relayed that no weathering should be done to the model. Hence, the
exhaust area was not blackened.
Markings
 The
Hasegawa kit decals come with markings and full data for a shark-mouth
56 Squadron F-4M Phantom, aircraft letter "Y". The only trouble was that
I needed to build aircraft letter "P" in the retirement scheme where the
whole vertical tail was painted red. While most of the needed markings
were in the kit, the white aircraft letter on the tail, the red letter
on the nose wheel well door, and the white aircraft serial number all
needed to be found. This sent me off to create some custom markings for
the model. The image to the right shows my original artwork for the
decals (reduced in size to save space).
The
Hasegawa kit decals come with markings and full data for a shark-mouth
56 Squadron F-4M Phantom, aircraft letter "Y". The only trouble was that
I needed to build aircraft letter "P" in the retirement scheme where the
whole vertical tail was painted red. While most of the needed markings
were in the kit, the white aircraft letter on the tail, the red letter
on the nose wheel well door, and the white aircraft serial number all
needed to be found. This sent me off to create some custom markings for
the model. The image to the right shows my original artwork for the
decals (reduced in size to save space).
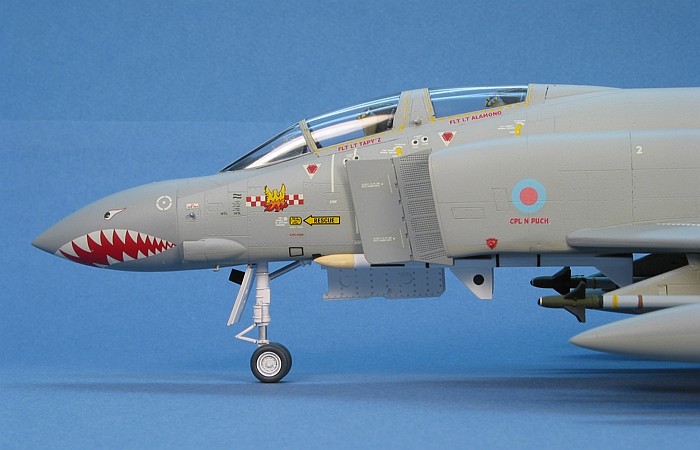
While I was at it, I also created a couple other markings that I needed
to make the job easier. A search of the Internet provided a couple
pictures of the exact aircraft in the markings I was building. From
these pictures, I was able to get the pilots' names and the crew chief's
name. I also created a set of "spots" to apply to the forward fins of
the Sky Flash missiles. The large trapazoidal blocks are backgrounds for
the vertical fin flash. The pictures showed this flash had a thin white
cheat line around its borders. Making a white block just slightly larger
than the fin flash in the kit decals allowed me to give that decal a
white border without having to reproduce the whole marking.
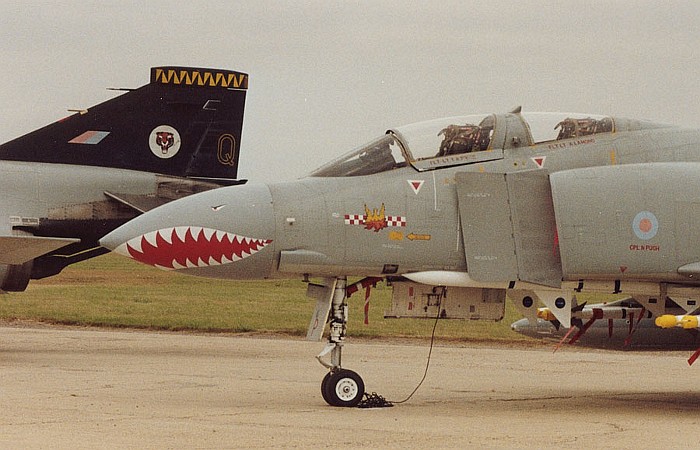
One modification of the kit decals was made for the shark's mouth on the
nose. Several 56 Squadron Phantoms had this mouth applied in a couple
styles. The kit decals provide a style with a thin black cheat line
around the edges. The aircraft I was building did not have the black
trimming. Hence, I carefully cut away the black border on the mouth
prior to applying the decal to the nose.
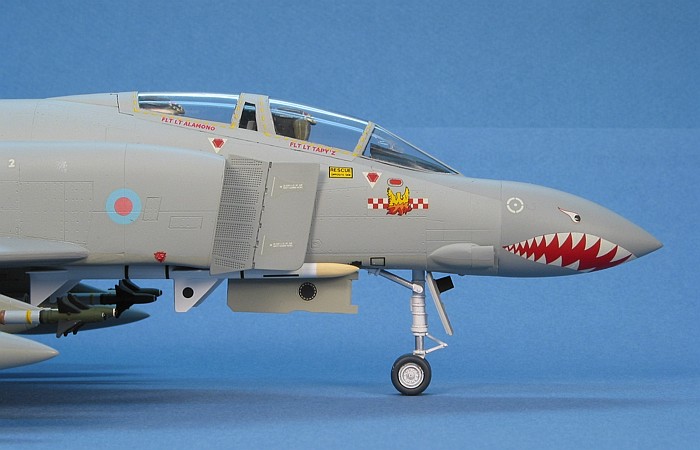
I used Solv-a-set as a setting solution for the decals. I had no
silvering of the Hasegawa decals, and the shark's mouth actually was
made to conform to the compound curve of the nose without having to cut
any relief slits in its edges.
For weathering, as I mentioned earlier, the toy company had instructed
me to not do any. I used my typical style of thinned down enamel paint
washes and only highlighted the edges of the control surfaces. I also
applied a light black-wash to the landing gear. I left the rest of the
model otherwise clean and un-weathered.
British Phantoms are cool! There is a subtle bulkiness to their lines
that is a result of the airframe changes needed to install the Rolls
Royce Spey engines. This gives the airframes a different feel from their
leaner cousins in the US. I will definitely need to build another
British Phantom in the near future to add to my permanent collection.
|
Additional Images and Project
Summary |
Click the
thumbnails below to view images full-sized.
Click the "Back" arrow on your browser to return to this page.
|
|
|
Project Statistics |
|
Completion
Date: |
18 May, 2002 |
|
Total Building
Time: |
30.4 |
|
Research: |
0.0 |
|
Construction: |
8.3 |
|
Painting
(includes creation and printing of custom decals): |
12.6 |
|
Decals /
Markings (includes creating and printing custom decals): |
9.5 |
|
Extra Detailing
/ Conversion: |
0.0 |
|
Model, Description and Images Copyright ©
2003 by David Aungst
 Home |
What's New |
Features |
Gallery |
Reviews |
Reference |
Forum |
Search
Home |
What's New |
Features |
Gallery |
Reviews |
Reference |
Forum |
Search