Squadron.com
The F-4 Phantom entered US Service in 1958 with the US Navy. In 1997,
39 years later, it was retired from the last US combat unit. During this
span of years in US Service, the Phantom participated in two different
"shooting conflicts", one in Vietnam and the other in Iraq. While the
Phantom got little chance to shoot down enemy aircraft in Iraq, it was
one of the premier fighters in Vietnam. F-4 Phantoms accounted for the
downing of over 180 North Vietnamese aircraft, most of which were MiGs.
The subject of this writing is a model of one of the Phantoms credited
with a MiG kill. On 10 May 1972, while flying escort for an attack on a
the North Vietnamese rail yards at Haiphong, this aircraft bagged a
MiG-17 "Fresco".
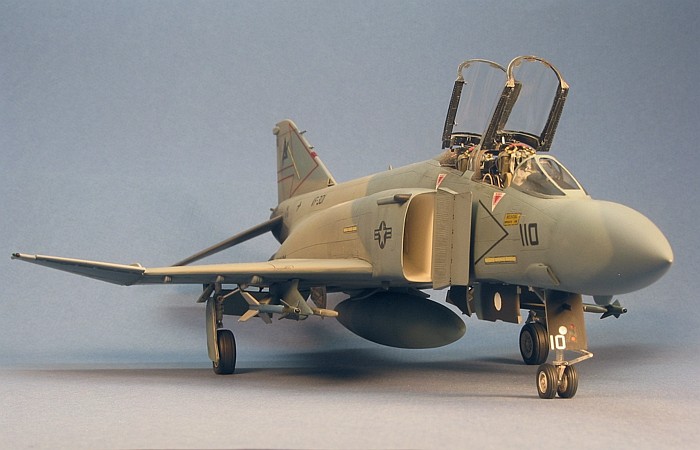
All things change with time, and this Phantom was no exception. In
1972 when this aircraft was victorious over its opponent, it was an F-4J
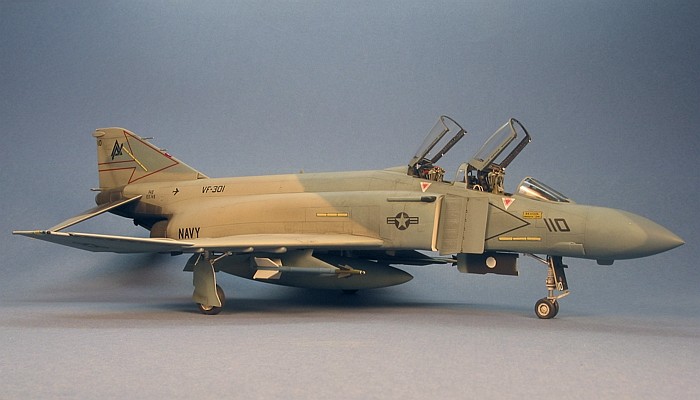
Phantom II painted in the bright unit colors of VF-96 and camouflaged in
Light Gull Gray with a White bottom. By 1983, the aircraft had undergone
an improvement upgrade to the F-4S standard and was now assigned
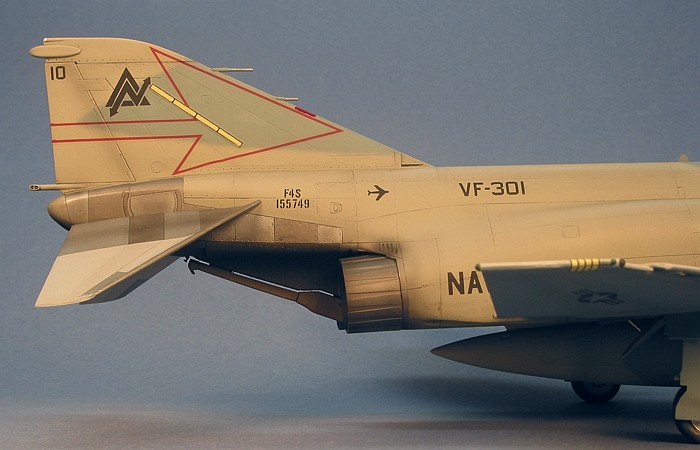
to VF-301 with much more subdued unit markings. Further, the camouflage
was changed to a low-visibility evaluation scheme known as the
Heater-Ferris scheme. Through all these changes, though, the
markings identifying this aircraft as a MiG Killer were preserved (in
one form or another). In 1983, the markings took the form of a black
MiG-17 silloette painted on the rear fuselage at the base of the
vertical tail.
Side Note: This is also the exact same
aircraft that came to a very public, flaming end at the 2002 NAS Point
Mugu Air Show. The aircraft seemed to develope a mechanical problem
following the routine break for landing that caused it to crash,
killing both crew members.
Because of the interesting paint scheme and that fact that the
aircraft was a MiG Killer, I had always wanted to build this aircraft.
When I was contacted over the Internet by someone wanting me to build
this exact aircraft, it did not take too much time for me to agree to
the job. I built this model as a contract job for this guy who then
presented the model to his father (who actually flew this aircraft with
VF-301 in the 1980s).
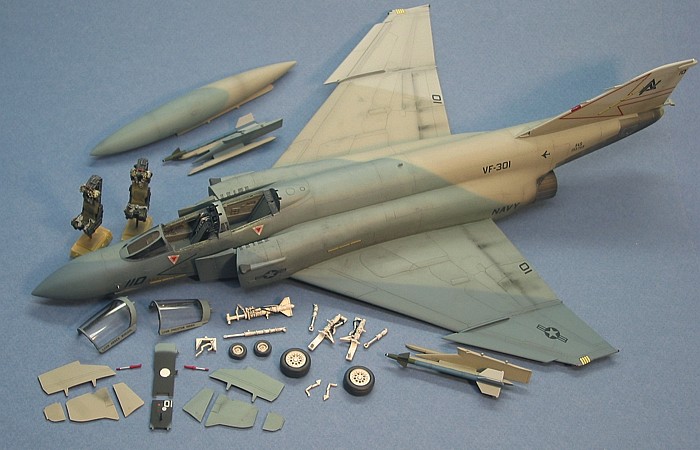
The kit was provided to me by the customer. The kit is one of the
Hasegaqwa "high-grade" kits for the Phantom, stock number CH010 /
51010. If you want to build a model of the F-4S Phantom, this is the kit
to get (I already owne six of them myself). The kit has the same basic
plastic components that all the Hasegawa F-4S kits contain. The
difference is in the extra goodies included only with the "high-grade"
release.
-
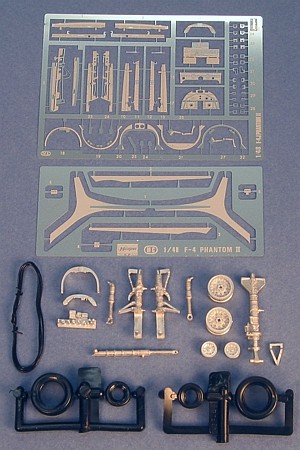 The first extra is a photo-etching set for the cockpit and canopy.
This is the best set for the Phantom out of all the photo-etching sets
from various the after-market companies (IMHO). It breaks down the
cockpit sills into segments that can be more easily fitted to the
cockpit, regardless of minor construction irregularities. It also
handles the canopies better with two etchings per canopy rail, built
up to better represent the bulk of the rail on the real aircraft.
The first extra is a photo-etching set for the cockpit and canopy.
This is the best set for the Phantom out of all the photo-etching sets
from various the after-market companies (IMHO). It breaks down the
cockpit sills into segments that can be more easily fitted to the
cockpit, regardless of minor construction irregularities. It also
handles the canopies better with two etchings per canopy rail, built
up to better represent the bulk of the rail on the real aircraft.
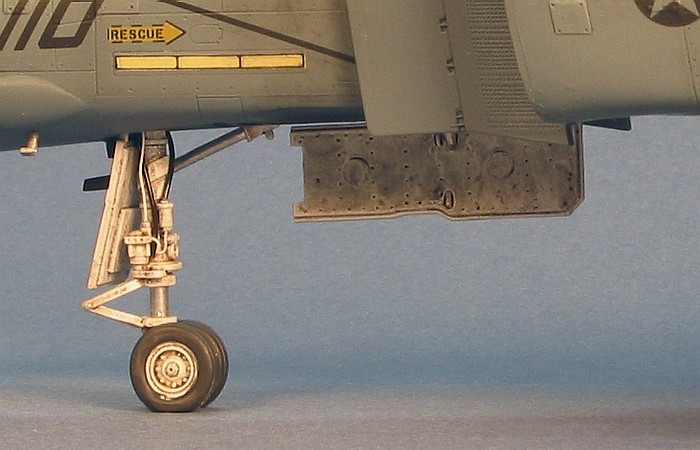
- The second extra is a set of white metal landing gear to replace
the kit plastic pieces. While the plastic pieces are not bad, these
white metal piece are very well done. All that is needed are a few
electrical and hydraulic lines and these landing gear pieces will
knock your socks off. Vinyl tires are provided with these landing gear
pieces, but I recommend ditching them and using some resin wheels from
either Cutting Edge or True Details. I've had bad
experiences with the vinyl tires on Phantom kits I have previously
built.
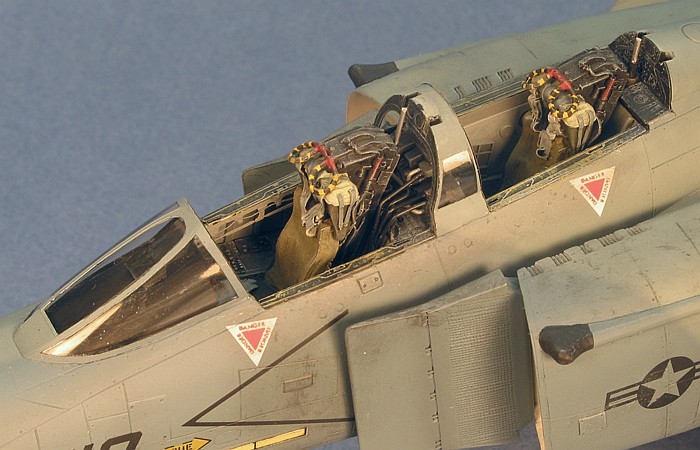
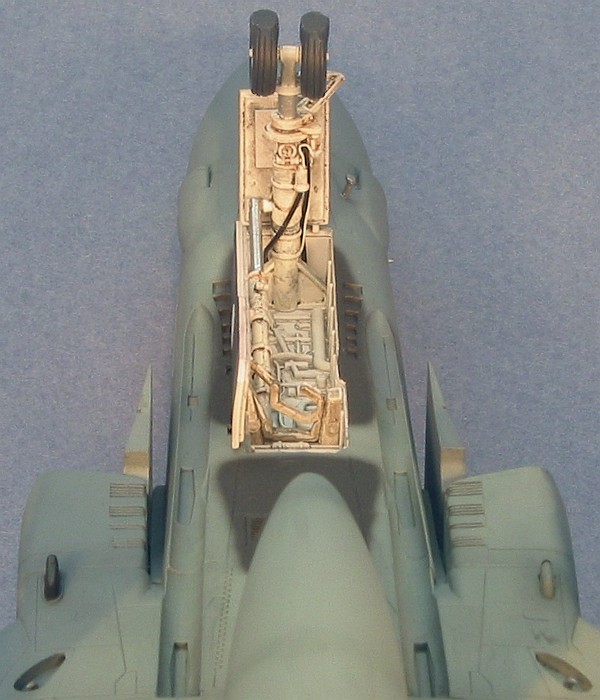
- The last "extra" pieces are a combination of white metal and vinyl
wire that are used to build up the "speghetti factory" that lives
between the two cockpits.
- There is also a second photo-etching set that comes in all the
F-4S kits which provides the reinforcing strap to attach to the belly
of the aircraft. Hasegawa only provides this in the F-4S kits,
but this strap is actually found on all slatted-wing F-4 Phantoms
(F-4E/F/G/S).
There are plenty of after-market detail sets to make even more
improvements in the kit, but these few items go a long way toward making
a better Phantom model right out of the box. In addition to using the
kit provided detail pieces, I also substituted some Verlinden
resin ejection seats for the kit-provided seats and a set of KMC
resin engine intakes with simulated ducting to fill the largely empty
engine intake areas.
I started the project by painting the cockpit. Even though I was
keeping a mostly out-of-the-box cockpit, I used my typical painting
techniques as outlined in my F-14 cockpit painting posting. The
following show the kit parts before painting, after painting, and after
assembly.
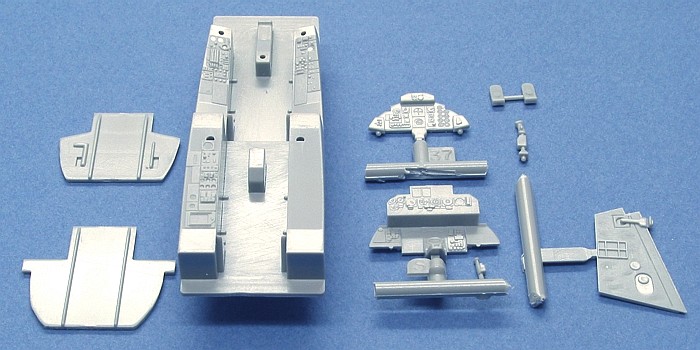
Cockpit Pieces - Unpainted |
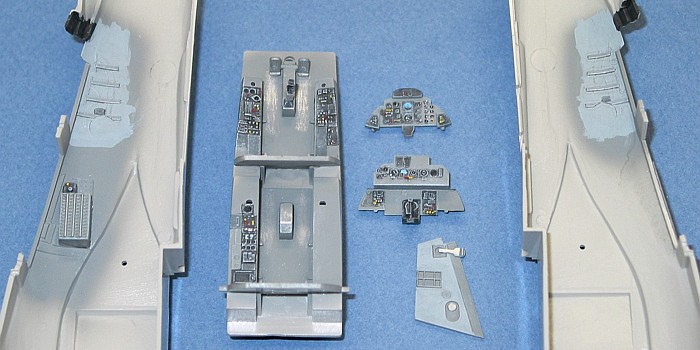
Cockpit Pieces - Painted |
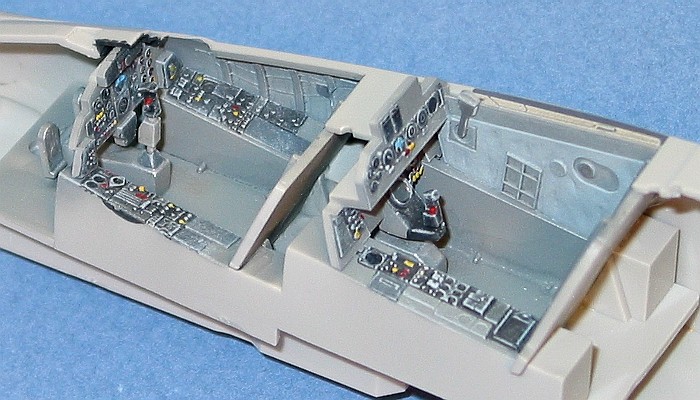
Cockpit Pieces - Assembled and Installed in Right
Fuselage Half |
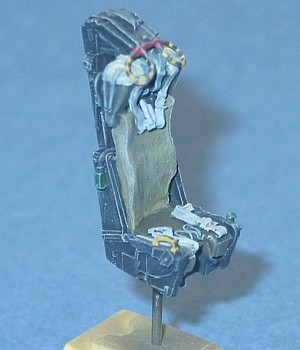
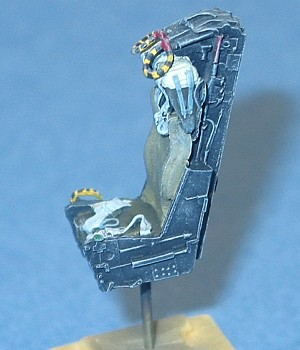
Completed Ejection Seat |
I was able to assemble the fuselage following the installation of the
cockpit. I left out the ejection seats and assorted etching pieces at
this time. I would add these near the end of the project.
The wings assembled easily. The kit provided wings are slatted, which
is correct for an F-4S. They are a hodge-podge of Air Force and Navy
characteristics, though. The assorted antenna blisters on the lower side
at the wing roots and behind the landing gear wells are Navy ECM gear.
The F-4E/F/G kit instructions say to cut them off. For the F-4S, they
are correct as is, so I left them alone.
The large bumps in the centers of the upper wing are reinforcing
plates applied to Navy aircraft to strengthen the landing gear so the
legs would not get driven up through the wing on a hard landing. They
are not correctly shaped, though, and needed to be refined. I gently
Dremeled them down to a more correct outline, then sanded them smooth
with sand paper. The images below show the bulges before and after
modification. For Air Force aircraft (F-4E/F/G), I would have completely
removed the bumps.
 |
 |
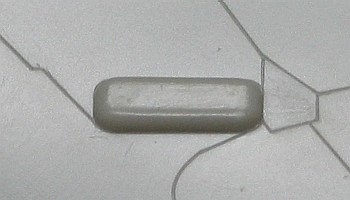
Kit Provided Mid-Wing Reinforcing Plate |
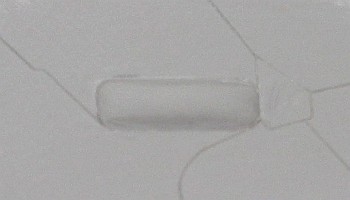
Corrected Mid-Wing Reinforcing Plate |
While all the bumps on the wings are Naval options, the slats on the
leading edges are the Air Force versions with the smaller cord slat
panels and the short-span wing fences at the wing fold line. The kit
does provide alternate wing fences that represent the long-span fences
found on the Naval slatted F-4 wing. I had to carve off the molded
short-span fences, then attach the alternate long-span fences.
I did not revise the slat panels, themselves, to be the longer cord
Naval style, instead keeping the kit provided Air Force style. Only a
true Phantom-ologist will note this variation, and the customer I was
building this model for wanted to control the costs.
With the fuselage and wings now assembled, I joined the two
sub-assemblies together to form the basic airframe. The model was
starting to look more like a Phantom. A few more items were attached to
the airframe like the tail tip and engine engine intakes, and I was
nearly ready for painting.
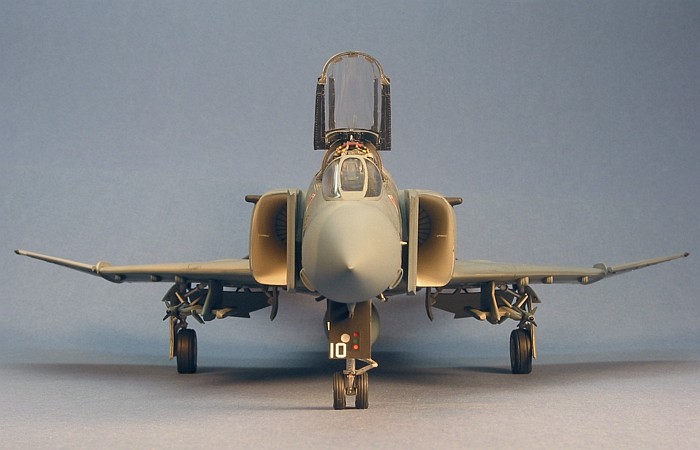
I cleaned up all the seams around the airframe (which are not many)
and painted the natural metal areas using several shades of metalizer. I
masked and painted the metalizer in a patch-work style to better
represent the look of the metal areas around the tail of the Phantom.
At this point, it was time for camouflage painting.
 I
used all Testors Model Master enamel paints for the camouflage.
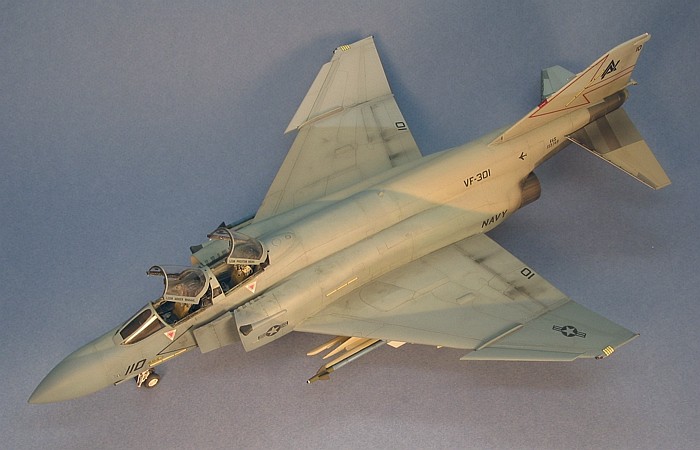
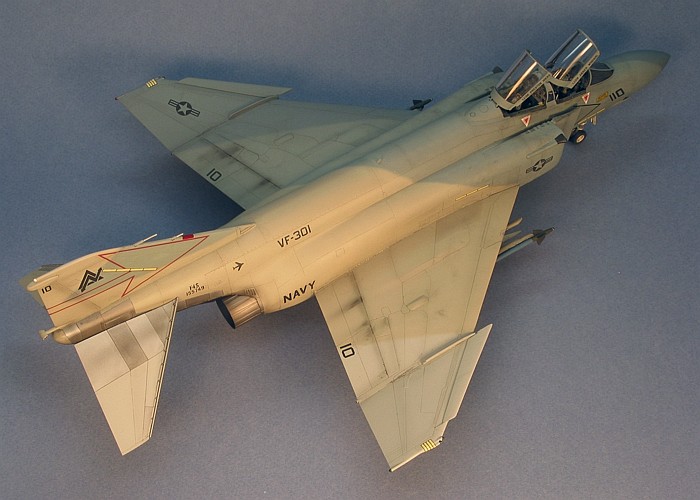
The camouflage colors of the Heater-Ferris scheme are
Intermediate Blue (F.S.35164), Graish Blue (F.S.35237), Light Sea Gray
(F.S.36307), and Light Ghost Gray (F.S.36375). The colors start with the
darkest color on the nose, extending out the left wing leading edge.
Then, progressively lighter shades are applied in a diagonal pattern,
ending with the lightest shade on the tail area and right wing outer
panels.
I
used all Testors Model Master enamel paints for the camouflage.
The camouflage colors of the Heater-Ferris scheme are
Intermediate Blue (F.S.35164), Graish Blue (F.S.35237), Light Sea Gray
(F.S.36307), and Light Ghost Gray (F.S.36375). The colors start with the
darkest color on the nose, extending out the left wing leading edge.
Then, progressively lighter shades are applied in a diagonal pattern,
ending with the lightest shade on the tail area and right wing outer
panels.
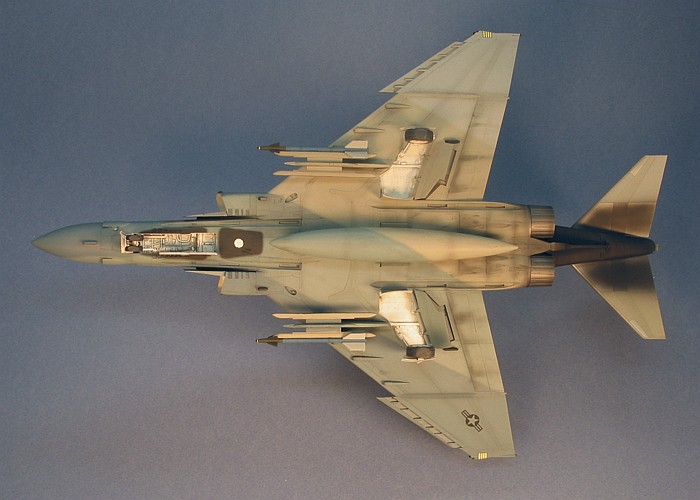
Of note is that the underside pattern is not mirror-imaged, which
complicates the nose camouflage pattern. Where the top pattern has the
left wing getting the dark leading edge, the bottom pattern has the
right wing getting the dark color. This makes for a strange interaction
in the patterns around the nose.
The Heater-Ferris scheme also has several standardized
variations. By mirror imaging the camouflage pattern from left diagonal
stripes to right diagonal stripes, a second version of the
Heater-Ferris scheme is created. Two more versions are created by
reversing the order of the colors in each of these first two versions,
placing the lighter colors on the nose and the darker colors on the
tail.
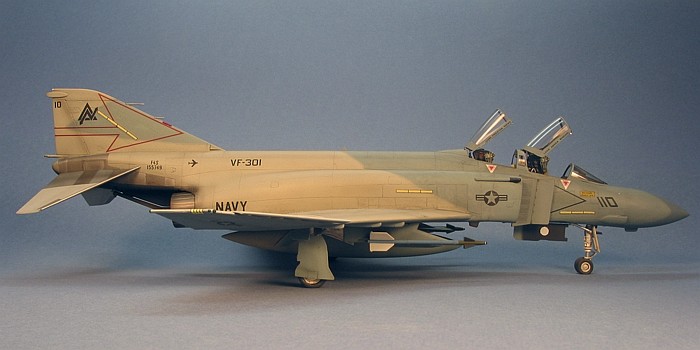
The version I painted here on my model was the final version applied
to all the VF-301 aircraft. VF-301 did briefly have two aircraft painted
in a version with light colored noses and dark tails, but these were
changed rather quickly to the scheme displayed here. VF-301's sister
unit, VF-302, also painted their aircraft in Heater-Ferris, but
they were not uniform about it and apparently had aircraft painted in
all four versions of the scheme. VF-302 also used low-visibility grey
markings on their aircraft, rather then the black markings used by
VF-301.
If you want to know more on this camouflage, there are two good
references discussing the VF-301 Phantoms painted in the
Heater-Ferris scheme. One is an old issue of FineScale Modeler
- Vol 10 / No 8, December 1992. The other is an old issue of Smoke
Trails - Vol 7 / No 1, Fall 1992. Smoke Trails is the
quarterly magazine published by the
F-4 Phantom II Society.
Decals to build Heater-Ferris camouflaged VF-301 aircraft are (were)
available on three decal sheets:
- SuperScale 48-218: This old SuperScale sheet
is the first sheet I am aware of for building VF-301 aircraft in the
Heater-Ferris camouflage. This sheet is an old issue, and it is not
too easy to come by anymore. It provides for a VF-301 aircraft
(ND-101) when they were testing the camouflage with the light colored
nose and dark tail. It suffers from questionable instructions with the
pattern draw incorrectly. It also prints the tail codes incorrectly in
mirror-imaged styles. This makes the right side tail codes backwards.
- Detail&Scale 0648: This is the second sheet for
Heater-Ferris VF-301 aircraft that I am aware of. This sheet provides
the exact markings for the MiG killer Phantom built in this posting.
This is the best of the sheets out there with mostly correct
instructions and the best matching decals to the markings seen in
pictures of the real aircraft. Notably correct on the sheet are the
national insignia which were painted onto the real aircraft using
disproportionate sizing. The decals duplicate these insignia quite
well.
Notably wrong on this sheet are two points in the instructions. First,
they got the two light colors of the camouflage (Light Sea Gray and
Light Ghost Gray) reversed in the painting diagrams. Second, they
state the nose wheel well doors are simply painted black. This is
incorrect. There is actually a false canopy on the underside of the
nose, which causes some areas (not all) of the nose wheel well doors
to be black. Pictures in the Detail&Scale Navy Phantoms volume
clearly show the false canopy, complete with a white spot
(representing a pilot's helmet) on both the large nose wheel door and
also under the fuselage behind the nose wheel well.
A picky point about this sheet is that it does not provide everything
you need for the aircraft. The instructions tell you to find your own
ejection seat triangles, but they make no mention of the correct size
or style for these triangles. They also tell you to find your own
formation tape light decals. I found all these easily in my almost
bottomless Phantom decal stash, but some modelers may not have these
available.
Still, this is the sheet I used to build the model in this posting.
The short-comings were not any big deal for me to fix.
- CAM 48-011: This is the third sheet for
Heater-Ferris VF-301 aircraft and which is the only one still readily
available. It provides for the same aircraft as found on the
Detail&Scale sheet. In fact, the CAM sheet is really just a
poor copy of the Detail&Scale sheet, complete with all the same
inaccuracies in the instructions. The "poor" part of the copy is that
they chose to clean up the national insignia and print them in proper
proportions, which is not correct for the aircraft in question. They
do provide nice formation tape lights (that even glow in the dark!),
but they do not mention that you need ejection seat triangles or show
were to place the included rescue markings.
In researching the aircraft, I found a person that was actually a
member of VF-301 who had 14 actual pictures of the real aircraft. This
enabled me to determine several things that had always annoyed me about
this aircraft. There are inconsistencies between pictures of the
aircraft that were hard to figure out. The facts that I gleaned out of
this person's pictures are as follows:
- The aircraft was painted into the Heater-Ferris scheme in
late 1982 or early 1983. Based on the markings locations drawn on the
instructions for the Detail&Scale decals, they are for the
aircraft as it appeared at this time.
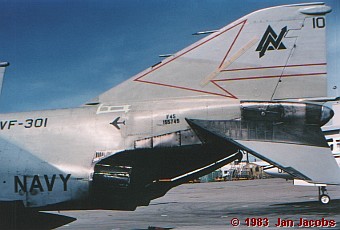
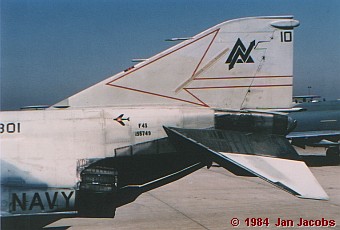
- Between May of 1983 and April of 1984, the aircraft was repainted
into the same camouflage and the markings were reapplied into subtly
(and not so subtly) different locations. The repainted camouflage
faded badly and by 1984 had numerous paint touch-ups applied in fresh
paint that no longer matched the faded colors. Note the differnces
between these two pictures. All the markings are in slightly different
locations and the line between the two light grays on the tail is
sustancially higher in the 1984 picture.
Knowing these things made better sense of the inconsistencies I had
seen before in pictures of the aircraft. The customer for this project
wanted the model to be clean and uniform in its finish. Thus, I modeled
the aircraft following the Detail&Scale instuctions for how the
aircraft looked in 1983. My only modification to the decal instructions
was the use of a full false canopy under the nose, not just the partial
false canopy draw in the diagrams.
For weathering, I used my typical style of thinned down enamel paint
washes and air brush shading. I finished the weathering with some dry
brushing to pop out the surface details. For a more complete discussion
of what I do to weather my models, see my posting on
"Weathering Aircraft".
With the major camouflage and markings complete, I turned my
attentions back to all the details needed to complete the model. Here is
where I usually spend the most time on any modern aircraft. While the
airframe will generally build up quickly, there are quite a few assorted
details to complete and attach in order to finish the project.
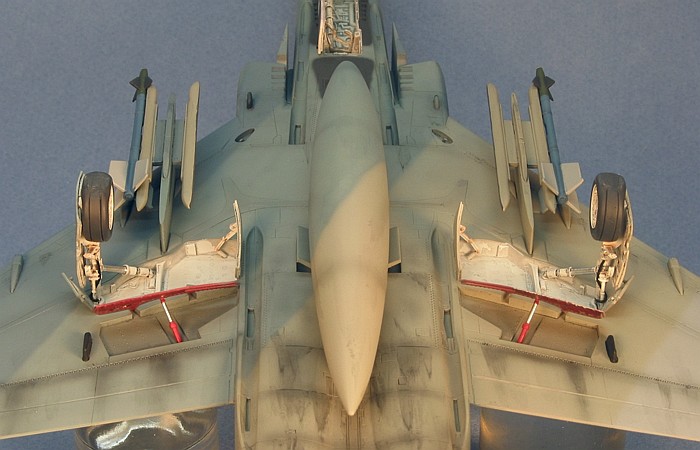
First on the list was the landing gear. I cleaned up any mold marks
on the white metal landing gear, then masked off the wheel wells on the
airframe. A coating of gloss white turned everything the right color. I
added some minor wiring details using pre-colored 1/24th
scale car ingnition wiring and weathered the pieces with some washes.
The landing gear attached with no difficulty, followed by attaching
the already painted wheel well doors (painted while I was doing the
airframe camouflage). I had a brief worry as I looked at my wheel well
doors and noticed that I had not yet painted the edges in red (I loath
this particular task). A quick check with a couple references showed
that this particular aircraft did not have red edges to the wheel well
doors (YEAH!). So, I moved forward with attaching the doors to the
landing gear and wheel well edges.
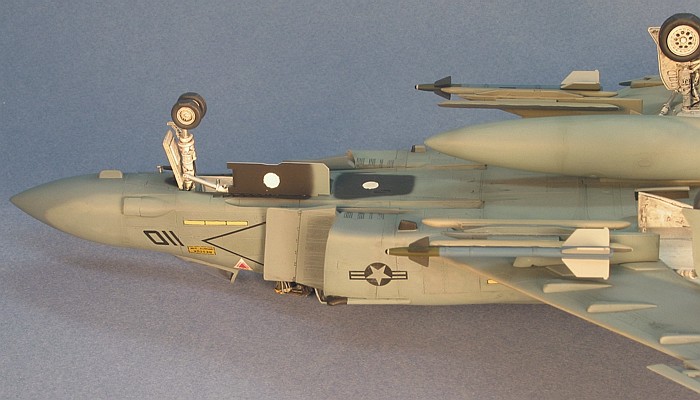
The weapons were next. The customer wanted a light practise loading,
typical of the non-wartime reserve status for the unit. I assembled the
centerline fuel tank and inboard wing pylons. Painting these in the
appropriate camouflage colors, I attached them in place. I then painted
up two of the kit-provided AIM-9D Sidewinders in practise round colors
and placed them onto the outboard missile rails for the inboard weapons
pylons.
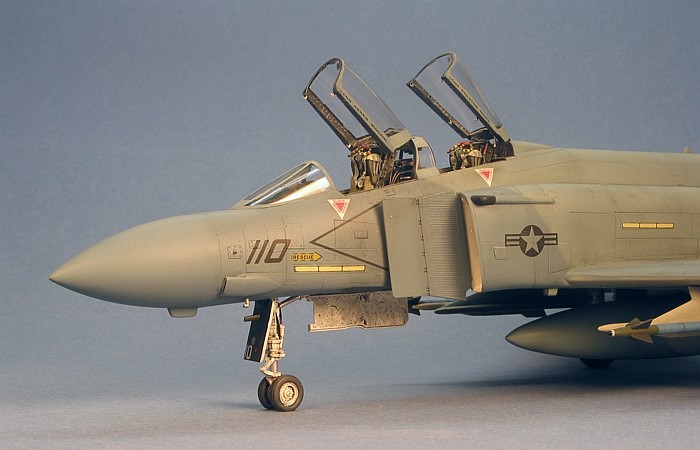
The last place I worked on was the cockpit area. The cockpit sills
and canopies get a lot of photo-etchings attached to them. I pre-painted
the etchings with Interior Black to save me from having to paint them
after attaching them. This made it so that I only had to touch up the
etchings after attachment without having to fully paint them after
attachment where the risk of getting unwanted paint on the clear parts
was great. I also attached some small strip styrene to the canopy trim
pieces so they would have something more substancial to which to be
attached. I used super glue to attach the etchings, using very small
amounts so as not to risk fogging the glass.
I completed the project with my usual last step, attaching the
canopies. I used window cleaner on a cotton swab to clean the canopies
before attaching them. The front canopy fits nicely with a positive
attachment. The attachment for the rear one is notoriously fragile. I
reinforced the rear canopy attachment with fine brass wire mounted into
holes I drilled in the upper rear cockpit molding. With the canopies
attached, I declared the project as complete.
This is a great kit. All the Hasegawa 1/48th
scale Phantom Phamily kits are good. Some have raised scribing, but most
are fully engraved. All of them build really well. If you want to add
extra detailing, there are lots of after-market goodies for these kits.
If you can get your hands on one, the "high-grade" Phantom kits include
really good extra parts as seen in this posting.
Being my favorite aircraft, I need to build more F-4 Phantoms that
will actually stay on my display shelves. I have built four of the
Hasegawa Phantom kits in just the last two years and none of them have
stayed with me ... ;o(
 Home |
What's New |
Features |
Gallery |
Reviews |
Reference |
Forum |
Search
Home |
What's New |
Features |
Gallery |
Reviews |
Reference |
Forum |
Search