|
F4U-1A Corsair
by Jeffrey Oliveira
|
|
|
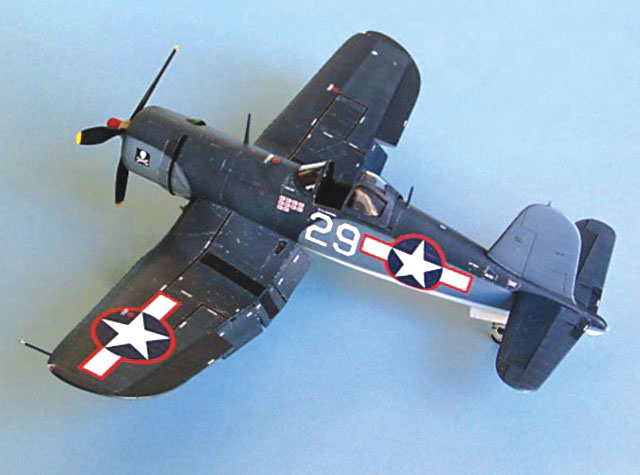
Chance-Vought F4U-1A
Corsair |

Revell's
1/32 scale F4U-1D Corsair is available online from Squadron.com
The history of the Corsair has been told and retold so many times
that you will all be familiar with it. Suffice to say this is the F4U-1A
version chosen for buildup because I liked the centerline bomb rack and
the excellent red bordered US national insignia from Techmod. This style
national insignia with the tri-color blue camouflage makes for a very
colorful model.
This project is based on the venerable Revell F4U-1 1/32 scale
Corsair kit H278 from 1970.
The Revell Corsair has many well known shortcomings. I knew that the
basic kit would need a massive overhaul to make something presentable.
With all the justified criticism of the kit, we must remember that at
least Revell made 1/32 fighters for us large scale fans, and this is
1960-70s kit technology. Also the general outline is correct so, with
work, a very nice display is possible. Modelers should try to build some
of these to sharpen their scratchbuilding and conversion skills. This is
what I have been doing since the 1960s and this has been a great help,
even allowing me to build a completely scratchbuilt 1/192 scale WWII
Destroyer Escort on which my father served in the North Atlantic.
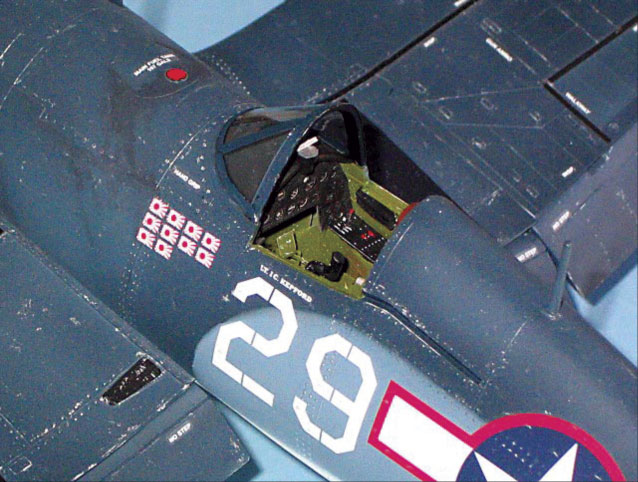
The Cockpit:
This is the usual starting point on all kits and I knew the Revell
parts were pretty basic and not very accurate. Instead, I used the
excellent Eduard 32 021 photoetch kit which has all the cockpit parts
you could want and more parts besides. I did use the kit's control
stick.
I was very impressed by the control panel which looked great and also by
the excellent pilot's seat which when built looks very much to scale
thickness and even has photoetched rails to attach it to the aft armored
bulkhead. The Eduard kit also has side console panels, plus throttles
and quadrant. It also has the foot wells so you built the correct
floorless cockpit. Highly recommended.
The cockpit was painted the usual interior green and black. All paints
used on the model were Testors Model Master enamels. I am used to using
them after all these years and have always gotten excellent results.
I had to build up the leather headrest with Squadron green putty, mix a
bit of burnt umber and white paint and paint it. I also added an outline
of bolts in the armor plate near the headrest by applying tiny dots of
white glue which if applied carefully and uniformly can look very
convincing. If you have a mistake simply wipe it off with a damp Q-tip
and try again. I built a new glare shield from sheet plastic and
modified a likely piece of spare part for the gunsight. Interestingly, I
bought the Squadron clear vacuformed canopy but didn't use it. It looked
fine, but with mods, the kit canopy wasn't that bad. I did punch out a
bit of the vacuform plastic for the gunsight glass.
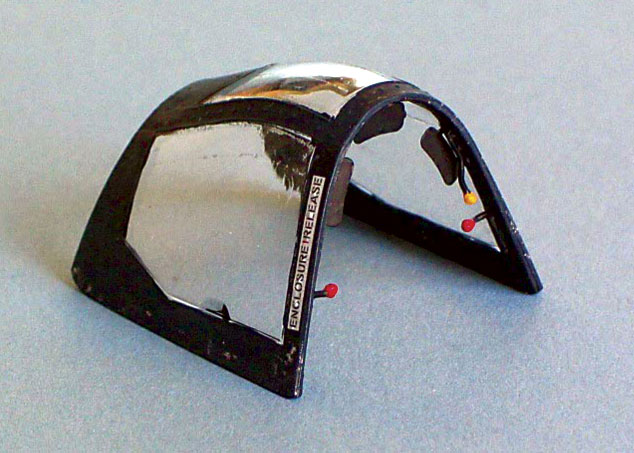
The canopy was improved with Eduard rear view mirrors, and
opening/locking handles made from the old reliable stretched sprue and
white glue for knobs. The canopy was also dipped in Future for the
glossy look then panted with Testors flat black inside and exterior
color outside after the Future was completely dry. The Windscreen was
attached with white glue to prevent superglue fogging. I left the kit
sliding hood loose attached so I could open and close it as needed for
display.
The Wings:
I wanted to drop the flaps for that Corsair "bird of prey about to
strike" look. I used my hot knife to cut off the molded on flap areas
then received the Oct 2002 issue of Fine Scale Modeler. In it Scott
Murphy had an article on his outstanding project of the same kit and
noted that Lone Star Models had a flap and wheel well set for this kit.
I hadn't been aware of that and had planned to build up my own flaps
with Squadron sheet plastic. I got the set and the flaps were great.
Only minor sanding and filling of the parts themselves were needed. I
built up the flap wells in the wings and the flap hinges with sheet
plastic and Evergreen plastic rod.
An interesting problem surfaced with the Lonestar parts. It contained
nice wheel wells but I had already mated the wings. What to do? I
couldn't fit the wheel well parts in through the still open flap wells
so I carefully cut the wells into four pieces and snaked them in, test
fit them, sanded and filed them, then did the final assembly and gluing
in place.
When building models little things go wrong and sharp eyed rivet
counters may notice the inner and outer well walls are switched. When
you are gluing parts on an airplane that is upside down for building,
the right wing is on your left side and vice versa. I didn't notice
until it was too late. This is when you hit yourself in the forehead and
yell DUH !!!!. It is very minor and the rework would have been more
destructive than was warranted so I left it as is.
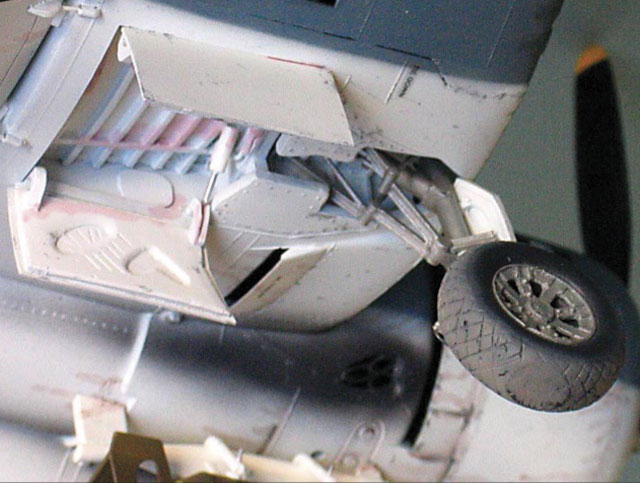
The landing gear strut itself is a reworked kit part, the rest were
discarded. The retraction mechanism is scratchbuilt form Plastruct I
beams and plastic rod. The gear is painted Steel. Tires are TruDetails.
Brake lines were added from wire. I lightly sprayed a coat of white and
burnt umber to simulate dust over the dark grey tire paint. Rembember,
tires are usually dark grey not black. The art of making kits look
realistic is to note what colors really look like. Not your intuitive
idea of what is correct. This is a lot of the fun of kit painting.
Another part of the wings which needed a lot of attention was the oil
cooler inlets. I used a combination of the kit louvers with Eduard round
screens but the ramp-in areas need a lot of careful green putty filling
and sanding to look right. These are the trouble spots that are tedious
to fix but make a big difference in the overall appearance of the model.
I also detailed the wing tip lights. I drilled out the inner area to
simulated a light bulb with a tiny drill bit. I sanded the lights to a
better fit, then wet sanded them with ultrafine sandpaper. I next
polished them with toothpaste (it works!!) then did the old Future dip.
I ended by adding a drop of red or green paint as required and got a
very nice effect.
The Fuselage:
The fuselage was built pretty much stock except for the photoetch
additions. I added rudder and elevator cranks from the Eduard kit and
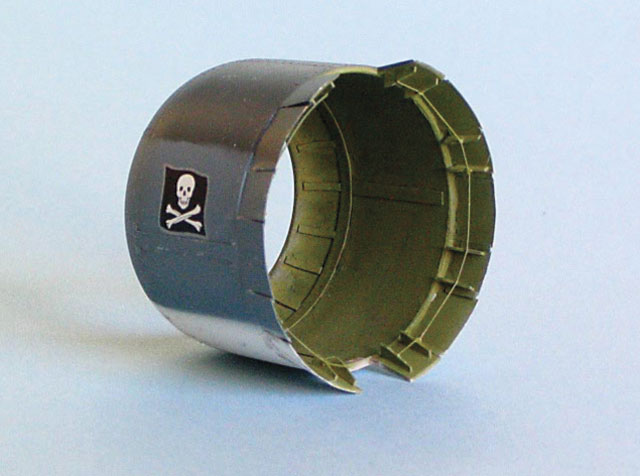
did more major surgery on the cowling. The kit cowl flaps are poor. The
are not correct in number or configuration. I hot knifed the kit parts
and added Eduard photoetched cowl flaps. Inside brackets were added as
well as the control cable. I also added strip styrene stiffeners inside
the cowl and painted it primer (interior) green. I then applied a dirty
black wash of thinner and a few drops of black paint to simulate the oil
these radial engines liked to throw.
The tail wheel was modified with Eduard parts and the interior of the
well was detailed with plastic sheet and rod per Detail and Scale
photos.
Interior painted green primer. A salmon brown primer was also used.
The tail wheel assemblies were painted grey or steel colors during F4U
production. I used light grey on mine.
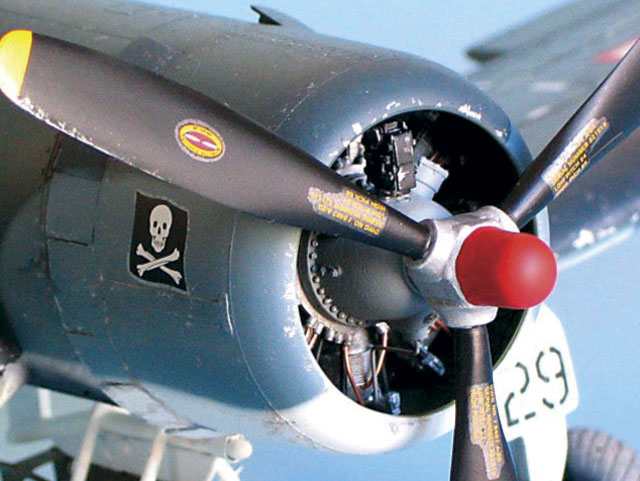
The Engine:
It is the great Teknics resin R-2800 kit which I bought based on
reviews online at Large Scale Planes. The engine is truly a kit in
itself and you can take it as far as you want to go in terms of extra
detailing. I added push rods to the front of each cylinder, Copper plug
wires, and an oil return line was added from stretched sprue on the
front lower area. The exhaust pipes on the aft end were not installed as
they were almost invisible on the completed model but I did cut out the
kit's simple exhaust area on the lower fuselage and added brass hollow
tubes for realism.
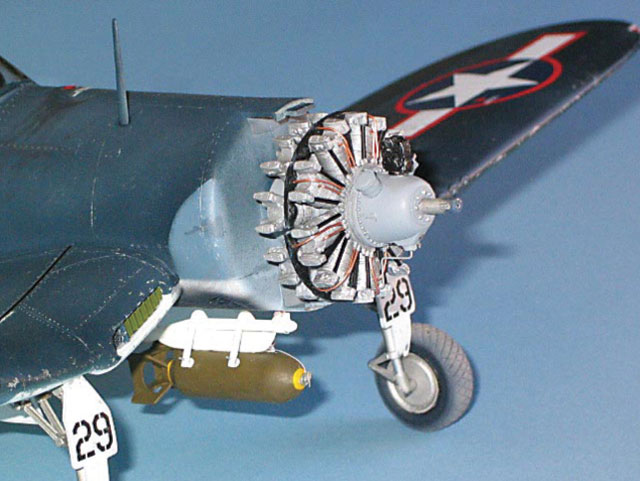
The engine case is painted light grey FS36270. The cylinders are
aluminum and the push rods are flat black. I even painted the Pratt &
Whitney logo on the front of the engine. Yes, I had the Optivisor on for
that! The engine is far superior to the kit parts (or even just about
any kit's engine parts) but be advised, the Teckniks kit will take some
time to build. It also has the option of later style nose case and
magnetos included. Highly recommended!
The kit prop was pretty accurate so I cleaned up the hub and used it.
Colors are the usual black blades, yellow tips, aluminum hub, and red
hub nose.
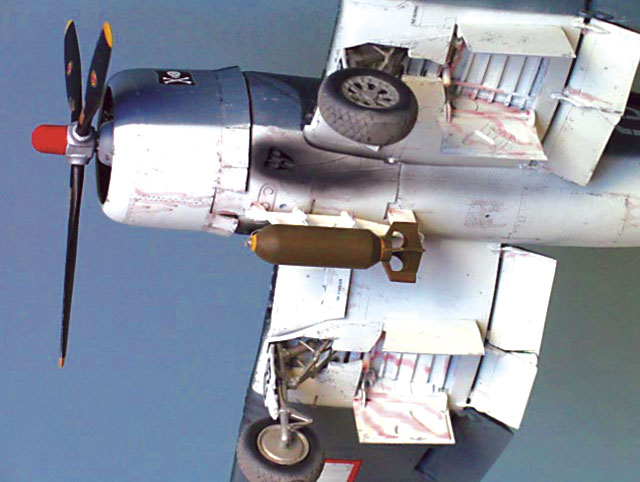
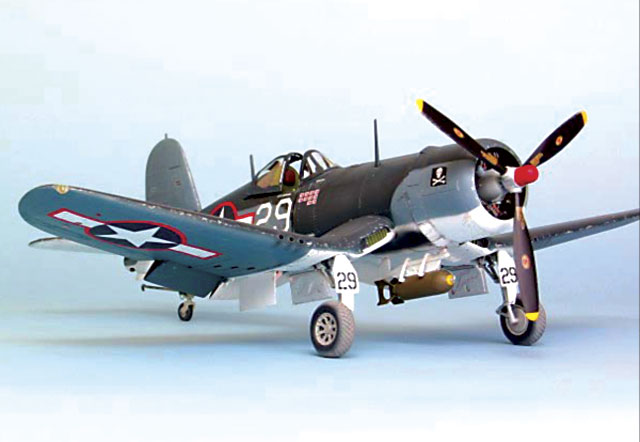
The Bomb Rack:
This was scratch built form plastic rod and sheet. The bomb was a
spare from the Hasegawa 1/32 P-51D kit. I used punched out plastic sheet
for the antisway pads and wire for the adjustment screws. It really
helps the look of the kit I think. Some underwing items can spoil the
lines of an aircraft but on the F4U, it works. The rack is painted
Insignia white FS 37875, and weathered with an oil stain wash. The bomb
is sprayed Olive Drab with yellow rings hand painted.
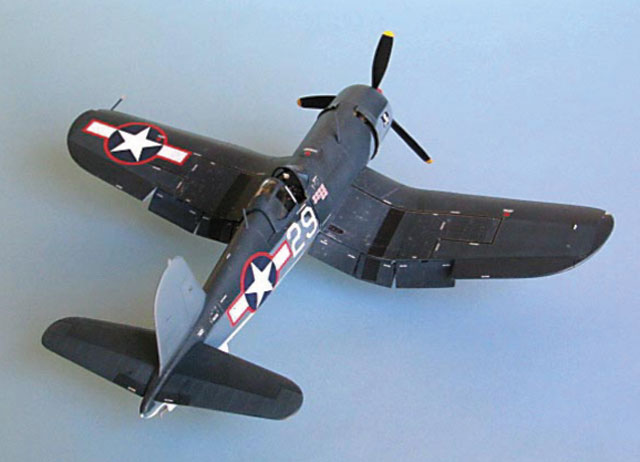
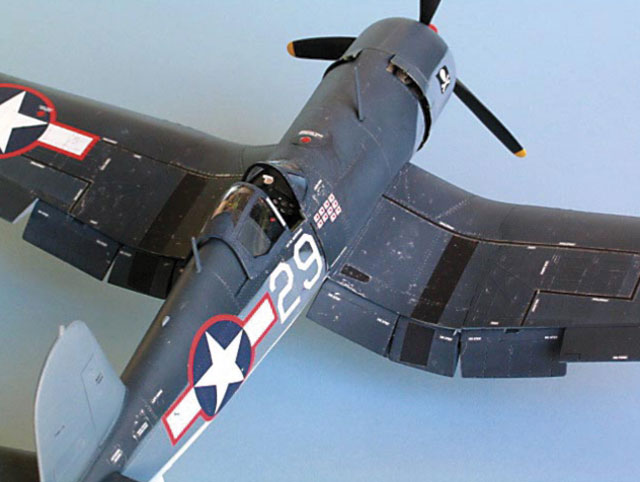
The aircraft is in the mid war tri color scheme. The lower surfaces
are Insignia White FS 37875. The upper surface is Non Specular Sea Blue
FS 35042. The mid fuselage is Intermediate Blue FS 35164. I used a 1980s
Badger model 350 for the large areas. and a new Badger model 150M for
the exhaust stains and detail touchup. The Techmod decal sheet has
extensive painting as well as decal placement info. Great job Techmod.
Before decals, I applied and overcoat of Testors Gloss for decaling and
then applied the Techmod set 32008 Vought F4U-1A decals for Lt. Ira
Kepford in Feb 1944. The decal sheet also includes the all blue US
national insignia if you need that and very complete stenciling. The
register is outstanding and can be read with a magnifying glass. Even
better, the decals are opaque!! I only had a slight bit of trouble
getting the large insignia to set down over the fabric ribbed areas on
the wings and the rivets on the fuselage. I used Microsol and it worked
well enough. I recommend the decal sheet and salute Techmod for making
1/32 scale decals.
There isn't enough selection on the market. It seems everything
interesting is 1/48 but we are making some progress. I applied
weathering chips with aluminum paint and a fine brush. Remember, don't
go crazy with this. Use actual photos for a guide. I then did Hydro
fluid leaks in the wheel wells with very thinned red paint with a touch
of umber to dull it. Fuel stains on the upper forward fuselage were done
the same way with very thinned black/grey paint. They stream from the
nice Eduard photoetch fuel tank access panel and cap. I also masked off
and sprayed very thin coats of light grey to dull the fabric areas of
the camoflage color. It won't change the color a lot, just enough if
done right. I also dull coated the decals, especially the national
insignia the same way or it would really jump out at your eye as too new
relative to a combat used aircraft. Remember, to do this lightly or you
may have to do a camouflage color reshoot. After the paints were dry, I
sprayed Testors dullcoat over the entire model with my Badger 350.
My main reference was Bert Kinzey's Detail and Scale Vol. 55 F4U
Corsair.
All I can say is God bless Bert Kinzey!! His Detail and Scale series
is such an outstanding help to any modeler that I hope he realizes what
his excellent series means to us!! I have many of his books and all are
superbly informative. They are in a way better than going to an air
museum since Kinzey points out many easily overlooked details of
aircraft configuration. The photos are also clear and useful. I built
this kit literally with the book open at all times right beside me.
I also used Fine Scale Modeler's Oct 2002 article on Scott Murphy's
Corsair. It was great for inspiration and part availability info. He
built his with the late war national insignia and was more complete on
the engine buildup than I did. I recommend this back issue to anyone
thinking of doing a similar project.
I lastly used several issues of Air Classics for info on part
configuration on flyable Corsairs. This helped me on engine part
placement but be careful of current Corsairs. Not all paint jobs are per
WWII specs and equipment may be changed or modernized. The historical
photos are very good also.
Click on the thumbnails
below to view larger images:
Model, Images and Text Copyright ©
2004 by Jeffrey Oliveira
Page Created 09 February, 2004
Last Updated 17 March, 2004
Back to HyperScale
Main Page
|
 Home |
What's New |
Features |
Gallery |
Reviews |
Reference |
Forum |
Search
Home |
What's New |
Features |
Gallery |
Reviews |
Reference |
Forum |
Search