|
F/A-18C Hornet
Hasegawa & Revell-Monogram
by C Wayne Sharp
|
|
|
F/A-18C Hornet |

Hasegawa's
1/48 scale F/A-18C and
Revell-Monogram's F/A-18C
are available online from Squadron
I will try not to bore
everyone with too much history of this front line Fighter/ Bomber that is
serving several countries as well as the U.S. Navy /Marine Corp. Instead,
this will
be my attempt to display some of the work I did to build the two premier
1/48 scale plastic models of the F/A-18 in the world, namely the Hasegawa
(various versions);and the always reliable Monogram/Revell, various
versions. The latter model has been around longer than the Hasegawa
offering..
Most of the fine details
of the history of this aircraft type has been covered by the likes of
Roger Jackson (some of my reference - see his Gallery on Modeling Madness) and others
who have displayed, and finely built, very nice renditions of these same models. I liked all of them.
But the basics are, the
F/A 18 was developed from the Northrop Aviation P-530 Cobra, YF-17 design,
in the 1970s and then was turned over to the McDonnell Douglas Corp. and
developed it into what we see today.
Revell-Monogram
vs. Hasegawa F/A-18C Kits
|
This, then, is a Tale of
Two Bugs.
When I first envisioned
this project, I thought it was a decent idea and I could sort of just drag
both of these models along. It was a good thought at the time. It did not
turn out that way but was a very interesting project anyway.
In common with all of you that just
had to have the so-called very best of the F/A 18 in quarter scale, I
bought the Hasegawa kit for the big bucks when they first came out but the
project
was put on the back burner for a very long time because every time I
looked at it I was intimidated by the gazillion parts and the lack of a
very nice cockpit which was just not available until the Black Box version
came out. So, light bulb time, I decided that I could combine several
parts and save some construction time by doing both the Hasegawa kit and
the old Monogram F/A-18A kit redone and re-issued under the Revell banner
with improvements to turn it into sort of a “C” variant.
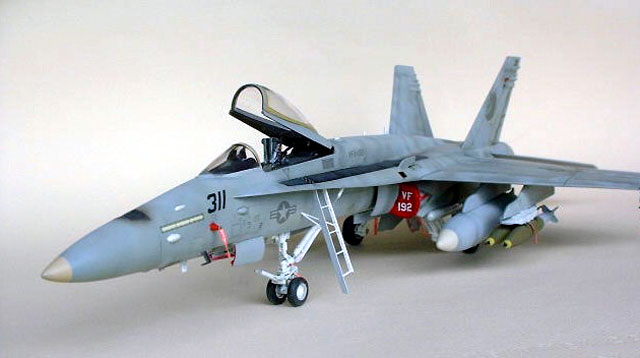
There is no doubt, the
Hasegawa kit is the better of the two and with the nice engraving, dropped
flaps, slats, boarding ladder etc. The Revell-Monogram kit is only fair
and is sort of crude by Hasegawa's standards but still over all it is still a
real nice cheap way to make a very nice rendition of a F/A 18C and have
tons of change left over. However, it will require a good bit of work to
make it comparable.
There
is a big BUT with the Hasegawa kit as well, it is no walk in the
park. I spent about as much time on the Hasegawa kit as the Revell
because of the cpmplex parts breakdown and all the joints that had to filled
and re-scribed. The Hasegawa kit’s white metal landing gear is very nice but
it requires a lot of work to get them to fit with the right angles etc. but
compared to the Revell, it is outstanding with the ability to do so much
more detail.
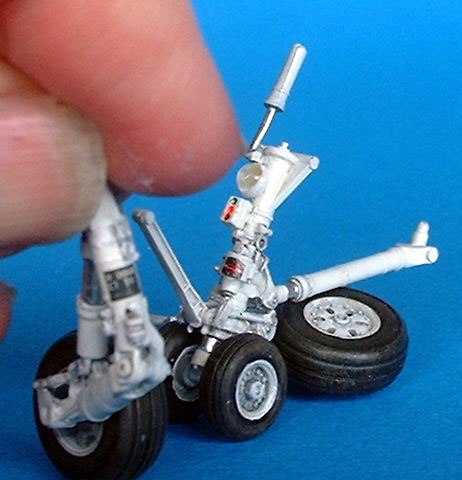
The Hasegawa kit has
ten sprues including the clear parts and the etched metal plus the
3 piece white metal landing gears. In contrast, the Revell kit had only
about 4 sprues plus the clear parts and every thing is plastic.. ( Note
to self, funny how it all looks the same when painted ) .. The Hase seems
to be a tad slimmer in the girth and the nose looks a little different
(thinner) but all in all, it all looks about the same in comparison size
and the finished product(s) look very much the same thing.. The Scale
Hounds and the rivet counters can hash out their dislikes. (show me
yours, I showed you mine).
Both kits have the wings and upper main fuselage molded together as one piece but how they go together is a major
difference but is still basic modeling skills. By now everyone knows about
the stupid way the Hase kit’s top wing sections have injector pin marks
but the Mono/ Revell kit has raised panel lines so both have to be sanded
off anyway but I just did enough to get rid of the marks but I did sand
off and re-scribe the panel lines on the Revell kit , it didn’t take too
much time really.
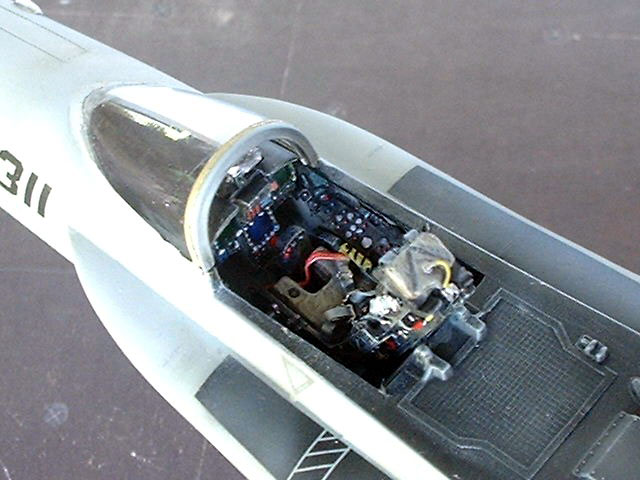
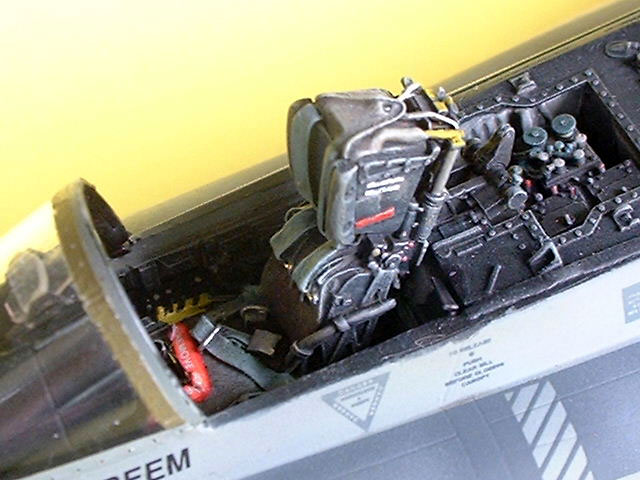
 First,
let me say, that the very nice Black Box resin cockpit is a jewel and is a
model all by itself. I hated to cover a lot of it up. Even the electronic
compartment behind the seat ( Hell hole) is very detailed and I don’t know
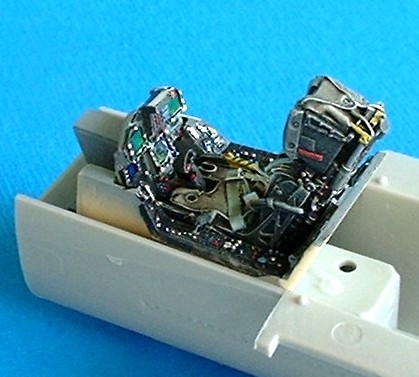
if it is correct or not, but it sure looks like it is and beats the revell’s fake screened- in area. First,
let me say, that the very nice Black Box resin cockpit is a jewel and is a
model all by itself. I hated to cover a lot of it up. Even the electronic
compartment behind the seat ( Hell hole) is very detailed and I don’t know
if it is correct or not, but it sure looks like it is and beats the revell’s fake screened- in area.
I did the cockpits on
both by using all the black box stuff I could in the Hase kit and some
Eduard metal in the Revell kit and a resin seat for the Revell from True
Details. Basic cockpit colors are, (I mostly used Testors Model Master enamels
for both ), dark gull gray, black, various shades of red, yellow, blue,
and Olive Drab. for seat covers and after a light wash of Raw Umber, I dry
brushed with tan etc,. and other lighter colors to enhance all the
details.
Both main fuselages of the
airframes were fitted but had major seams on both but the Revell has
bigger gaps so I used a combination of putty, Mr.Surfacer 500, to remove
all the bad joints (note: the Revell was worse, but I still spent just
about as much time with the Hasegawa kit, because it cost more etc ( Note to
self, get your money’s worth of work) and I used light ghost gray for a
primer to find and repair all the bad blemishes and I re-scribed all my
lost detail and prepared for the basic paint job(s).
Click the thumbnails below to view larger images:
The rudder alignment
was easy on both models but the Revell kit had no braces at the base of
the rudders like the Hasegawa kit so I made some with strip evergreen plastic
card. The Hasegawa kit also has the nice separate flaps and slats/ rudders,
the Revell kit does not and I was not going to try to cut them on this
model. Cutting edge makes a nice resin replacement set for the Revell kit
but I was not going to spend any more $$ for it. I have seen bunches of
the F-18s as they came as transient aircraft at my base over the years
and most all ,to a machine, always set on the ramp with the flaps, slats,
and stabilizers down at a drastic angle but some (very few) set with them
in a up neutral ( I don’t know the mechanics or reasons why but they were
), and yes, I did see more than one with the speed brake open for whatever
reason, I don’t know why, but it was anyway! When the fires were lit, and
the preflight started, everything went to neutral.
I used the kit wheels
on both and the kit pylons as well but I hit the spares boxes for some
weapons load as none was provided in the Hasegawa kit and the Revell kits’
was bad to say the least . all the gear doors were painted white inside
and trimmed in red with a fine point, water based red pencil/ marker (
they work very well)
The fuel tanks from the
Hasegawa kit were the only ones I used. The Revell tanks were bad so I just
welded all the tanks together and de-seamed them and decided to use only
one for the Hasegawa kit and two for the Revell to help it out in the
“hanging” department.
Click the thumbnails below to view larger images:
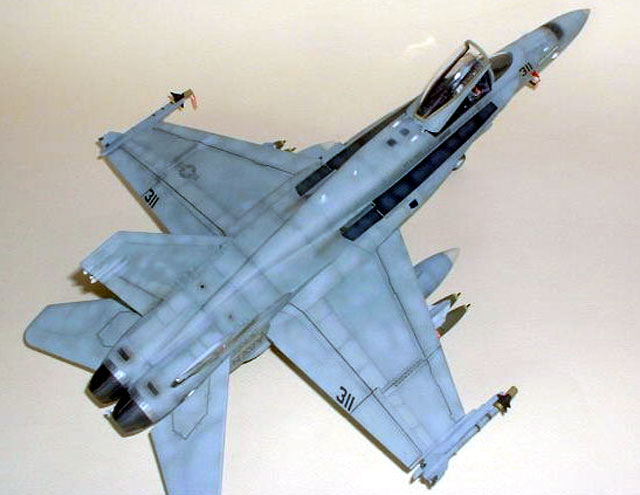
As everyone knows, the
Hasegawa and the Revell-Monogram kits, have no turbine faces to replicate
the engines inside the intake, (as much as the Hasegawa kit cost, that should
have been provided) so you can see all the way to the rear
of the model through the intakes.
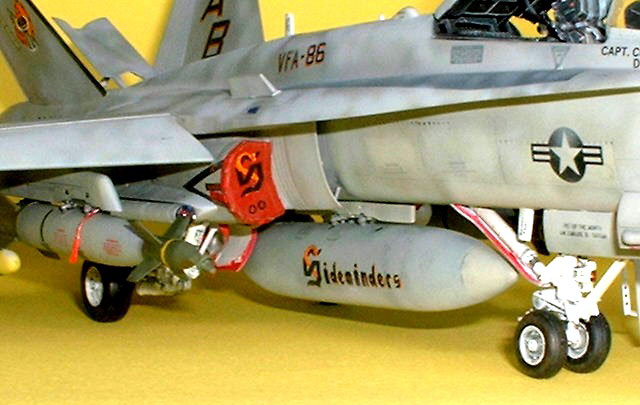
I simply decided to make some FOD covers and
be done with it. Both intakes were about the same size so I could make the
same pattern work for both models. I have never seen a “hard” insert cover
for an F-18 (they may exist, I just never seen any) so I needed to make
the garbage bag “baggie” type. I guess everyone has their own idea on
this but I used some aluminum foil duct tape and cut a pattern to fit over
the intakes and when folded, trimmed, and used smaller pieces for ties
etc. they will maintain the way they are molded. After this was done, I removed and Painted them all red (most I have seen was red,
there may very well be different colors as they can be made in the fabric
or egress shop, and dry brushed with some tan/ light browns (white
will not work, it will look pink) and put some decals on it to represent a
squadron marking.. (AMS modeling at it’s best, the ACES will cry over
that one).
Another tricky aspect
of the kits was doing the ladder(s).
The Hasegawa kit has a nice ladder and some etched
metal to give it good detail but I made the actuator out of a chrome colored stright pin and some small tubing. But , I had forgotten
that the Revell
kit had no ladder but did have the ladder recessed panel under the glove
area and I cut it out and then I remembered I didn’t have a ladder so I
just had to scratch build one from Evergreen plastic card using the Hasegawa
kit’s ladder for a pattern.
It is okay but is a little wide in the final
mounting phase,
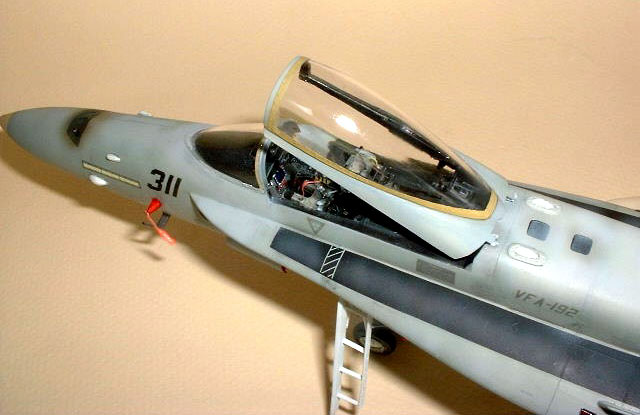
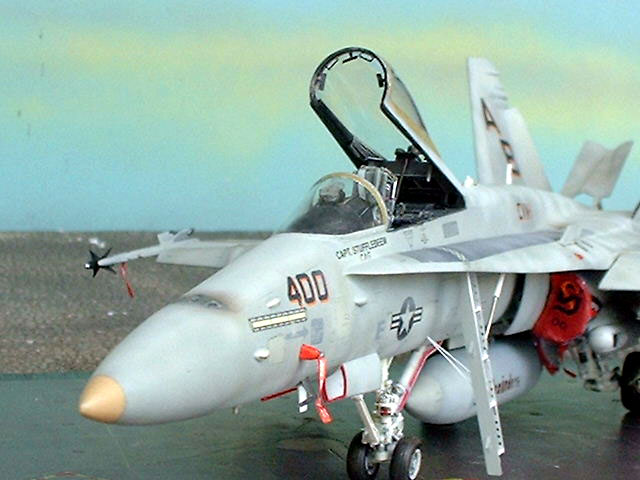
The canopies are
different in that the Hasegawa was a one piece, middle seam, that was removed
with a medium sanding stick and polished with 1000/ 2000 wet grit and
compounded, cleaned with WD-40 washed with denatured alcohol and then
dipped in future two or three times after painting. The Monogram/Revell’s
is a two piece type with the frame separate but was just as hard to paint.
To get the ochre tone looking re-enforcement seal that we see on most jet
aircraft, I just painted some bare metal foil the color I wanted and then
I cut in thin strips and applied to the canopy and wind screen. So now
with a lot of the details done I could now move on the paint shop. (BTW,
to my modeling friends and buddies that are crying about why I opened the
speed brake, I just wanted it to look cute for the old maid school
teachers and third graders, so there!)
At this point, I laid the Revell kit aside, it seemed like a no
brainer to go full force with the Hasegawa paint scheme. ( I was getting
tired of doing the same thing on both and needed a break and/ or to work
on something else on the semi- finished pile.)
In the past several
years, the US Navy / Marine Corp, has applied at non-descript paint
scheme. After a little while in use on land and/ or sea, the paint job
gets to looking like a patchwork of drab grays and faded tones
that is very hard to replicate on a small model, but there is nothing wrong
with trying.
We have all had mixed
results at this scheme but I thought that if I painted it similar to the
way they paint the real aircraft, I.E., they repaint each panel or areas
when it is opened or worked on to keep it covered, paints are not always
the same shades or they are faded badly.) then I could go from there. I
mixed some ochre / tan etc. and painted the Radome ( MM makes a Radome tan
for this, but I just used what was on hand and made do ), and masked it
off.
Click the thumbnails below to view larger images:
I then applied the Lt.
Ghost Gray, and the Dark Ghost gray on the pattern indicated by the decal
sheet. After that, well, I started re-painting panels and lines with some
highly thinned darker and lighter colors of grays, to try and match some
of the aircraft I have seen and current pictures of used aircraft. It
looked like a patchwork quilt, at about the 4th or 5th
stage of painting, I was ready for the first gloss coat of floquil high
gloss. (note: there is nothing wrong with mixing paints to get different
tone/ colors it works very well and you can even call it “scale Paint” if
you like or you can feel better by saying “scale effect”, (whatever that
means.) ( remember, there is no such thing as total correctness,
regardless of how hard you try, you always have to alibi something on the
model but for you to win consistently at contest, remember,
CRAFTSMANSHIP AND PRESENTATION IS THE KEY.!) But, I was not satisfied with
that result of the first paint setting, so I toned it down with more Lt.
Ghost gray and mixed Lt. Gull gray with it to lighten it up some.
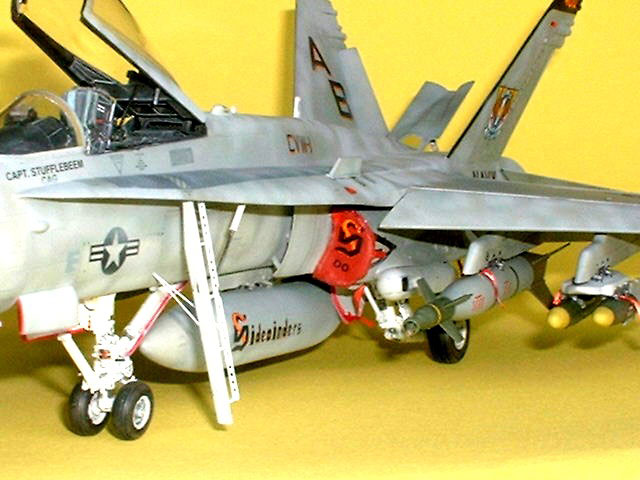
Later on, I painted the Revell kit in a very similar fashion, but after about 3 coats of Gloss (
after each coat I sand with some 2000 wet grit except the last coat.) I
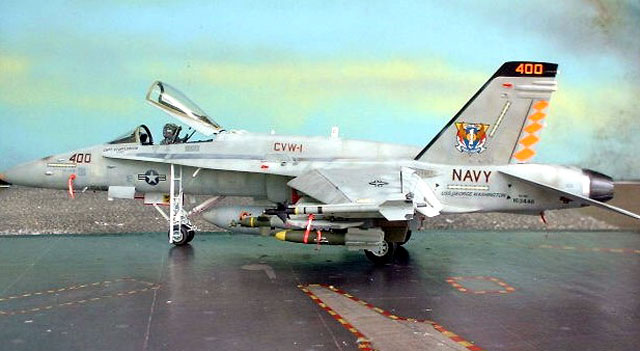
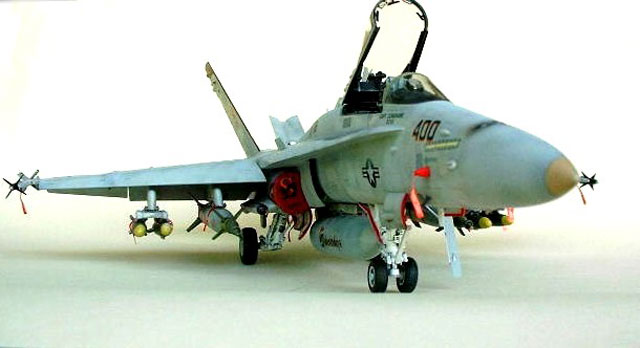
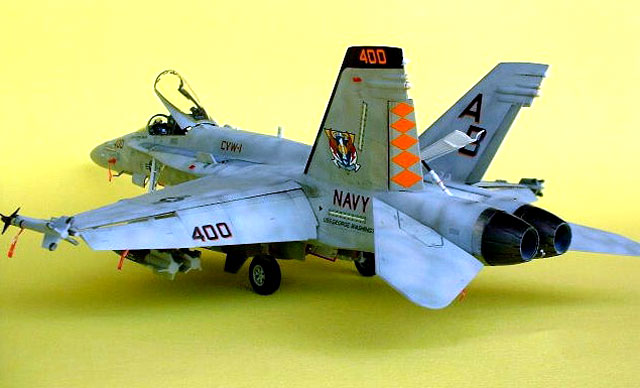
could now start the decal process. For the Hasegawa kit I chose the AeroMaster sheet # 48-395, Stinging Hornets, for a CAG bird BU. No.
163446 # 400 of VFA-86 “Sidewinders” based on the USS George Washington
in 1996.
Yes, I know this one
has been done on other occasions on the internet and very well I might
add. But this was the best sheet I had at the time and so this is my
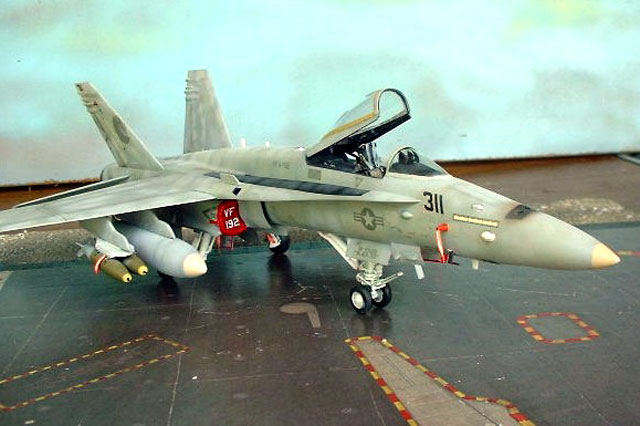
version. Later I went for the low-vis scheme for the Revell kit and I
used the decal scheme that came with the Hasegawa kit, for VF-192, “Golden
Dragons”. Yes, I know that the paint scheme(s) without decals looks like a
strange picture but it, (they) started to look much better after the decal
process started.
The bright metal rings
around the engine(s) was painted with Alcad II and the engines on both was
painted with MM gun metal metalizer and then rubbed with SNJ aluminum
powder and a very small amount of Brass powder just to add a golden sheen
to it.
Actually, these paint
jobs, ( to me), are somewhat harder to do than a three tone camo paint
job. Because for the most part, there is no given pattern after the
initial basic paint scheme is done. After that, you almost have to get
next to one of these birds and make some notes and let your favorite air
brush work for you.
Decals
The decals on these two
models was done by my normal process which is; I use a mild decal solution
or, plain distilled soft water, after all the decals are on, I spray some
Walthers decal dulling solution to help hide all the decal film. After
that is dry, I lightly wet sand again with 2000 grit but don’t break the
paint or decal surface ( this gets rid of any dust/ bug dooties etc.) and
then spray clear gloss again to seal. At this point, I will decide if I
want to do a wash or not, I did use a “sludge wash” on the Hase kit but I
was not satisfied so I cancelled it by spraying again with light gray
tones to wash most of it out. I did not wash the Revell kit.
Another
method of wash that I do sometimes, if needed, is to make a darker color (
not always black) wash with oil or enamel paint, and apply very small
amounts in the recesses of a high gloss finish and then in a very few
minutes, wipe it off with a cotton swab with turpenoid. After a good
couple of days of drying, I spray Testors Dull Coat, light coat, and the
next day, one more coat of Dull coat to make it a little flatter etc.
NOW!! I just start
adding and gluing on all the hanging parts using CA, starting with all the
gear, doors, tail hook(s) lights, pylons w/ stores, and the flip over to
install the seat(s) , canopies, pitot tubes, etc. the angle of attack
sensor covers were scratch made with some evergreen plastic strip and
flagged. Now, we are ready for the picture table and hope I can get a few
shots that we can see that show some of all this stuff and all this work..
First, I will confess the fact, that
the Revell finished kit did not have any nomenclature plates on the
landing gear or any brackets/ mirrors on the Canopy but I have since added
those.
The choice to do an
article with two models is not too hard to do, as long as you do not try to build
both models at the same time. If and when I try this again, I will make
sure that one of these things has already been built and is already a
shelf sitter.
The simple fact is
that, for sure, the Hasegawa kit is the very best 1/48 scale F/A-18,
but most of us will not go spend big bucks every time we want one of
those for multiple schemes. For multiple scheme builds, the old Revell-Monogram
is the way to go and you can still pick those up cheap. With a little
extra work, it is very good.
Now we all look forward
to the forthcoming Revell-Monogram Super Hornet!
- Web sites for the
MacDonnell Douglas F/A 18 A/C/D.
- Web site for
TigerStrike Decals.
- Detail & Scale Volume
6 developmental & Early Production Aircraft.
- Squadron F/A-18 “IN
ACTION” series.
- Roger Jackson,
Monogram 1/48 scale F/A 18C Modeling Madness website Gallery.
- Personal photos and
notes of Aircraft I have seen over several years.
Model, Images and Text Copyright ©
2003 by C. Wayne Sharp
Page Created 18 August, 2003
Last Updated
17 March, 2004
Back to
HyperScale Main Page |
 Home |
What's New |
Features |
Gallery |
Reviews |
Reference |
Forum |
Search
Home |
What's New |
Features |
Gallery |
Reviews |
Reference |
Forum |
Search