Question: What is the best way to learn to use a
new double-action airbrush?
Answer: Use it! And, I mean REALLY
use it!
Back in 1982, I bought my first Badger
150-IL airbrush. This is a great airbrush and is the
airbrush model I still use today (although I have
worn out two and now am on my third brush). After
tinkering with the brush for about a year, I decided
that a baptism of fire would be helpful in learning
to use the thing. To that end, in 1983, I set out to
build two of the JAWS camouflaged A-10A "Warthog"
aircraft. Trust me, there is no better way to learn
to use your airbrush than to dive in and attempt a
camouflage as found on these "Warthogs".
I was relentlessly picky about the size,
location, and shape of all the assorted spots in the
JAWS camouflages. I repainted the tail sections of
the kits three or four times until I felt I was
getting the camouflage I wanted. Through all this
repetition, I learned all about my airbrush and its
usage, inside and out. I feel I can trace much of my
painting technique and ability today back to these
two JAWS "Warthogs".
When I started my "Warthogs", there was not much
information on them. All I realy had were the
diagrams in the SuperScale decals. Unlike
many SuperScale releases, the instructions in
this particular A-10 decal sheet were at least a
little helpful. They provided topside and left side
drawings of two of the JAWS "Warthogs". Using some
additional diagrams from an old Koku-Fan magazine
(01-1981) and the few pictures I could locate in
books and other magazines, I got the right side and
some of the bottom details. I felt I was as armed as
I could get with documentation for the time.
Since I originally painted these two models, much
more information has come out on them. I now have
nicely detailed Koku-Fan magazine articles providing
four-view diagrams for even better camouflage
coverage. I have also found many more pictures of
the aircraft. Perhaps the single best source of
information to come out in recent years was from
Dana Bell on HyperScale. Click the following to view
these references.
Dana's references are invaluable for anyone
wanting to attempt these camouflages.
Believe it or not, in the end I actually did not
complete the two JAWS "Warthogs" that I started. I
finished them up until the very last steps of adding
canopies, weapons, and ejection seats, then I lost
interest. I even had all the associated parts
painted up and ready, but I just never felt like
doing the last little bit of gluing to finish the
models. The two of them lived for many years, mostly
unseen, on top of my model display shelves in the
living room. Eventually I gave them to my friend,
Skip, just to get rid of them. He completed the last
2% of work on them by gluing on all the assorted
already paint detail items. They now sit on the
display shelves in his parent's basement.
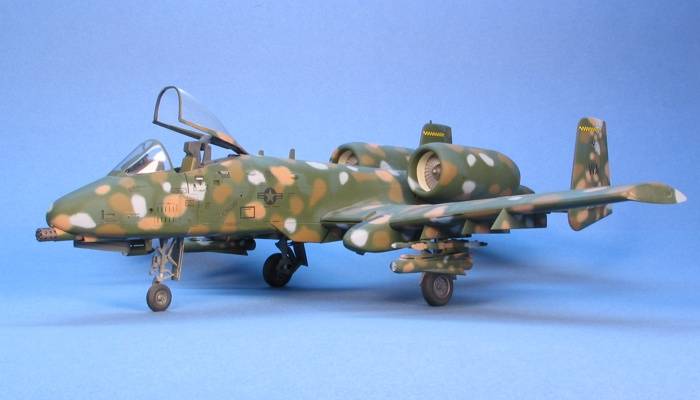
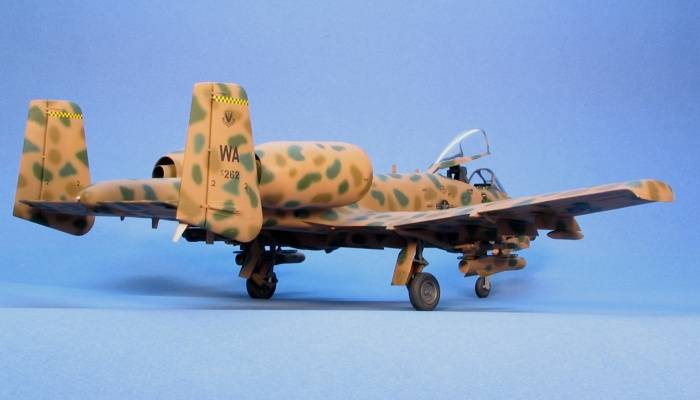
I recently borrowed the two models back so I
could take the pictures for this posting. Please
excuse the dust still on the models and visible in
some of the pictures. When I borrowed them back,
they had nearly a scale foot of dust on them. I
litterally ran water on them in the kitchen sink to
attempt to clean them up some. I was reluctant to
use a brush to scrub them because of the age of the
paint. Without a brush, many nooks and crannies
retained a base layer of dusty grime.
At the time I started building these kits, there
was only one choice for 1/48th
scale "Warthog" kits -- the Tamiya A-10 kit.
This is one of Tamiya's oldest aircraft
releases in 1/48th
scale, and I was building a couple of the original
release kits. Being the original release, the kit
has some issues. I understand that Tamiya has
revised the molds for later releases to fix some of
these issues.
- The panel lines was raised. Imagine that --
a raised scribing Tamiya kit!
- The kit was really one of the original FSD
airframes, not a production A-10A. This implies
several things about the airframe:
- The model was missing the flare and
chaff dispensers under the wingtips and
behind the main landing gear.
- The model had flap guides that extended
beyond the trailing edges of the wings. The
extended flap guides were due to the FSD
airframes having thirty degree flaps while
production airframes only have twenty degree
flaps.
- The ejection seat was an ESCAPAC, not an
ACES II.
- The wheel sponsons are too squared and bulky
looking. This is more of a kit flaw as the shape
of the sponsons did not change between the FSD
and production airframes. Tamiya just got
it wrong.
- The weapons in the kit were simplistic and
inaccurate. They also reflected options that
were never cleared for use on the production
aircraft (such as MERs for the inner weapons
pylons).
Fortunely, the JAWS "Warthogs" were mostly all
FSD airframes. Thus, many of the kit issues played
right into my hands for what I wanted to build. The
brown aircraft that I built, 75-0262, was the only
JAWS aircraft that was not FSD, being the first full
production aircraft. I did not know this when I
built the models, so I made no attempt to fix
anything.
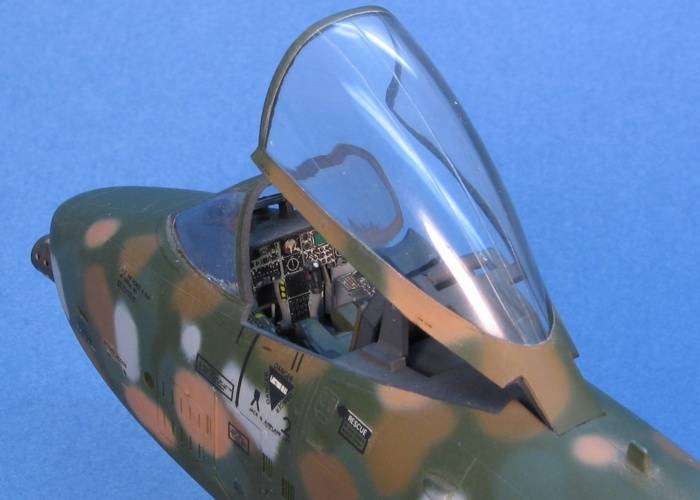
The kit cockpit was decals! Oh, the horror! I was
not up to the challenge to fix this and used the
provided decals in the cockpit. I toyed briefly with
scratch-building some cockpit updates, but a stoke
of sanity took a hold on me and I refrained from the
madness.
That is not to say I built the models
out-of-the-box, though. Before I had decided even on
which exact aircraft I was going to build, I started
doing some updates to the kit. I scratch-built new
cannons for the nose using aluminum tube and brass
wire. I wrapped sheet styrene into the engine
intakes to better represent the ducting. I also
played around with opening up some of the assorted
intakes and exhausts around the airframe.
Once the airframes were fully assembled, it was
time to paint.
The JAWS Warthogs were painted in five colors -
Field Drab (F.S.30118), Sand (F.S.30227), European
Green (F.S.34092), Medium Green (F.S.34102), and
D.Gull Gray (F.S.36231). I did not have a source for
the Sand color (F.S.30227), so I used Tan
(F.S.30219) as a substitute. From my Federal
Standard color chart, these two colors were close
enough to make this substitution acceptable.
The Green Aircraft -
75-0259
A-10A 75-0259 is the only one of the four JAWS
Warthogs to use all five colors. The entire aircraft
is painted in a base coat of Medium Green
(F.S.34102). The other four colors are used in an
overlapping spot pattern over the entire airframe.
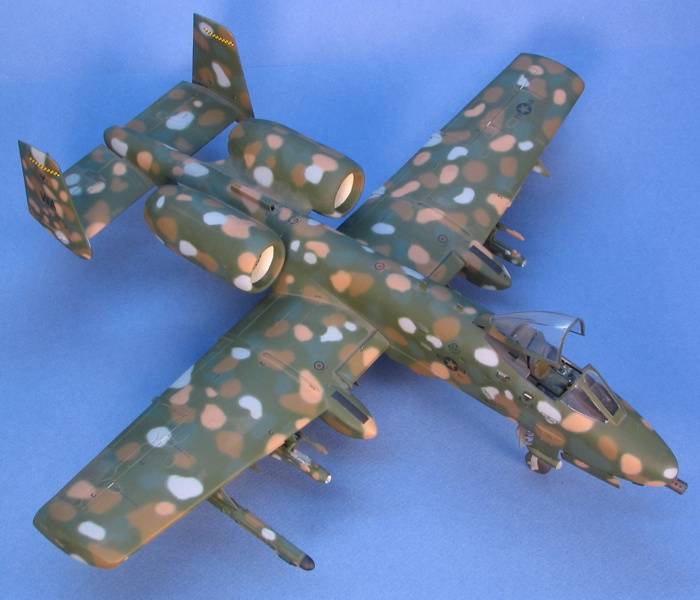
I started by painting the whole model in Medium
Green. Then I worked my way through the various
colors of the spots. Based on the diagrams in the
SuperScale decal instructions and Koku-Fan
Magazine diagrams, it was apparent that the spots
were not all applied in the same sequence. I took
care to correctly overlay the spots to capture the
correct effects of which spots were painted over top
of others. Spots on the bottom of the airframe and
weapons pylons are guess-work as I had very few
pictures that showed these areas.
The Brown Aircraft -
75-0262
A-10A 75-0262 is painted in four of the five
colors. The D.Gull Gray (F.S.36231) is not used on
this aircraft.
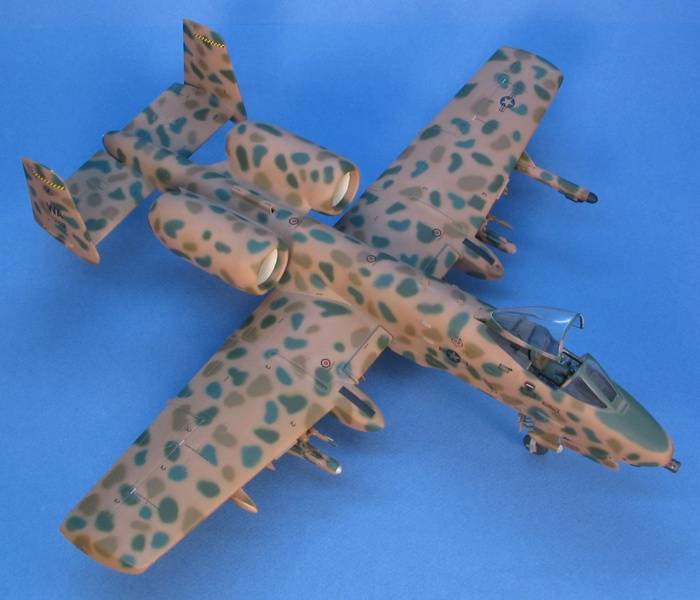
I started by painting the entire model in Tan
(F.S.30219). Like the green aircraft, I worked my
way through the rest of the colors to apply the
spots. The "feel" of the spot pattern is different
on the brown aircraft as compared to the green one.
The green aircraft has lots of overlapping spots.
Alternately, the brown aircraft has mostly discreet
spots that do not touch. This makes for a different
"feel" in the pattern.
Markings and
Finishing Touches
Decals for both aircraft were available from
SuperScale on sheet 48-069. I messed up some
decals while trying to apply them, so I needed to
buy a second sheet to replace the messed up
markings. It is a shame I did not yet have the
ability to make custom decals back then. It would
have saved me some time and headache to just whip up
a couple new decals using the SuperScale
sheet as a guide.
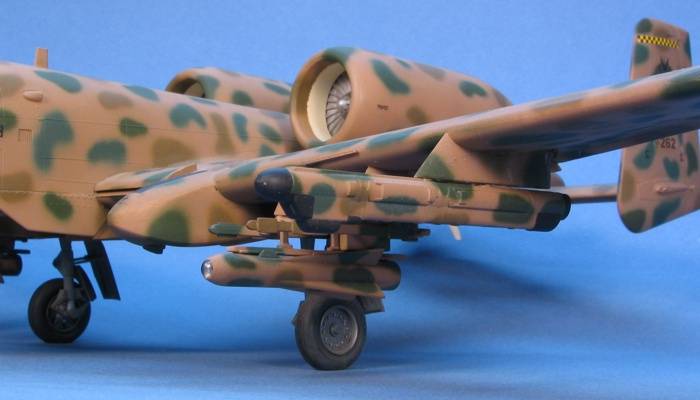
During the JAWS evaluation, from what I have seen
in pictures, the aircraft were so camouflaged that
even their weapons got a coating of the spotted
camouflage. When I was building and painting the
weapons, I painted them over in spots to match the
aircraft. Since the Tamiya weapons were
pretty poor, I replaced them with Hasegawa
weapons taken from the weapons sets.
For weathering, well, there is none. I never got
that far in my working on the models and Skip did
not weather them when he finished them by attaching
all the already completed details.
There you have it, the best airbrush painting
lesson I could have ever dreamed of. Over the years
since I worked on these two models, Monogram
has released an A-10 kit that is superior to
Tamiya (IMHO). I would like to someday remake
these kits using the Monogram kit as a
starting point. I think it would be easier to
back-date the Monogram kit to an FSD airframe
than it would be to fix all the issues in the
Tamiya kit.
Home
| What's New |
Features |
Gallery |
Reviews |
Reference |
Forum |
Search