|
1/48 Hasegawa Kit #09495
A6M3 Zero Type 22
by Jonathan Squires
|
 |
|
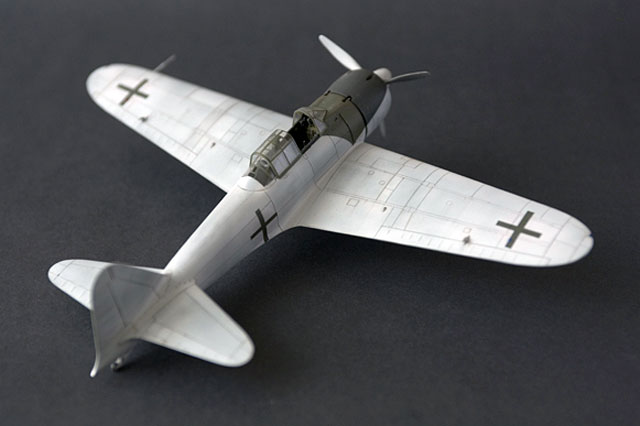
Captured Mitsubishi A6M3
Type 22 “Zero”
JNAF Serial Nr. 2-182 / RNZAF Serial Nr. NZ6000 |

Hasegawa's 1/48 scale Rufe is available online from Squadron
I
enjoy making models of aircraft that have some sort of unique history or
background – particularly when the aircraft has a connection with New
Zealand. In this instance, the subject is an A6M3 Zero. Captured by the
RNZAF at the end of the Second World War, this Zero was to go though
some interesting times before ultimately ending up on display at the War
Memorial Museum in Auckland, New Zealand, where it remains to this day.
The
model featured is depicted as it appeared, in the distinctive surrender
markings, when it first arrived at Piva Airstrip, Bougainville, in
September 1945.
History
In
September 1945, The Royal New Zealand Air Force (RNZAF) became aware of
an intact, and supposedly airworthy, A6M3 Zero located at Kara Airstrip
in Southern Bougainville. The decision was made to recover it,
presumably as a war prize. Originally, the intention was that it be
flown to Rabaul by a Japanese pilot where it would be handed over to the
RNZAF. However, the surrender commission intervened, stating that a
Japanese pilot could not be trusted, and may attempt a Kamikaze attack
on an allied target.
|
 |
|
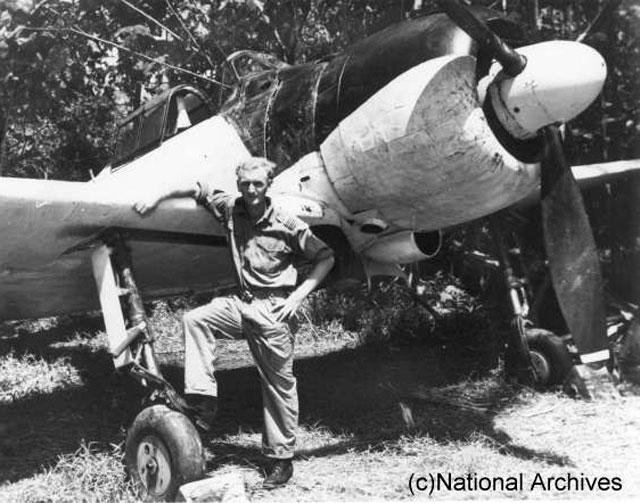
2-182 as ‘discovered’
at Kara airstrip, 14 September, 1945. It was flown to Piva the
next day by Wing Cdr. Kofoed.
© RNZAF Official.
Air Force Museum, Christchurch, New Zealand. |
The
aircraft may well have been abandoned to become another jungle relic had
it not been for the intervention of Wing Cdr. Bill Kofoed. Determined to
secure the Zero, Wing Cdr. Kofoed flew to Kara on 15th
September with the objective of flying the aircraft back to Piva
himself. After a pre-flight inspection and brief familiarisation from
the Japanese pilot – he successfully did so.
The
aircraft remained at Piva until mid-October 1945, whereupon it was
shipped back to New Zealand. On arrival in Auckland, it was allocated
the RNZAF serial NZ6000, and deposited at RNZAF Hobsonville, where
instruction had been given to make it serviceable again (it had not been
flown since Wing Cdr Kofoed flew it from Kara to Piva). The intention at
this point was to use the aircraft for exhibition flying and tactical
training of RNZAF fighter pilots. Neither of these eventuated though,
and with the arrival of the RNZAF’s first jet, a Meteor, combined with
the obsolescence of the Zero, interest in the project rapidly declined.
NZ6000 flew one last time in December 1945 before being transferred, in
February 1947 (after a period of storage) to the RNZAF Technical
Training School (TTS) at Hobsonville. The intention now was for it to be
used as an instructional airframe, however this did not eventuate
either, and the Zero soon became an unwanted storage problem to the
point that, in August 1947, the TTS sought to dispose of it.
|
 |
|
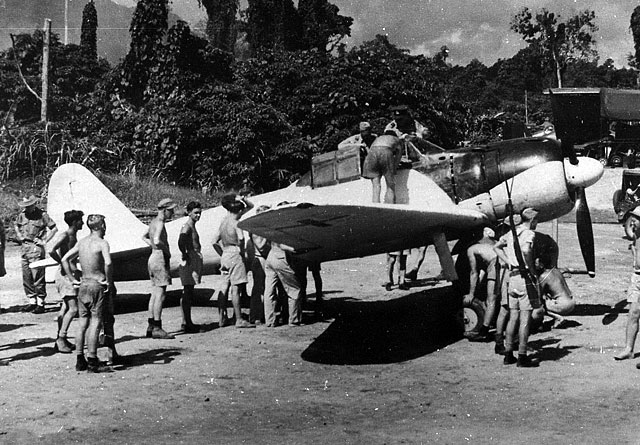
Shot of 2-182 upon
its arrival at Piva airstrip on 15 September 1945. The Zero’s
arrival at Piva generated considerable interest as many of the
RNZAF personnel had never actually seen a Japanese aircraft
before, let alone up close.
© RNZAF Official.
Air Force Museum, Christchurch, New Zealand. |
The
Air Ministry, perhaps realising that the Zero had some value, decided to
offer it to the Auckland Museum. The Museum accepted the offer, but
could not take immediate ownership of NZ6000 due to a lack of space.
Instead, The Museum requested that the RNZAF retain possession until
space was available to display it. Presumably with some reluctance and
no other options, The RNZAF accepted.
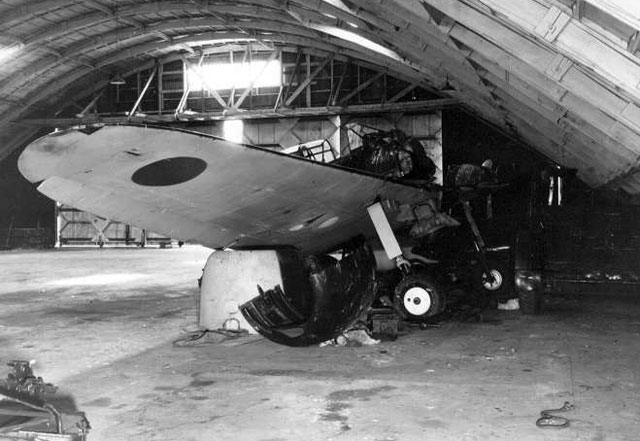
Life
now really took a turn for the worse. By 1950, NZ6000 was stored in the
open along with other war surplus aircraft, where it became the victim
of souvenir hunters, vandalism and the weather. The state of the
aircraft became so bad that, by 1953, the Air Force once again tried to
rid themselves of it as surplus. Before this could be accomplished
someone remembered that the Auckland Museum actually “owned” NZ6000, so
again the Museum was asked to take it over, which they still could not.
So, once again, the RNZAF was left with the Zero.
Through the mid-1950’s the Zero remained in open storage at Hobsonville.
During this time it was displayed (on the ground) three times; twice at
the Royal Easter Show (1954 & 1957) and finally at the RNZAF 21st
Anniversary Celebrations in 1958. For the 1958 display, the aircraft was
partially refurbished and re-painted in a hypothetical grey/green colour
scheme.
Finally, in December 1959, Auckland Museum took possession of the Zero.
From
1959 to the mid nineties the Zero was displayed in the World War II
gallery of the Auckland Museum. It wore the imaginary 1958 display
colour scheme until, in 1985, the aircraft was partially disassembled in
an attempt to establish its true identity. During this research it was
discovered that NZ6000 was actually a composite airframe made up from no
less than 8 uniquely serial numbered Zeros. This is no doubt a
reflection of two things; the deteriorating state of the Japanese supply
situation as WW2 drew to a close as well as the remedial work that was
done on the aircraft at Kara in 1945.
It
was not until 1997 when, as part of a major Auckland Museum renovation
program, that a complete restoration of the Zero commenced. This
involved the disassembly of the airframe, reconnection of some controls,
reinstallation of recovered instruments as well as careful removal of
the multiple layers of paint accumulated in the past 50 years.
Ultimately, this revealed the original JNAF Markings as well as the
original tail number; 2-182.
At
the end of the restoration, 2-182 was installed, complete in its
original WWII JNAF markings, to its current location at The War Memorial
Museum, Auckland, New Zealand.
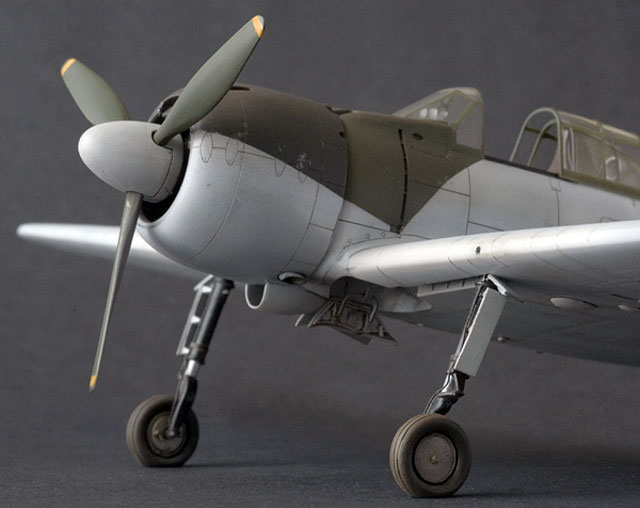
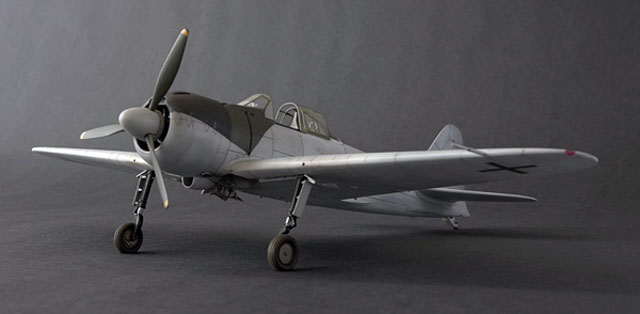
Construction of Hasegawa's 1/48 scale A6M3 Zerol was very
straightforward. It is a great kit.
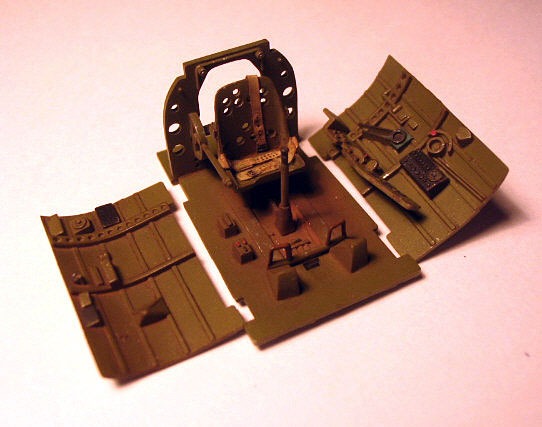
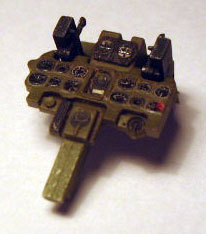
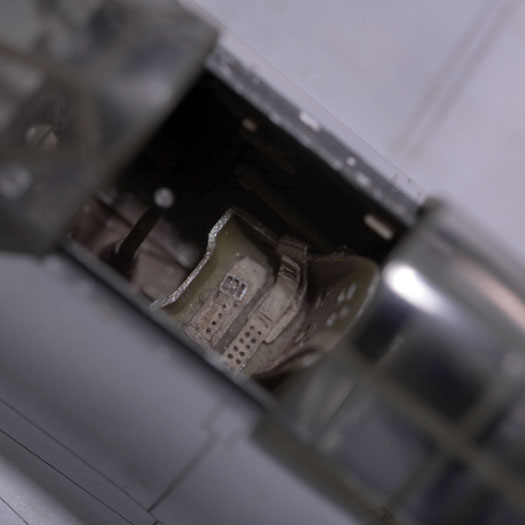
However, I did make some small additions. Starting with the cockpit, I
painted it Aeromaster Nakajima Interior Green followed by a coat of
Gunze gloss clear. Next I applied a liberal wash of highly thinned
Testor's Burnt Umber. Once this was dry I flat coated all the cockpit
pieces, picked out the small details in an appropriate colour, and
finished it off with some light dry-brushing (medium grey). The last
step was to liberally apply Gunze pastels to all cockpit parts in order
to give as dirty a look as possible. The only addition I made to the out
of the box kit was the use of an Ultracast seat, as this has great
seatbelts on it!
The
assembly of the basic airframe was very quick. I did, however, try
something new during construction, in that I used more glue than normal
on the main fuselage and wing joints. By using just enough glue to
create a small ‘overflow’, or ridge when the parts are pushed together,
you not only create a good bond, but, once you have sanded the small
ridge of glue off with fine sandpaper, you get a smooth, seam free
joint.
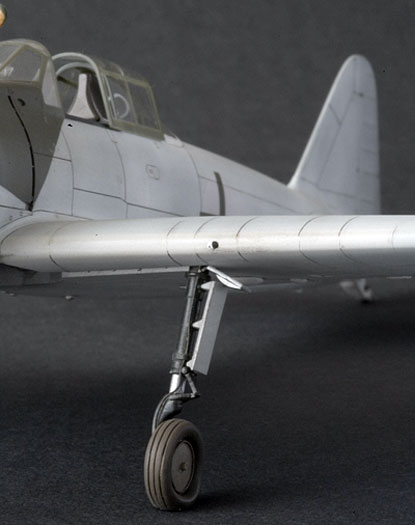 For
the undercarriage, I used a set of True Details wheels as well as fuse
wire to simulate brake lines. For
the undercarriage, I used a set of True Details wheels as well as fuse
wire to simulate brake lines.
For
the wheels, they were first painted in Aeromaster Tyre black, then given
a fine misting of sandy brown on the vertical axis – this is to try and
simulate dirt and dust. For the engine, I made an ignition harness from
fine fuse wire.
The
only other aftermarket addition used was a set of Moskit exhaust pipes
because, if the kit does have a bit of a weak area, it is the way that
the exhausts are depicted.
Other than this, there were some small changes to the basic kit in order
to make it as per 2-182 as it appeared in late 1945.
-
The main undercarriage doors were shortened.
-
The armament was removed.
-
The radio antenna and aerial were removed.
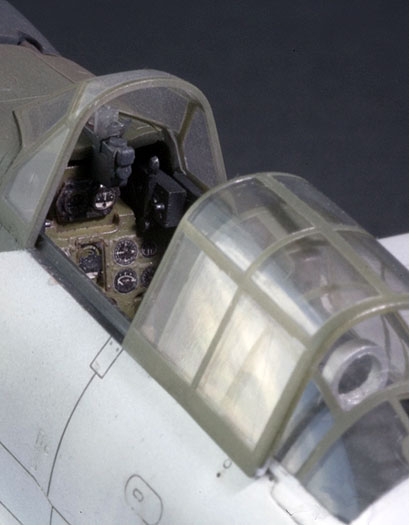
Once
the airframe was complete, and the afterdeck painted, I masked and
attached the canopy. I prefer to attach the canopy before painting as it
not only protects the interior, but also ensures that the canopy framing
will have the same finish, in terms of weathering etc., as the rest of
the model.
Paint
The
focus for this build was going to be the paint scheme.
I
began by spraying the approximate area of the national markings in a
combination of about 90% red & 10% dark brown (Hinomoura Red). Next,
these areas were masked off using circles that were cut with an Olfa
Circle cutter (I used the kit decals to determine size and location of
the markings). I painted and then masked the yellow identification
stripes (on the leading edges of the wings). Once this masking was
complete, I “pre-shaded” the panel lines with NATO black before applying
the standard JNAF scheme of dark green over light grey with a blue/black
cowl. All of the masking (except the canopy) was now removed.

Using the available photos as a reference, I now masked off the
distinctive edge of the white paint on the cowling, forward fuselage and
canopy.
1. The
model was then painted using Gunze Gloss White. I was super careful to
apply only so much paint that it was possible to just see the
faint outline of the national markings underneath.
2. Once
the white had dried, and the masking removed, I carefully sanded
(polished) the model with a Micromesh 12000 grit polishing pad. I was
careful to make sure that 80/90% of the ‘rubbing’ was in the direction
of the airflow. What I was trying to show was a hint of the camouflage
underneath the white overspray – but only a hint.
Note that when using the polishing pad, the
paint will tend to thin out the most – and the quickest - where
there is raised surface detail, such as the bulges that cover the
gun mechanisms on the bottom of the wing. If you are not careful
enough (as I was not) then you will take all the paint off the top
of these areas. It is then very difficult to fix this as it is near
impossible to match the overall finish of the rest of the model on
such a small area – from scratch. I fixed the problem by painting
the bulges white; however they stand out and do not look at all
convincing!
3. The
next step was to randomly select some panels on the upper/lower surfaces
and, without using tape, paint them in Tamiya flat white. The contrast
between the ‘fresh’ white and the ‘opaque’, sanded white creates a
messy, uneven look that, in conjunction with the just visible camouflage
underneath creates a ‘patchwork’ finish.
4. At
this stage the undercarriage bays were masked and painted in aluminium.
I am not sure that this is the correct colour, as it may have been
Aotake blue, however based on what I had read it is not unlikely that it
was simply aluminium.
5. Next,
I mixed a super thin “wash” of Testors Burnt Umber. Basically this is
about 10% paint with 90% thinner (ie. dirty thinners) and applied this,
using the end of an OO brush, to the panel lines. I then let this dry
thoroughly; and then, once dry, applied a small amount of thinner to the
tip of a tissue and wiped, in the direction of the airflow, over the
model so as to create subtle streaks on the airframe. You can just see
this effect in the photos.
6. Masking
templates were measured and cut for the crosses. These were applied to
the model, over the top of the Hinomouras, and painted the same dark
green as the surface of the model.
To
finish off the painting, the model was given a coat of Gunze Flat.
Weathering
Given that the aircraft only flew one or two times in these markings,
the “in-flight” weathering would have been minimal. Instead, I wanted to
focus on making the aircraft look like it had sat underneath trees for
several weeks, possibly months, and consequently had some ‘static’ dirt
on it.
But,
the trick here was to make the accumulated dirt only appear as stains –
as all of the loose debris would have been blown off when the aircraft
was flown, hence only leaving dirty stains behind.
To
achieve this I used a combination of the wash (as described above) and
Gunze pastels, applied using a stiff artists brush and then blown off.
All the while I was very careful not to overdo it, as I have wrecked
some models by overdoing the weathering.
Once
the weathering was complete, a final coat of Gunze flat was applied to
seal in all of the different layers of paint & pastels. At the very end,
subtle paint chipping was applied using a very sharp silver artists
pencil – having the pencil as sharp as possible is really important!
Finishing Touches
Final details included painting the navigation lights, removing the
masking from the canopy and adding the undercarriage legs, doors and
pitot head.
This
was a super interesting build. Not least for the historical aspect, but
also for the ‘learn as I go’ painting process that I used to simulate
the white finish.
The
Hasegawa series of Zero’s are superb kits, very easy to build and as far
as I can tell, fairly accurate. The subject is a little unusual, and it
will no doubt be an interesting contrast to the other aircraft in my
collection.
Lewis, Peter. The Mitsubishi Zero.
http://mitsubishi_zero.tripod.com/. This
site has a plethora of information specifically on 2-182 and the Zero in
general.
Lansdale, Jim, & Long, Jim.
J-Aircraft.com.
Japanese Ships, Aircraft and Historical Research.
www.j-aircraft.com
Treweek, Philip. Kiwi Aircraft Images.
http://www.kiwiaircraftimages.com/. Particularly the pages on the “Mitsubishi
A6M3 Zero-Sen 22 (Zeke)” and “Museums”.
The
Royal New Zealand Air Force Museum, Christchurch, New Zealand.
Various material & photographs from
www.aucklandmuseum.com
Thanks to Simon Narramore for taking the photographs of the model.
Additional
Photo Captions
|
Image: 2-182Ohakea.jpg
NZ6000 at Ohakea circa 1958. It is as prepared for the RNZAF 21st
Anniversary Celebrations, and wears an imaginary brown, green and grey
camouflage scheme.
©
RNZAF Official. Air Force Museum, Christchurch, New Zealand.
Image: 2-182ArdmoreBits.jpg
NZ6000 in ‘component’ storage (circa 1958) at Ardmore shortly before
Auckland Museum took possession in 1959. It still wears the imaginary
colour scheme; it wore these markings until 1997 when it was extensively
refurbished by the Auckland Museum.
©
RNZAF Official. Air Force Museum, Christchurch, New Zealand.
Image: 2-182AucklandMuseumToday.jpg
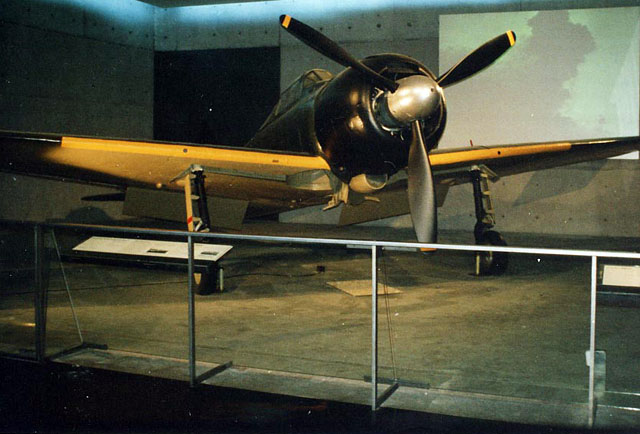
2-812 in its current home at the Auckland Museum. Unfortunately good
photos of the Zero are hard to come by, as the room it lives in is quite
dark, and not good for photography.
Image courtesy of Robert E. Montgomery.
Click the
thumbnails below to view larger images:
Model, Images and Text Copyright © 2006
by Jonathan Squires
Page Created 20 October, 2006
Last Updated
21 February, 2007
Back to
HyperScale Main Page |
 Home
| What's New |
Features |
Gallery |
Reviews |
Reference |
Forum |
Search
Home
| What's New |
Features |
Gallery |
Reviews |
Reference |
Forum |
Search