|
Hasegawa's
1/48 scale
Mitsubishi A6M3
Zero
by John Maher
|
 |
|
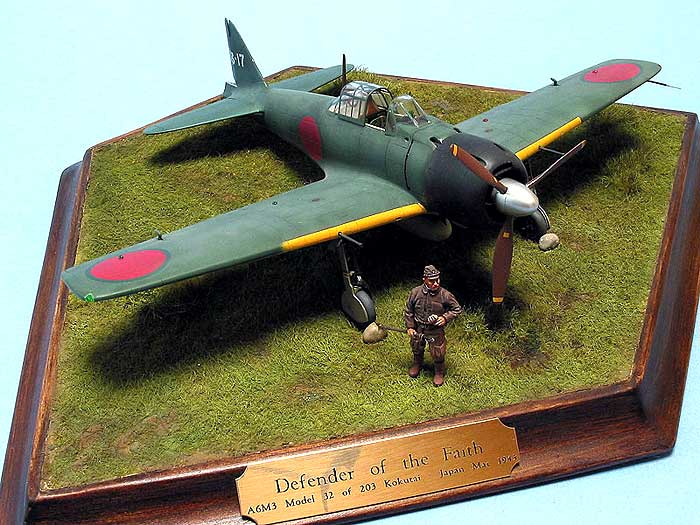
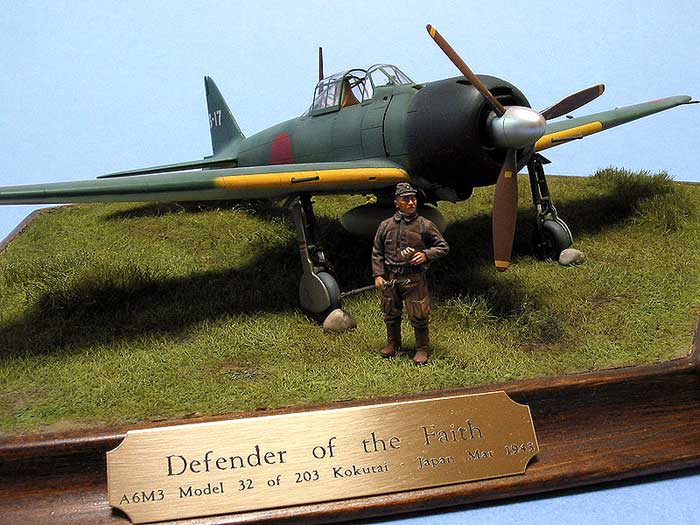
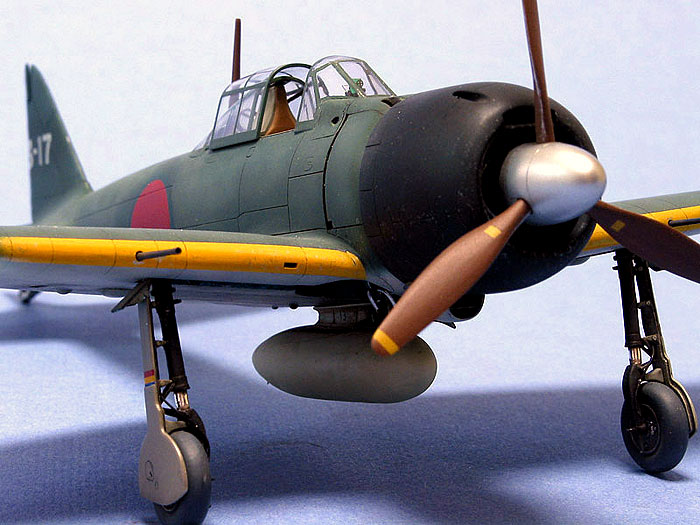
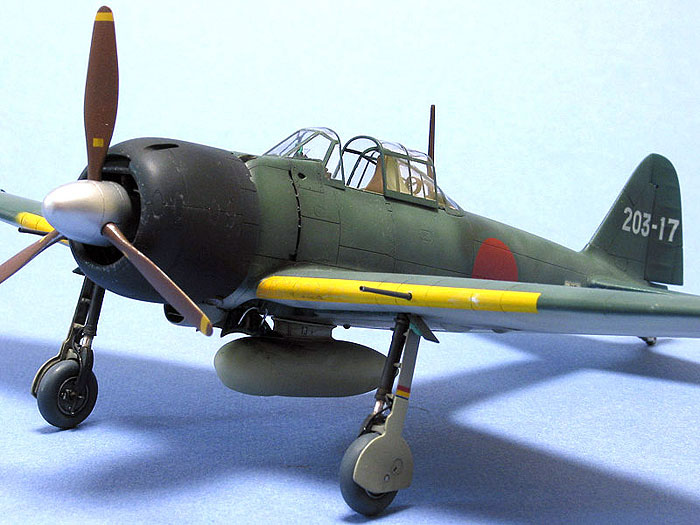
Mitsubishi A6M3 Zero Type 23 |
images of completed model by
Tony Bell

Hasegawa's 1/48 scale Rufe is available online from Squadron
When I started mocking up this
vignette and saw the figure close is to the wing mounted cannon, I
thought of calling the piece “Me and Mr. 20mm” but in the end I opted
for the more vainglorious “Defender of the Faith”.
I’ve always liked the Zero,
particularly the Model 32 with its slightly incongruous square wing
tips. But the challenge for me was that unlike a Bf109 or a Spitfire or
even a Mustang, documentation on Zero paint schemes and painting
practices in English are scarce.
I started with Hasegawa’s 1/48
Zero Model 32 kit and then added as much detail as I could.
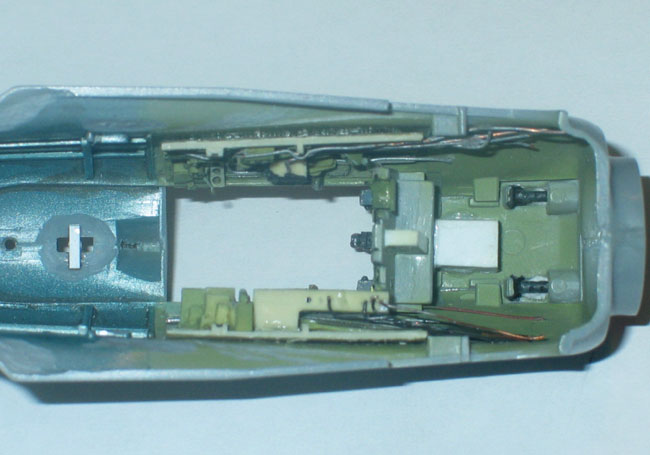
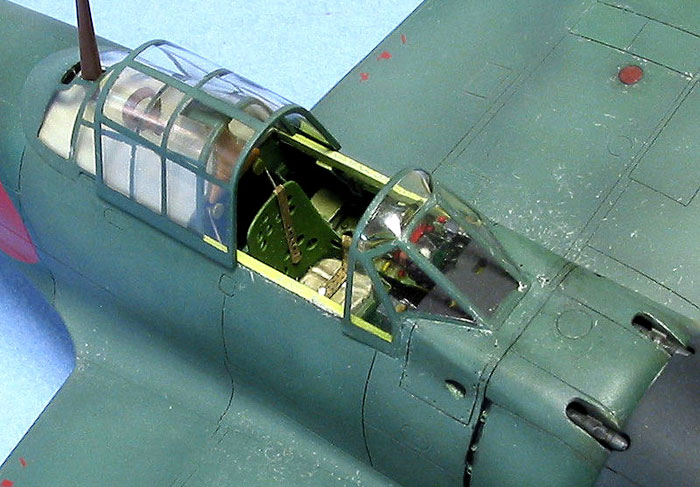
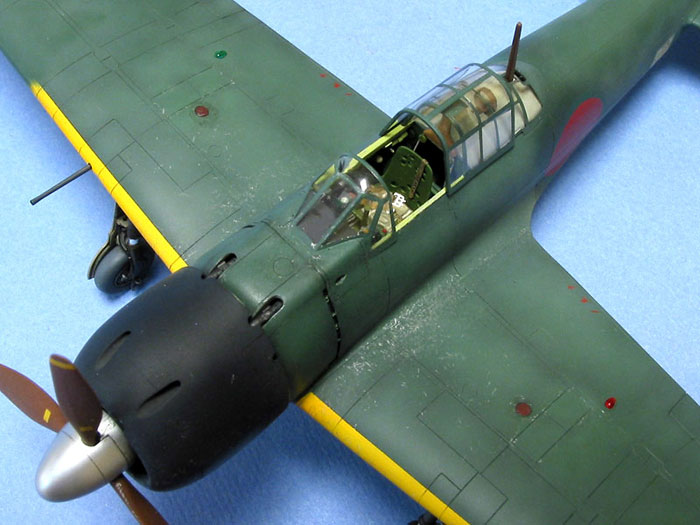
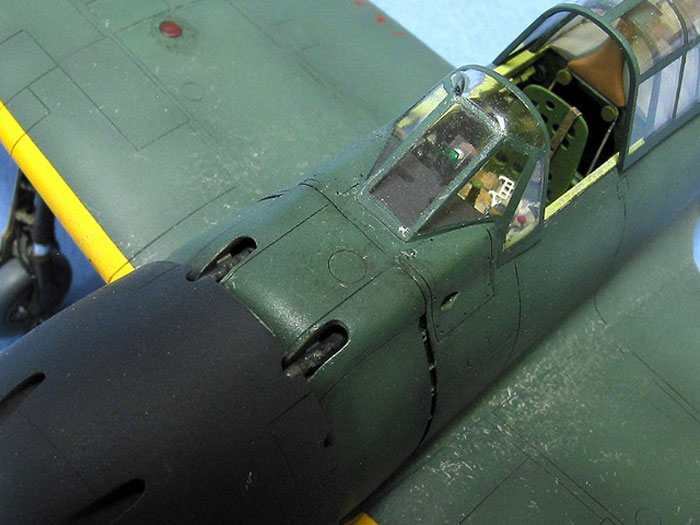
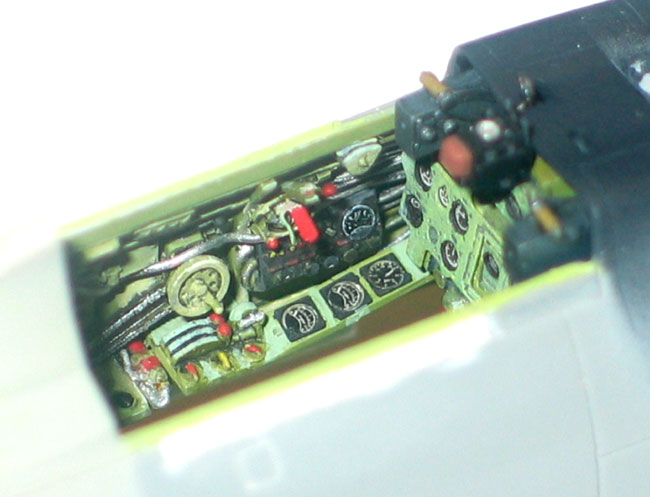
Beginning with the cockpit, I
used a combination of Hawkeye Designs’ resin update set (which I believe
is now owned and marketed by Cutting Edge), Eduard’s photo etch details,
and Model Technologies Japanese Seat Belts with Buckles set (sadly no
longer available). These accessories are much improved over what’s
provided by the kit, particularly the following: the seat (and the
details behind it), the machine gun butts that sit under the forward
cockpit coaming, and from Eduard, nothing in my mind beats the look of a
photo-etch instrument panel. As with most resin cockpit and photo-etch
sets, however, you do have to thin down the sides of the fuselage to get
these parts to fit.
Click the thumbnails below to view larger
images:
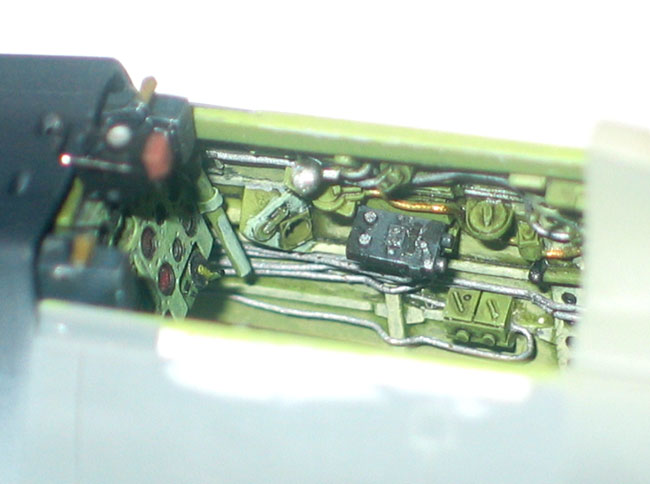
To these aftermarket sets, I
then added instrument dials to the left side console (using Waldron
faces and bezels) plus a mass of wiring made from fine solder and copper
wire to replicate the very busy cockpit of the Zero. I then painted
everything much like you paint a figure: the trick here is to paint
highlights on the raised areas and likewise accentuate the areas that
are in shadow. Rather than using a wash and dry brush technique, I
instead used various shades of the basic Japanese interior green by
first airbrushing a base of both Model Master Medium Green (floor and
seat) and FS Green (side walls and instrument panel) and then following
up with shading done with Humbrol. I painted the floor a darker colour
than the walls so as to do as much as possible to create visual
interest. As sub-contractors manufacture most aircraft components, they
would likely be different shades of the same basic colour anyway.
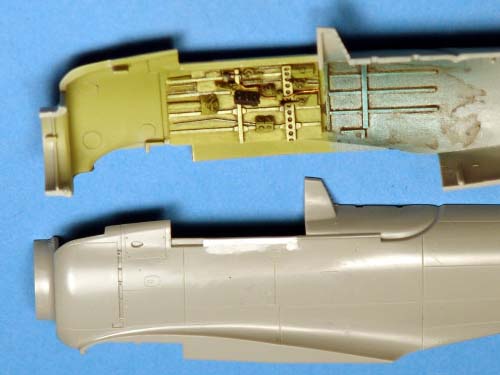
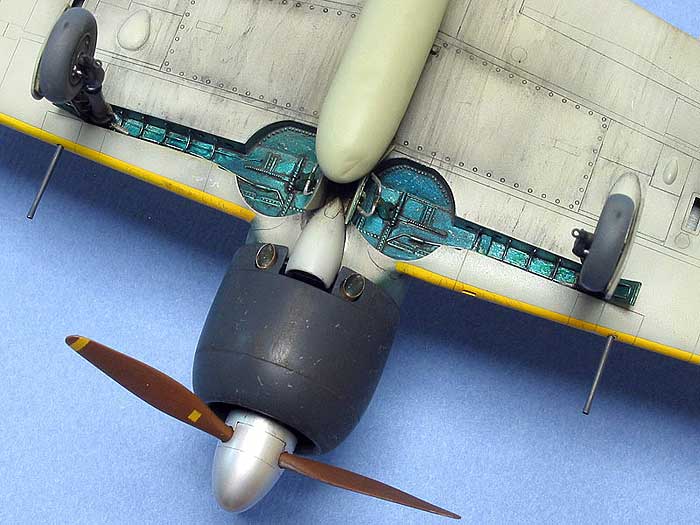
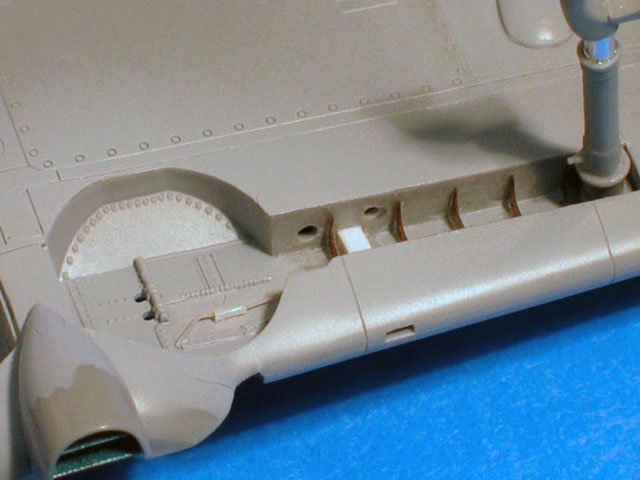
The next project I tackled was
the wheel wells, an area in which the Hasegawa kit shows its age. As
moulded, the wheel well is actually in two parts: a lower wing section
that includes the oil cooler is separate from the main lower wing piece,
which means there’s a tricky L-shaped seam inside the wheel well that
must be dealt with. Making matters worse, the wells are too shallow.
Click the thumbnails below to view larger
images:
I was able to resolve the seam
problem with a combination of Mr Surfacer and Precision Stix, one of my
favourite tools. These are small sanding sticks in the 320 – 1500 grade
range. For this application, I cut very small sections into which I
speared the point of a new No. 11 blade so that in profile, it looks
like a miniature dust mop. I was then able to painstakingly smooth out
the Mr Surfacer and eliminate the seams.
As for the wheel wells being too
shallow, I decided to leave them as is and then do my best with
finishing to give the illusion of depth. In this I was aided by
Eduard’s photo etch ribs that are made slightly smaller than true scale
to match the profile of the kit. I then added the duct for the cockpit
fresh air intake in the starboard wing plus the plumbing for the brake
lines and pitot tube. I also drilled some lightening holes into the
rear walls of the wells.
I then masked off the wheel
wells and laid down a coat of Tamiya’s AS-12 silver, which I decanted
from the spray bomb and ran through my Badger 150 cut with lacquer
thinner. I then over sprayed this area with a fifty-fifty mix of
Gunze’s clear blue and clear green in an attempt to replicate the
elusive Aotake finish. Once dry, I added a wash of Liquitex acrlylic
Mars Black and Burnt Umber. I applied this fairly liberally with
distilled water and in layers to give the wheel wells depth, and to
accurately portray one the dirtier areas of an aircraft. Any body
that’s looked in to the wheel wells of a still flying warbird knows how
grimy they can get. As a final touch, I rubbed some alcohol along the
raised edges of some the wheel well details so that the natural metal
shines through and adds to the illusion of depth.
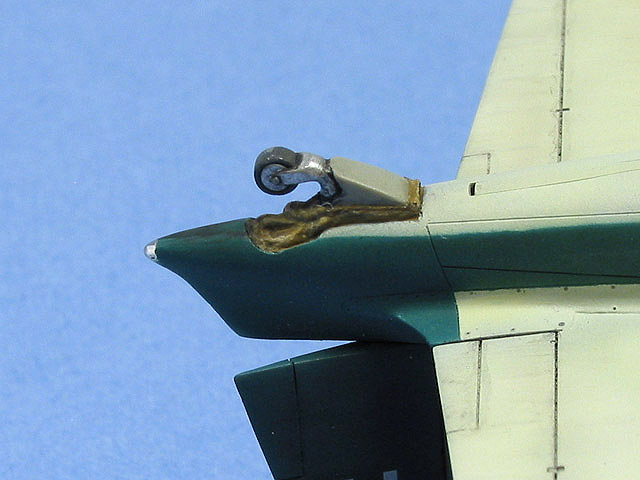
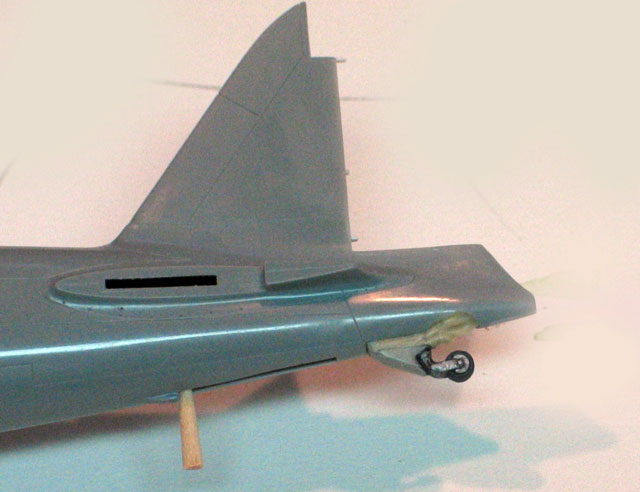
The tail wheel on many Japanese
aircraft has a leather bag around it that seals out dust and debris from
the inside of the fuselage. Hasegawa makes no effort to replicate this
in their Zero kits. So, using a page from figure modellers, I figured I
could replicate this leather bag by sculpting it with A+B putty. Trying
to attempt such a project after the model was built and painted sounded
a lot harder than assembling and finishing the tail wheel and its bag
first and then masking them off as protection from the painting stage.
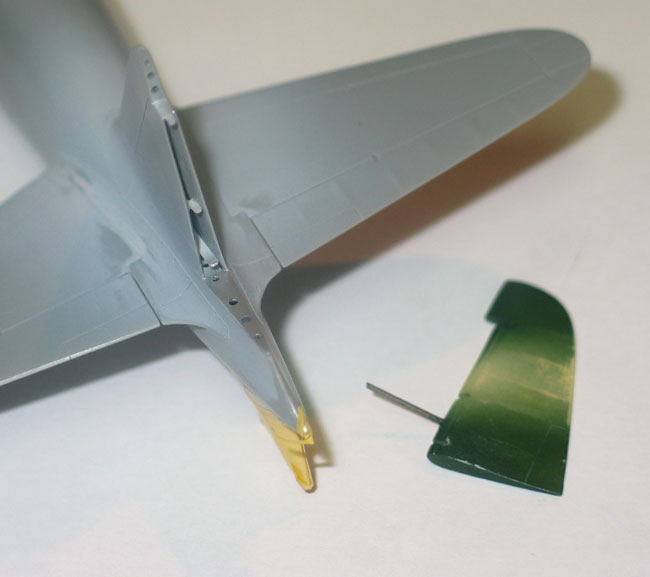
While working on the tail wheel,
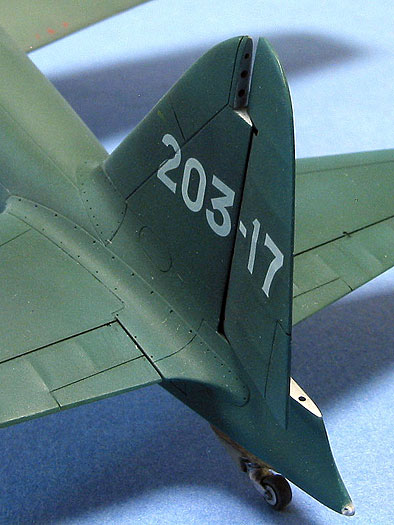
I decided to deflect the rudder. One of the reasons Japanese aircraft
are very light is because, well, they have a lot of lightening holes.
So when the rudder moves, you see said holes.
Click the thumbnails below to view larger
images:
I used a rudder from KMC to
replace the kit rudder after it had been carefully removed from the
fuselage. Bevelling the inside edges, adding hinges, and drilling out
the lightening holes were then performed. All that is then needed is a
pin in the replacement rudder to help its adhesion to the main fuselage
assembly.
Before joining the wings and
fuselage together, I first added the tail planes to the fuselage.
Mounting the tail planes before the wings helps me make the whole model
true. As the tail planes and rudder are almost always perfectly square,
I can use a protractor and drawings of the plane being modelled to make
sure I’ve got the angles right. Then if necessary the wings can be
adjusted to fit.
To the engine I added the push
rods from brass and the spark plug wires using Detail Master ignition
wires. Also added was some Eduard photo etch parts and copper telephone
wire between the cylinder heads. The only way to see this detail on the
finished model is to shine a penlight into the cowl. Easily recognized
however, are the Moskit exhaust pipes I used.
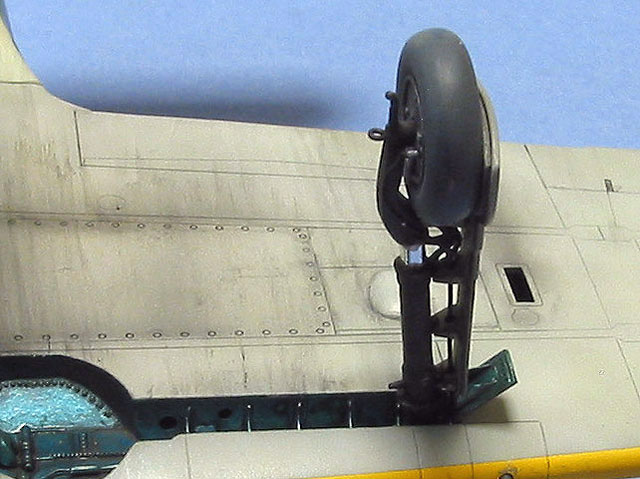
My last project was the main
landing gear legs, for which I used Tamiya’s 1/32 scale Zero landing
gear as a guide. The torque link was an Eduard photo etch part. The
oleo was wrapped with household aluminium foil using Microscale’s foil
adhesive.
The main gear cover as moulded
by Hasegawa does not sit tight against the leg, so I lengthened the
attachment arms with Evergreen StripStyrene. I could then use a round
file to shape the extended attachment arms to wrap around their
respective landing gear legs.
Holes were also drilled in to
the centre of the attachment arms through which I ran fine solder to
represent the brake lines. The two ends were then connected
respectively to the wheels themselves and the plumbing already installed
in the wheel wells with stretched sections of a Q-tip.
I also added to the legs tow
rings and the arms that extend below the axle. The latter engages the
inner wheel cover during the gear retraction sequence. This part was
made by pining a section of Evergreen StripStyrene to the bottom of the
kit part. It was then sanded to shape using the Tamiya part as a
guide. Next, a small plastic disk punched out using the Waldron
sub-miniature punch was attached to the tip. When five-minute epoxy is
then applied to the disk, it dries in a half-moon shape.
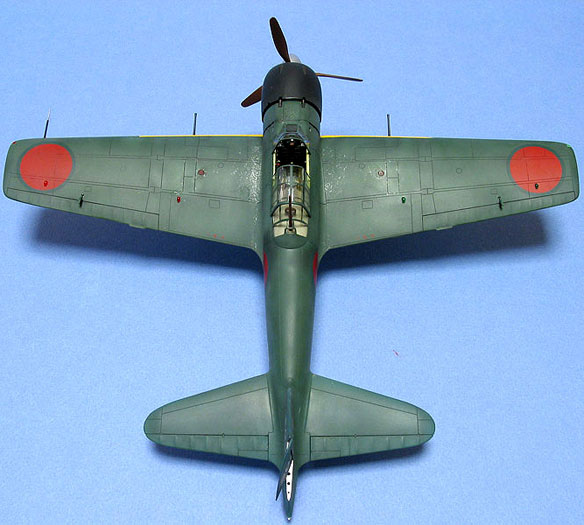
 The
colour scheme represents a hypothetical aircraft, as I wasn’t keen on
either an all grey or a mottled scheme. The
colour scheme represents a hypothetical aircraft, as I wasn’t keen on
either an all grey or a mottled scheme.
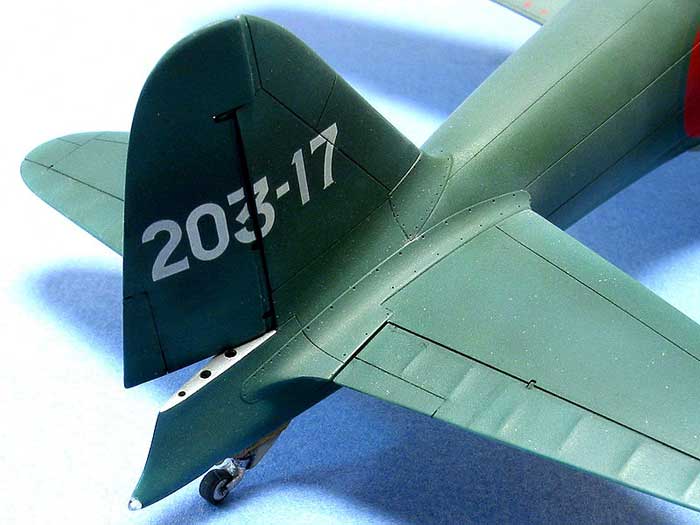
I decided to instead show a
Model 32 that had been repaired with a replacement aft fuselage and tail
section from a Model 52. While I have no direct photographs supporting
this approach, I have circumstantial evidence from a web site (www.kilroywasthere.org/003-pages0glenwallace/45-03-18/html)
that at least the Model 32 was still operated
late in the war.
This page is the story of an American navy
pilot recounting a mission over Kyushu in March 1945 during which he
claims to have engaged Zeke 52s and 32s. I know from Osprey’s IJN Aces
that 203 Kokutai was based there at that time and interestingly, its
commander, Takeo Tanimizu, had flown a 32 with some success the previous
December with the Tainan AG.
I therefore painted the model in
two sections: the wings and forward fuselage were painted first overall
with Gunze RLM02 (H70) mixed fifty-fifty with Gunze White and then the
upper sections were painted with five shades of Gunze IJN Green (H59).
I used this many shades to make it look like this section had been
repainted a couple of times.
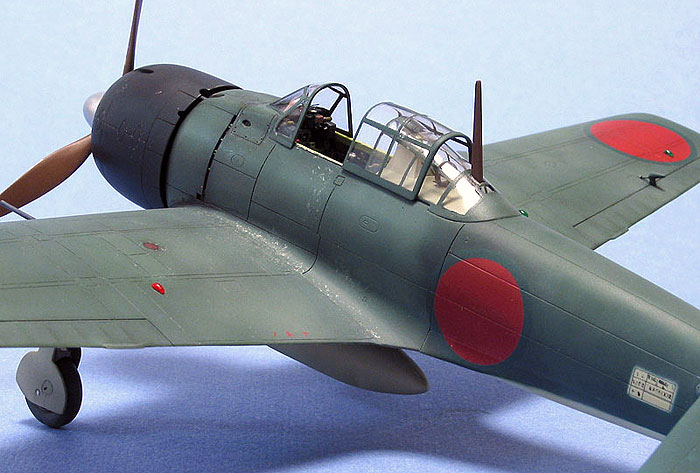
The upper aft fuselage and tail
were painted in a custom Gunze colour mixed by my friend Garfield
Ingram, to match the green surround on the Hinomarus I used from
Aeromaster’s late war Zero sheet. The lower sections were painted Gunze
Sky (H74). I used paper masks for the colour demarcation and for the
background of the manufacturer’s (Nakajima) data stencil on the port
fuselage.
I did my usual pre-and
post-shading to accentuate panel lines and simulate uneven fading. Only
the following areas received a wash: the panels around the engine area,
cowl machine guns, wing gun covers, and around the control surfaces.
Decals were sealed with multiple coats of Polly Scale gloss, followed
each time by a gentle rub down with Micro Mesh 6000, 8000 and 12000
grades. As car modellers discovered long ago, this is a great way to
make the raised edges of a decal truly disappear. The entire airframe
except the cowl was finally sealed with Polly Scale flat.
The cowl was painted first with
a fifty-fifty mix of Model Master’s Insignia Blue and Aircraft Interior
Black. I then post-shaded with a very thinned down Aircraft Interior
Black. Paint chipping was done with a Prismacolor pencil.
I used a combination of Winsor
Newton oil paints, Liquitex Acrylics and Mig Pigments for weathering. I
like to apply these in layers so that the oil paints make the prominent
oil streaks, the acrylics are for the subtle staining and the pigments
are a great way to show the streaking back from the wheel wells.
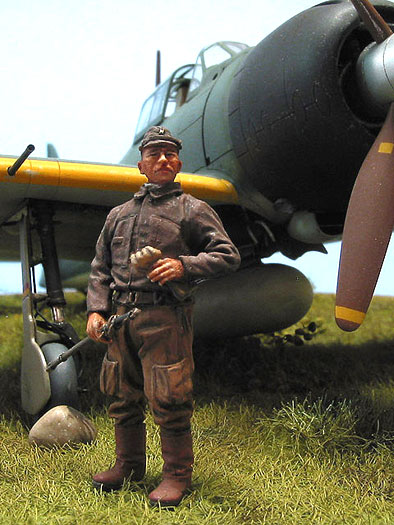
As always, to give my model a
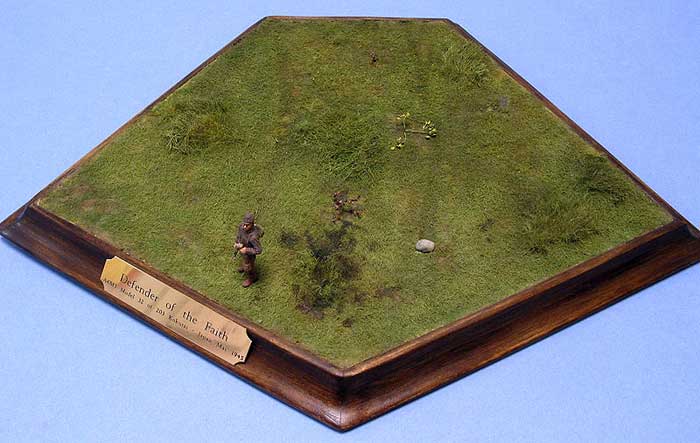
sense of scale and place, I created a base and added a figure.
 The
grass field had its basic contouring done with a pre-mixed dry wall
compound. I then added the very fine dirt found in your garden after
which I smoothed out some of the contours with Celluclay, particularly
around the tire tracks, as I wanted the look of soft ground and not a
muddy quagmire. The
grass field had its basic contouring done with a pre-mixed dry wall
compound. I then added the very fine dirt found in your garden after
which I smoothed out some of the contours with Celluclay, particularly
around the tire tracks, as I wanted the look of soft ground and not a
muddy quagmire.
You're now left with an ugly
grey base with dirt on it. I then stained this groundwork with Woodland
Scenics earth pigment, as raw plaster would soak up gallons of my
shading colours. It was now time to add every day static grass and the
trick here is to apply lots of white glue thinned with water. Then,
after dumping the static grass on to the wet glue, you blow across it
very hard to get it to stand up.
Once the grass dried, I airbrushed six different Humbrol colours for
shading and blending including greens, yellow-greens and browns. I also
planted and then painted some pieces of dried flower material, dry
brushed the whole thing with the same shades of Humbrol, and finished it
all with Flowering Foliage from Woodland Scenics sprinkled very lightly
(to represent dandelions) and held in place with hair spray. My last
detail was oil stains applied with Winsor Newton oils.
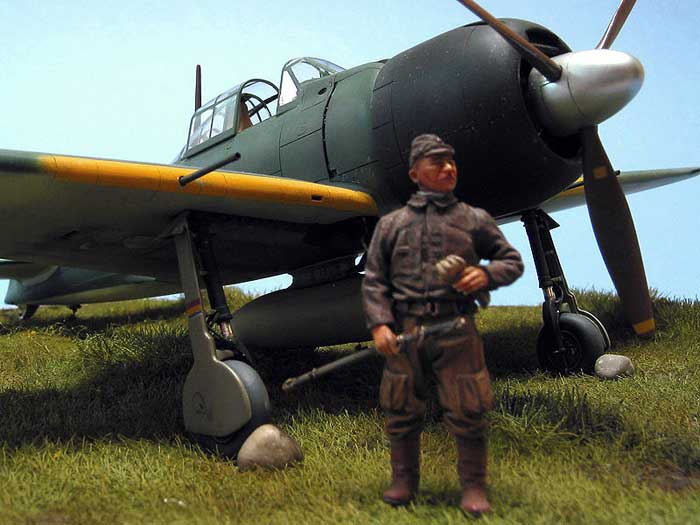
The figure is from Jaguar and
sculpted by Mike Good. His skin was painted with Winsor & Newton oils
and his clothing and sword were done with Humbrol.
My final touch was adding
turned-brass cannon barrels from Fine Details. Purists may argue that
the long-barrelled cannons were never used on a Model 32 but I imagined
this aircraft as being like something out of a Japanese version of the
“Blue Max”, set in WWII so I used them anyway.
Credits
Finished Model Photography: Tony
Bell
In-progress Photography: Richard
Briggs & Garfield Ingram
Thanks also to Harvey Low for
sharing his knowledge of Japanese aircraft
Click the thumbnails below to view larger
images:
Model and Text
Copyright © 2006 by
John Maher
Images of completed model Copyright © 2006 by Tony Bell
Page Created 25 September, 2006
Last Updated
21 February, 2007
Back to
HyperScale Main Page |
 Home
| What's New |
Features |
Gallery |
Reviews |
Reference |
Forum |
Search
Home
| What's New |
Features |
Gallery |
Reviews |
Reference |
Forum |
Search