|
2 x Heller's 1/72
scale
Sud Se 316
Alouette III
by
Thomas Muggli
|
 |
|
Sud Se 316
Alouette III |

Heller's
1/72 scale Alouette III is available online from Squadron.com
I recently built an Italeri Eurocopter Cougar for my 1/72 scale Swiss
Air Force collection. It sat all alone on my shelf among all the
fixed-wing aircraft models. Clearly, it needed company. The natural
choice was the Alouette III.
Whether you are an injured climber stuck on a mountain top, or a
pilot stranded on a glacier after ejecting from your fighter jet, the
Swiss Air Force helicopter squadrons have the ability to get you out of
your predicament. Their means is the Sud Aviation SE 316 Alouette III.
This contemporary of the 1960s vintage UH-1 Huey is still in service
today, being used by both military and civilian organizatons, worldwide.
The Swiss Air Force procured 80 of these versatile helicopters between
1964 and 1972. Ever since, the Alouettes are the backbone of the Swiss
Air Force helicopter fleet.
They serve many purposes, among which are mountain search and rescue.
It is only recently that some of the Alouettes have been retired due to
their age. However, for some time, the larger and more modern Eurocopter
Cougars have been replacing the Alouettes in front line service.
Nevertheless, the now venerable helicopter is expected to remain in
service for training and liason duties for some years to come.
As with many helicopter types, the choice of kits of the Alouette III is
very limited. In fact, the only one I know of is the old 1/72 scale
Heller kit. Thankfully, it has been reissued many times. I bought one of
them some years ago. More recently, I came across another kit in French
Securite Civile colors with added parts for rescue gear. I also found an
excellent Model Art decal sheet featuring decals for several Swiss
Alouette IIIs. My original plan was to build just one model, but with
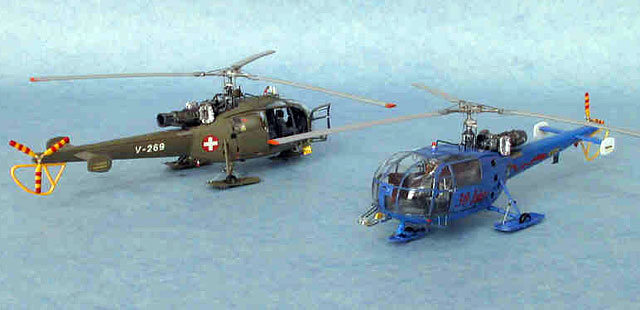
plenty of decals on hand I felt compelled to build two Alouette IIIs. I
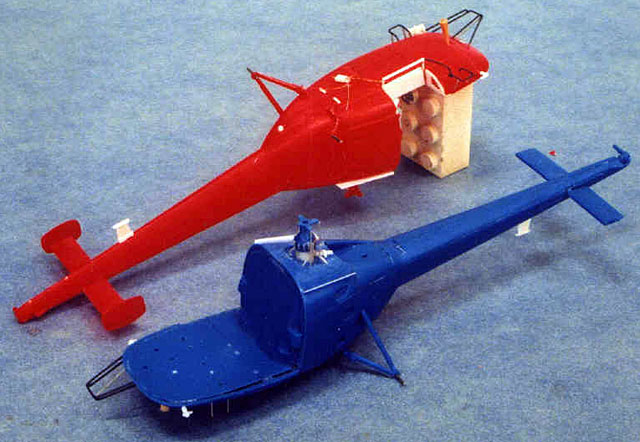
decided to build both models simultaneously. One would be finished in
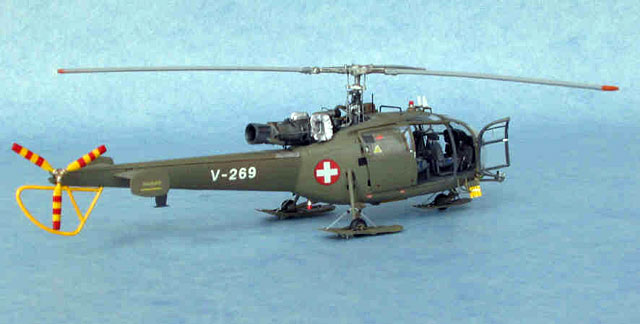
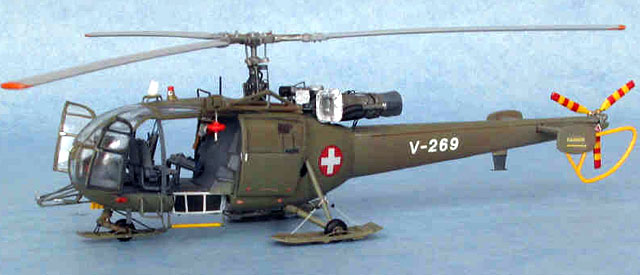
rescue configuration, and feature the olive drab paint scheme common for
Swiss Air Force Alouette IIIs, while the other would be in liaison
configuration, and painted in the blue anniversary scheme of light
aviation wing 4.
My two kits happened to be cast in bright blue and red plastic. I
thought I was holding toys in my hands! But closer examination revealed
that despite its age the Heller Alouette III is not a bad kit. The
overall shape looks accurate and surface detail is adequate. The only
significant drawback is a general lack of detail. Many small parts are
simplified and out of scale. To achieve a more realistic look for my
models, I intended to add as many scratchbuilt details as my skills and
reference material would allow.
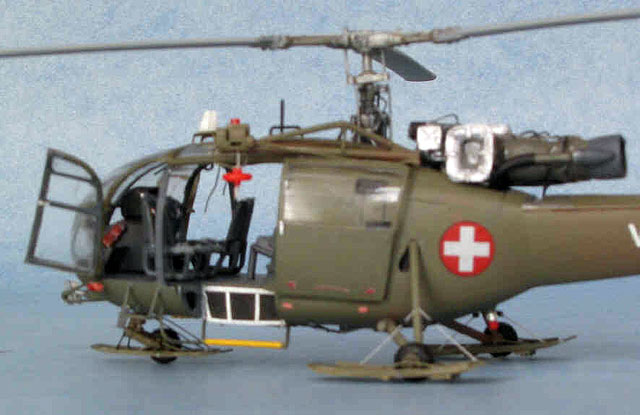
I decided to complete the construction in subassemblies. The first item
on my list was the Artouste III turbine, which sits in the open on top
of the fuselage. No doubt it is one of the focal points of the models.
The shape of the turbine provided in the kit is not correct for the
Swiss Alouette IIIs. To correct this I fashioned a sleeve from a 5 mm
wide 0.5mm thick styrene strip which I glued around the rear portion of
the turbine’s mid section. Using a sanding stick and sandpaper I faired
the sleeve with the turbine’s body. Next, I glued the other kit supplied
turbine parts in place. After studying reference photos taken from
various angles, I added plumbing made from various gauges of copper wire
and other details made from styrene scraps.
Finally, I brush painted the turbine with acrylics, again referring
to photos of the real aircraft.
Next, I turned my attention to the skis, which are standard equipment on
Swiss Alouette IIIs. The Securite Civile kit provided a set of skis, but
they are basically chunks of styrene with no detail. I used them only as
templates to make new skis from thin sheet styrene. The new skis were
then detailed with stretched sprue and styrene strips.
Before continuing with detail work, I assembled the fuselage halves,
cabin floor and rear wall. The only modification needed here was to cut
out a well on the port side of the rescue helicopter. This well is
opened when the rescue hoist is in use. The walls of the well were made
from sheet styrene. After cleaning up a few seams, the fuselage was
ready for further detailing.
More Details
First, I made a landing light, which is located in the middle of the
forward fuselage and is represented on the kit only by a raised circle.
I drilled a small hole in the middle of this circle. Turning a 5mm drill
bit between my fingers, I enlarged the hole until I had a shallow
depression the size of the landing light. A small piece of bright
aluminum foil was then glued and burnished into the depression. Once the
glue set, I trimmed any excess foil from the edges of the depression. I
filled the depression with superglue and let it dry thoroughly. Finally
the area was sanded smooth and polished to a glassy sheen.
The next item was a harness on the underside of the fuselage, which is
used to hoist external loads. I made the harness from copper wire,
stretched sprue and styrene bits. The harness was painted separately and
attached during final assembly after the models were painted. Turning to
the top of the fuselage, I worked on the rotor head next. The kit
supplied item seemed too short and offered only coarse detail. I
extended the rotor head with a 2 mm piece of styrene tubing and glued it
into place. Again, I broke out the stretched sprue and styrene bits to
add more detail. In hindsight, looking at the finished models, it
appears that I overdid the extension of the rotor head at bit. But I
don’t feel that it is noticeable enough to warrant rebuilding it. At
this point I also assembled the main rotor and detailed it with a few
pieces of stretched sprue.
Using steel wire, I made cockpit entry steps and a holding bar on the
rescue helicopter, as well as bracing for the mirrors, which allow the
pilot to see below the helicopter. Position lights and the flare racks
on the starboard side of the fuselage were made from sheet styrene bits.
I glued all these parts to the lower fuselage ensuring their proper
position and alignment according to my references. Next, the
kit-supplied tail fin assembly and main landing gear legs were added.
Fins on each side of the upper fuselage and a large UHF antenna on the
bottom of the tail boom were made from sheet styrene and glued in place.
I used the rescue hoist provided in the kit, but replaced some of its
bracing with steel wire and added some details made from copper wire.
The tail rotor and its protective frame are also kit parts, which were
cleaned up carefully. These items were painted separately and left off
the model until final assembly.
Cabin
The Alouette III features the ultimate greenhouse cockpit. You can
literally see everything in the cabin. I used the kit-supplied seats,
instrument panel mount and control columns. But I also added a detailed
instrument panel, foot pedals, a styrene strip edge of the front
passenger area, and seat belts made from aluminum foil with styrene
scrap buckles. More added details include copper wire headphone cables
hanging from the ceiling, and an emergency kit with a shovel made from
stretched sheet styrene covered with bare metal foil to be mounted on
the rear wall.
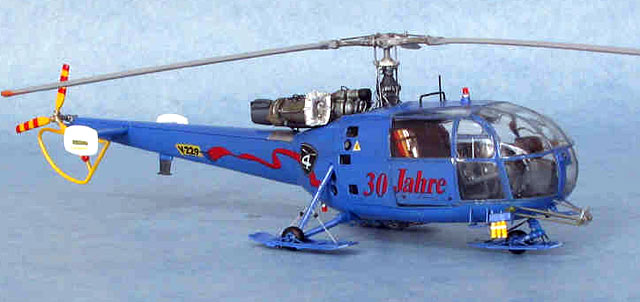
Now it was time to work on the greenhouse itself. To achieve a realistic
look, I considered making stretch form duplicates for acetate of all the
clear parts. After examining the kit parts, I concluded that they were
thin enough to spare myself the trouble of making duplicates. Since I
wanted to pose the doors open on the rescue helicopter, I cut the four
doors off from one of the clear canopies using a razor saw. Then, I gave
all the clear parts a bath in Future floor cleaner and let them dry
thoroughly. Meanwhile, I airbrushed a clear decal sheet with the cabin’s
interior color. Once the paint had dried, I cut strips and rectangles
and applied them to the inside of the clear parts to represent framing
and door panels. This was done just on the rescue helicopter since only
its inside would be in plain view. I also airbrushed sections of the
decal sheet with the exterior color covering the interior color painted
earlier. Later, once the canopy was installed, I cut strips from the
sheet and applied them to the outside of the cabin. I find this a very
efficient way to simulate cockpit framing since no masking is required
and razor sharp lines are achieved. As an added bonus the interior color
painted first is visible on the inside of the canopy.
Painting
and Final Assembly
|
While I had the airbrush out, I also painted the fuselage. This was
easy, since both models have simple one color paint scheme. I used Model
Master acrylic olive drab and a home made blue mix of Tamiya acrylics.
After spraying a coat of Future floor cleaner, the decals were applied.
I followed up with a coat of clear flat on the rescue helicopter and
another coat of Future for the anniversary scheme.
Now for the big event - final assembly.
First I installed all the items in the cabin. It should be noted here
that on the rescue helicopter the forward passenger seats are facing to
the rear. I glued the clear cabin parts in place using only tiny amounts
of superglue to prevent fogging. Any gaps were filled with white glue. I
left the doors off the rescue helicopter for now. Next, I added small
parts such as the front wheel, main wheels, skis, tail rotors, antennas,
beacons, flares, mirrors, outside load harness and the rescue hoist.
Finally, I added the open doors on the rescue helicopter.
And there they were – my two little Alouette IIIs!
Click on the thumbnails
below to view larger images:
Model, Images and Text Copyright ©
2005 by Thomas Muggli
Page Created 11 February, 2005
Last Updated
11 February, 2005
Back to
HyperScale Main Page
|
 Home
| What's New |
Features |
Gallery |
Reviews |
Reference |
Forum |
Search
Home
| What's New |
Features |
Gallery |
Reviews |
Reference |
Forum |
Search