|
1/32 scale Type 110 cowl
conversion
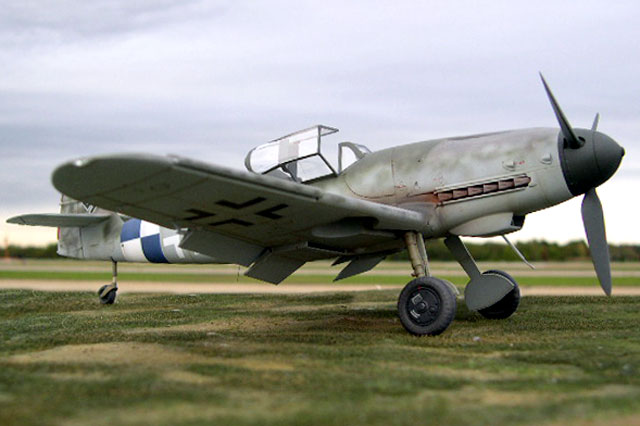
Messerschmitt
Bf 109G-10
by
Floyd S. Werner Jr.
|
 |
|
Messerschmitt Bf
109G-10 Type 110 Cowling |

Hasegawa's 1/32 scale Messerschmitt Bf 109G-14 is available online
from Squadron.com
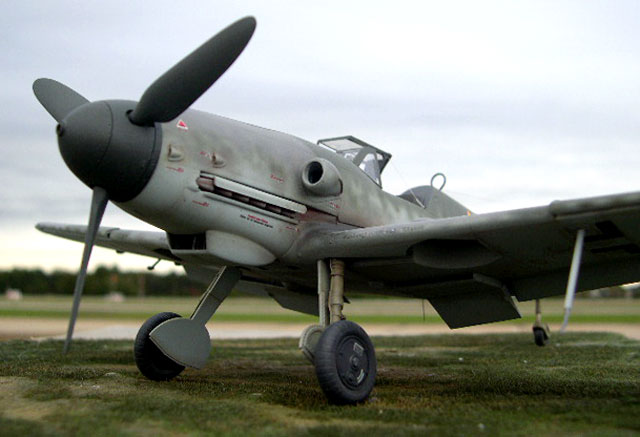
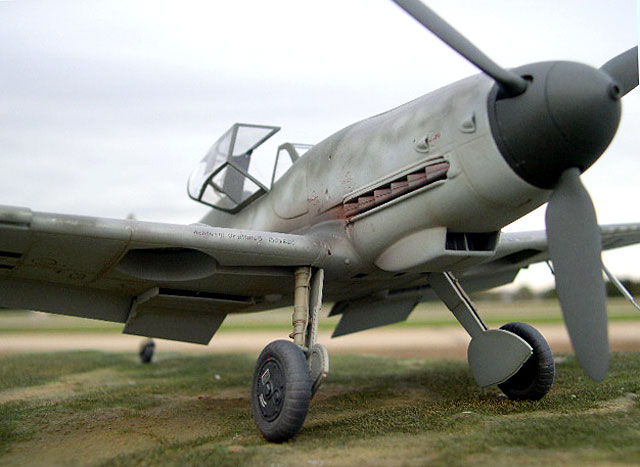
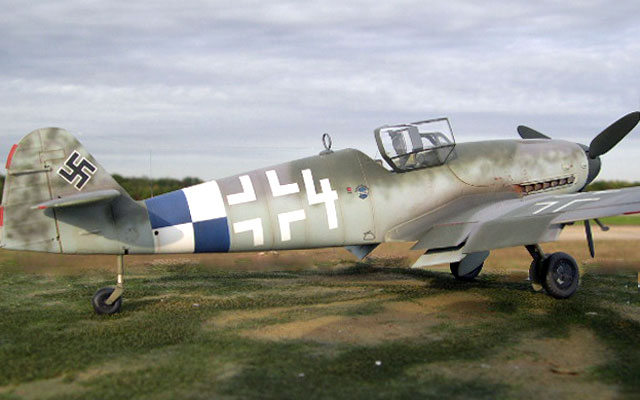
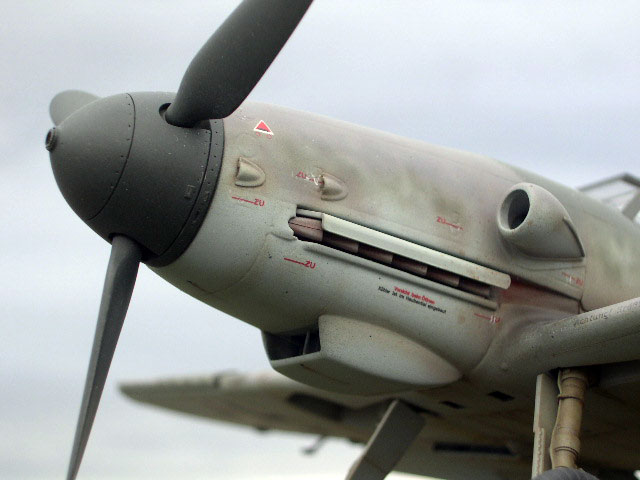
Developed by Erla, the Type 110 cowling is a very asymmetrical
covering for the DB605. The left engine cowling is very different from
the right. Another trait of the Type 110 is the flat panel below the
left cockpit. Due to the unique shape of the cowlings the gun troughs
were actually longer. Many of these Erla aircraft were issued to JG300,
the bomber units converting over to fighters and the Italians.
The designation, "Type 110" was a numerical value applied by noted
Luftwaffe researcher, Jean-Claude Mermet, in his book "Messerschmitt
Bf109 G-1 through K-4, Engines and Fittings". Offered only to members of
the Luftwaffe Verband, some portions of the book were quoted in Brett
Green's "Augsburg's Last Eagles".
Enough has been said about the basic Hasegawa kit that I will
concentrate on the actual conversion, aftermarket sets used and
finishing.
Cutting Edge Type 110 conversion
It should be noted that this conversion set is designed for the
Hasegawa Bf-109G-14 kit, NOT the G-10. Cutting Edge has taken the
position that Hasegawa got the shape of the Erla and spine correct on
the G-14 kit. (Someone tell me why if you have an accurate canopy and
spine would you remake it and screw it up on the G-10/K-4 kit?)
The Cutting Edge conversion is molded in light gray plastic and is
bubble free and distortion free. The Erla conversion is very unique and
Cutting Edge has accurately captured the asymmetrical look of the
cowlings. The cowlings add a very different look over the standard G-10.
You are provided with new front cowlings, the upper saddle panel, the
square panel for the left side and the elliptical panel for the left.
Also provided is a new radiator, a supercharger inlet, as well as, two
sets of scoops, exhaust stacks and guns. Generally a very good fit on
all the parts. All panel lines are recessed. The only issue I found with
the set was having to scribe the saddle panel grab handles on top with
the Eduard photo etch templates. You will also have to drill the drain
hole on the bottom of the front cowling and the crank handle on the
right cowling. Neither is a difficult endeavor.
If you use the G-14 kit, the only issue with this conversion set is that
you are limited to the small kidney shaped bulges on the wings and the
small tail wheel. It is only a small issue as many of the Type 110
aircraft had the smaller wheels, but a few did have the larger wheels
and associated bulges and tall tail wheels so check your references.
Construction is very straightforward and there are no big issues. All
the cuts are along natural panel lines and are a straight drop in fit
for the kit parts, except for the canopy. The nose has to be cut from
the firewall down and then the kit saddle panel has to be removed. After
that everything is an easy fit once the casting blocks are removed. The
cowlings have cuts for the fuselage to fit into. This ensures that you
the cowlings are straight. You will have to use caution in the engine
exhaust area and the gun troughs. Both of them have flashed over resin
(to ease casting) that has to be removed. It is fairly easy to remove
them and they represented very little problem.
The hardest part of the conversion, which turned out to be a non-issue,
was that you had to cut the front clear windows. I used Dymo-tape to
protect the windscreen and then just used a razor saw to remove the
bottom windows. Once that was done the curved portion in the front was
sanded down with sandpaper wrapped around a knife blade handle. With
that done the rest of the construction proceeds as normal. If you screw
it up once the kit gives you a second canopy.
Cutting Edge Bf-109G06 Super detailed Cockpit- CEC32090
Because I used an aftermarket cockpit I elected to cut the cowling
alignment area. It wasn't a real issue, but if I had to do it again I
would not cut the cowling. I would modify the cockpit. This is the only
thing I had to do different with the cockpit set. The cockpit still fit
beautifully and greatly enhanced the look.
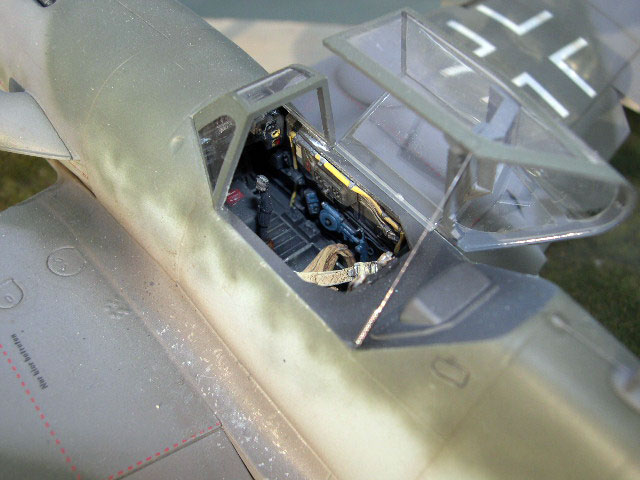
The cockpit is very nicely detailed. Yes, yes, I know that the G-6
cockpit differed slightly from the G-10, but I don't really care. It
looks really nice in there. I wanted to try the poseable seatbelts. This
set was a little thick but I have another set where they are much
thinner, so check your set. I used a scalpel blade to cut the belts out
and painted them with Polly-S paints. I would recommend using an enamel
next time, but they took the paint well and look very nice. I can see
the merits of the poseable belts. I liked them but I also like the
molded on type. The choice is up to the modeler.
The cockpit was painted with Model Master RLM 66 and dry brushed with
RLM 02. Some silver paint and pencil were added to simulate chipped and
worn areas. Details were picked out with red, yellow and blue.
Bf-109F/G/K Detailing Set- CEC32084
I think this set is essential if you are building the Hasegawa G-6/14
kits. Again molded in light gray resin that is bubble and defect free
this set offers some great goodies. There is some redundancy with this
set and the type 110 conversion set, such as the exhausts, cowl guns,
and air scoops. The small tail wheel is included and is considerably
better than the kit offering. There are elevators that can be used but I
elected not to use them. I did use the battery cover for behind the
cockpit.
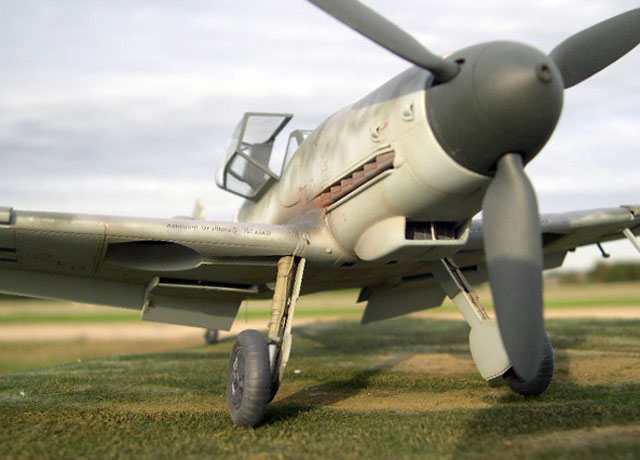
Bf-109G/K Extended Strut & Tail Wheel
This set includes a white metal strut and resin tail wheel. The set
is an easy way to produce an accurate look for an extended tail wheel
airplane.
Because my airplane had the larger tail wheel and the kit used is the
G-14 you are obligated to the small tail wheel unless you use this set.
It is as easy as painting and gluing in place. I used epoxy so that I
had time to adjust it while it set.
Messerschmitt Bf-109 Spinner- EP#20-32
In my opinion, the worse part of the Hasegawa kit is the spinner,
regardless of the version. This makes the Eagle Editions spinner a
required essential. The Eagle Editions spinner is much better looking
than the one offered in the kit. The fit is great as long as you follow
the instructions.
Continuing the Build
Once you get the cowlings cut out and attached the construction of
the kit progresses normally.
The fit of the kit is excellent and progresses rapidly and before you
know it is time for painting.
Painting,
Markings and Weathering
|
The model was washed and then wiped down with both resin and plastic
cleaner. The kit was finally primed with Tamiya Primer Fine (White).
Once things were cleaned up it was off to the paint booth. Using Model
Master RLM 66 as a preshade color the model was ready for real color. I
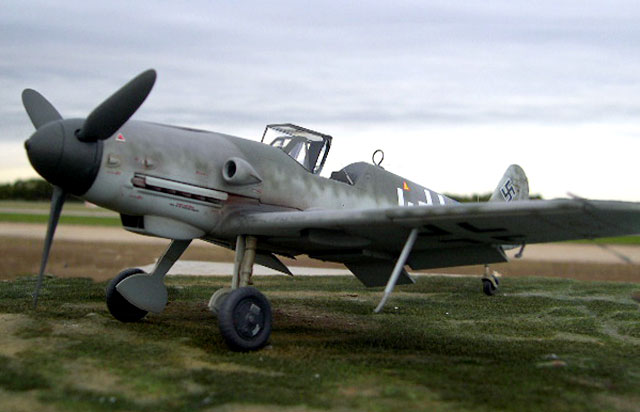
started to paint the RVD band with Tamiya Flat White. Once this was done
I masked the checkered pattern with Tamiya masking tape and then sprayed
Tamiya Flat Blue. This bit of color was awesome. I made a decision to do
this kit again someday in 1/48th scale. Once the band was masked over,
Model Master RLM 76 was sprayed over the entire kit. Model Master RLM 75
was laid down over the wings and fuselage followed up with Gunze RLM 83
(Dark Green). A coat of Tamiya Clear and the model was ready for
decaling.
Cutting Edge Decals Bf-109G-10 type 100 & 110 cowl versions- CED32060
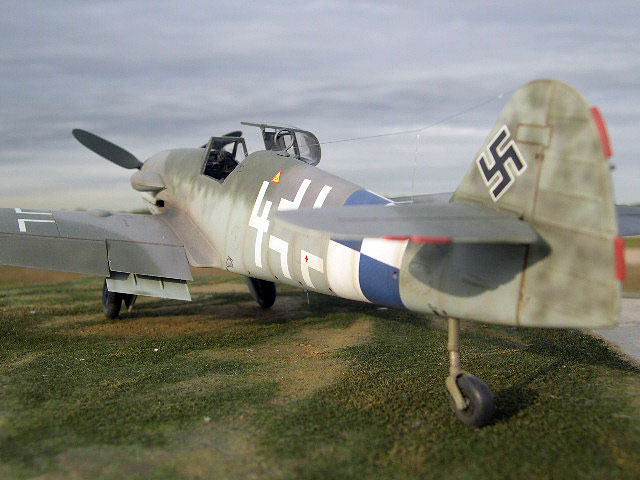
Markings are provided for three aircraft and choosing one was
difficult. A "regular" 109 from JG77 is included. There are two Type 110
cowled machines, one from JG300 with a rust red band and "Gisela" under
the cockpit and the other is "White 4" with a white and blue
checkerboard design. I chose "White 4" because of the late war
semi-defensive colors and the checkers looked very colorful. The Cutting
Edge decals are thin in perfect register and very opaque. They worked
beautifully and conformed real well with MicroSol and Set. The decal
sheet does not include the simplified crosses for the airplane that I
chose. I thought this strange, but the Hasegawa decals actually worked
real well. I was surprised and shocked as the Hasegawa decals were not
that thick and are useable.
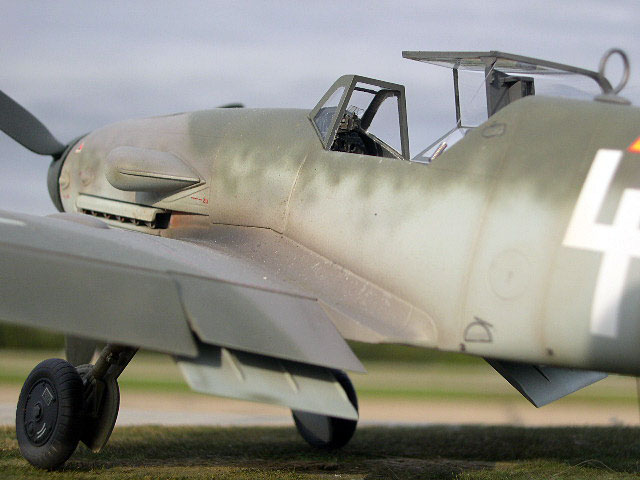
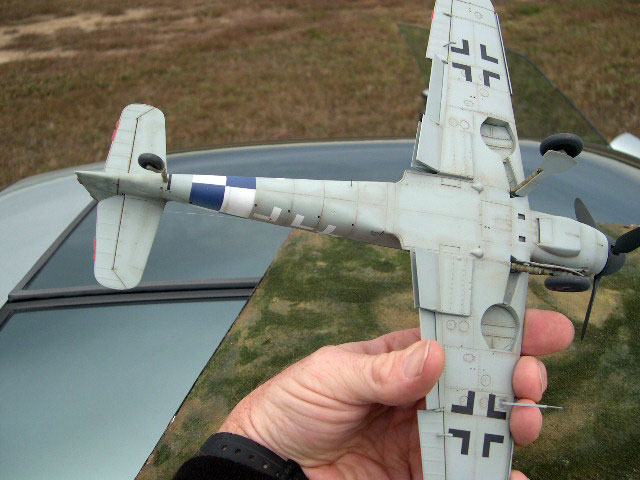
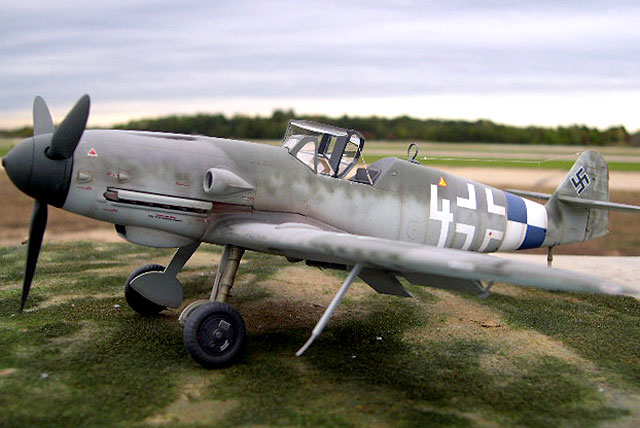
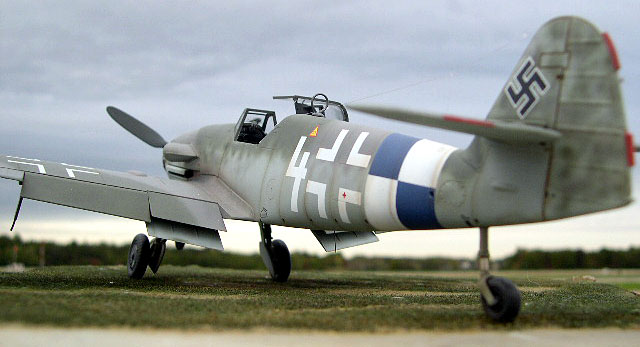
I elected to do a G-10 from the decal sheet with the blue and white
checkerboard. The aircraft was a typical late war RLM 75/83 machine with
limited mottling. Cutting Edge depicts it with a long tail wheel and
large wing bulges, but because the picture that the markings are based
on shows the aircraft as a heap of metal the wings aren't visible so I
used a little artistic license and used the smaller wheels and bulges
for the wings with the long tail wheel. I'm not saying that Cutting Edge
is wrong or right but noone knows for sure so prove me wrong. It still
looks cool.
A coat of Tamiya clear sealed the decals and leveled everything out.
Model Master Acrylic Flat was applied in preparation for weathering.
Weathering
I start my weathering with a Burnt Umber wash in all panel lines.
This is followed up with silver pencil for chipped areas, such as the
wing root. A mixture of 50/50 Tamiya Flat Black and Red Brown was highly
thinned and airbrushed to the exhaust area. Weathering was brought to an
end with some pastels applied to the wing root area. Everything was
sealed with another coat of flat.
Final bits were added and the model was completed.
The Cutting Edge conversion is very easy to use, even though it is
recommended for experienced modelers, and makes a very unique looking
airplane. Remember the conversion is based on the G-14 kit and not the
G-10. With that said, I can highly recommend it.
I hope they do this conversion in 1/48th scale.
The Cutting Edge cockpit looks really nice and adds considerably to
the look of the model, again highly recommended. The Cutting Edge detail
set is highly recommended and essential to add that extra level of
detail. The Cutting Edge tail wheel is highly recommended for its
strength and improvement over the kit part, if you used your G-10 strut,
or as a replacement. The Cutting Edge decals are an excellent supplement
to the kit decals and required for the conversion set. The colorful
machines are nicely done.
The Eagle Editions spinner is essential and adds greatly to the kit's
appearance.
I was very happy with the conversion and all the items that I used. I
think the unique shaped cowl along with the blue and white checkerboards
make this a very nice looking model.
Thanks to Meteor Productions and Eagle Editions for the
review examples.
Click on the thumbnails
below to view larger images:
Messerschmitt Bf 109
Modelling Manuals 17 |
|
|
|
|
US Price: $17.95
UK Price: £12.99
Publisher:
Osprey Publishing
Publish Date:
January 25, 2002
Details: 64 pages; ISBN: 1841762652 |
|
|
Model, Images and Text Copyright ©
2004 by Floyd S. Werner Jr.
Page Created 22 October, 2004
Last Updated 23 October, 2004
Back to
HyperScale Main Page
|
 Home
| What's New |
Features |
Gallery |
Reviews |
Reference |
Forum |
Search
Home
| What's New |
Features |
Gallery |
Reviews |
Reference |
Forum |
Search