|
Revell 1/32 Bf
109G-4 Conversion
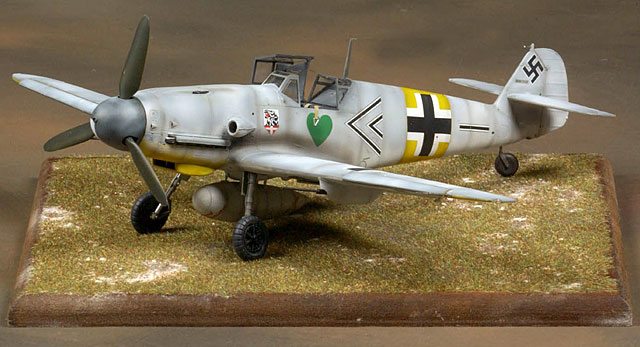
Messerschmitt Bf 109G-2
by Jamie
Haggo
|
 |
|
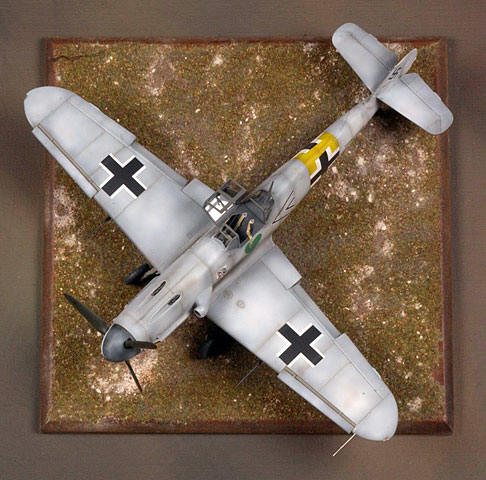
Messerschmitt Bf
109G-2
Hans ‘Assi’ Hanh, Kommanduer III./JG 54 February 1943 |

ProModeler's
1/32 scale Messerschmitt Bf 109G-4
is available online from Squadron.com
This is the aircraft Major Hans ‘Assi’ Hanh was flying when he was
shot down near Staraya, Russia on the 21 Febuary 1943 by a La-5 flown by
Russian ace Starshiiy Leytenant Pavel Grazhdanikov.
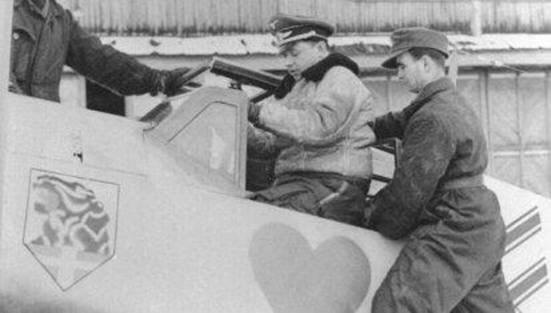
At that time Assi Hanh had amassed a total of 108 kills on the
Western and Eastern fronts. Hanh was captured after a forced landing
behind enemy lines and spent the next 7 years in Soviet captivity.
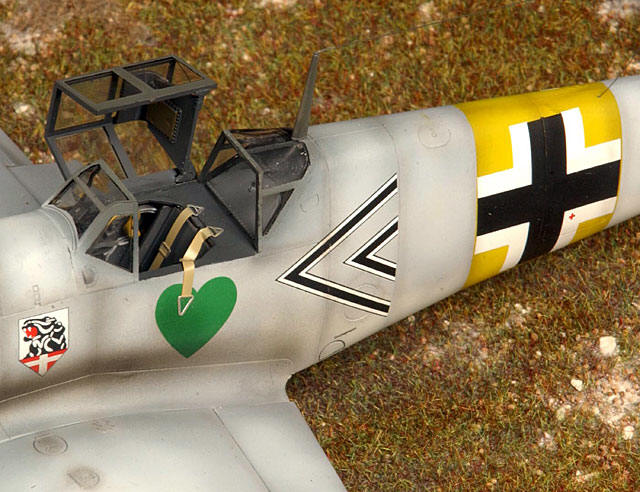
To model Major Hanh’s last Bf-109 the Revell G-4 version needs to be
back dated to the G-2 version. This is a relatively simple procedure. I
decided to leave the cockpit alone since I was unsure whether there were
any differences, I assumed that there would be none of any major
significance, I did however add some Eduard etched seat belts. After the
cockpit had been sprayed with RLM 66, washed and dry brushed it was
assembled and left aside while I stuck the fuselage together. I was
initially worried about the join between the front and rear fuselage
halves as I really do not like joints along panel lines, I need not have
worried as Hasegawa (where the moulds originate) have tooled these to
perfection. To complete the fuselage the cowling was put together. To
cater for the different gun troughs, the top part of the cowling is
separate leaving a visible join. There is no panel line here so any
visible evidence needs to be eliminated using filler and wet and dry.
The rest of the kit was assembled as per the instructions apart from the
upper wing bulges were omitted. I did not have a photo of this
particular machines tail so as to determine whether the tail wheel was
blanked over as moulded in the kit (the lazy option) or if there was a
recess for a retractable unit. I went for the difficult option and
opened this out as I felt this was most likely to be accurate. I used a
large diameter syringe needle inserted in the rear fuselage to take the
modified tail wheel leg. It is too far forward according to the drawings
I have but I could see no easy option to mount it in the recess so I
compromised. Another compromise was the size of the tail wheel which is
of smaller diameter than the kit’s G-4. I did not have a suitable unit
in my spares box so left it as it was, you never know, since I do not
have a photo of this area this could be accurate, maybe….possibly…..hmmmmm!
Once the model was masked and primed and pre-shaded I started on the
fun bit, the painting. I used my own mix of Tamiya paints for the RLM
76, I reckon from the colour photos of wartime vintage (I know,
"danger Will Robinson") and contemporary pictures of original
components (mild caution Will Robison) that RLM 76 maybe a bit paler
than people think. There, I think that has set the cat amongst the
pigeons!
This was then post shaded with a lightened mix for the centre of the
panels and a darker mix with greys and browns for the panel lines. This
was then masked then a plain old RLM 74/75 scheme was sprayed on with
Vallejo acrylic, the canopy was masked inside and out with RLM 66
sprayed on the inside and camouflage on the outside..
Lastly the yellow panels were sprayed, again using Vallejo and post
shaded. The yellow was then masked in preparation for the fun bit, the
temporary white distemper. This was done using thin coats of ‘dirty’
Vallejo white with the fine nozzle of my Aztec fitted; the effect was
slowly built up using various shades of white.
The next phase was a gloss varnish, again Vallejo. This was the first
time I had used this companies varnishes and I am mightily impressed.
After the Eagle-Cals decals were applied (don’t you just love
temporary winter schemes, almost no stencils), the white was oversprayed
on the yellow nose panel and the spinner. I think I boobed the spinner,
I think it must be ¾ white, not RLM 70. Anyway, once all the fiddly bits
were added my first ever 1:32 kit was finished. This is my favourite
model in my cabinet and I have another one at the top of my stash, I
think I maybe a convert to 1/32 scale.
Messerschmitt Bf 109
Modelling Manuals 17 |
|
|
|
|
US Price: $17.95
UK Price: £12.99
Publisher:
Osprey Publishing
Publish Date:
January 25, 2002
Details: 64 pages; ISBN: 1841762652 |
|
|
Model, Images and Text Copyright © 2004
by Jamie Haggo
Except WWII Hahn image
Page Created 03 September, 2004
Last Updated
04 September, 2004
Back to
HyperScale Main Page
|
 Home
| What's New |
Features |
Gallery |
Reviews |
Reference |
Forum |
Search
Home
| What's New |
Features |
Gallery |
Reviews |
Reference |
Forum |
Search