|
Hasegawa's 1/48 scale
Messerschmitt Bf
109 G-4/R6
'Regia Aeronautica'
by Werner Scheibling
|
 |
|
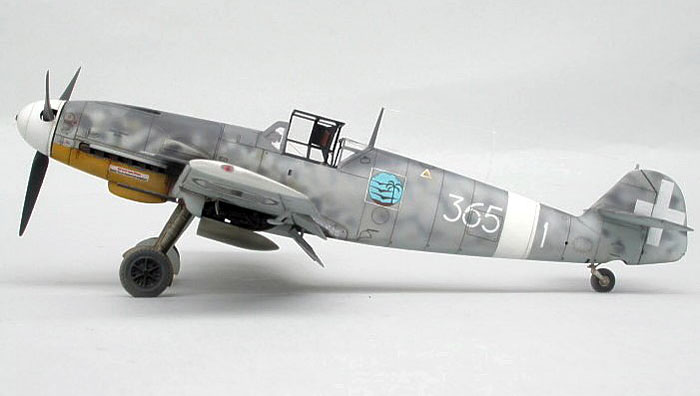
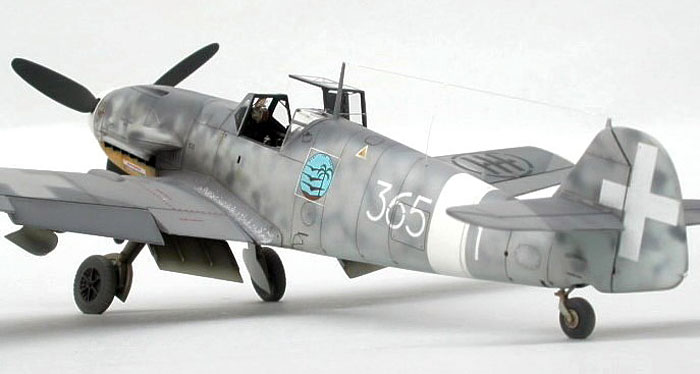
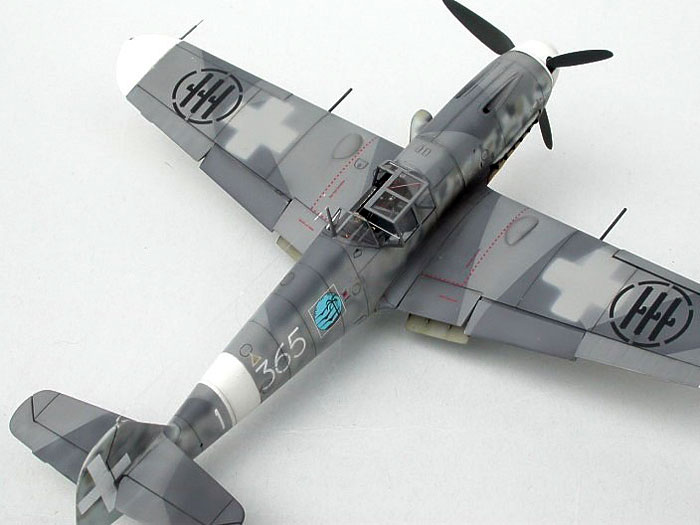
Messerschmitt Bf 109
G-4/R6, Werk-Nr. 19566
365a Squadriglia, 150o Gruppo Autonomo, Sciacca, South-West
Sicily,
June 1943, most likely flown by Squadron Leader Lt. Giuseppe
Gianelli |

Hasegawa's 1/48 scale
Messerschmitt Bf 109G-4
is available online from Squadron.com
This is Hasegawa's 1/48 scale
Messerschmitt Bf 109G-4/R6 kit, from the 'special version' series. It
comes with additional resin parts and decals relating to two planes that
flew with the Italian Regia Aeronautica in the last months before
Mussolini's Fascist Empire collapsed with the Armistice of 8th
September 1943.
One of these, the original
365-1, is well documented in an often-published colour photo of WW II
origin which shows it parked in the open on Sciacca airfield.
When the Allied invasion forces
secured this airfield in July 1943, they drew up a detailed record of
the majority of the Messerschmitt 109 fighters found there. Because of
these records, 365-1 can be clearly identified as a Bf 109 G-4/R6, Werk-Nr.
19566. It served with the 150o
Gruppo Autonomo from 23rd May 1943 until early July, making
it the longest lived Bf 109 in Regia Aeronautica Service.
The Allied intelligence
commission described 365-1's condition as 'fair but tail damaged', and
indeed the photo shows two small red-brown patches on the rudder's left
side. I would interpret these patches as repaired battle damage – bullet
holes patched up with red-brown fabric or fabric doped with red-brown
primer.
The fate of 365-1 is not known,
but it can be assumed that the aeroplane, though flyable, ended up on
Sciacca's huge scrap yard amongst other Bf 109s and Macchi C.200s and
202s.
The Kit
This 'special version' kit found
its way into European shops in the summer of 2004 and consists of all
the sprues you would normally find in the box of a regular G-6 kit.
Highlights and shortcomings of this kit have been described many times
over the years so I won't repeat them here.
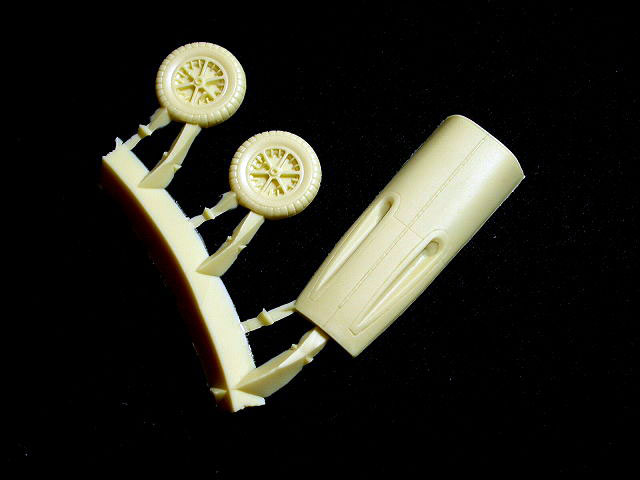
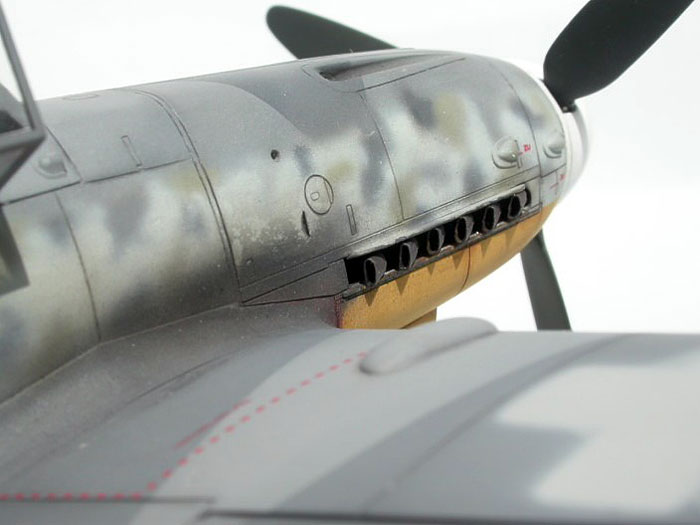
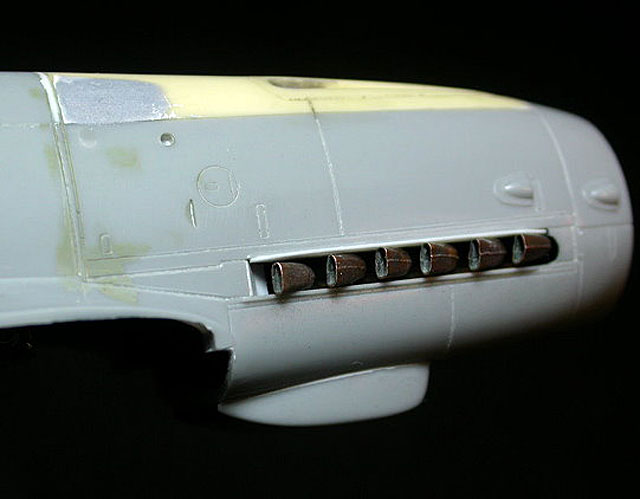
Additional parts which enable
the modeller to turn this kit into an earlier G-4 are nicely cast in
yellowish, rather tough and flexible resin. These are: The upper cowl
decking with gun troughs for two 7,92 mm MG17 and two main wheels with
spoked hubs and treaded tyres.
My enthusiasm for the resin
parts cooled noticeably when I found out that the cowl decking was
a whole millimetre too short at the rear and too narrow to fit the
fuselage properly. I had to fill the millimetre gap with styrene sheet
and build up the right side with Milliput epoxy putty. It took hours of
delicate filling and sanding to make the glue seam – which doesn't fall
on a panel line - finally invisible. Gunze-Sangyo's 'Mr. Resin' primer,
applied in several layers by airbrush and sanded down after each
application, finally did the job.
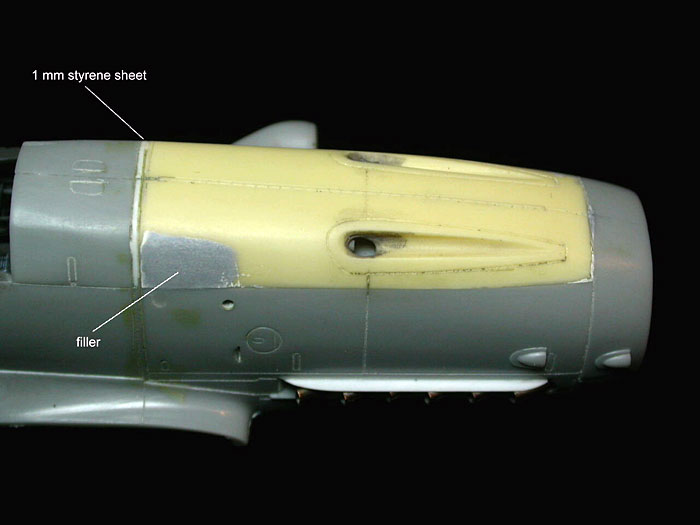
I have my doubts whether the described
fault can be explained by 'resin shrinkage', as the kit was brand-new
off the shelf. Hasegawa would have done a much more appreciable job if
they had added the proper injection moulded parts from their G-2 kit.
Both resin wheels had tiny casting imperfections which resulted in a
'broken' spoke in each. Luckily this fault is hardly noticeable once the
parts are painted and weathered.
Unfortunately I have to continue
moaning as the decal sheet was practically unusable. All white
characters - and there are a lot - were printed in some kind of cream
colour which would have stood out drastically next to painted white
wingtips and a white fuselage band. Testing some of the decals showed
that they also silvered strongly once dry. This is not what can be
expected from a company that is generally referred to as one of the top
three – both in quality but unfortunately also also in price.
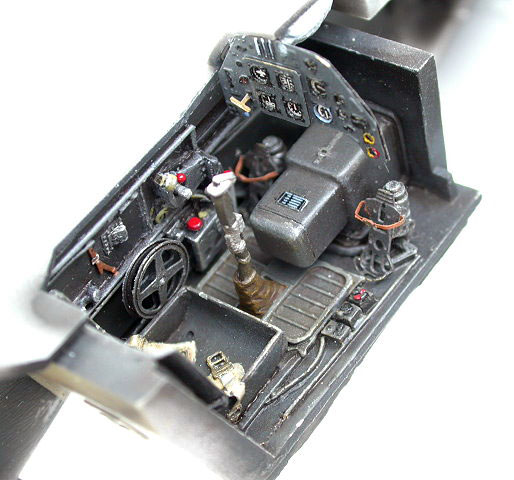
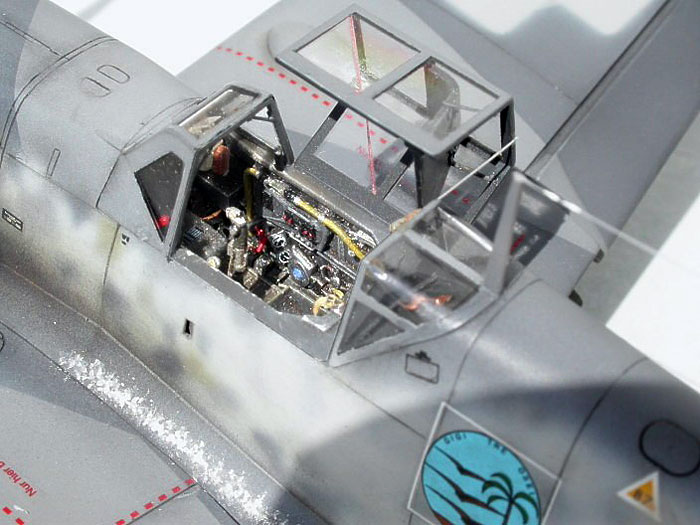
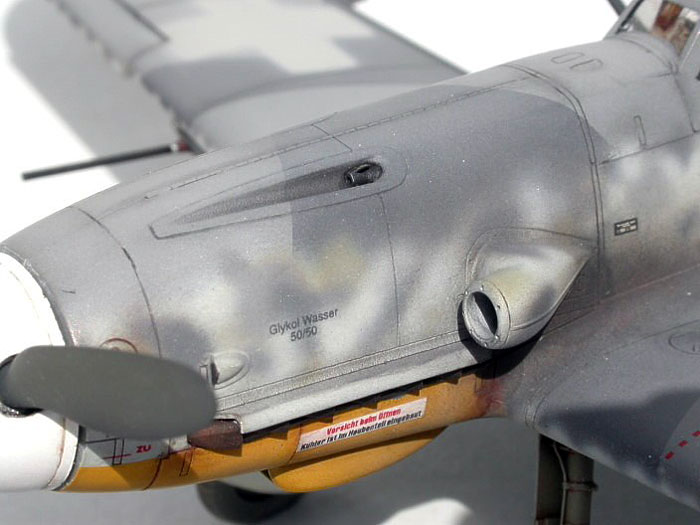
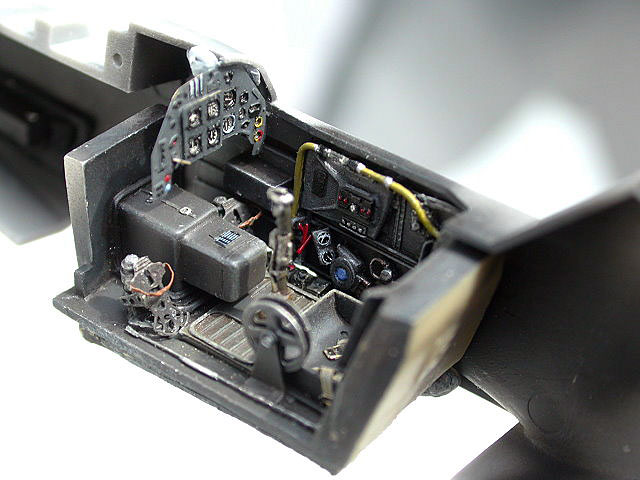
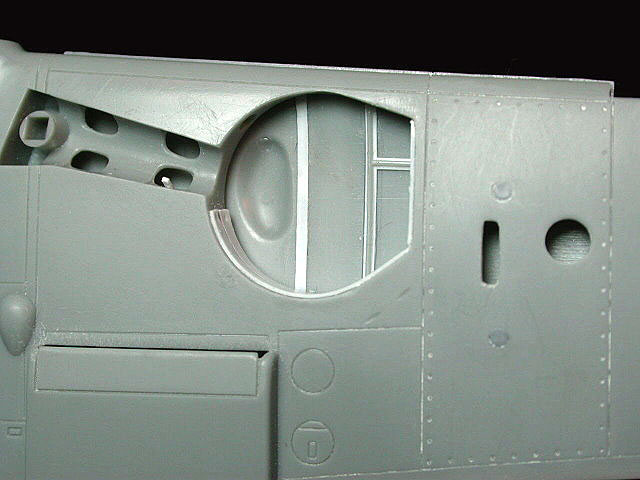
Cockpit / Fuselage
The rather simple cockpit parts
provided by Hasegawa had to make place for a much nicer resin cockpit
produced by Aires. Cockpit sidewalls, floor and related components are
beautifully cast in rather brittle cream coloured resin and - together
with additional photo-etched items - make up into a convincing replica
of the original.
Click on the thumbnails
below to view larger images:
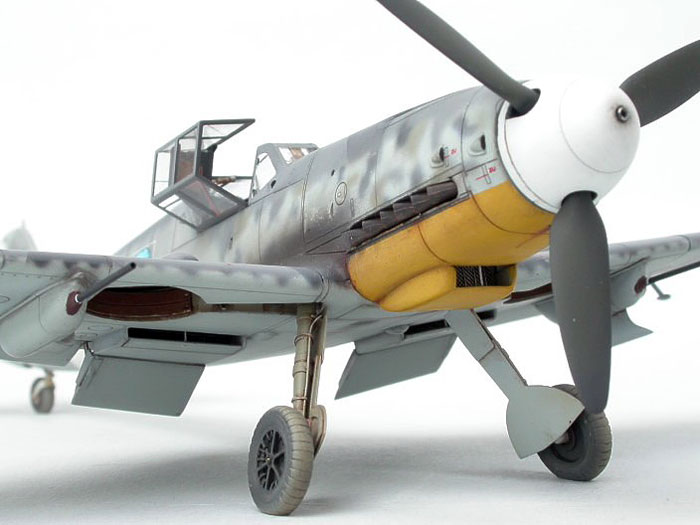
Further Alterations:
·
Installation of 'Moskit' real metal
exhausts with thinned down exhaust shrouds.
·
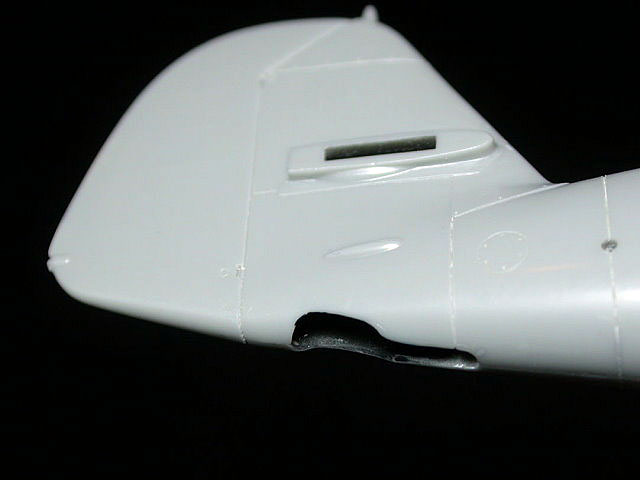
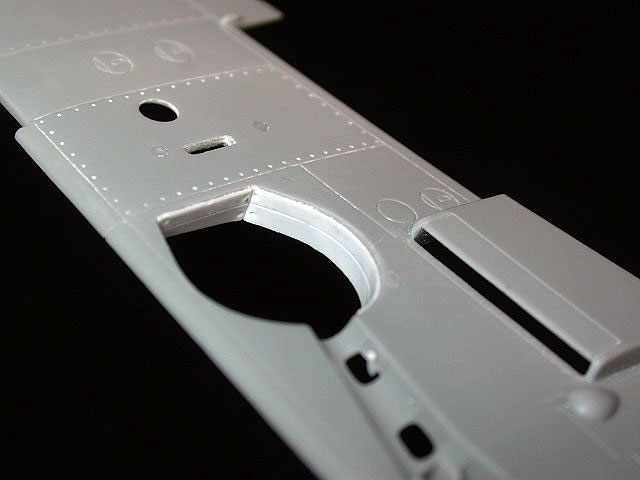
A cutout for the tail wheel well. 365-1
featured the early style open wheel well which is untypical for a G-4. A
section of styrene tubing was epoxied into the wheel well to act as a
recipient for the brass tail wheel strut.
·
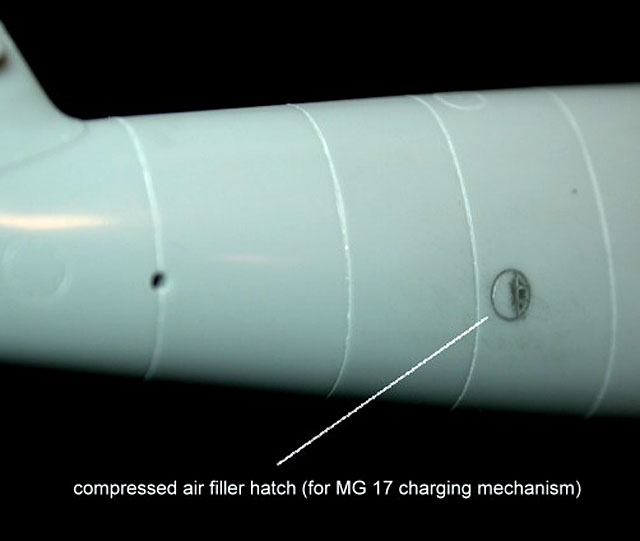
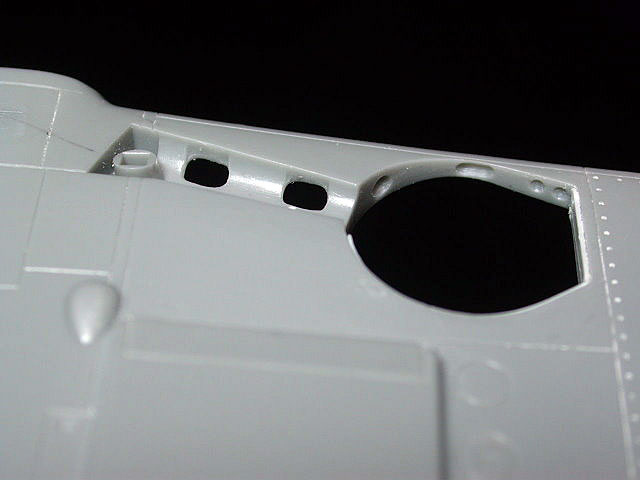
A round hatch had to be scribed on the
righthand rear fuselage side to represent the filler hatch for
compressed air necessary to charge the twin MG 17 guns.
·
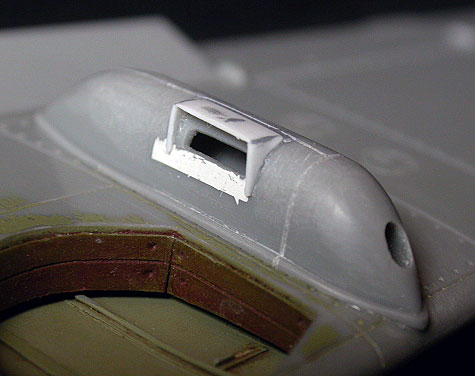
The spinner once started life as part
of a so-called 'corrected prop and spinner' set cast in resin by Cutting
Edge. The difference to the original Hasegawa part is a slightly less
curved profile, resulting in a diameter smaller by a mere 0,1mm at the
middle. I doubt that the difference between the two parts can be seen
with the eye. I had to measure the resin replacement with callipers to
believe it.
If Cutting Edge would have wanted to do a really nice job they would
have changed the cutouts for the prop blades (which were not
symmetrical) and fitted a proper blast tube for the engine mounted MG
151/20. I fixed these shortcomings and then did something with silicone
rubber and resin that made spending 5 dollars much more palatable. I did
not use the Cutting Edge prop blades as they look too wide compared to
pictures of early 109 G's.
Click on the thumbnails
below to view larger images:
Wings
·
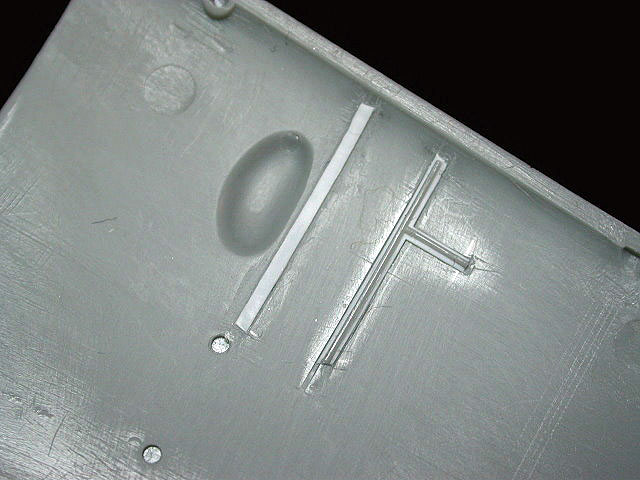
The main wheel wells were refined by
adding strenghtening ribs to the inside of the upper wing. The concave
shape of the wing bulges was modelled with a round grinding bit.. Four
lightening holes along each of the recesses for the u/c legs were
drilled out and tiny styrene stubs, representing the u/c locking pins,
added. The zipped canvas covers along the rear of each wheel well were
modelled with appropriately engraved 0,1 mm styrene sheet.
·
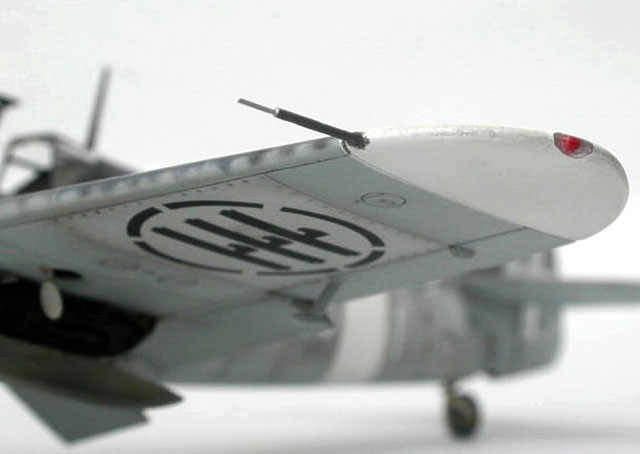
I used cut-offs from clear styrene
sprue to represent the wing tip position lights. First I drilled a 0,3
mm hole into the clear material and filled it with paint (blue-green
starboard and red port). Then I glued the clear part into cutouts I had
prepared in the wing tips, sanded everything into shape and polished the
clear styrene to a high shine.
·
Using the wing parts as they are would
result into far too flat a dihedral. Both wing roots had to be sanded
down considerably to achieve the proper 'V'-angle.
·
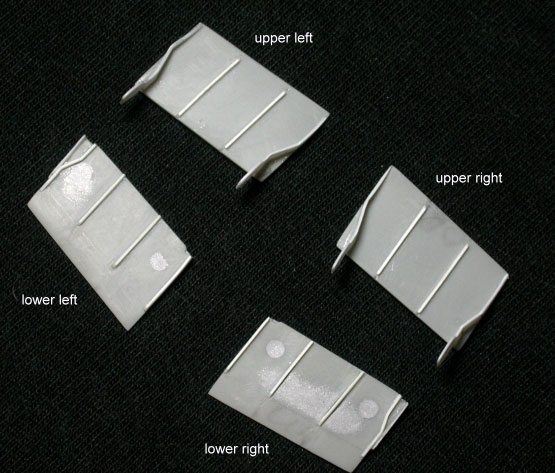
I added stiffeners and air-flow guide
panels to the otherwise completely bare radiator outlet flaps. Large
sink marks in both landing flaps had to be filled and sanded – a fault
that seems to be common with this kit.
Click on the thumbnails
below to view larger images:
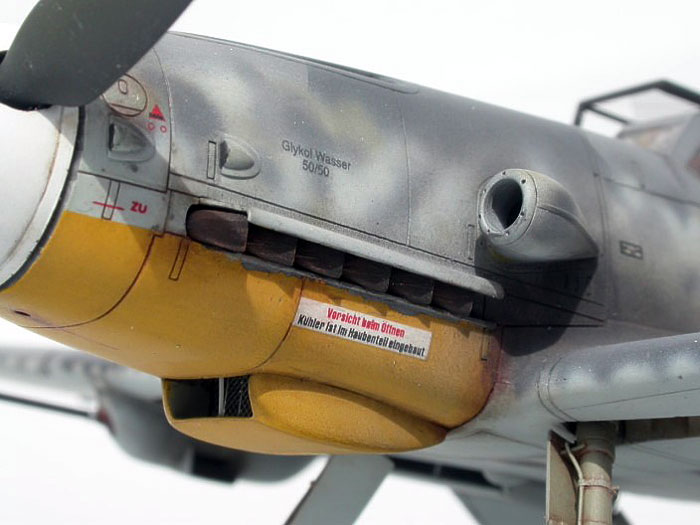
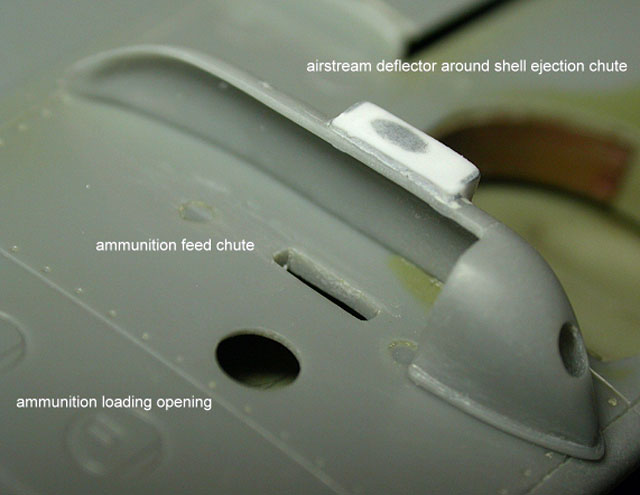
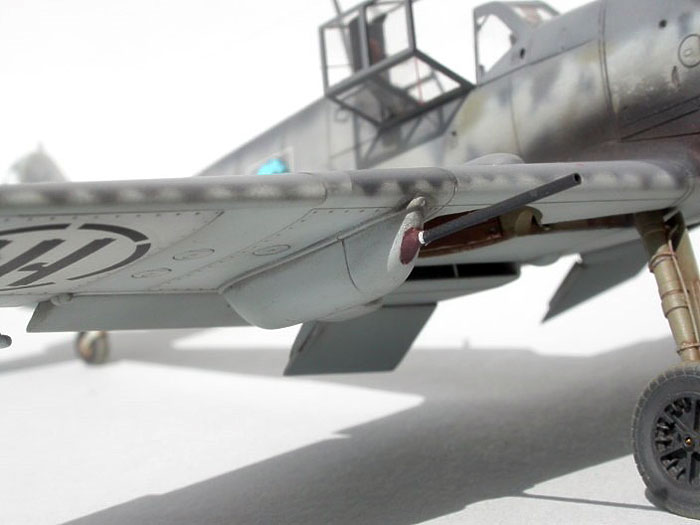
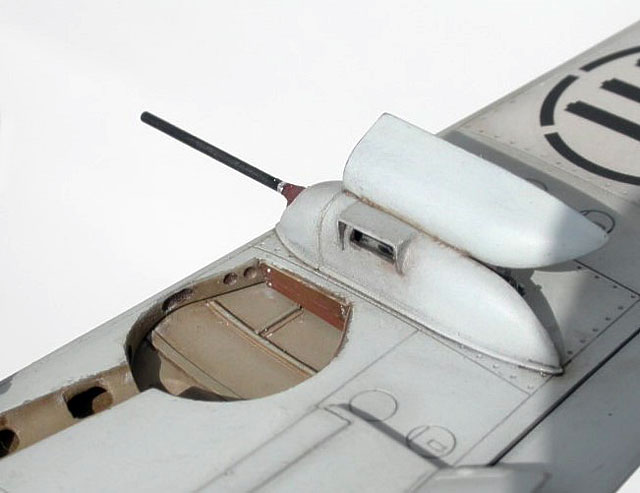
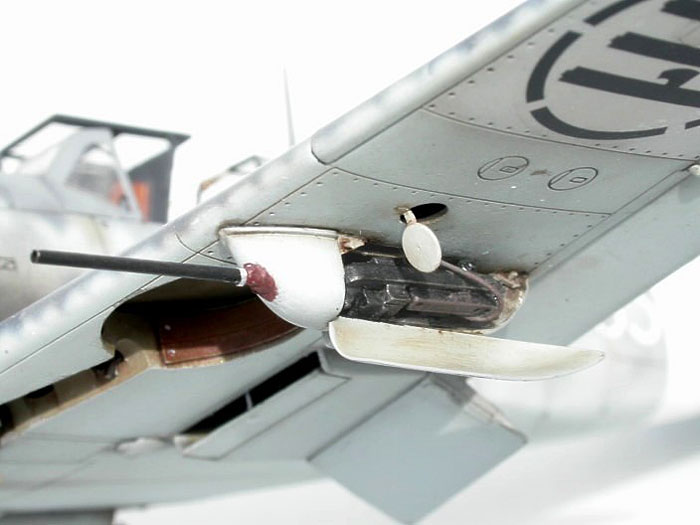
Wing armament ('R6 = Rüstsatz
6')
To add a point of interest to my
model I decided to open up one underwing gondola and show the MG 151/20
installation.
I could not come up with any
technical drawings, so had to rely solely on one b/w photo that shows
two technicians working on the left wing gun of a Mediterranean based Bf
109G. The photo is good enough to show how this weapon was installed in
the narrow (left wing) gondola: The gun lay on its left side and the
ammunition belt fed straight down into the breech. The empty ammo belt
was fed into a chute that was angled by 90 degrees and ejected the empty
cases and links towards the centre of the aircraft. The rather
un-aerodynamic airstream-deflectors around the ejection chute allowed
the empty ammo belt to disintegrate properly before it could be grabbed
by the air stream. Without these deflectors the cannons tended to jam
after a few rounds.
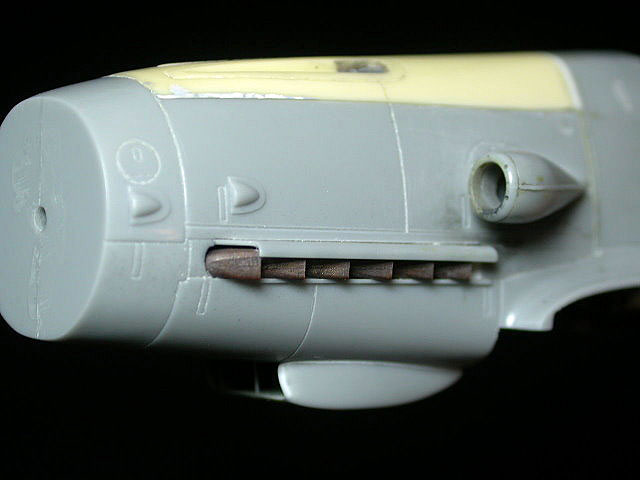
Hasegawa's parts are basically
correct in outline, but I had to relocate the ejection chute and
scratch-build the deflectors from 0,1mm styrene sheet. The open
inspection hatch was crash-moulded with thin plastic sheet.
Aires offers a set of four very
detailed MG 151/20 guns in resin, which fit perfectly into the wing
gondola. The gondola just needed a little hollowing out with a rotating
tool. I replaced the gun barrels with 0,8 mm hypodermic needle tubing,
as the original resin parts are overscale.
The leather or fabric shrouds
covering the gondola openings around the gun barrels were replicated
with carefully applied PVA glue. This stuff shrinks slightly during
drying and looks convincingly like crinkly leather or fabric after
painting.
Click on the thumbnails
below to view larger images:
Undercarriage
·
The undercarriage was refined with
thinner scratch-built covers and hydraulic lines made from 0,2 mm copper
wire. The wheels were connected to the legs with short stubs of brass
wire. Doing this, I also corrected the u/c leg – wheel distance and
angle.
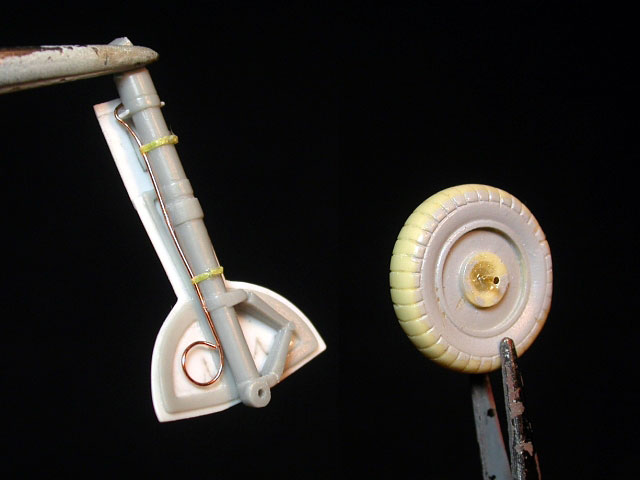
·
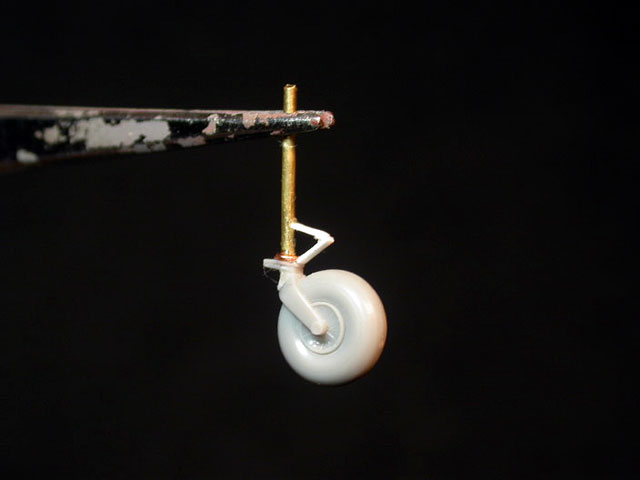
The tail wheel was customized by
removing the 'canvas' boot protecting the oleo leg and its scissors –
just like on the real 365-1. A length of 0,8 mm brass wire was used to
form the strut and the scissors were constructed from styrene sheet.
While studying available photos
of Regia Aeronautica Bf 109 Gs, I stumbled upon some sort of modern
myth: All the decal sets for Italian 109 Gs I have seen so far represent
the wing fasces as surrounded by a segmented circle. The photos I've
checked show that Italian 109Gs were adorned with completely standard
wing insignia sporting a normal black circular surround. I also do have
my doubts whether the original German top wing crosses were as neatly
oversprayed as generally depicted. Still I preferred the somewhat more
perfectionist look to an irregular grey patch. The lower wing fasces
were applied after the whole wing panel was oversprayed in a somewhat
lighter shade of grey. Both rear fuselage sides (roughly from aerial
mast to vertical stabilizer) were oversprayed with an Italian shade of
light grey and an imitation of the original German mottle scheme in
darker greys.
I also resisted representing the
aforementioned tail damage as I didn't want to ruin the looks of that
interesting aeroplane.
My model was airbrushed entirely
with 'Vallejo Model Air' acrylics and an Iwata Eclipse HP-BS. I can only
comment that these are the best paints I've ever worked with and I now
prefer them even to my up-to-now favourite brand of LIFECOLOR.
Decals came from Sky Models'
'Italian Bf 109Gs' sheet. The printing quality is first rate, as always,
even though the carrier film turned out to be somewhat thicker than
usual. It took plenty of Aeromaster's 'AeroSol' (which is really strong
stuff) to force the decals down into the panel lines.
Panel lines and weathering were
done with various shades of pastel dust. Only very few areas – such as
the cockpit, wheel wells and undercarriage – were treated with light
washes of artist's oils.
Kit, Accessories and Decals
·
Hasegawa 1/48 kit 'special version'
#09559 Messerschmitt Bf 109 G-4 Regia Aeronautica
·
Aires 1/48 resin and PE cockpit set
#4034, Messerschmitt Bf 109 G
·
Aires 1/48 resin set #4021, German
20mm gun MG 151/20
·
Sky Models 1/48 decal sheet #48011,
Messerschmitt Bf 109 G/K in Italian Service
·
Moskit 1/48 metal exhausts #48-02,
Messerschmitt Bf 109 F/G/K
References
·
Ali Straniere in Italia No. 1,
Messerschmitt Bf 109 Italiani, by Gregory
Alegi and Marco Gueli, La Bancarella Aeronautica Torino, 2002
·
Regia Aeronautica Caccia & Assalto
1940-1943, Parte II, by Paolo Waldis,
Marino De Bortoli and Angelo Brioschi, La Bancarella Aeronautica Torino,
2003
·
Aero Detail No. 5, Messerschmitt Bf
109 G, by Shigeru Nohara and Masatsugu
Shiwaku, Dai Nippon Kaiga Co. Tokyo, 1992
ISBN: 4-499-20589-1
·
Messerschmitt Me 109, Alle Varianten
von Bf 109 F bis 109 K, by Willy Radinger and
Wolfgang Otto, Aviatic Verlag Oberhaching, 1998
ISBN: 3-925505-43-1
Click on the thumbnails
below to view larger images:
Messerschmitt Bf 109
Modelling Manuals 17 |
|
|
|
|
US Price: $17.95
UK Price: £12.99
Publisher:
Osprey Publishing
Publish Date:
January 25, 2002
Details: 64 pages; ISBN: 1841762652 |
|
|
Model, Images and Text Copyright ©
2004 by Werner Scheibling
Page Created 06 June, 2005
Last Updated 06 June, 2005
Back to HyperScale
Main Page
|
 Home
| What's New |
Features |
Gallery |
Reviews |
Reference |
Forum |
Search
Home
| What's New |
Features |
Gallery |
Reviews |
Reference |
Forum |
Search