|
Scratchbuilt 1/32 scale
CEV "Schirra"
by David Hanners
|
 |
|
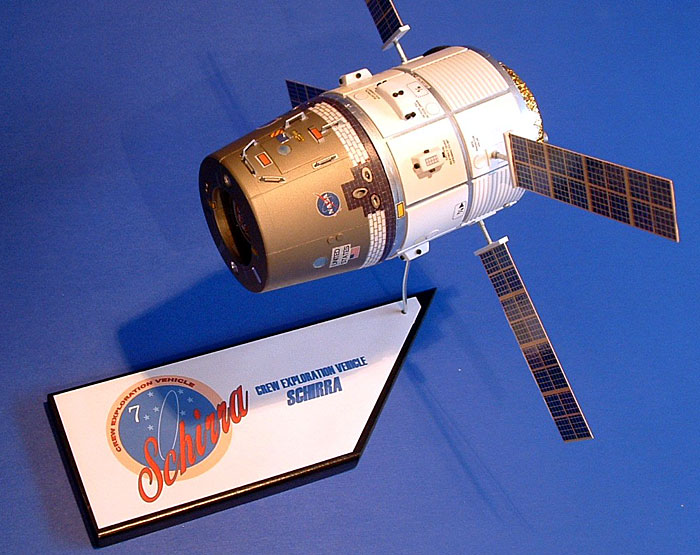
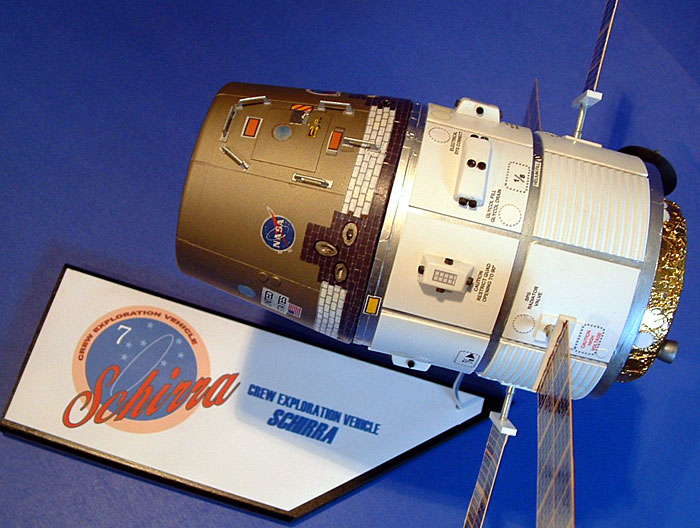
CEV "Schirra" |

HyperScale is proudly supported by
Squadron.com
The Crew Exploration Vehicle, or CEV, is part of NASA's initiative to
return to the moon and then go on to Mars. There is no set design for the
spacecraft yet, but some manufacturers have come up with concept drawings.
The CEV "Schirra" is loosely based on Lockheed Martin concept drawings.
The model was built with sheet styrene, styrene tube, styrene strips
and half-rounds, stretched sprue, the dosage cup from a Tylenol bottle,
the bottom of a plastic medicine vial, metal tubing, a nozzle from the
spares box, aluminum foil and gold foil from a roll of Rollo candy. The
details:
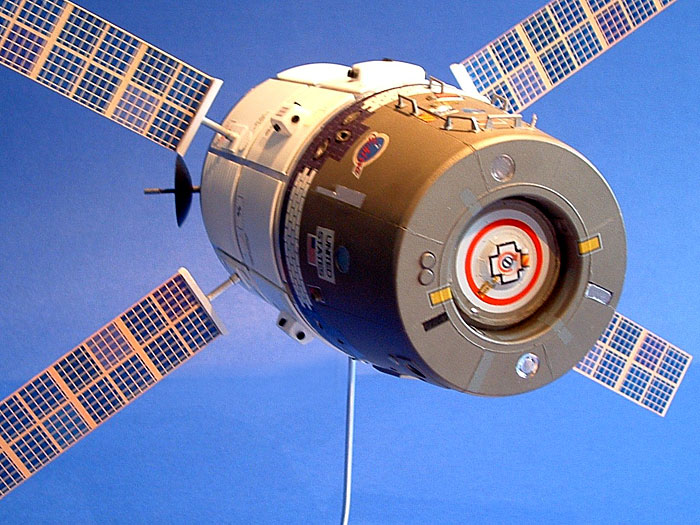
Command Module
The capsule is a truncated cone, so I figured how big I wanted it to be
and fed the dimensions into an online shroud calculator. It told me how
big the upper and lower arcs should be, as well as how many degrees the
shroud should extend. These dimensions were transferred to .015 sheet
styrene and cut out. Before forming it to the rounded shape, I scribed
panel lines and cut holes for the RCS. The shroud was then glued into a
rounded shape, and lengths of styrene tubing were cut at an angle and
inserted into the RCS holes, cut flush with the surface and sanded to
create oval exhaust ports. The windows were cut out with a paper punch and
backed with scrap styrene.
Disks cut from .030 styrene were used for the top and bottom, and one
was placed in the middle of the capsule to add strength. I cut a hole in
the top disk and then trimmed the dosage cup from a Tylenol bottle and
inserted it to create a docking tunnel. The "hatch" is the bottom of a
medicine vial. Surface detail was added with sheet styrene. Handrails were
made from stretched sprue and small bits of sheet styrene.
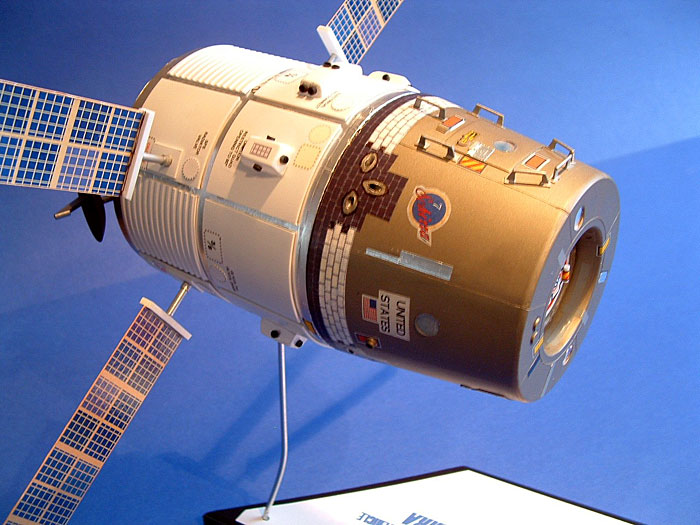
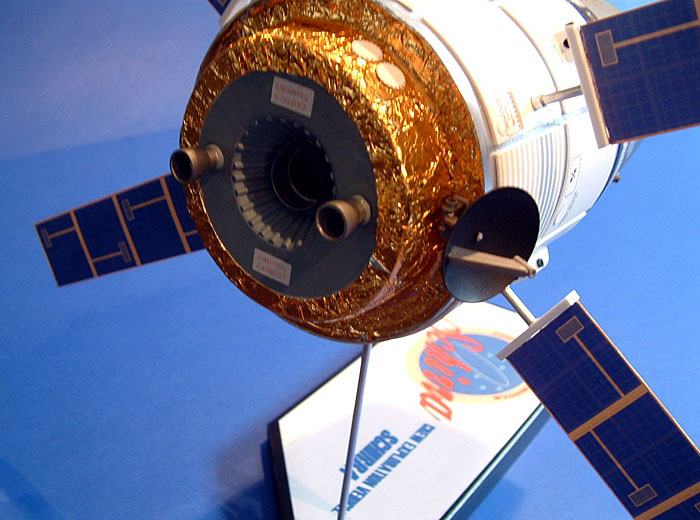
Service Module
The SM is a simple cylinder, built much the same way as the CM -- .015
sheet styrene formed into a body around two .030 styrene circle bulkheads.
The cylinder was then covered with aluminum foil and radiators and access
panels were glued to the surface. I left a few crinkles in the foil to
simulate the effect of direct sunlight on bare metal in outer space. I
used .030 sheet styrene for some of the panels and corrugated sheet
styrene for others. They were cut into long strips, formed around a pencil
holder that was roughly the size of the SM, then dipped in hot water for a
few seconds so they would retain their curvature.
Once they were cut to size and glued on, I marked where the solar
arrays would go, drilled holes and inserted metal tubing to hold the panel
arrays. The RCS housings are sheet styrene heat-formed over two different
male molds I carved from wood, and the RCS nozzles are small slices of
styrene tubing. Another truncated cone was used for the bottom propulsion
section, and an even smaller truncated cone was placed in the middle of
that to produce a "well" for the rocket nozzle, which came from the spares
box. The sides of the well were detailed with half-round styrene strips.
Solar Arrays
The solar arrays are strips of .015 plastic glued to styrene strips,
which were glued to metal tubing that is one size smaller than the tubing
in the SM.
The arrays fit into the holes in the SM.
Paint
The CM was airbrushed with Testor's Metalizer "Jet Exhaust." Pactra
Medium Gray acrylic was brush-painted onto the rear engine section.
Testor's Steel and Aluminum and Badger acrylic Flat Black were used for
detail painting. As mentioned earlier, aluminum foil was used to cover the
surface of the SM, and gold foil from a roll of Rollo candy was used on
the propulsion section of the SM. Both foils were attached with Microscale
Micro Metal Foil Adhesive.
Decals
Virtually all of the decals were homemade on my computer (using the
"Draw" function in Word) and printed out onto white decal film. The "CEV
Schirra" emblem, "United States" markings, HRSI and LRSI tiles, hatch
markings, windows, warning markings, access hatch and front and backs of
the solar arrays were created on the computer.
The NASA "meatball" and American flag were copied from online sources
and printed out onto white decal film. A yellow RESCUE arrow from a sheet
of space shuttle decals was used on the main hatch. Solid-color decal
stock was used for various panels and strips, as well as for the white and
red "target" marking on the docking hatch.
Model, Images and Text Copyright © 2004
by David Hanners
Page Created 14 April, 2004
Last Updated
15 April, 2004
Back to
HyperScale Main Page |
 Home
| What's New |
Features |
Gallery |
Reviews |
Reference |
Forum |
Search
Home
| What's New |
Features |
Gallery |
Reviews |
Reference |
Forum |
Search