|
Kitbashing
a 1/48 scale
Canadair CF-116 “CF-5”
by David Askett
|
 |
|
Canadair CF-116 |

HyperScale is proudly supported by Squadron.com
The CF-116
Ignoring technical advice, the Canadian government
announced in July of 1965 that the Northrop F-5A Freedom Fighter would
be Canada’s new tactical fighter.
This decision, driven largely by the low cost of
the F-5A weapons system, stunned many members of the RCAF. The fighter
would be built in Canada, but the programme would provide little
technical value to a country that had designed and built the CF-100
Canuck and CF-105 Arrow, and had license produced the CF-104
Starfighter. The F-5’s range was woefully inadequate to defend a country
the size of Canada, and its small warload would make it an inefficient
close support aircraft. Nevertheless, the government stuck to its
decision. Despite the unsuitability and ineffectiveness of the type, 89
CF-5As and 26 two-seat CF-5Ds would ultimately be produced for the
Canadian Armed Forces, who largely regarded them as “toy” fighters.
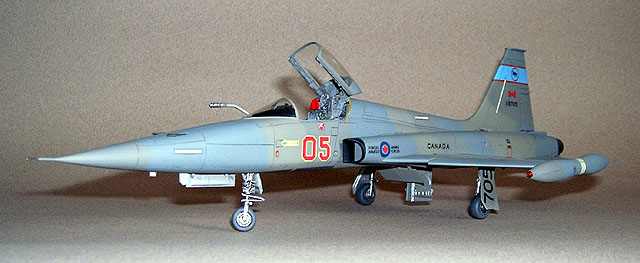
Perhaps the CF-5s greatest contribution to the Canadian Forces came not
from its abilities as an operational fighter-bomber, but later on in its
life when it was pressed into service as an “aggressor” type to hone the
skills of Canadian fighter pilots. There is no denying the fact that it
performed this job very, very well.
The Model
This model is based on a mid-1980’s Italeri release
of the old Testors / Hawk kit of the F-5A Freedom Fighter. While this
kit is excellent from a shape and scale point of view, the absence of
detail in the cockpit and wheel wells belies its age. Still, it makes an
excellent basis for a model of this important type, and can often be
picked up at swap-meets for just a few dollars.
For my model, I combined this kit with detail parts
from a Monogram F-5E, plus a few aftermarket goodies.
The Cockpit
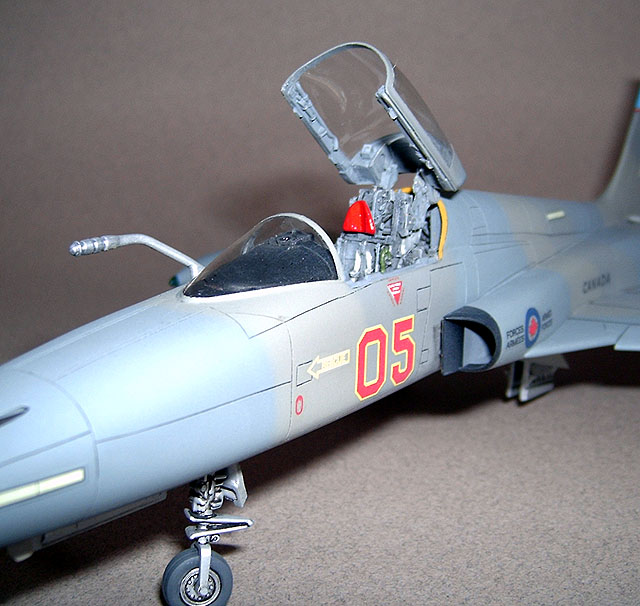
With a little bit of grinding, Black Box’s resin
cockpit set intended for Monogram’s F-5E can be made to fit Italeri’s
F-5A. Thoughtfully, BB provide the early-style of head box for the
ejection seat, as appropriate for the CF-5. The F-5E’s radar scope will
need to be removed from the center of the instrument panel, but
otherwise this excellent cockpit set represents the CF-5s ‘pit very
well.

After assembly, the cockpit components were painted Dark Gull Gray,
given a wash of a darker gray, and then dry-brushed with a very light
grey to bring out the detail before details were painted various colours
to match reference photos.
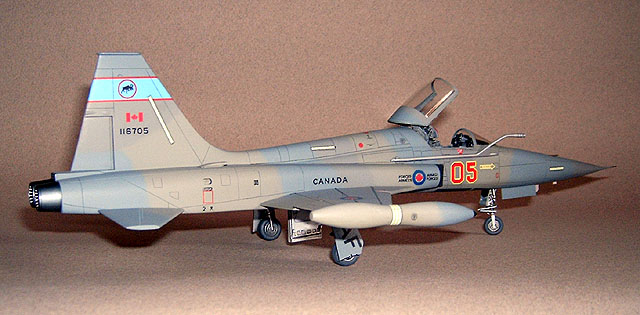
Airframe
With the cockpit painted and installed, the
nosewheel bay from Monogram’s F-5E kit was grafted onto one fuselage
half of the Italeri kit. The fuselage halves were then joined, using
liquid glue. After this, assembly went quickly. The interiors of the
engine air intakes were painted grey and black, then assembled and
attached to the model.
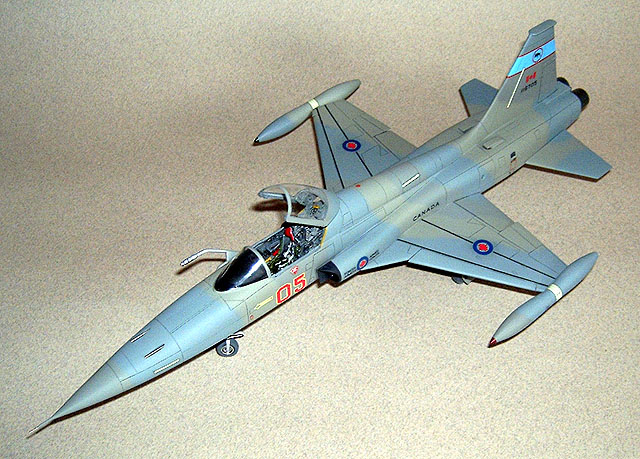
The wings were added next. First, though, a little surgery. CF-5s on the
ground seem to always have their leading and trailing edge flaps dropped
slightly. To represent this, these were cut from the wings, sanded along
with the rest of the wing to give realistic leading and trailing edge
thicknesses, and reattached in the appropriate attitudes.
The tailplanes were also sanded down to reduce their thickness, and
sharpen their trailing edges. I was careful not to remove the double row
of rivets on their upper surfaces, though, as these are there on the
real aircraft. Because of the fragile nature of their mounting pins, the
tailplanes were set aside to be attached after painting and finishing.
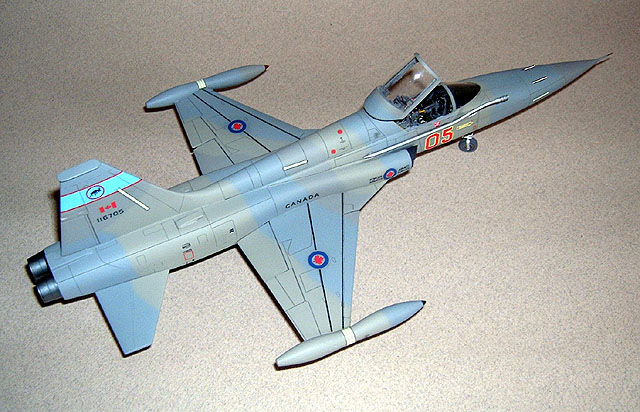
The tiptanks, so characteristic of the CF-5, are resin copies of a
master I made several years ago. Note the angle at which they are
mounted, relative to the fuselage. This feature is sometimes missed in
models of this aircraft.
The cannon ports on top of the nose were represented by plastic tube of
the appropriate diameter, super glued into holes ground through the top
of the fuselage parts. This sounds like a daunting job, but if care is
taken with alignment it’s not too tricky. What’s more, if the results
are less than satisfactory new holes can be opened up and the process
repeated as necessary! After the model was finished, the cannon barrels
themselves were represented by lengths of steel tube.
While I had out my bag of tube and the super glue, I replaced the pitot
tube on the tip of the nose with telescoping sections of two different
diameters of hypodermic needle tubing.
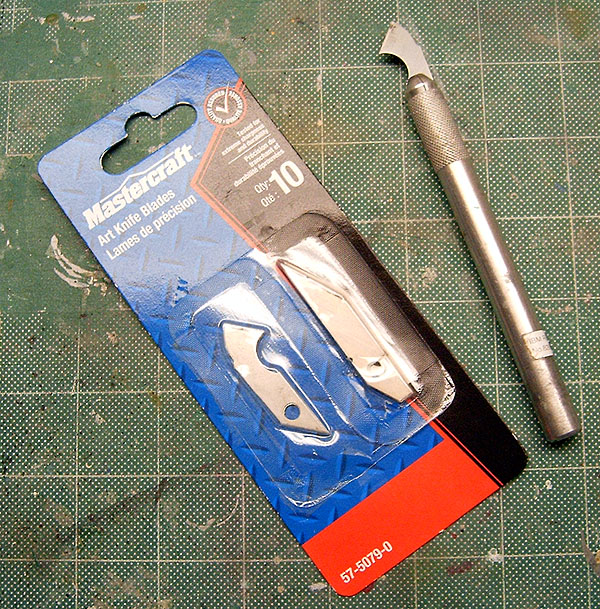
At this point, all the raised panel detail was removed from the model
with 600-grit sandpaper and replaced with new, scribed panel lines. For
this job, I used the back of an Xacto No.11 blade, a sharp needle
chucked in an Xacto knife handle, and a Mastercraft “art knife blade”. I
found these art knife blades at Canadian Tire, priced at about $2.00 for
a set of ten (product #57-5079-0), but I’m sure there will be equivalent
products available in other countries. The blade on the left side of the
package (see photo above) works at least as well as an Olfa P-Cutter,
but is less expensive and handier due to its smaller size.
Other Bits & Pieces
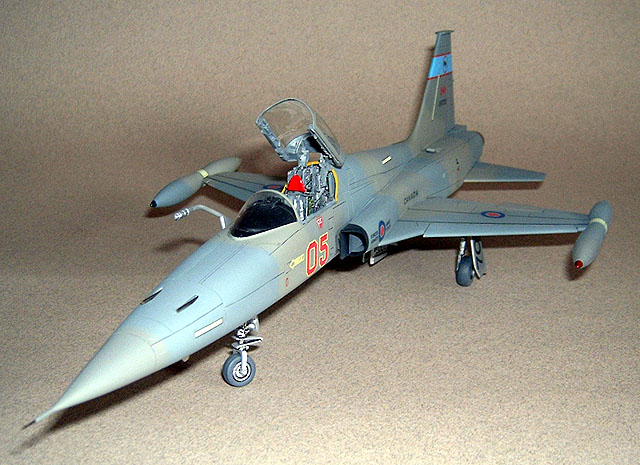
Landing gear – The nose wheel and leg for the nose
gear came from a Mongram F-5E, with the torque link reversed, and a new
yoke for the nose wheel built from scratch. Unfortunately, the F-5A’s
main gear legs and wheels were totally different than the F-5E’s, so I
was unable to use these goodies from Monogram’s kit. Thankfully,
Italeri’s main wheels are accurately sized and shaped, and surprisingly
well detailed. These were used together with improved main gear legs
that were also based on the Italeri parts. All landing gear doors are
from Monogram’s F-5E, as is the emergency arresting hook that was
transplanted under the rear fuselage of my model.
Canopy – The windscreen and canopy hood are copies of the kit parts,
vacuformed over the kit parts using ten-thou clear butyrate and a
homemade vacuformer. Black Box’s resin detail fit perfectly into the
inside of the new canopy hood, something that would have been impossible
with the thick kit parts.
Refuelling probe – This was scratchbuilt to match photos, from plastic
sheet and tube, and the tip of a refuelling probe from a Monogram F-104.
Painting,
Markings and Finishing
|
After giving the model a thorough cleaning, the parts that were not to
be painted were masked off with Tamiya tape and a coat of Mr. Surfacer
1000 was airbrushed over the model. This revealed the inevitable host of
flaws that always seem to appear from nowhere when this primer is
applied! Eventually, after repeated fill/sand/prime cycles, painting
could begin. I decided to finish the model in an early version of the
“Ghost” aggressor scheme and so custom-mixed Gunze acrylics to match
samples I have of the necessary colours. These are FS595b 35237 Blue,
36251 Gray and 36307 Gray.
These colours were airbrushed free-hand over the model, working from
lightest to darkest, with an Iwata HP-SB airbrush. When the paint had
dried, a thin coat of Future was sprayed over the model. The decals are
from Mike Grant’s CF-5 sheet, produced with an Alps printer, and I have
to say I was impressed by them. They went on well, snuggled down nicely
and, after another thin coat of Future over top, looked almost painted
on.
Surface detail was brought out with a wash of dark grey watercolour
before the model was sealed with Model Master clear matt acrylic. I
generally don’t care for this clear flat, as I find it is very white and
tends to lighten the colours on a model, but in this case it was exactly
this effect that I wanted to produce, to give the model a slightly faded
appearance.
This project would probably have been a lot simpler
if I’d started with Classic Airframes’ F-5A kit. What can I say, I like
fixing up old model kits! This one had been in my collection for years,
and there’s nothing basically wrong with the kit. In fact, in some areas
I prefer it to CA’s offering; the exhaust pipes, for example. All in
all, this was a fun and satisfying model to build, and I’m reasonably
happy with the results.
McIntyre, Bob: Canadian Profile #4 – Canadair CF-5.
SMS Publishing, 1985.
Shaw, Robbie: Superbase 18: Cold Lake. Osprey Aerospace, 1990.
Click
the thumbnails below to view larger images:
Model, Images and Text Copyright ©
2005 by David Askett
Page Created 13 June, 2005
Last Updated
13 June, 2005
Back to
HyperScale Main Page |
 Home
| What's New |
Features |
Gallery |
Reviews |
Reference |
Forum |
Search
Home
| What's New |
Features |
Gallery |
Reviews |
Reference |
Forum |
Search