|
Crusades
Knight
Fall of St John of Acre, 1291
by
Glen
Phillips
|
 |
|
Crusades Knight
Fall of St John of Acre, 1291 |

Soldiers' 54mm Crusader Knight is available online from Squadron.com
 Soldiers’
54mm Crusades Knight (SRSA034) is a well sculpted, well cast, and well
fitting figures. ‘Well’ seems to be the operative word. The figure
builder and painter can’t ask for much more. Soldiers’
54mm Crusades Knight (SRSA034) is a well sculpted, well cast, and well
fitting figures. ‘Well’ seems to be the operative word. The figure
builder and painter can’t ask for much more.
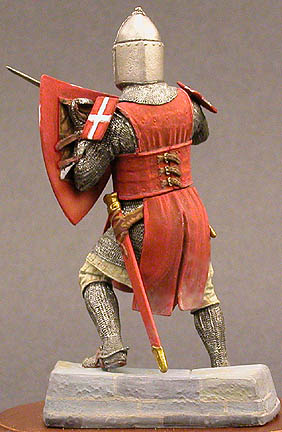
The metal kit comes broken down into left and right hips, torso,
helmet, right arm with sword, an upper left arm, the shield with the
integrally cast lower left arm, sword scabbard, knife, front and rear
coat tails, and a stepped metal base. The base is not the one depicted
on the box art. An optional head with a mail coif is also provided.
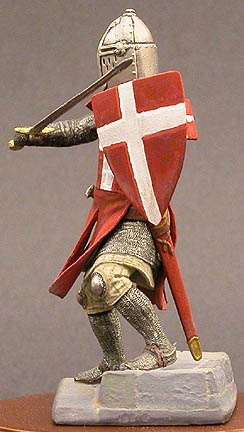
The figure is in a combat pose wearing a ‘coat of plates.’ This is
basically rectangular metal plates sewn or riveted between two layers of
heavy cloth; sort of an early version of the brigandine. The plates give
the coat an interesting faceted appearance. Beneath the coat of plates,
the figure is wearing a quilted gambeson and pants, chain mail, and
‘knee cops’ to protect the knees.
Cleanup was fast; only about 45 minutes with nippers, a file, and a
sanding stick. I had to take a close look under good light to find the
seams, but I did find them. I assembled the legs and torso using
5-minute epoxy. The remaining parts were left separate; thorough test
fitting ensured there would be no problems during post painting
assembly. The figure was then pinned to the base in preparation for
priming.
Priming
 I
primed the figure with Floquil Gray Primer, slightly thinned with
lacquer thinner, and applied with a soft brush. No points for
originality there. I left the helmet and sword blade in their natural
metal state. These were buffed with a motor-tool and small amount of
polishing compound. The idea is not to create a chrome appearance, but
one of dull used metal. The helmet details were given a pinpoint wash
using Andrea Acrylic Flat Black. No other coatings were applied. I
primed the figure with Floquil Gray Primer, slightly thinned with
lacquer thinner, and applied with a soft brush. No points for
originality there. I left the helmet and sword blade in their natural
metal state. These were buffed with a motor-tool and small amount of
polishing compound. The idea is not to create a chrome appearance, but
one of dull used metal. The helmet details were given a pinpoint wash
using Andrea Acrylic Flat Black. No other coatings were applied.
Painting
I painted the area under the tunic first, then followed with the
quilted gambeson and pants, the spurs, and any leather straps or padding
on the chain mail. The chain mail was painted using Andrea’s Gun Metal
and a Flat Black wash. The wash is heavier in some areas such as under
the armpits, inside folds, etc. When necessary I’ll drybrush a bit of
Gun Metal to restore highlights.
I painted the cross on the coat of plates and shield off-white. This
allows the use of pure white as a highlight. The coat and shield were
then painted Andrea Dark Red, darkened with brown for shadows and
lightened with yellow for highlights. I paid particular attention to the
coat facets; each facet has its own set of highlights and shadows. This
was a first for me and I was pleased with the result.
Final Assembly
 Once
the paint was dry, the remaining parts – arms, shield, scabbard, knife,
and helmet – were superglued into place. All of these parts were
pre-painted. The only filling needed was the seam between the scabbard
and it supporting belt. This is where the cleanup and test fitting pays
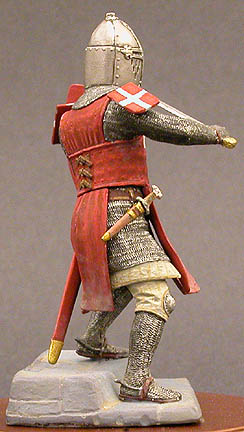
dividends! The ailettes were the last items to be added to the figure.
These are the small rectangular pieces on the shoulders. By most
accounts, these were made of heavy parchment, metal, or wood. Their
primary purpose was to serve as a means of identification from the side.
At least one of my references states they were only worn during
tournaments. I added them anyway, since not doing so would require
filling in the mounting hole and restoring the chain mail. I don’t feel
my sculpting skills are quite up to that. Yet. Once
the paint was dry, the remaining parts – arms, shield, scabbard, knife,
and helmet – were superglued into place. All of these parts were
pre-painted. The only filling needed was the seam between the scabbard
and it supporting belt. This is where the cleanup and test fitting pays
dividends! The ailettes were the last items to be added to the figure.
These are the small rectangular pieces on the shoulders. By most
accounts, these were made of heavy parchment, metal, or wood. Their
primary purpose was to serve as a means of identification from the side.
At least one of my references states they were only worn during
tournaments. I added them anyway, since not doing so would require
filling in the mounting hole and restoring the chain mail. I don’t feel
my sculpting skills are quite up to that. Yet.
Base
The individual stones on the base were painted in shades of gray
tinted with blue, green, brown, etc., and then given a light coat of
dusty brown. This same dustcoat was worked up the lower legs and the
coat flaps.
Overall, this particular kit was a no muss, no fuss figure. The parts
breakdown is logical and everything fit together the way it was supposed
to. I’m looking forward to another one.
Model and Images Copyright 2004 by
Glen Phillips
Page Created 09 June, 2004
Last Updated 13 June, 2004
Back to
HyperScale Main Page
|
 Home
| What's New |
Features |
Gallery |
Reviews |
Reference |
Forum |
Search
Home
| What's New |
Features |
Gallery |
Reviews |
Reference |
Forum |
Search