|

HyperScale is proudly supported by
Squadron.com
Boeing's Delta IV is the latest in the company's line of Delta launch
vehicles. The most famous of those is the Delta II, but the Delta IV
bears little resemblance to its older cousin. This rocket was developed
by Boeing in partnership with the U.S. Air Force's Evolved Expendable
Launch Vehicle (EELV) program. It is intended to launch medium- to
heavy-size satellites. There are five launch vehicle configurations in
the Delta IV family, and each is based on the Common Booster Core (CBC),
which is powered by the RS-68 main engine. The RS-68 produces 650,000
pounds of thrust, and it is the first new cryogenic rocket motor built
in the U.S. in two decades.
At present, there are no card models of the Delta IV, although Erik
te Groen
http://www.lansbergen.net/eng/index.htm has said he will be offering
a Delta IV Heavy sometime this year. Going by the rest of the models he
designs and offers on his website, it should be a great model.
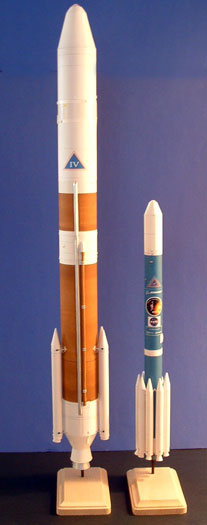
While waiting for Erik's "Heavy," I figured I'd go ahead and
scratchbuild a Delta IV Medium+(5,4). (A note here on the Delta IV
naming convention. The "medium+" indicates that the CBC is augmented by
strap-on graphite epoxy motors, or GEMs. The "5" indicates the diameter
in meters of the second stage and payload fairing, and the "4" indicates
the number of GEMs.)
In contemplating the scratchbuild, I guessed there would only be a
couple of major building challenges: the lower part of the engine
section, and the skins of the CBC's LH2 and LO2 tanks. The rest of the
rocket would be basic -- just a long tube, for which I would use model
rocket tubes covered with "skins," topped by a payload fairing. Stick
four GEMs on the side and you're done.
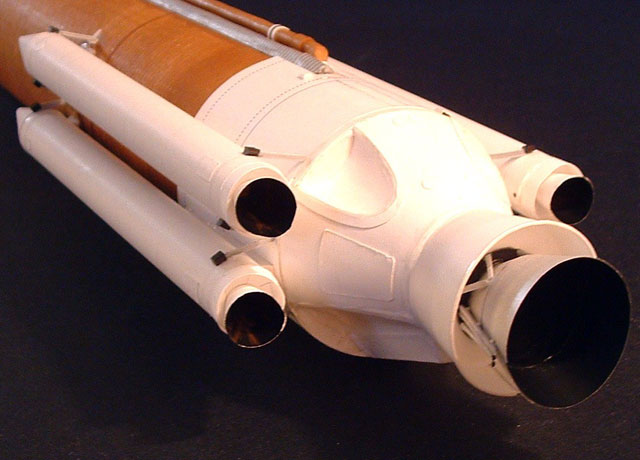
At first glance, the lower part of the engine section appears to be a
truncated cone. At second glance, it is quite different -- an asymmetric
cone with four half-oval shaped indentations, and a large fairing on one
side (I'll call this side the "top" because when the rocket is
horizontal, it is on top) between two the upper pair of indentations.
That fairing changes the geometry of the indentations, so they are
different from the two on the "bottom." I began by figuring the
dimensions of the basic truncated cone, (I used Robert Blaske's
indispensable shroud calculator, at
http://www.realmcommunications.com/rblaske/shroudcalc/shroudcalc.htm
) and then I transferred the dimensions to 65-pound cardstock.
 From
there, it was a matter of gluing and cutting and trial and error. I
wound up with a decent approximation (in card, anyway) of the engine
section, indents, fairings and all. From
there, it was a matter of gluing and cutting and trial and error. I
wound up with a decent approximation (in card, anyway) of the engine
section, indents, fairings and all.
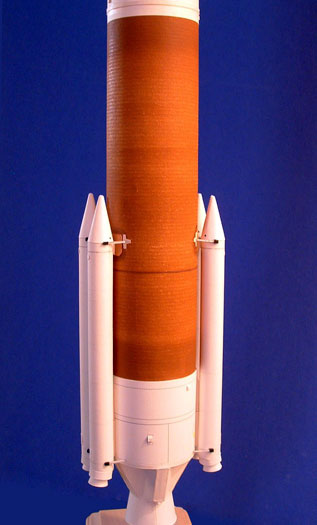
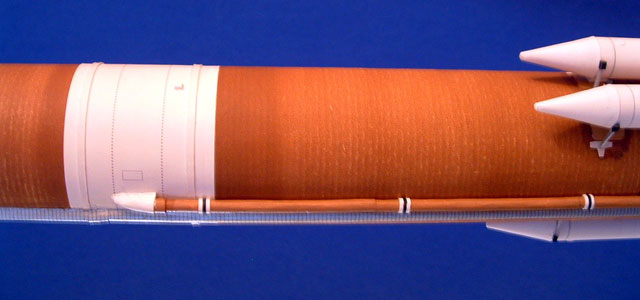
The skins for the fuel and oxidizer tanks seemed like they would present
a bigger challenge. In photos, it appears the tanks are covered with a
foam insulation akin to that applied to the space shuttle's External
Tank. For all I know, it could be the very same kind of foam; photos of
the Delta IV show it with two of the ET's big characteristics -- a rust
color that weathers unevenly, giving it a mottled appearance, and a
horizontally "ribbed" surface texture. Replicating this appearance is
very important for getting the look and "feel" of the Delta IV, and I
was stumped as to how I was going to accomplish it in card.
So I paid a visit to my local art supply store to look through their
selection of paper. My hope was to find something thick enough that I
could engrave rough "grooves" in to simulate the tanks' appearance. But
while looking through their books (and books, and books...) of paper
samples, I came across some paper that already had a light ribbed
pattern embossed into it. What's more, the paper was the same light tan
color of the "weathered" foam. I bought the large sheet (I think it cost
all of a couple bucks) and my hope was that when I applied the paper to
the tube, the rib pattern wouldn't flatten out. When I got it home and
test-fitted a section to the model, the rib pattern kept its shape, and
the texture looked darn-near perfect to my tastes. I cut two sections to
the appropriate size for the fuel and oxidizer tanks, then airbrushed
them with a light coat of "Shipyard Rust" from Badger's line of acrylic
maritime paints. I sprayed heavier coats near the tops and bottoms of
each skin because in the photos I have, the foam seems to maintain its
rusty color in those sections, as well as around such things as the GEM
attach points. Once the paint was dry and I affixed the skins to the
model, I lightly sanded them, removing the darker rust color from the
raised portions and giving the foam the appropriate ribbed and weathered
look.
|
|
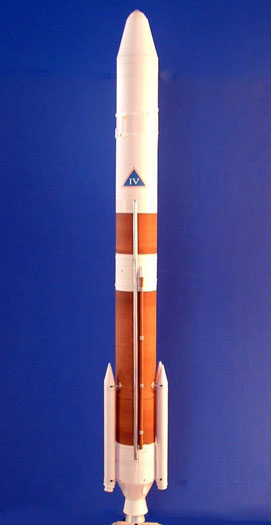
The rest of the Delta IV's construction was pretty straightforward. I
used 65-pound card stock and heavier stock for the rocket's centerbody,
interstage, second-stage intertank, etc. For the 5-meter composite
fairing, I "borrowed" the pieces from Erik te Groen's Delta III model,
enlarged them to the appropriate size and used them as a pattern to
build the fairing, adding details as I went. Similarly, I used the GEMs
from one of his Delta II models after sizing them appropriately. I made
the RS-68 nozzle from silver paper, using the pattern from a Titan II
nozzle that I found online and enlarged. The utility tunnel was made
from silver paper, which I rolled into a semicircular structure around a
knitting needle. The LO2 feedline was made from paper tubes I rolled
around a plastic tube. Other bits and pieces were added from laminated
cardstock or paper.
Even in 1/96th scale, the finished model is imposing -- over 27 inches
tall. This really is a big rocket!
Click the thumbnails below to view larger images:
Model, Images and Text Copyright © 2005
by David Hanners
Page Created 03 March, 2005
Last Updated
03 March, 2005
Back to
HyperScale Main Page |
 Home
| What's New |
Features |
Gallery |
Reviews |
Reference |
Forum |
Search
Home
| What's New |
Features |
Gallery |
Reviews |
Reference |
Forum |
Search