|
Monogram +
Lone Star 1/48 scale
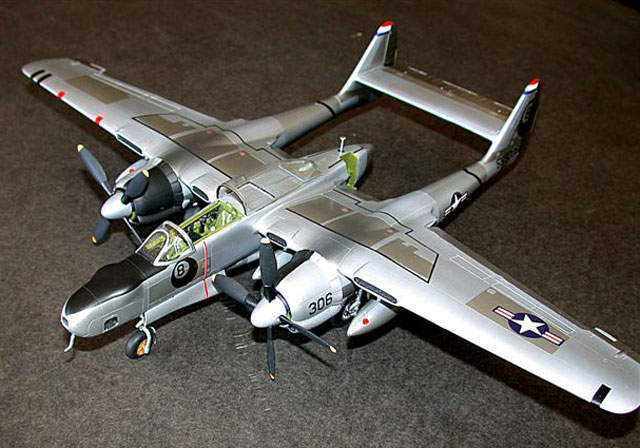
Northrop F-15A Reporter
by "Bondo" Phil Brandt
|
 |
|
Northrop F-15A Reporter |

HyperScale is proudly sponsored by Squadron
The Northrop F-15A
Reporter joins the North American F-82 as arguably the two least-known
post-World War II propeller-driven aircraft.
Conceived as a highspeed
(440 MPH), long range (4000 miles) turbocharged reconnaissance platform,
it was an outgrowth of the cancelled P-61C escort fighter. The
significant military aircraft drawdown in late 1945 was responsible for
only thirty-six F-15A airframes being produced, of which as many as
twenty-eight reached Far East postwar operational areas.
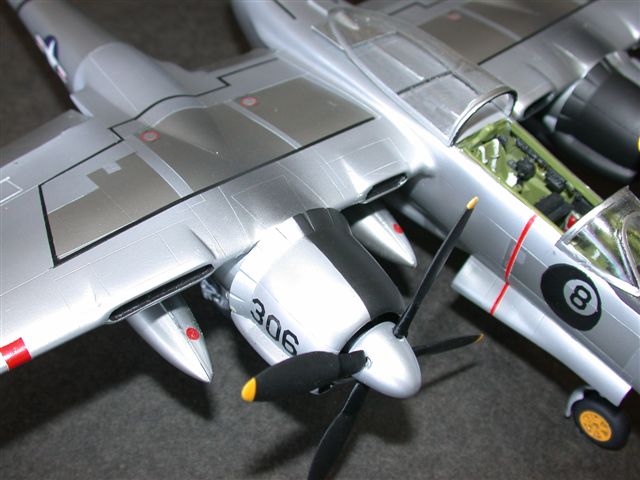
Flown exclusively by the 8th Photo Reconnaissance Squadron "Eight
Ballers", the Reporter's military career lasted only two years
(1947-1949), but its accomplishments were staggering. Huge expanses of
the Far East including Japan, Korea and the Philippines were photomapped,
the first such operation in history. Particularly important was the
mapping of the Korean peninsula, which became extremely valuable just
one year later when North Korean forces attacked across the DMZ.
The Reporter was quickly
overcome by Jet Age RF-80s, and most of the airframes languishing at
Johnson Air Base west of Tokyo were scrapped in place. Sundry Reporters
made it back to the CONUS to be converted to firebombers, and some were
bailed to test agencies and eventually scrapped. No Reporters have
survived; the last, a firebomber conversion, crashed on takeoff at
Hemet, California in the Sixties.
Conversion Basics
We are all aware that
AmTech announced release of an injected 1/48 Black Widow family,
including a Reporter, what, two years ago? AmTech has been beset by
business and health (of its principal) issues, and modelers such as this
curmudgeon just don't have that much time to fret away.
Thus Mike West's Lone Star Model release (a year ago) of a very complete
Reporter conversion set for the elderly-but- just-fine (IMO) Monogram
Black Widow was welcomed by employees of the Bondo Industries Conversion
Division, and work commenced immediately. I've previously written a
lengthy review of the Lone Star set, so I'll tread more lightly on it in
this article.
Conversion Set Components
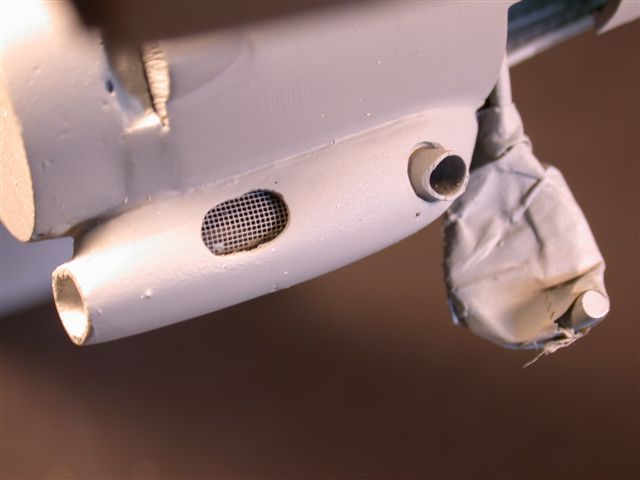
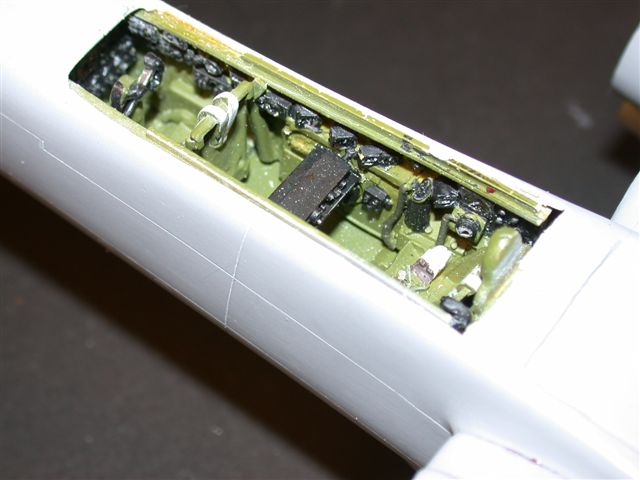
Included are: a multipiece
cockpit tub w/seats, new engine nacelles and engine front faces, nacelle
cooler fairings, turbocharger fairings, recce nose, tail boom plugs,
prop blades, spinners, a vacuformed crew nacelle and canopy and a crew
boarding ladder and stairwell.
Construction Basics
Sanding and rescribing the
twin-boom Monogram airframe took two days, and Bondo thought this would
be the toughest part. He was wrong! Fitting the resin tub into the
vacuform pod, fairing the wings into said pod--I used through-pod brass
tubing to locate and strengthen the wing/fuselage joint--and insuring
alignment of the stabilizer with the wings and pods was by far more
taxing. The forward portion of both tail booms were altered by cutting
off designated portions and adding new resin boom castings, engine
spacer blocks, engine faces and the new engine nacelles (the cooling
flaps were thinned via Dremel) with integrated oil cooler cheek
fairings.
Cockpit / Canopy
The very large (eleven
feet in the real item!) canopy was separated from the windscreen and
posed in the open configuration to more clearly reveal the very nice
busy-ness of the Lone Star tub and seats. Associated canopy retraction
components and the reinforcement arches for windscreen and canopy were
scratchbuilt.
Click on the thumbnails
below to view larger images:
Weight and Balance
Because of the solid recce
nose, I was unable to place enough weight forward to get that nosegear
on the ground, and the gear isn't that sturdy either. Sooo, the bird
remains a tailsitter. I drilled a small hole in the bottom of the
nosewheel and glued in a quarter-inch length of plastic rod which, in
turn, slips into the plaque surface with an interference fit.
Finish
In the beginning there
were many iterations of lacquer primer, 3M Blue Acryl lacquer putty,
wetsanding (up to 12,000 grit) and then starting over with primer. Small
surface discontinuities may be easily seen during this putty/primer
routine by holding the appropriate portions of the model closely to an
incident light. After a few passes of the aforesaid sanding routine,
more than a few portions of laboriously-scribed lines had disappeared
and had to be reaccomplished.
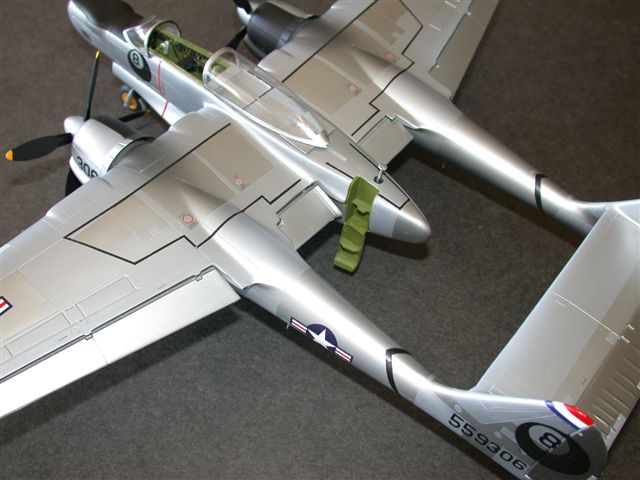
An overall coat of Alclad II Aluminum was initially applied, and then
contrasting panels were shot with Duraluminum, Dark Aluminum and, for
the fabric-covered stab and rudders, Magnesium. Masking for the
multishade routine--I can't say enough good about the yellow Tamiya
masking tape which I use in considerable quantity--was very labor
intensive, as was the masking for all wingwalks and other markings. I
didn't use decal stripes because they're almost as labor intensive as
the masking--I've done decal wingwalks on 1/72 B-52s and B-47s!--and
they're too delicate if not clearcoated....and I usually prefer to not
clearcoat Alclad, because it can "kill" natural metal brightness.
Antiglare black panels were shot with Testors Acrylic. Since Alclad
offers such a slick, hard surface, I gently wetsanded the areas about to
be coated in black with 1000 grit to help create a mechanical paint
bond.
Markings
The distinctive Eighth
Photo Reconnaissance Squadron "Eight Balls" were a no-brainer. I simply
cut two circle stencils out of Tamiya tape, placed them in an eccentric
configuration, and shot Testor's black.
Then it was just a matter
of placing an AeroMaster black "eight" in the smaller aluminum circle
which remained when the inner mask was lifted. Serial numbers and
national insignia were also done with AeroMaster.
Well, the bleeding's
finally over in this involved conversion, but with gratifying results,
at least for this senior modeler. As for the rest of you Black Widow
family fans pining away for the Amtech releases....as Dirty Harry said
so many years ago, "Do ya feel lucky?"
Well, do ya?
If I were y'all, I'd go
the "bird-in-the-hand" route with the available-now Lone Star set.
Click on the thumbnails
below to view larger images:
Model, Images and Text Copyright ©
2005 by Phil Brandt
Page Created 13 April, 2005
Last Updated
14 April, 2005
Back to
HyperScale Main Page
|
Home
| What's New |
Features |
Gallery |
Reviews |
Reference |
Forum |
Search