|
Hasegawa's 1/48 scale
F-16CG
Block 40
by
Piero De
Santis
|
 |
|
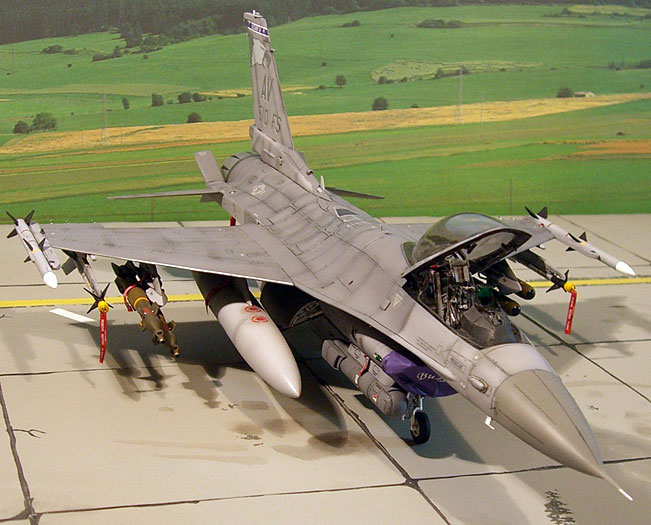
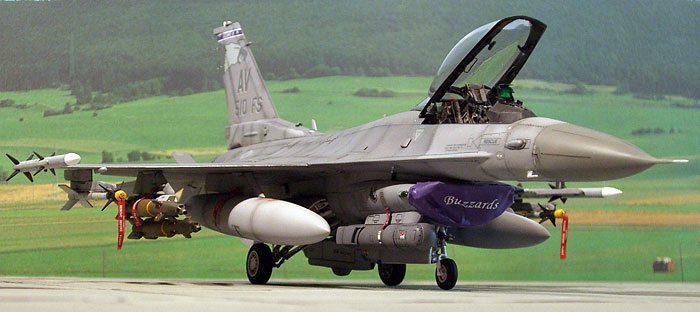
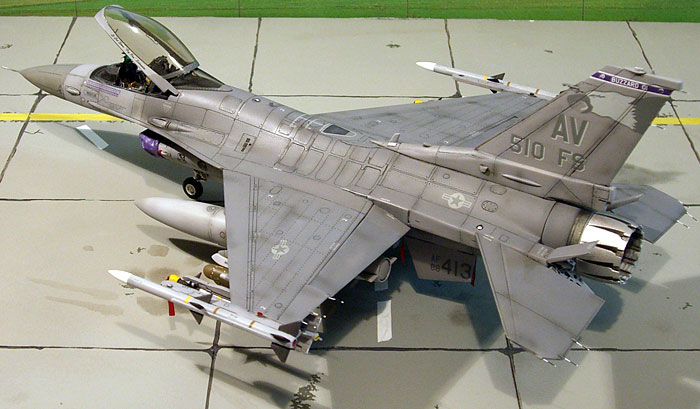
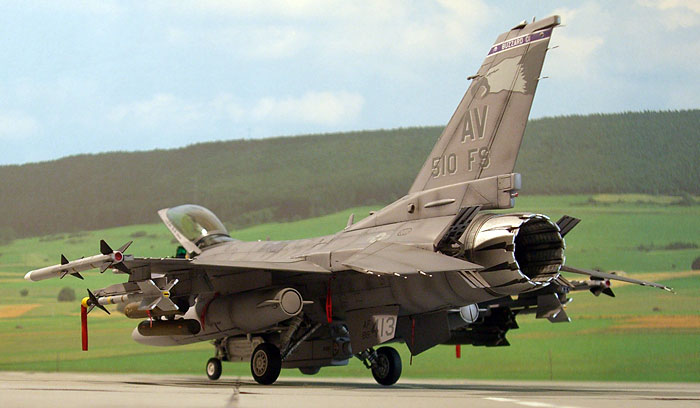
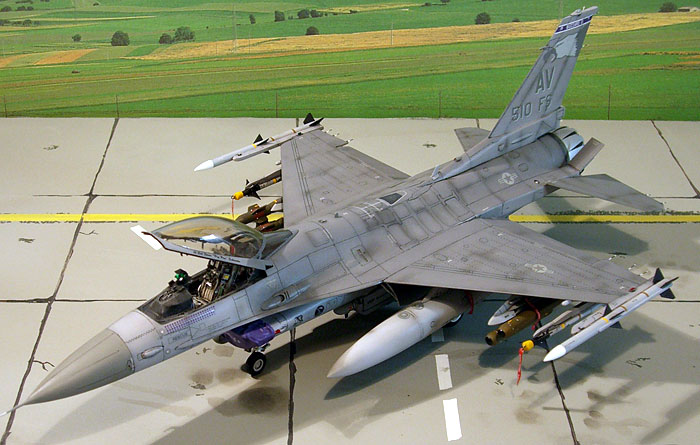
USAF F-16CG Block 40
Buzzards Squadron |

Hasegawa's 1/48 scale Harrier
GR.7 is available online from Squadron.com
The F-16CG enters service in the USAF as a version
optimised for the night attack mission.
Two big USAF fighter squadron based at Aviano AFB
are equipped with F-16C/D block 40: FS 510th “Buzzards” and
FS 555th “Triple Nickel”.
Both squadrons were heavy involved in the NATO
actions over the Balkans conflicts for the Bosnia and Kosovo.
The Block-40 includes:
- Modified
cockpit with a new wide angle HUD.
- Cockpit tub
colours and lights for night operations.
- New big
undercarriage wheels, legs and bay doors.
- Strengthened
dorsal plaques.
For my model I choose the squadron commander’s
aircraft from the “Buzzards” Squadron, based at Aviano AFB during the
Allied Force operations over Kosovo in the 1999. It has a big screaming
buzzard squadron badge applied on both side of the tail fin and purple
mission markings under the canopy.
The F-16 in Plastic
There is almost everything on the F-16 in all the
three main scale 1/72nd, 1/48 and 1/32nd: kits, decals, resin detail
sets, photo etched sheets, conversion sets…
Looking only at the 1/48 scale, I choose the
Hasegawa kit: you can find so many different variant and boxes from
Hasegawa, A, A+, B, B+, C and D of different blocks (30, 40, 52).
Other F-16’s kit in 1/48 came from Academy (a
“simplified copy of the Hasegawa), Italeri (cheap), Revell (Italeri
re-boxed), ESCI, Tamiya, Monogram, Arii… no comment, please go with
Hasegawa.
The 1/48 scale “Hasegawa” F-16C (block 40-52) has
many parts in common with the other Hasegawa F-16’s boxes, with some
extras to build a GE power version.
To improve the C version I got some extra parts
from the aftermarket and from other kits:
- Aires resin
cockpit for F-16C.
- Shull-24
resin GE exhaust nozzle.
- Shull-24
resin PIDS pylons.
- Aires resin
wheel bays.
- Eduard photo
etched set.
- F-2B
Hasegawa kits: this kit contains the correct wheels and legs for
block 40, plus many other detail parts.
Now some information related to the assembly of
the Hasegawa kit.
- Cockpit
resin set must be sanded a lot before placed inside the fuselage
parts. A precise cut must be done on the plastic fuselage to fit the
resin cockpit.
- A 10 grams
weight must be placed into the nose to avoid a tail sitting model.
- Because I
was not so happy with the resin seamless intake and I like a lot the
purple FOD with white “Buzzards” logo, I decide to scratch build one
using masking tape.
- Wheel bays
are easy to fit inside the fuselage.
- Join the
wings with the fuselage was the biggest task for me building the
kit… I can’t found a way without using an amount of Tamiya
bi-component filler.
As I said before, many details were added to
obtain a block 40 aircraft replica and some panel lines were corrected
too.
Paint
I painted my model using my Aztek double-action
airbrush.
References I used for the correct camouflage
pattern can be found on the ASTRA Decal instruction sheet, on the
“Aviano AFB” book and on the FS510th web site.
The colours are:
- Medium Ghost
Grey (FS36270)
- Dark Ghost
Grey (FS36118)
I use acrylic paints from Gunze.
Pre-shading and post-shading as usual for my
models.
I spayed some clear smoke along the panel lines.
Decals
I got the decal sheets for “Aviano F-16CG” by
“Astra Decal”: printed by Cartograph those decal are not the “best” of
their production, because are not very thin and correct.
I sprayed a cote of clear gloss from Tamiya" to
prepare the model for decaling.
"Microscale" Set/Sol were used to apply decals.
To finish a cote of clear gloss from Tamiya and
then a flat clear from Gunze.
Weapons and Ordnance
To load my F-16CG as a “Fast-CAS” I got a Lantirn
laser pod from a Hasegawa modern weapons set.
I added an asymmetrical configuration with a pair
of GBU-12 LGB under the right wing and a pair of rocket pod under the
left wing.
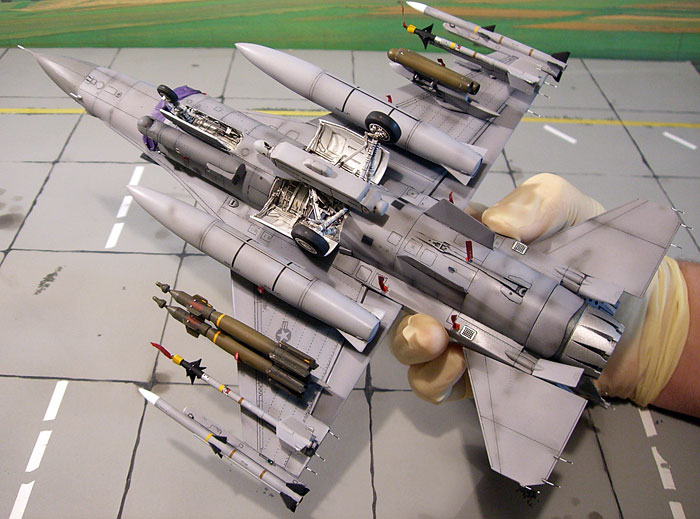
AIM-9M infra-red missile under wing rails and
AIM-120B at the wing tip rails.
An ECM pod ALQ-131 from Hasegawa weapons set was
added under the belly pylon.
A pair of “standard” fuel tanks under the internal
wing pylons.
Some RBF tags from Eduard’s etched sheet were
added all over the model to add a touch of colour and realism.
Books that can be recommended for references are "DACO
F-16C/D" book, some "World Air Power Journal" back issues, “Aviano AFB”
monograph volume and “HT Model F-16” volume .
Specific information, support and references on
can be found on the web.
CIAO!
Piero
Click the thumbnails below
to view larger images:
Modelling the Harrier I
and II
Osprey Modelling 1 |
|
|
|
|
Author: Glenn Ashley
US Price: $17.95
UK Price: £12.99
Publisher:
Osprey Publishing
Publish Date: September 25, 2003
Details: 80 pages; ISBN: 184176647X
|
|
|
Model and Images Copyright 2006 by
Piero De Santis
Page Created 13 February, 2006
Last Updated 21 February, 2007
Back to
HyperScale Main Page
|
 Home
| What's New |
Features |
Gallery |
Reviews |
Reference |
Forum |
Search
Home
| What's New |
Features |
Gallery |
Reviews |
Reference |
Forum |
Search