|
Taming the Wildcat
Revell's 1/32 scale F4F-4
by Charles Landrum
|
 |
|
F4F-4 Wildcat |

HyperScale is proudly supported by Squadron.com
This is a modeling tale of endurance that unfolded over the course of
13 years. The kit is the Smithsonian Series release of the Wildcat from
the 1980’s. It was a gift from my dad in 1990, on my 29th birthday. The
kit spent most of the intervening years on the shelf, where I hoped that
none of the smaller parts would get lost. When Trumpeter released its
corrected kit of the 1/32 scale Wildcat, I decided that I had to have it
and that it was time to give up on the Revell kit. However, this is
really a tale of a venerable kit standing up to its upstart rival with a
little modeling help. Purchasing the Trumpeter kit and laying the two
side by side, I decided the Revell kit wasn’t a bad little kit after all
(recall Charlie Brown and his Christmas tree). I set out to prove that
my unfinished kit could still be made into a nice replica. I hope that I
have redeemed somewhat the reputation of the Revell Wildcat.
I have always liked the stout lines of the Wildcat and admired its
versatility. Here is a plane that held the line in the early days of the
War in the Pacific, from Wake Island to Midway to Guadalcanal. And then,
long after being supplanted by the Hellcat and Corsair, it soldiered on
until the war’s end flying from “jeep” carriers.
What got me started on this kit was a 1986 Fine Scale Modeler Article on
how to detail a radial engine. I was fascinated and decided to test the
techniques on my newly acquired Wildcat kit. What stretched out the
project was my desire to detail the rest of the plane like my ambitions
for the engine. Advanced modeling syndrome had taken root. Unfortunately
my skill did not match my ambition and so the kit went onto the shelf.
Eduard’s release of their photo-etched detail set for the kit in the mid
‘90s rekindled my enthusiasm and I tore into the cockpit fully enjoying
the process of re-building it. Then frustration set it, the wheel well
was too basic. I stopped again.
In the late 90’s I visited the Naval Air Museum in Pensacola, Florida.
Looked into the main well of their restored F4F-3 and was again
inspired. This time the Squadron Walk around book was available. Out
came the knife and I went after the control surfaces first. But I got
frustrated by the wing fold and stopped; I never made it to the wheel
well.
Fast forward to 2003 and the corrected 1/32 scale Trumpeter Wildcat was
out. Knowing I was going to pick up my kit at the IPMS meeting, I
brought my “in progress” kit for a comparison. There I quickly realized
that my unfinished Revell kit didn’t look too bad after all. Lynn
Ritger, quick to completely rebuild an old kit for the glory, cajoled me
into finishing the job. I am glad he did, but I didn’t share my work
until it was done, afraid that I would lay an egg.
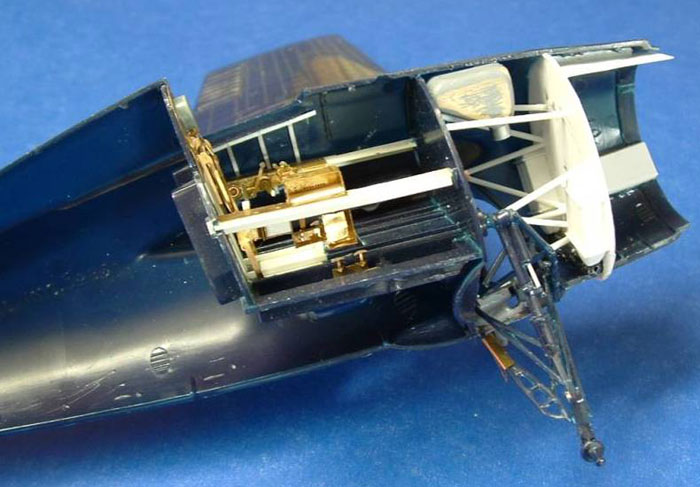
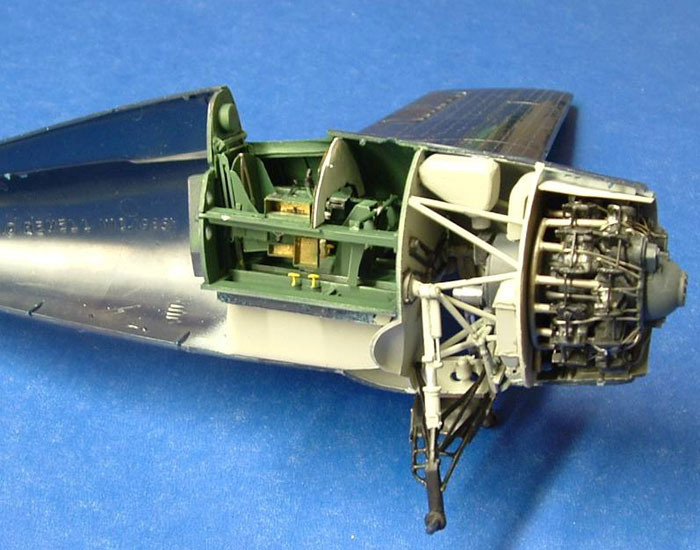
The majority of my improvements occurred in three areas, the engine,
the cockpit and the wheel well. Tackle these areas and you have it made.
Yeah, sure!
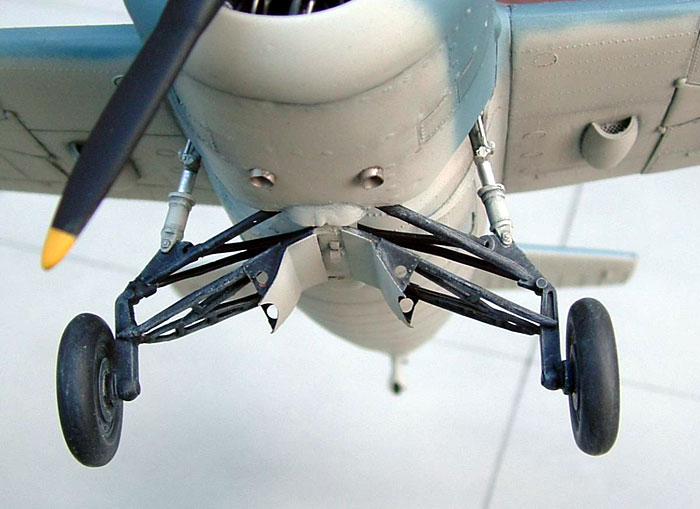
The fit of the kit is actually pretty good. I was very surprised by
the snug fit of the wings at the root. I was careful to not sand away
too much raised detail and replaced it where I could, the hardness of
the plastic helped here. In fact I found the plastic almost brittle. Age
may have something to do with it, but I remember that Revell kits from
the 1960’s had harder plastic. I ended up snapping a main strut and had
to reinforce it with brass wire. Although I wanted to build the kit with
the wings folded, I decided that it would required to much work and I
wanted to finish this project.
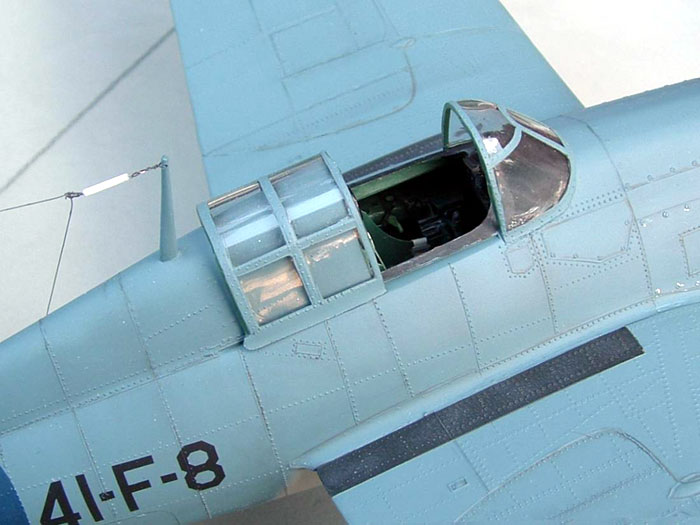
I built up the cockpit primarily with the Eduard set. I found that the
Eduard seat, as nice as it is, sat too close to the control column. So I
fabricated a new one from .010 styrene patterned after the Eduard seat
but a tad smaller. I also added the bulkheads (painted Flat Gull Gray)
for the fuel tank below the cockpit, so you couldn’t see across the
width of the fuselage at the lower windows. The gun site is made from
scratch. I used Euro Dark Green to represent Bronze Green. The shade
needs to be a little darker; next time I will add a little black to the
color.
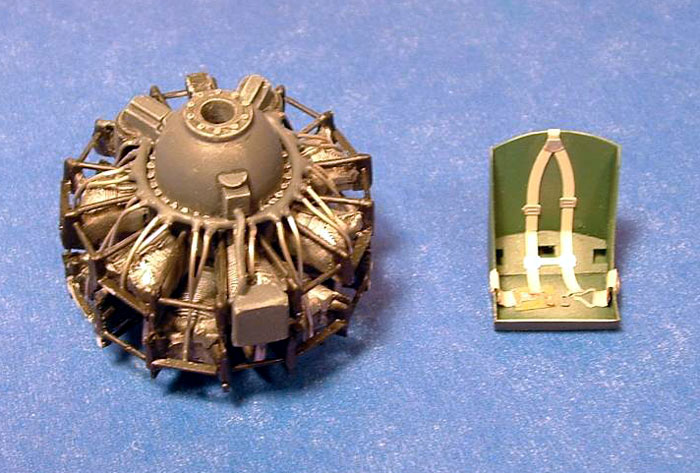
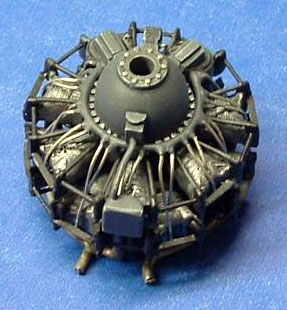
The kit engine is not bad, but needs more detail in this scale. . So the
work began and I ended up rebuilding the engine twice before I finished
the kit. I cut the back row of cylinders off the firewall and added
styrene to build them up. There are no after market details, it is all
styrene, wire and solder. And even though most of it is hidden, I
decided in the home stretch (winter of 2003-2004) to add as much detail
as I could even though it would go unseen. It was good practice. I added
the air ducting for the carburetor and the intercoolers as well. I added
exhaust pipes (unrecognizable blobs in the Revell kit) made from coffee
stirrers.
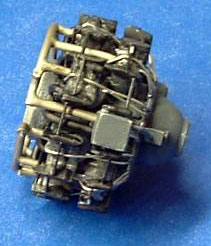
The Trumpeter kit admittedly helped me set dimensions in the main wheel
well. I patterned the oil tank from Trumpeter’s and carved it from
basswood. The intercoolers I patterned and improved from the Eduard set.
In the Eduard set they lack the correct shape and Eduard, like the
Tamiya, incorrectly only provides one! I also dummied up the accessory
section of the engine copying that of the Trumpeter kit. Neither
Trumpeter’s nor mine is right, but it does the job and provides the
right effect. I built the engine mount from styrene rods and in the
process found an error in Trumpeter engine mount wrong, the “V” is in
correct at the top, it doesn’t allow room for the air intake trunk
(missing) down to the carburetor. I added this trunk on mine. I couldn’t
find a suitable replica for the bicycle chain of the landing gear
operating mechanism, so it is made from styrene strip.
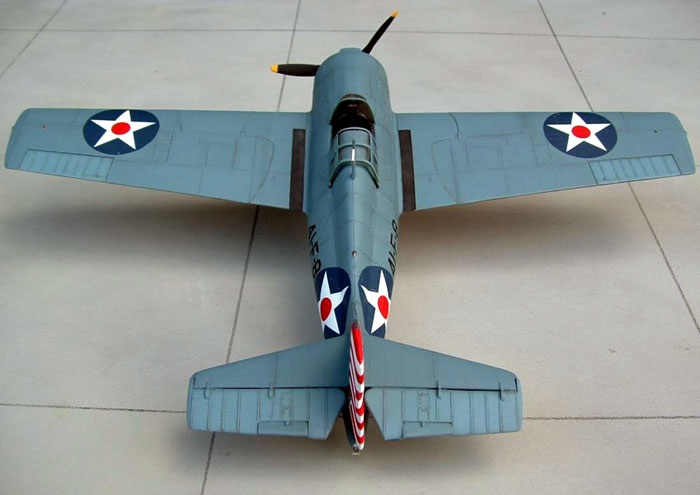
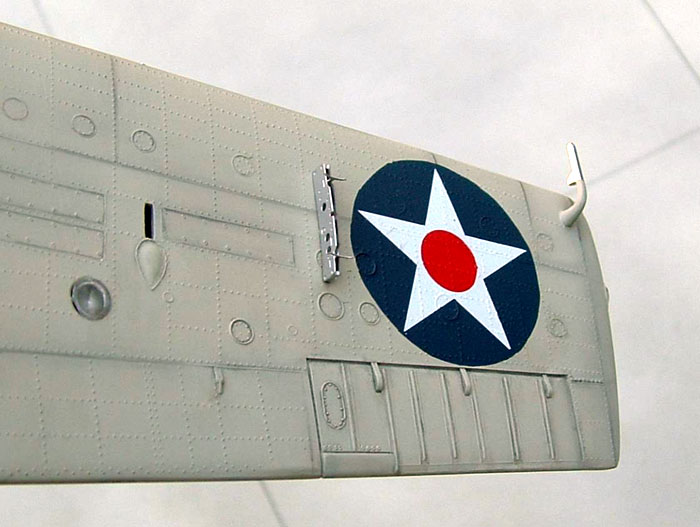
My other enhancements included scratch building a tailhook, and adding a
landing light to the underside of the wing (another curious omission by
Revell). The bomb racks and oil cooler screens came from the Eduard set,
as did the tailhook roller.
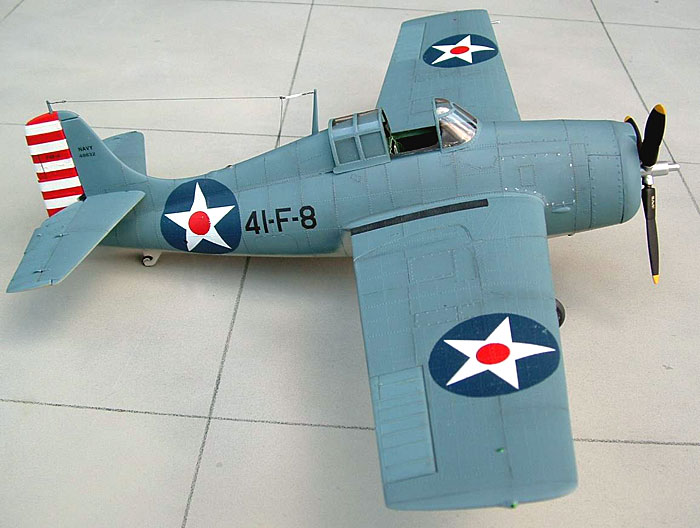
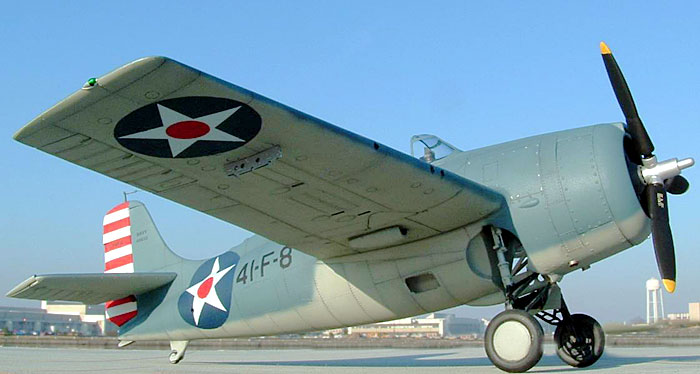
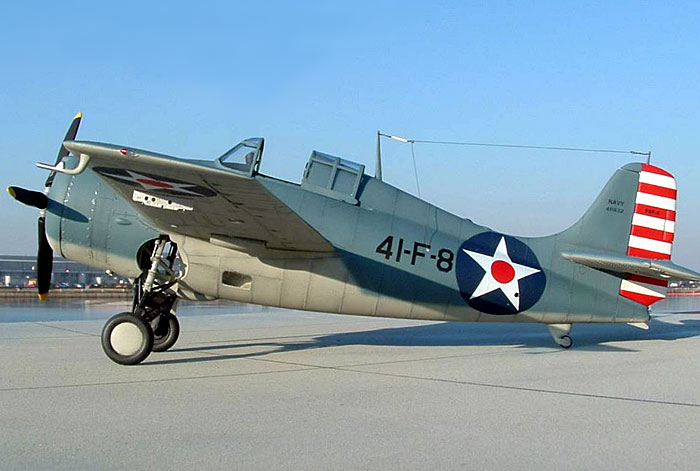
My model represents a new F4F-4 of VF-41 in the earlier months of
1942 onboard USS Ranger.
Paint
 The
underside of the model and the wheel well and engine compartment are
painted Model Master enamel Flat Gull Gray FS 36440. The
underside of the model and the wheel well and engine compartment are
painted Model Master enamel Flat Gull Gray FS 36440.
For the topside color, I originally used Model Master Navy Blue Gray,
but I found it to be too light. Not wanting to custom mix a match, I
also read the Model Master RAF PRU Blue is a pretty close match to
period Navy Blue Gray - I have to say that it is based on the color
photos I have seen.
I left the fabric control surfaces the lighter Navy Blue Gray to
provide a faded effect.
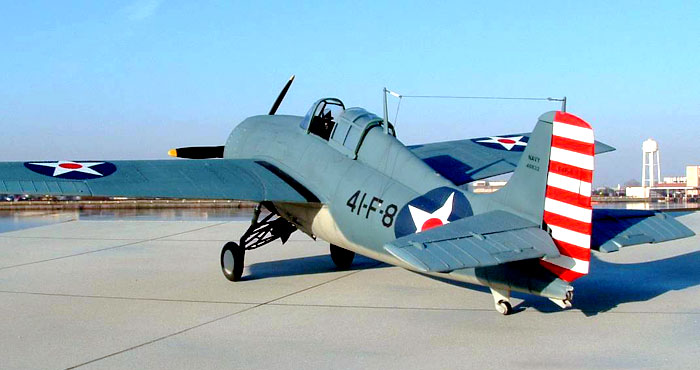
The rudder is painted Model Master Insignia White and Insignia Red.
Decals
The markings are a mix of decals. The numbers are Aeromaster and went
down fine. The propeller blade labels and bureau number are Trumpeters,
and they worked fine too. I also tried to use the Trumpeter roundels but
the insignia blue is too light. So I cut insignia blue disks from Scale
master decals, the stars are from the Trumpeter roundels and the center
red disk is insignia red sprayed on to decal paper and punched out with
a hole punch. So the roundels are a three layer decal.
No sooner had I done all this than Cutting Edge released their
decals. Cest la vie.
I kept weathering to a minimum. I did use a wash of Euro 1 gray in
some spots. I primarily used pencil to emphasize the raised panel lines
and softened them by buffing with a facial tissue.
Why did I stick with the kit? First it looks like the Wildcat
compared to the drawings and photos I have. Secondly, I like the raised
detail, which faithfully replicates the Wildcats that I have seen (Ok
the rivets on horizontal stabilizer are overdone!). Thirdly, I stuck
with it for the challenge of finishing the kit and building my skills.
The pictures were taken with a Fuji Finepix S300, 3.1 Megapixel camera.
I set the exposure on auto with increased depth of field resolution. I
shot some of the pictures at Naval Air Station Norfolk, Chamber’s Field,
on a Saturday morning with the same hangars in the background that
housed the F4F-4s of VF-41 in 1942 before they were loaded on the
Ranger.
Charles Landrum is a defense consultant now retired from the US Navy. A US
Naval Academy Graduate, he spent the bulk of his 20-year naval career at
sea serving on six ships of the Atlantic Fleet including USS SAIPAN, USS
ENTERPRISE, USS BIDDLE, USS HAYLER, USS HARRY E. YARNELL and USS KIDD. He
also accumulated time and experience on the ships of the NATO navies,
especially Canadian. An avid modeler and Hyperscaler, he concentrates his
modeling efforts on the ships and aircraft of the US Navy. He and his
family continue to reside in Norfolk
Click on the thumbnails
below to view larger images:
Wildcat Aces of
World War 2
Aircraft of
the Aces 3 |
|
|
|
|
Author:
Barrett Tillman
Illustrator: Chris Davey
US Price: $19.95
UK Price: £12.99
Publisher:
Osprey Publishing
Publish Date:
April
10, 1995
Details: 96 pages; ISBN: 1855324865 |
|
|
Model, Images and Text Copyright © 2004
by Charles Landrum
Page Created 05 May, 2004
Last Updated
05 May, 2004
Back to
HyperScale Main Page |
 Home
| What's New |
Features |
Gallery |
Reviews |
Reference |
Forum |
Search
Home
| What's New |
Features |
Gallery |
Reviews |
Reference |
Forum |
Search