|
F-4J Phantom II
by
David W. Aungst
|
 |
|
F-4J Phantom II |

HyperScale is proudly supported by
Squadron
This posting completes my "Seven Phantoms in Seven Months". I
have an eight Phantom in construction (an RF-4) right now, but there is
little chance of that one getting done in time to be an eight Phantom
for next month. I hope you have enjoyed all my Phantoms. Maybe next
month I will do a Bf 109 ...
The day after a model club meeting, I was talking with my friend Skip
concerning how nice the (then) new re-tooled Hasegawa F-4J Phantom
kit was. He decided to make me put my money where my mouth was and
challenged me to complete the kit in one month, in time for our club's
next meeting and the annual club competition. I accepted the challenge,
and this model was the result which I finished one month later. Not only
did I complete it in the alloted timeframe, but I won first place in the
category at the club competition.
Of course, I have since topped this performance by completing three
Hasegawa F-4 Phantoms in one month. They really are great kits.
In all honesty, though, the model was not as completed as it should
have been when I competed it at my model club. The airframe was finished
and complete, but the model as I wanted it to be done was unfinished,
missing its weapons. After the club meeting, I found I had lost interest
in completing the model, even though the weapons were already half done.
So, I placed the model on my display shelves, stashed the weapons in my
workroom, and forgot about the whole thing for the last thirteen years.
Recently, I decided I wanted the model truely done. I wanted to complete
the model with all the weapons I still had squirreled away in my workroom,
put away in just the state they were left thirteen years ago. I also
wanted to correct some markings issues and fix pieces that were broken
after thirteen years on my display shelves.
So, that is what I did.
Skip, the friend that originally dared me to build this model, has an
affinity for naming models (his, mine, or anyone's), even if the model
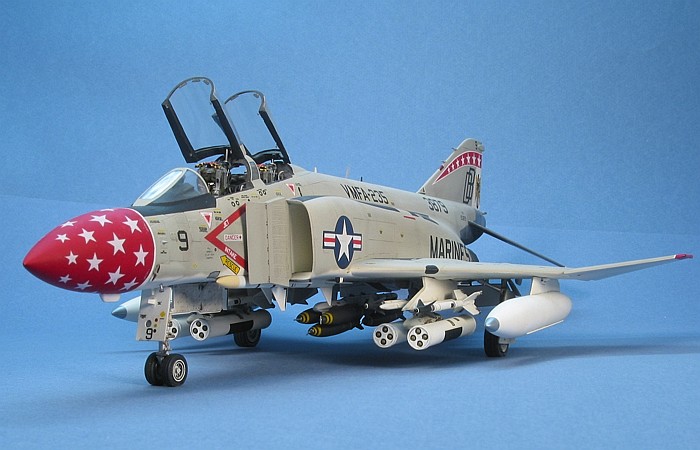
does not display any name or artwork. He named this model "Rudolph". It is
a natural for anyone knowing the story about the red-nosed reindeer. Who
was I to argue? Over the years I have corresponded with some unit
personnel from VMFA-235, and they informed me that the red nosed aircraft
were known in the unit as "Bozo-Noses". I guess that works too.
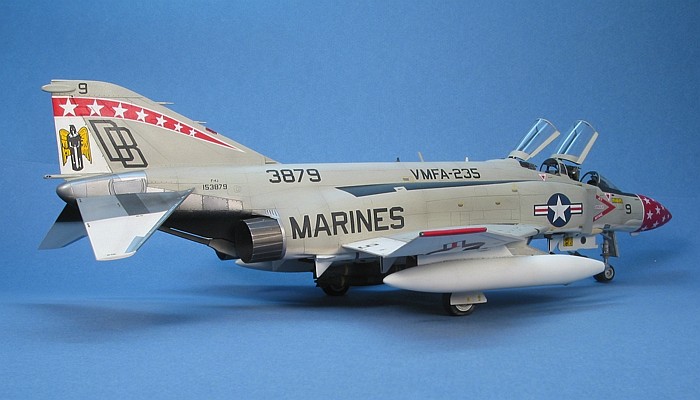
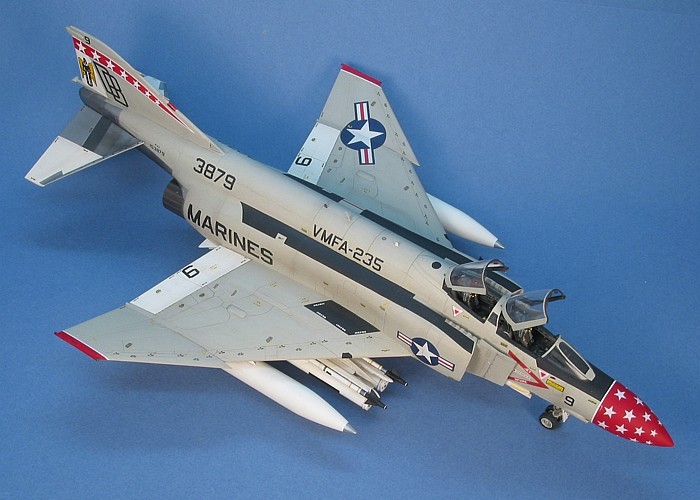
This is Hasegawa's 1/48th scale
F-4J Phantom II. It is the second release of the F-4J kit that came out
with VF-96 markings and fully engraved panel lines. In my opinion, this
kit (and the F-4S kit which is basically the same with slatted wings) are
the best of the Hasegawa Phantom kits. Not that any of the
Hasegawa Phantom kits are bad, but I feel this (and the F-4S) stand
above the others just a bit.
I'm not going to say much here on the kit since it has been around for
quite some time and reviewed in detail in other postings. Suffice to say
it is a great kit and produces a very nice model right out of the box.
This was the fourth Hasegawa F-4 I built. By this point, I was
getting quite comfortable with the kit and was not afraid to get
adventuresome in the construction. Hence, I did not build it
out-of-the-box, although none of my modifications were very extensive.
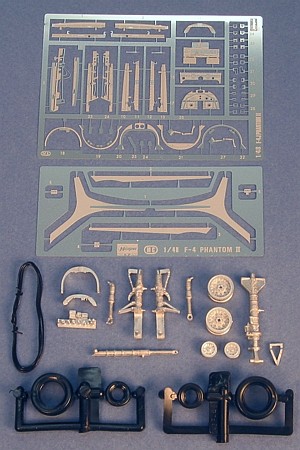
-
Etched metal cockpit and canopy etchings.
-
Etched metal blade antennae.
-
White metal landing gear. I adding
plumbing and electrical lines to the white metal pieces.
-
White metal wheel hubs with vinyl tires.
This is the only time I have used these vinyl tires. They are starting
to decompose a bit after thirteen years on my display shelves. I have
noted small oily spots on the shelf in the places where the wheels
sit. In all later builds of Hasegawa Phantom kits, I have
replaced these vinyl tires with either resin wheels or just the kit's
plastic wheels.
-
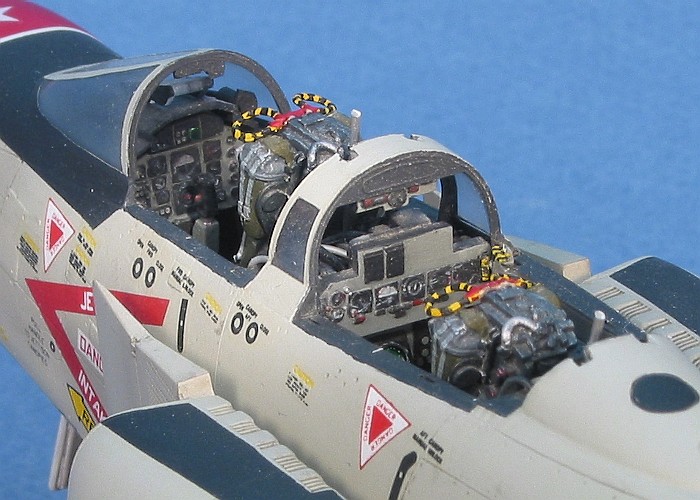
I scratch-built the wiring details between
and behind the cockpits.
-
I scratch-built various instrumentation on
the top of the front instrument hood.
-
I replaced the kit ejection seats with
Verlinden products. I've since decided that I like the True
Details seats better. A close inspection of the Verlinden
seats will show they are not complete and represent seats that are being
maintenanced. The upper harnesses that should connect to the top of the
seat are just dangled over the parachute pack and not attached to
anything. This is being picky, I know, but modeling is a picky,
detail-oriented pastime.
-
I added the pitots inside the engine
intakes.
-
I replaced the tail pitots with brass wire
and styrene stock.
-
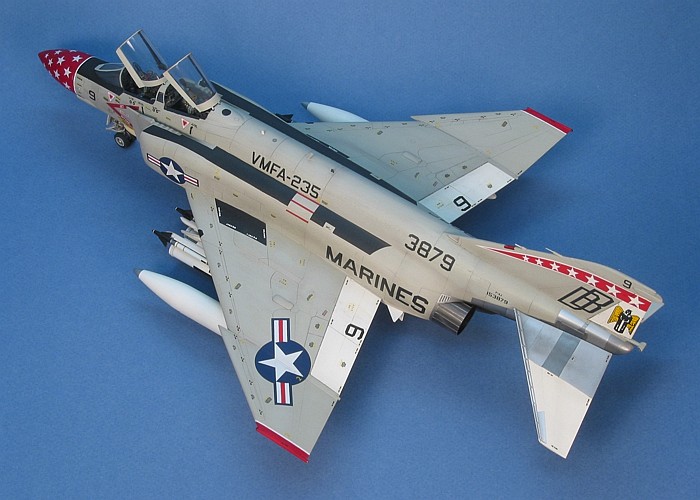
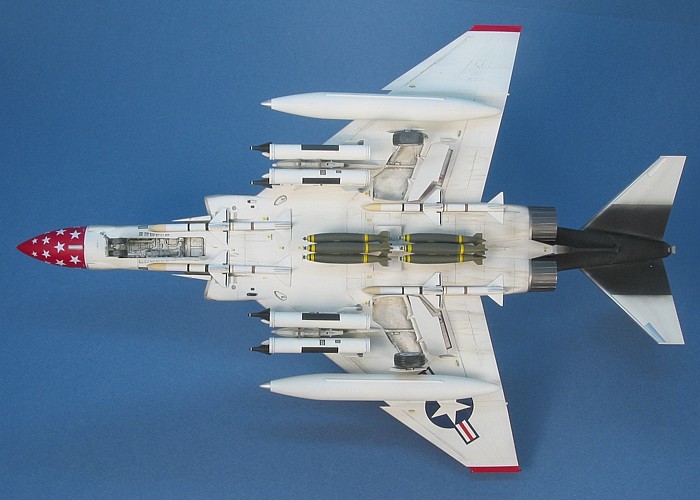
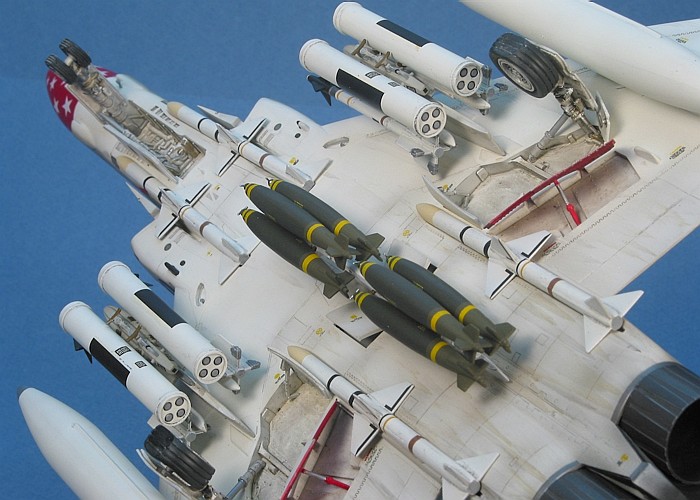
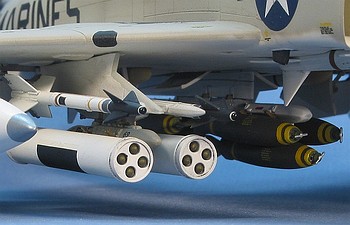
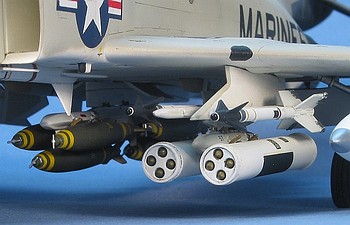
I wanted this Phantom to be armed to the
teeth, so I incorporated lots of weapons from the various Hasegawa
Weapons Sets. The original plan had six LAU-10 rocket pods, but over the
years, two of the pods were outsourced and used on an OV-10A model, so
only four were left for the Phantom. I also had orinally planned twelve
500lb bombs to be mounted on the outboard weapons pylons with Multiple
Ejector Racks (MERs), but over the years, six of these were used with
their accompanying MER on a Skyhawk model, so I changed to a centerline
mount of the remaining six bombs. This change then effected the fuel
loading from a single 600 gallon centerline tank to two 370 gallon wing
tanks. The final weapons selection includes the following.
-
Four AIM-7E Sparrow Missiles
-
Four AIM-9D Sidewinder Missiles
-
Six Mk 82 500lb High Drag "Snakeye" bombs
mounted on a centerline MER
-
Four LAU-10 Zuni rocket pods mounted on
two Triple Ejector Racks (TERs)
- Two wing fuel tanks as provided in the basic kit
  I
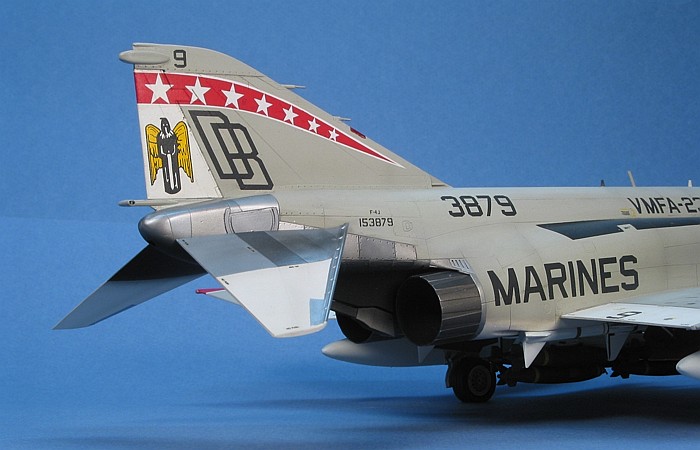
used all Testors Model Master enamel paints for the camouflage. The
camouflage is the standard Light Gull Gray (F.S.36440) over White. The
natural metal tail surfaces are done with various name brands of Metalizer
paints (five shades, interspersed to give the effect of separate panels). I
used all Testors Model Master enamel paints for the camouflage. The
camouflage is the standard Light Gull Gray (F.S.36440) over White. The
natural metal tail surfaces are done with various name brands of Metalizer
paints (five shades, interspersed to give the effect of separate panels).
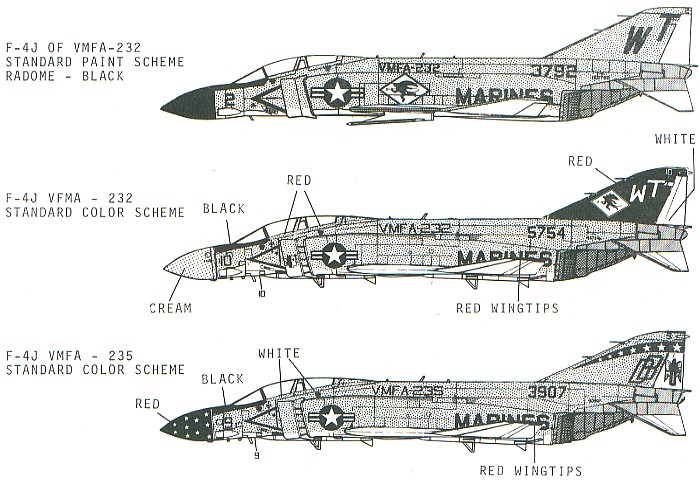
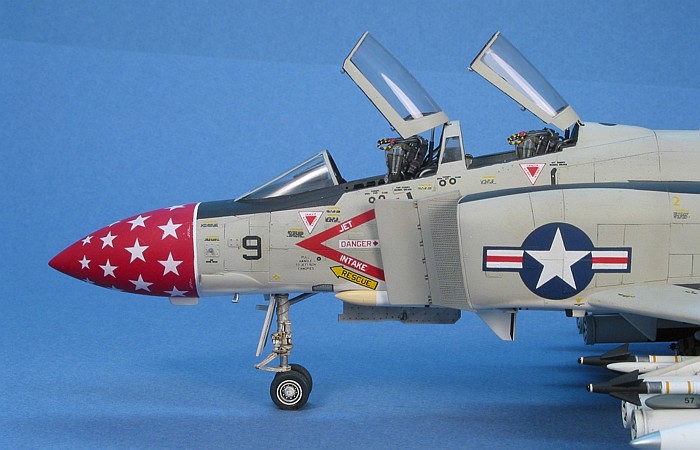
For the aircraft's markings, VMFA-235 "Death Angels" was one option of
about a dozen different F-4J's that I wanted to build. Skip wanted me to
build this one, requesting it as part of the inital dare. I started the
project looking to build exactly what he dared me to, no problem. Halfway
through the project, though, I started to think of other options and
almost did build a different unit. To lock in the decision, I quickly
painted the nose red. That stopped the other options from being
considered.
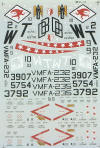
The decals initially came from SuperScale sheet #48-086. A
detailed review of the VMFA-235 portion of this SuperScale decal
sheet follows.
-
| |
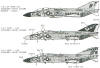
Instructions
Decals |
This is "old" SuperScale, back when instructions were a little
on the limited side. Of course, current SuperScale is not much
different. For being the least expensive portion of the contents in the
decal package, you would think they could give just a little bit more
information in the instructions. Only one side-view of each aircraft
provided in the decals is on the instructions, in black and white, with
very limited notes about the aircraft.
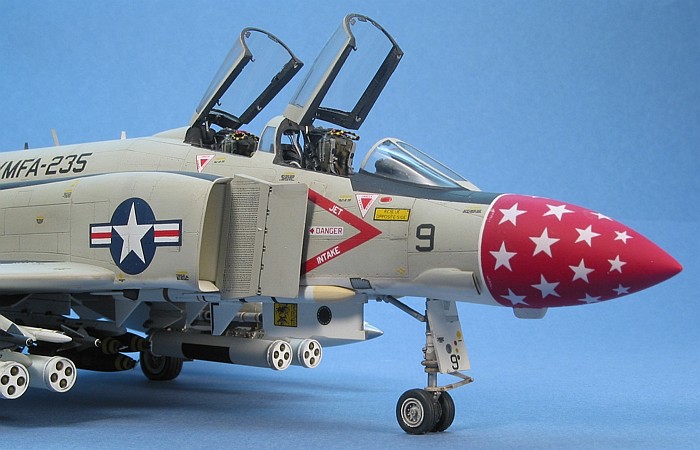
- The decal sheet provides white stars as separate decals to plaster
the nose. The provided stars are much smaller than the ones I have seen
in pictures, so I replaced the stars with larger ones found on a W.W.II
US armor decal sheet.
- The nose numbers "9" are squared (not leaning). This is subjective,
but the images I have seen show a slight lean to the numbers toward the
back of the aircraft.
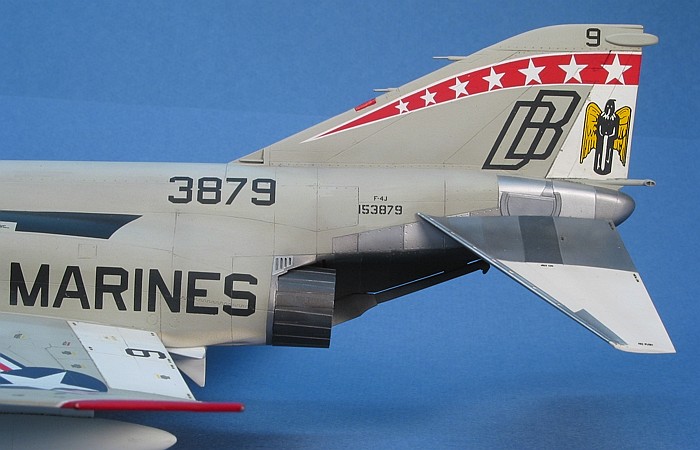
- The BuNo provided by SuperScale is 153907. I have never been
able to confirm this BuNo was with VMFA-235. All the pictures I have
found of the number "9" aircraft show a BuNo of 153879. I guess I should
trust SuperScale and their research that showed this BuNo on this
aircraft, but then I have found lots of errors in other decal sheets
that just make me wonder. In the end, I could not live with the "wrong"
BuNo (see below).
- The "VMFA-235" writing on the aircraft spine is in a strange font
that I have never found on any aircraft. Not wanting to use the provided
decals in that weird font, I replaced them with some markings I pieced
together from another sheet using the standard US Navy block font. This
looked better to me and matched pictures I have of VMFA-235 aircraft.
- The Death Angel for the rudder is provided. This apparently is not a
personal marking, but is actually a part of the full unit markings. I
found a picture of two VMFA-235 aircraft parked on a carrier deck and
both carry the Death Angel on the rudder (and neither aircraft is modex
number 9).
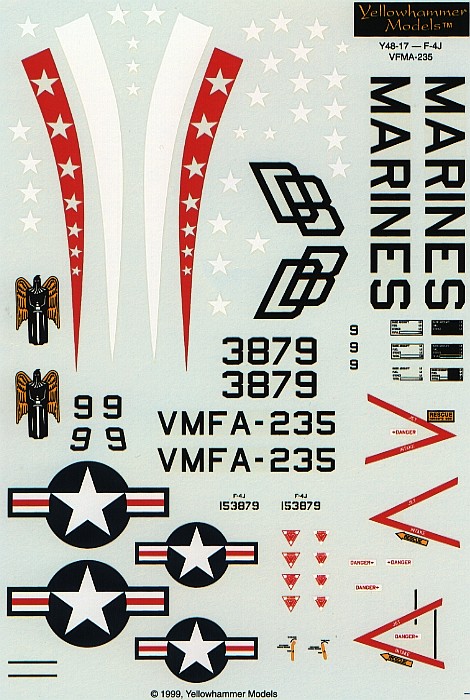
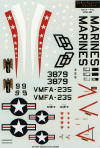
Eventually, in time, other decal companies released decals for VMFA-235
aircraft. When Meteor Productions released VMFA-235 markings in their
Yellow Hammer decal line, I was quick to pick up a set. The following
highlights the details of the set, YH48-017, and contrasts this decal set
with the SuperScale sheet.
-
| |

Instructions
Decals
|
Let us start with the instructions. Yellowhammer has a full
color instruction sheet. That is a good beginning. Unfortunately, that
is where it ends. There is very limited information concerning the
aircraft on the sheet. The big block of text is a unit history for
VMFA-235. It would have been helpful to highlight some points like the
positioning of the stars on the nose, but nothing is stated beyond basic
camouflage, the red nose, the locations of the major markings, and that
the death angel on the rudder was not always on the aircraft. The
instructions completely miss the red wingtips.
- The stars for the nose are better sized, larger than those provided
by SuperScale, but providing only two sizes where there should be
three. There are three more stars for the nose than needed, but extras
are never a problem.
For the record, the stars should come in three sizes. Theere are four
bands of stars on the nose. The first band closest the nose tip uses six
small stars. The second band uses seven medium stars. Both the rear-most
bands use seven large stars. The stars are spaced evenly around the
nose. The six stars in the first band have three stars on each side of
the nose (none are on centerline). The second and fourth bands have
centerline-top stars. The third band has a centerline-bottom star. The
stars have their top points facing straight up, except for the
centerline stars, which have ther top points facing forward. This is
probably more than anyone wanted to know about the stars, but is the
kind of information the decal instructions should provide.
- The BuNo on the sheet is 153879. This is the BuNo shown in all the
images of DB-9 I have found.
- The nose numbers "9" are leaning as seen in images of DB-9.
- "VMFA-235" is provided in standard US Navy block lettering.
- The instructions note that at some period the angel was not present
on the tail. What they do not mention is that during the period that the
angel was missing, the wing walkways were D.Gull Gray, not black.
I guess I am being a little hard on this set of decals. In reality, the
decals themselves are good in most all respects. If you can find some
extra pictures of the aircraft in books to help clarify the markings,
these are much better then the SuperScale decal set (IMHO).
Armed with these Yellow Hammer decals (mainly the BuNos is all I
needed), I started renovating the old F-4J model. I found the old
SuperScale decals were really well atached to the model, forcing me to
gently scrape the old decals off the model with an X-acto knife. I touched
up the L.Gull Gray paint with my air brush, then gloss coated the areas.
The new decals went on with no difficulties, and I flat coated the model
to finish up. I changed the BuNo on the aircraft, but I left the nose
number as it was provided by SuperScale. The nose number slant was
not that noticable, and there were too many other decals close by that I
could have messed up while working on the nose numbers.
When I stopped work on the weapons thirteen years ago, they were mostly
painted and ready for decals. I completed the painting, then applied
decals. A little black-wash weathering and a flat coat finished them off.
I drilled and pined the weapons into place using fine brass wire. See my
"Attaching Ordnance" posting for more information regarding this
technique.
I like detailed weapons, if I use any at all. I find too many modelers
treat weapons as "window dressing" and skimp on detailing them to match
the rest of the model. In total, I spent about 15 hours painting,
decalling, and weathering just the weapons so that they would match the
rest of the aircraft. The rocket pod and bomb decals came from the
Hasegawa weapons set decal sheets. The Sparrow and Sidewinder missile
decals came from the recent ProModeler release of the F-4E.
For weathering, I used my typical style of thinned down enamel paint
washes and air brush shading. I finished the weathering with some dry
brushing to pop out the surface details. For a more complete discussion of
what I do to weather my models, see my posting on
"Weathering Aircraft".
Phantoms look much better with a lot of weapons hung underneath. This
has always been the "ugly duckling" of my F-4 Phantom models.
With it not being really done and having no weapons, it just did not
appeal to me. I am happy to have finally, after all these years, finished
it.
|
Additional Images and Project
Summary |
Click the
thumbnails below to view images full-sized.
Click the "Back" arrow on your browser to return to this page.
|
|
|
Project Statistics |
|
Completion Date: |
15 November, 1990 |
|
Total Building
Time: |
67 |
|
Research: |
2.0 |
|
Construction: |
16.0 |
|
Painting
(includes creation and printing of custom decals): |
31.1 |
|
Decals / Markings
(includes creating and printing custom decals): |
7.0 |
|
Extra Detailing /
Conversion: |
11.0 |
|
| |
Modelling the F-4 Phantom II
Osprey Modelling 3 |
|
| |
|
|
Author: Geoff Coughlin, Neil Ashby
US Price: $17.95
UK Price: £12.99
Publisher:
Osprey Publishing
Publish Date: September 25, 2003
Details: 80 pages; ISBN: 1841767468
|
|
|
Model, Description and Images Copyright © 2004 by
David Aungst
Page Created 30 March, 2004
Last Updated
28 March, 2005
Back to
HyperScale Main Page |
 Home
| What's New |
Features |
Gallery |
Reviews |
Reference |
Forum |
Search
Home
| What's New |
Features |
Gallery |
Reviews |
Reference |
Forum |
Search