|
Classic
Airframes' 1/48 scale
Fiat CR.42 CN
by
James Kelly
|
 |
|
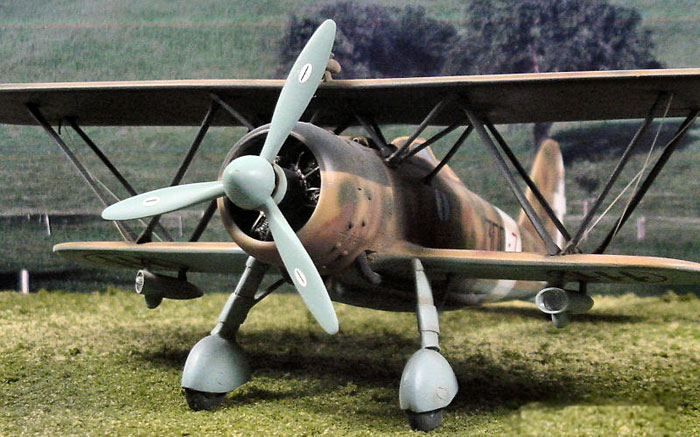
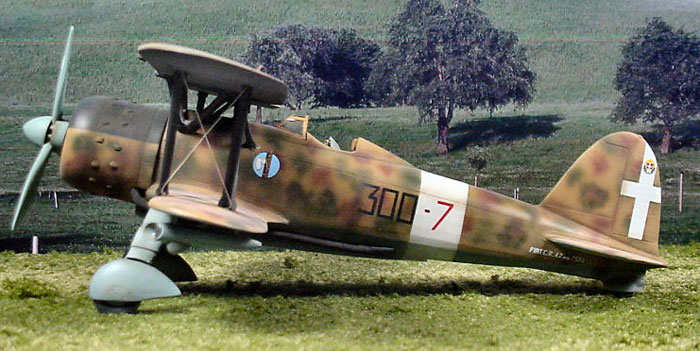
Fiat CR.42 CN Night Fighter |

Classic
Airframes' 1/48 scale Fiat CR 42 CN may be ordered online from
Squadron
For a detailed examination of the kit
contents, see
Steven "Modeldad" Eisenman's in-box review here on HyperScale.
The last of the great biplane fighters to enter service
in 1938, the Fiat CR.42 “Falco” (Falcon) became the single most-produced
Italian fighter. Agile, light, and regarded by Regia Aeronautica pilots
as a wonderful aircraft to fly, the Falco was ironically too little, too
late. Designed for combat aeronautics rapidly becoming surpassed by
low-slung monoplane fighters such as the Messerschmitt Bf 109 and even
the Fiat G.50 Freccia, the CR.42 was still produced through 1943.
Exported to numerous countries including Belgium, Hungary, Sweden, and
Germany, the Falco also fulfilled roles as a fighter, attack aircraft,
and even as an early-war night-fighter. One note of interest is that
this nimble fighter fought with the Luftwaffe, against the
Luftwaffe,,and as a Co-belligerent of the Luftwaffe. Despite it’s low
speed and light armament, the CR.42 CN (“Caccia Notturna”, or “Night
Fighter”) was fitted with exhaust flame dampers, radio, and
small,experimental, underwing searchlights.
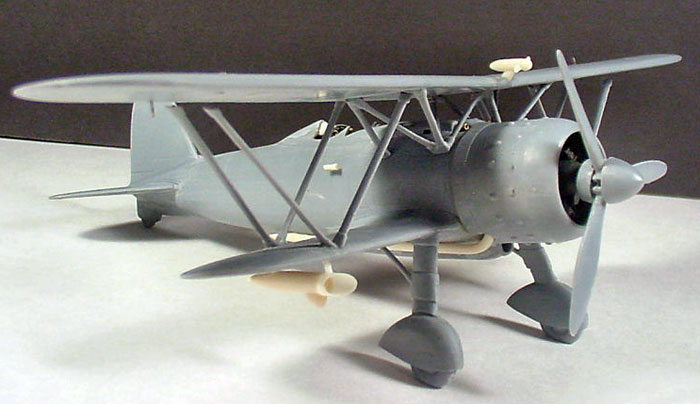
Classic Airframes has released 3 previous versions of the “Falco”; The
CR.42 Falco in Italian markings, one in Export markings, and the
CR.42AS. This version features all-new tooling, markings for 5 different
aircraft, resin parts for the Night-Fighting version, and Eduard Zoom
colored photoetched parts. The gray styrene plastic parts appear to have
been molded in the form(s) of a familiar Czech manufacturer, and bear
the resemblance of a limited-run kit. The details are nicely done, but
the parts seem a bit thick. Heavy sprue gates abound, and care will be
required separating them from the trees. The extra Caccia Notturna parts
include the aforementioned searchlights, clear lenses for each, a
generator to run them, and two different lengths of extended exhausts.
The parts come in their own bag, and the rest of the resin parts
(engine, cockpit, etc.) are in another bag. The bags themselves are free
to sail around inside the box, and I’m pleasantly surprised none of the
resin parts were broken.
The parts break down as follows:
-
36 styrene pieces molded in gray
-
40 cream colored resin parts
-
2 clear searchlight lenses
-
1 clear windscreen
-
2 PE frets
A supplemental sheet of instructions are included for
the “CN” version, along with a copied photo (B & W) of the completed
cockpit. A painting/color guide is included for each of the versions and
the decals, printed by MicroScale, are very well-done and in perfect
register. The instruction sheet does contain one notable error, and I
had a brief conversation with the Classic Airframes crew in Atlanta
regarding this. In Step 11, the inner cabane struts are illustrated
upside-down; use care when installing these, or further problems will be
generated! They were nice enough to show me on a built-up Falco they had
on display, so forewarned is forearmed!
Construction begins in the cockpit, and this is the
heart of the multi-media experience…other than a resin floor, seat, and
a couple gas bottles, this entire structure is photoetched nirvana. An
elaborate cage of pressed metal, with delicate instruments suspended
where a typical instrument panel would be, is a test of patience and
mettle (obvious pun intended). I recently purchased Small Shoppe’s “Bug”
Kit of photoetched metal bending brake and accessories. Now, I’ve always
liked the level of detail PE parts add to a build, but admittedly I
wasn’t very adept at working with them. The kit I picked up included
“The Bug”, a rolling set for creating round parts, and a PE Seperation
set, which prevents the fiddlies from entering orbit. This was the best
$60 I have spent on modeling in I don’t know how long, and quite frankly
it made preparing these complicated parts a breeze!
I spent about 12 hours over 3 days completing the cockpit to what you
see in the photos. Afterwards, I painted it overall XF-25 Light Sea
Gray, and picked out some details in Testor’s Metallizer Burnt Metal and
Burnt Iron.
And here’s where the trouble began. While test fitting the completed
office in the fuselage halves, I managed to crush both sides of the
“cage”. Apparently, the directions would have you incorrectly place them
on the floor sides, as opposed to where they would fit better.
Additionally, the resin floor needs some grinding down so as to fit, as
well as a bit of the fuselage walls. I will illustrate this in the next
installment, so as to add more meaning to these words. I’ve had this kit
on the back bench for the past week, as I was more than a little
frustrated after inadvertently crushing three days of work. As bad as
that sounds, it really should be a straightforward repair; just hammer
the cage back out flat, grind down the resin floor and styrene fuselage,
then simply repaint it all. It’s all good! Modeling is FUN!
After several attempts to dry-fit the cockpit into the fuselage, and
several more crushings/rebuilds, the aircraft was finally buttoned up. I
literally had to thin the walls of the fuselage with my rotary tool to
the point of translucence when held up to indirect light. The resin
floor of the cockpit was also altered to a dangerously thin strip to
which the PE parts remaining were re-cemented to (several small pieces,
including a console, are permanently lost…and my workshop doesn’t even
have carpet!). I was able to get everything to fit after several weeks
of very brief sessions; let’s be honest, my level of frustration at this
point was extremely high.
Once all of this drama was behind me, construction proceeded fairly
easily (or maybe it seemed that way…it couldn’t have been much more
difficult!). The instruction sheet incorrectly shows the inner most
cabane struts (B5 & B6) being placed upside down. They are drawn as an
“upside-down V”, when in fact they should go on as a “V” proper. Failing
to catch this will result in many problems. The next two sets of struts
went on without difficulty, but the outer most pairs each have a strut
(B9 & B16) that is at least an 1/8” too long. Careful trimming will
align them properly. As an aside, all of the mounting holes on the
underside of the top wing are off in postion, and I simply filled mine
in and snipped off the pins from each strut. You could drill new ones,
but the Tenax sticks just as well this way. The 3 piece main gear
assembles easily, but the holes are too small and need boring out with
care.
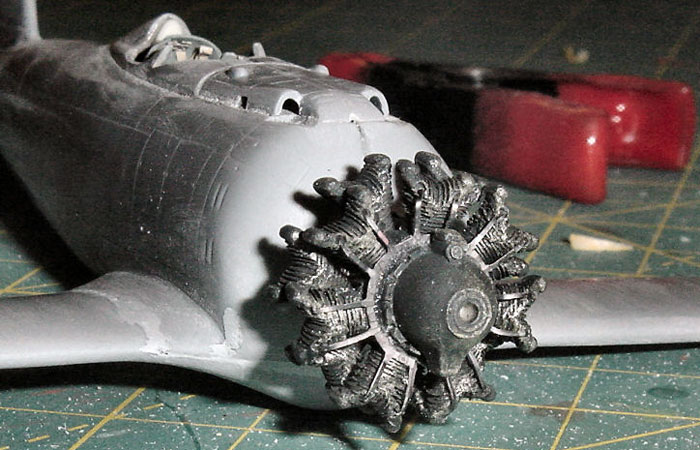
The resin engine features 14 delicately molded cylinder heads, all of
which fit perfectly into the corresponding crankshaft holes. A PE
ignition harness is included and add a nice touch. The one piece
propeller blade assembly had flash and heavy molding seams on all three
blades, and this had to be cleaned up with extra care.
The model received two light coats of Mr. Surfacer 500
primer, which was sanded smooth with Micromesh polishing cloths.
Preshading of panel lines was accomplished with Tamiya XF-69 NATO Black.
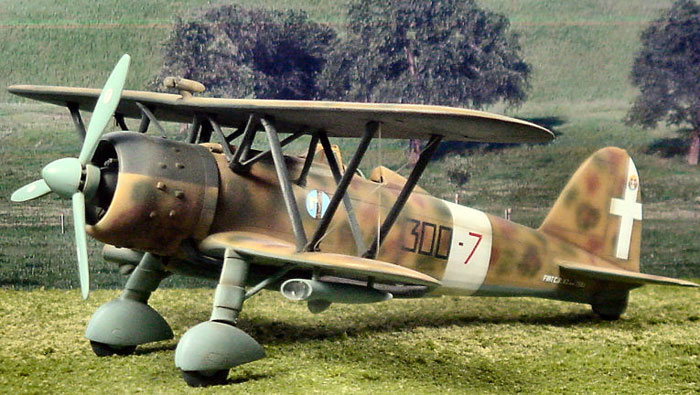
I chose to paint the model as a machine with 300o
Squadron, 167o Gruppo Autonomo Caccia Notturna, Rome-Ciampino, circa
1942. I liked that this was a Night Fighter, but wasn’t totally
blacked-out like most that I’ve seen photos of.
The underside of the top wing, the struts, and a large
panel of the cowling were all that were black…the rest was standard
mottling and pale blue-grey.
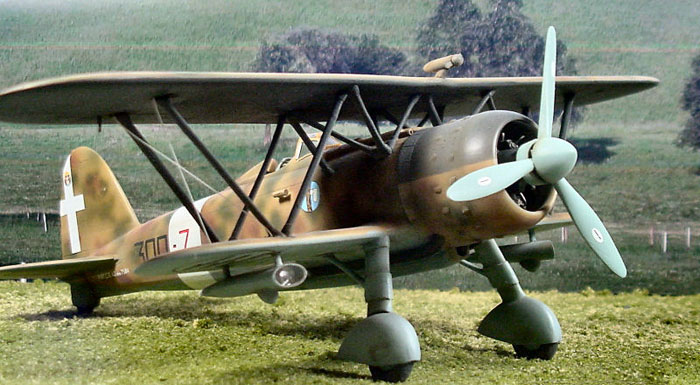
XF-59 Sand Yellow was used as the base color, and the
mottling so familiar to Reggia Aeronautica fans was achieved with XF-58
Olive Green and XF-64 Red Brown. The NATO Black was used for the
above-mentioned areas of “night”, and the undersides’ Blue-Grey was a
mixed concoction off of the bench.
A coat of Future prepared the surfaces for the gorgeous
Microscale decals, which were then sealed in with another coat of the
modeler’s liquid gold which also waxes floors. No washes here though…..I
directly finished the machine off with a custom-mixed semi-matte coat
(Tamiya X-21 Flat Base and Future mixed 3:7). I then lightly post-shaded
the model’s panel lines with a mix of XF-1 Flat Black and XF-64 Red
Brown thinned 95% with 92% Isopropyl alcohol.
I added the simple rigging with 4# fishing line.
That’s my story, and I’m stickin’ to it!
This was not an easy build by any means…a lot of trial
and many errors to complete a theoretically simple process of installing
a cockpit, lots of pieces seemingly molded for some other kit, and more
than a couple weeks of inactivity due to not even wanting to deal with
the beast. This kit tested my patience on a regular basis, and pushed my
skills to the limit, but I do so love a challenge!
And, I’d do it again, as strange as that sounds.
I love the way it turned out, despite my best efforts,
and it’s one of my favorites on the shelf. As far as multi-media goes,
this kit does offer a lot of modeling for the money; decent moldings on
the styrene parts, beautiful PE frets from Eduard (2) and several bags
of resin parts that are sharply cast, easy to clean up and use, and
dress up the plane nicely.
I would not recommend this kit to anyone who is a novice
modeler, or to someone with little multimedia experience.
But, to an experienced modeler with a few multimedia
projects under the belt, I will offer a hearty recommendation for
obtaining this model! It will challenge you, but when all is said and
done, you’ll have a really nice example of an important piece of
aviation history to be proud of in your collection.
Thanks to Jules Bringuier of Classic Airframes for the
review sample.
Italian Aces of World War
2
Aircraft of the Aces 34 |
|
|
|
|
Author: Giorgio Apostolo
Illustrator: Richard Caruana
US Price: $19.95
UK Price: £12.99
Publisher:
Osprey Publishing
Publish Date:
November 25, 2000
Details: 96 pages; ISBN: 1841760781 |
|
|
Model, Images and Text Copyright © 2005
by James Kelly
Page Created 25 November, 2005
Last Updated
25 November, 2005
Back to
HyperScale Main Page
|
 Home
| What's New |
Features |
Gallery |
Reviews |
Reference |
Forum |
Search
Home
| What's New |
Features |
Gallery |
Reviews |
Reference |
Forum |
Search