|
Eduard's 1/48 scale
Fokker D.VII (OAW)
by Wolf Buddee
|
 |
|
Fokker D.VII (OAW) |

Eduard's 1/48 scale Fokker D.VII is available online from
Squadron
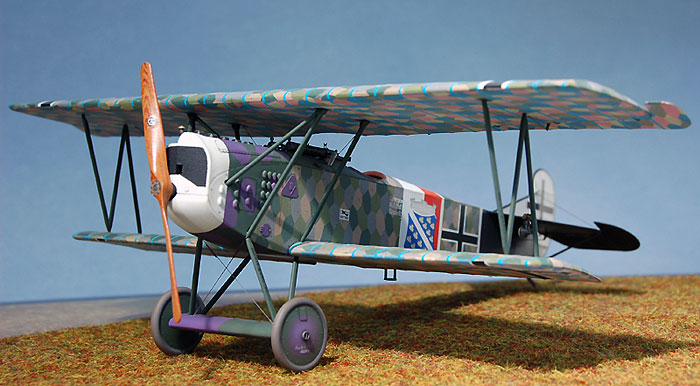
Of the many models I have built over the years, Eduard's 1/48 scale
Fokker DVII (OAW) kit stands out as being exceptional in terms of what
you get in the box.
Eduard supplies virtually everything you need to build a very
detailed and accurate replica of this famous WWI fighter. Only the
rigging material is missing and very little of this is needed on the
Fokker DVII. The overall fit and finish of the kit is excellent, all
control surfaces are separate pieces, colored and regular photo-etch is
included, and there are enough decal sheets provided to do at least 4
different colorful schemes. A large portion of these decals represent
the lozenge printed fabric and rib tapes that cover the wings and most
of the fuselage. Very impressive!
Here is my build of Eduard’s beautiful Fokker DVII.
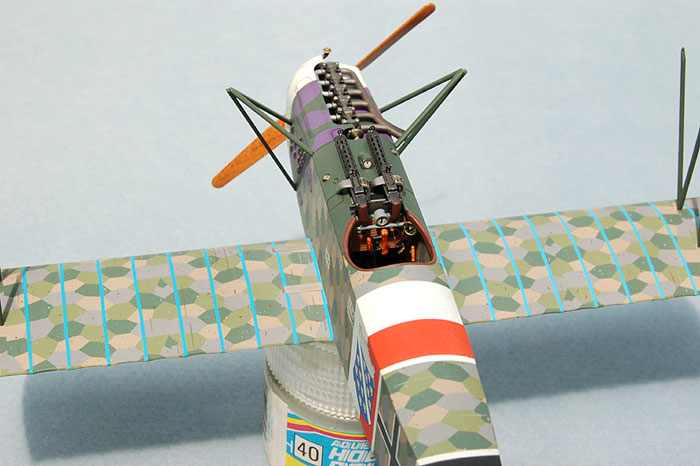
Engine
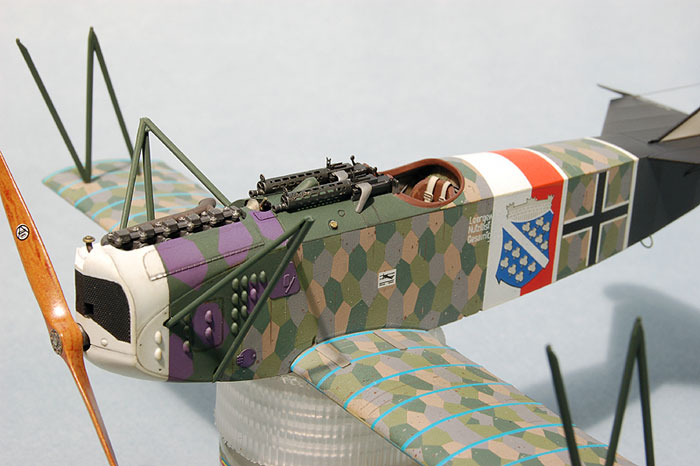
Assembly starts with the engine. This is beautifully detailed and
includes pre-painted photo-etched data placards. I followed Eduard’s
color call-outs for the most part but I also used Mark Miller’s
excellent 3D drawings as reference as well as photos of the actual
Mercedes engine. Mark’s 3D drawings can be found at:
http://mwmiller.theaerodrome.com/
Another excellent source of reference for the Fokker DVII can be found
on the Memorial Flight Associations website:
http://memorial.free.fr/indexuk.html . This site shows the
complete restoration of a Fokker DVII and is a must see, even if you’re
not building this model.
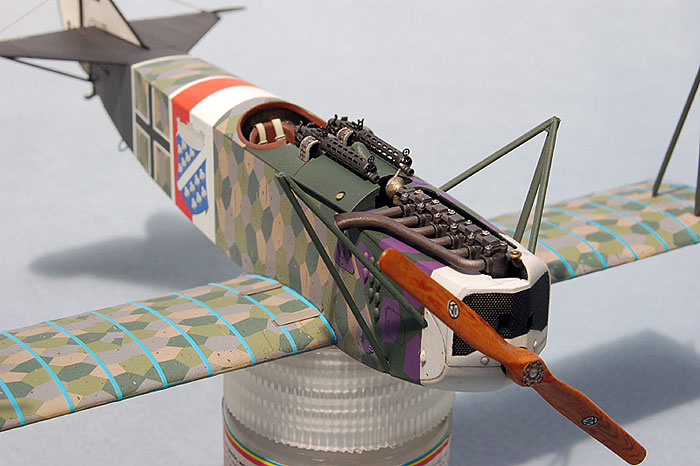
I elected not to wire or plumb the engine as little of it is visible
once installed in the fuselage. I used various shades of metallic paint
and numerous washes and dry-brushing to highlight the engine details.
Two places where I modified the kit were in the propeller shaft and the
exhaust. The kit prop shaft had a little too much play so I glued a
length of brass tube in through the front of the engine and made a new
prop shaft with an appropriate size of styrene rod glued to the kit
propeller boss. The exhaust was modified by opening up the exhaust
outlet and adding small lengths of stiff wire to the ends of the exhaust
manifold to more positively locate it on to the cylinder heads.
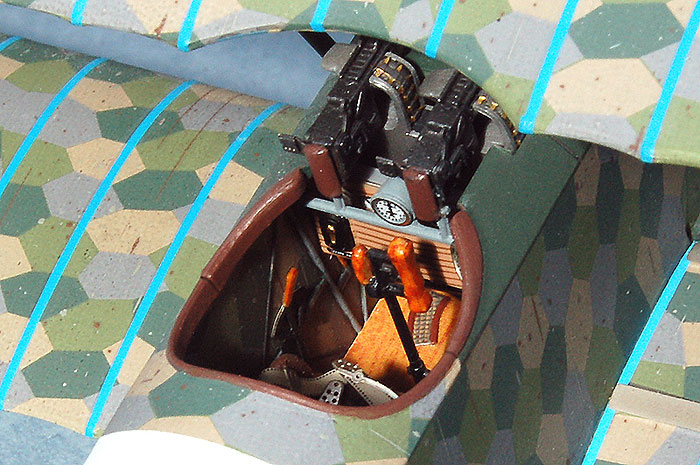
Cockpit
 With
the engine complete, I now turned to the cockpit. With
the engine complete, I now turned to the cockpit.
For them most part, the cockpit was assembled as per the instructions
with a few noted exceptions. The floor was painted with Model Master
Wood and clear coated with Polly Scale Clear Gloss. The floor was then
covered with a piece of golden oak wood grain decal and clear coated
again with Polly Scale Satin finish. Remaining details were then added
to the floor. The outer raised edges of the photo-etch heel plates were
painted a darker wood color as shown in a color photograph I have.
Eduard suggests leaving these parts unpainted.
Any items that were wood such as the control column grips and
throttle handles were painted Model Master Wood and then covered with
red oak wood grain decal material to give them a slightly contrasting
color to the wood floor. I replaced Eduard’s magneto switch on the
instrument panel with a multi-piece item from a Part photo-etch fret
only because the Part item looked much better in detail. Once the
interior lozenge decals for the cockpit sidewalls were dry, I used a
dark wash to edge the interior metal framing and bracing wires. The
metal framing was then painted a medium grey and the bracing wires were
carefully picked out with Humbrol Metal Cote.
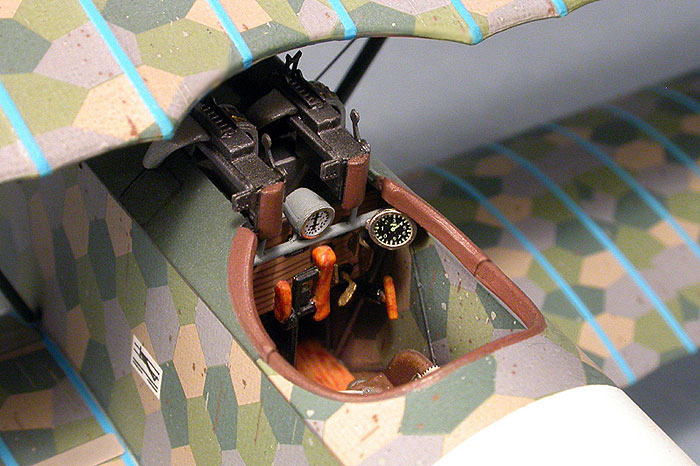
The ammunition box was modified slightly to more accurately represent
the open guide chutes for the ammunition belts. I thinned the guide
chutes substantially and then added thin strips of card stock to the
outer edges of each chute. This opened up the feed chutes and ammunition
belts from the Part photo-etch fret where glued within the open guide
chutes. The end result looks far more realistic. This was the most
extensive modification done to the kit as I was trying hard to keep the
build as close to out of the box as possible. When adding the photo-etch
instruments, I deviated from the instructions again. Rather than simply
fold the instrument bezels over top of the instrument, I separated each
bezel from the instrument. The small nub on each part was then filed
clean and the bezel was placed over the instrument and secured with a
drop of Polly Scale Clear Gloss. This way the finished instrument
assembly looked much cleaner. With all the cockpit items securely in
place, the fuselage halves were closed up and glued together without any
fit or alignment problems at all.
Wings and tail planes
The lower wing assembly was straight forward but dry-fitting revealed
a slight gap between the wing and fuselage on one side. Adding a very
thin shim of card stock filled the gap perfectly and the wing was glued
in place. There was also a slight gap at the front of the horizontal
tail plane to fuselage join. Again this was shimmed with card stock and
blended in with Mr. Surfacer 500. Before adding the tail plane though,
holes for the rudder and elevator control cables were opened up. The
upper wing was assembled minus the ailerons, and set aside to be decaled
later. The radiator face was also added to the front of the fuselage at
this time. The radiator cap had a prominent mold line running across it
and I found it was easier to replace it with a scratch-built item.
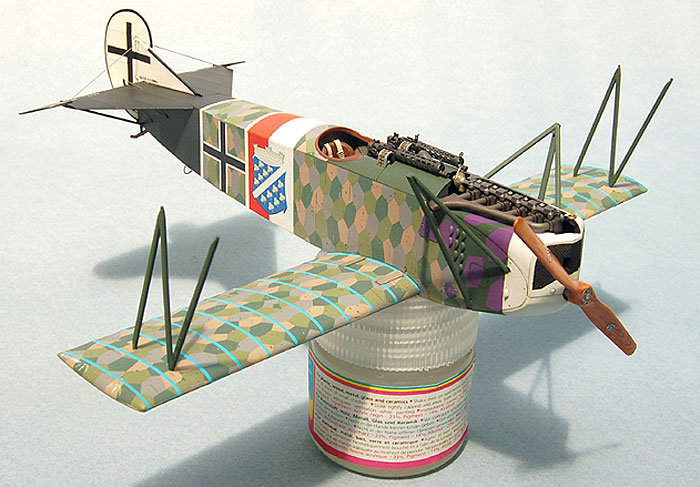
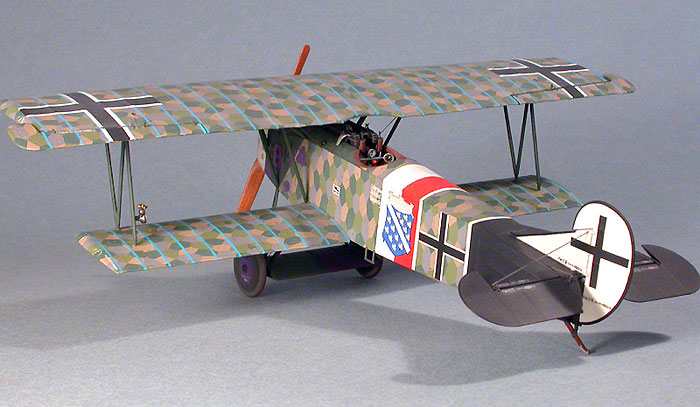
The aircraft I was building required a bit of painting to be done
before the lozenge decals could be applied to the fuselage and lower
wings. I started by masking off the rear of the fuselage and painting
the tail with Tamiya semi-gloss black. The engine assembly was masked
and front of the fuselage and radiator assembly as well as the rudder
and fin were painted flat white. When dry I masked off the white and
painted the remainder of the nose up to the end of the engine
compartment Gunze purple lightened with a bit of white. This was then
masked with irregular shapes of Tamiya masking tape to represent the
giraffe spot camouflage pattern. Finally the nose and upper fuselage
decking up to the cockpit opening was painted Gunze dark green. All wing
and landing gear struts were painted this green as well. The small
landing gear wing/axle fairing assembly was painted purple and green
split 50/50. The wheels also received both these colors, purple being
added to the center of each outer wheel face. The tires were painted
Model Master RLM 75 lightened considerably with white. It was now time
to start with the decals. The cockpit opening was masked off, and the
entire fuselage and wing assemblies were sprayed Polly Scale Clear Gloss
in preparation for the decals.
I started with the lozenge decals by first measuring the length of decal
material required for the lower fuselage. Using a pair of dividers for
chart plotting I marked where the decal needed to be cut so that it
would end where the tail had been painted black. Once cut, the decal was
applied fitting perfectly. The same was done with the upper fuselage and
the multi-piece fuselage side decals. The decals fit well with a notable
exception. The fuselage side decals, when lined up at the top didn’t
extend down far enough to meet the top of the lower wings. I checked
Eduard’s website, and I noticed their built up model showed the same
shortfall. I solved the problem by matching up and cutting individual
lozenge patterns from extra decal material and I applied them one by one
until the gap was closed. Tedious yes, but it worked very well. The
lozenge decals for the upper and lower surfaces of the bottom wing fit
perfectly, easily conforming to shape at the wing tips and trailing
edges with a little Micro-Sol. The wing rib tape decals were also easy
to apply, but very time consuming. The upper wing decals presented no
problems either but it pays to follow the instructions carefully as to
the application sequence. Start on the wing bottom first and then do the
top. I noticed too late that I had misaligned the first decal on the
wing top and wound up with a gap on one side which I filled again by
applying individual lozenge patterns and trimming until the gap was
closed. It’s a very good thing Eduard provides extra lozenge decal! I
learned after my model was finished that it was unlikely the ailerons
received the rib tapes and while I applied them on my model, it would
certainly save time if they weren’t required.
Once application of the lozenge decals was finished I started on the
individual markings. I applied the upper portion of the fuselage band
first and here I ran in to trouble. At first I thought that I had
inadvertently applied the decal backwards. The sides of the decal
definitely didn’t angle down properly when the upper portion of the
decal lay flat. With lots of water, I removed the decal and flipped it
around. That was worse. I had clearly had it the right way around the
first time. With more water I flipped it back but I still couldn’t get
it to fit. With the sides aligned properly, I had a large wrinkle at
each upper rear corner of the decal. Ok, apply lots of Mirco-Sol and see
what happens, I thought but it became readily apparent that Mirco-Sol
wasn’t going to solve my problem. Trying to move the decal now only
caused it to tear as it was turning very soft. As a last resort, I
carefully cut the decal with a new #11 blade along the top fuselage
edges and I removed the whole top portion of the decal. After everything
had set and dried, I cut a new piece of white decal material to fit and
applied it to the top of the fuselage. Replacing the red portion of the
band was a little trickier. I didn’t want to mask over the decals and
spray the red so I searched through my decal collection to find a
suitable piece of red decal material. It turned out that the red portion
of the band was actually dark orange and nothing I had was close to
matching the color. My only option was to mix the color and spray
another piece of white decal material. Using Tamiya red, yellow, and a
little brown, I managed a perfect color match. I then cut my new decal
to size and applied it to the top of the fuselage. It worked perfectly!
I would suggest that anyone doing the same scheme cut the large fuselage
band decal in to 3 parts and then apply it. I finished off by adding the
bottom portion of the band decal to the underside of the fuselage. The
rest of the decals went on without a hitch and when everything was dry,
a coat of Polly Scale Flat sealed everything in.
Final assembly included the addition of the Spandau machine guns.
Their mounting was a little fiddly but once I figured out how they fit,
they were glued in place with Zap Ca.
Next the outer wing “N” struts were attached to the lower wing with 5
minute epoxy. Disaster struck when I managed to melt the top of one of
the outer “N” struts by inadvertently holding the model too close to my
work light. Construction ground to a halt while I waited for a
replacement part to arrive from Eduard.
The top wing was then rested on to the outer struts, the model
inverted, and the remaining wing and cabane struts were glued in place
on to the fuselage.
Detail painting was finished on the underside of the upper wing, the
control cables were added for the ailerons, and the upper wing was glued
in place. The small stiffener brackets at the top of the cabane struts
were painted, set in place, and then affixed with drops of Polly Scale
flat finish.
The undercarriage assembly was now added using both 5 minute epoxy
and Zap Ca with everything self aligning without problems.
Rigging is very minimal on the Fokker DVII. Control cables and
rigging were added using Aero Club rigging material which is elastic,
stretches very fine, and attaches easily with minute drops of Ca. Once
attached, the rigging material was brush painted a metallic grey color
using paint dispensed from a Gunze marker. For the bracing wires
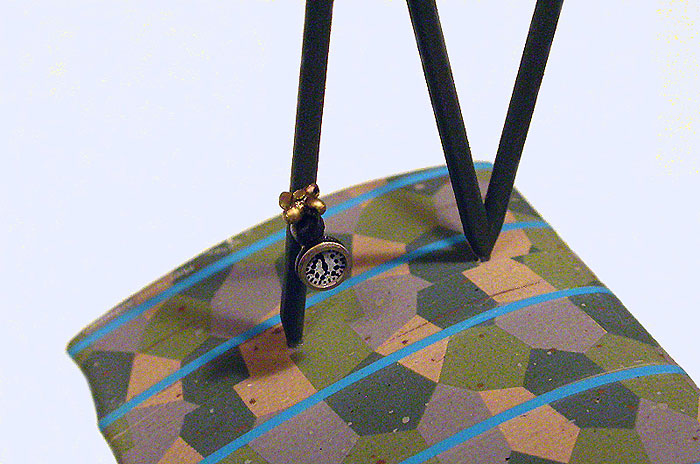
attached to the undercarriage, I also used a couple of photo-etched
turnbuckles that came from the Part photo-tech fret.
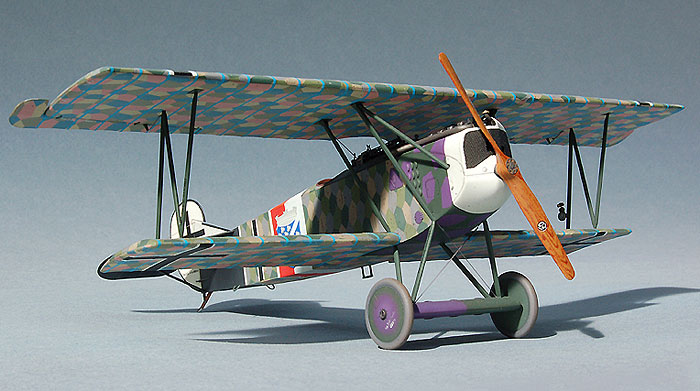
Finally the model was all finished and the end result was a very
satisfying, enjoyable, and easy build of one of Fokker’s most famous WWI
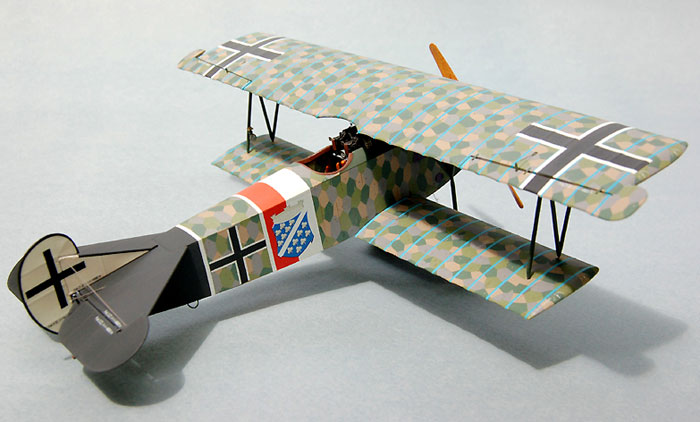
fighters. The aircraft I chose to build carried a fuselage band and
crest displaying the colors of Hessen. I thought it appropriate as I was
born many years ago in the city of Alsfeld, Hessen, Germany.
Click the
thumbnails below to view larger images:
Model, Images and Text Copyright © 2006
by Wolf Buddee
Page Created 13 October, 2006
Last Updated
21 February, 2007
Back to
HyperScale Main Page |
 Home
| What's New |
Features |
Gallery |
Reviews |
Reference |
Forum |
Search
Home
| What's New |
Features |
Gallery |
Reviews |
Reference |
Forum |
Search