|
Hasegawa's 1/32
scale
Focke-Wulf Fw
190A-5
by
Ian Robertson
|
 |
|
Focke-Wulf Fw 190A-5 |

Hasegawa's
1/32 scale Focke-Wulf Fw 190A-5
is available online from Squadron.com
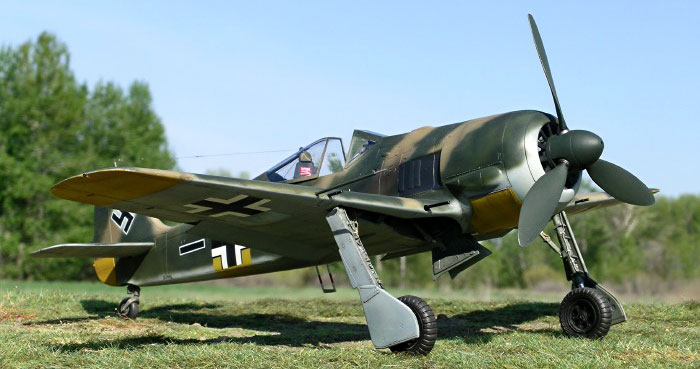
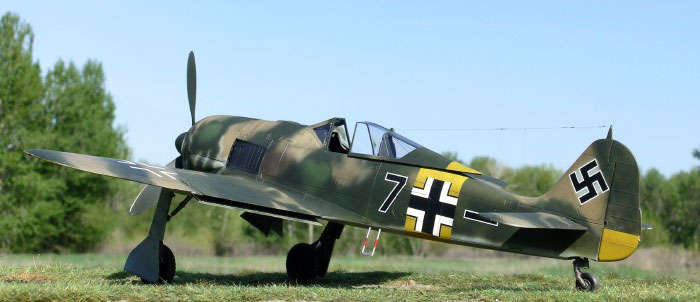
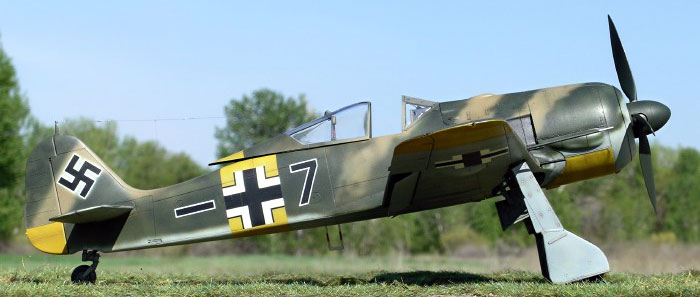
This is Hasegawa’s 1/32 Fw.190A-5 in the colorful markings of Lt.
Emil Lang’s “Black 7” from 5./JG54 during the summer of 1943 on the
Eastern Front.
For reference material I relied on several photographs and a color
profile of the aircraft in Bergstrom and Pegg’s superb “Jagdwaffe: The
War in Russia 1942-1943” (pp 256-257). The numerous photographs show
both the port and starboard sides of the aircraft, making paint patterns
less speculative.
Hasegawa’s Fw.190A-5 maintains the superb quality and affordable
price of their other recent Fw.190 releases. However, a couple of issues
should be addressed to improve accuracy. First, the wheels supplied in
the kit are incorrect for the A-5 (wrong tread and hub detail). Eagle
Editions produce resin replacements, which were what I used on my model.
Second, Hasegawa’s instructions show the control stick installed
backward in the cockpit, so be sure to turn it around. Third, the
instructions show the attachment of the FuG 16zy antenna to the
underwing, which was incorrect for the A-5 (it was not used until the
A-7).
Fine rivet detail was added to the fuselage, tail and wings using
Hasegawa’s rivet-making tool and spacing template. Tamiya tape was used
to guide the placement of the template on the model’s surface. Once the
rivets were in place, I polished the model’s surfaces lightly with a
Micromesh sanding cloth to help tone down the visibility of the rivets.
Although the kit’s cockpit is well detailed in my opinion, I replaced
the seat with one from Cutting Edge, and I made my own seatbelts from
lead foil with brass buckles from MDC. The dials on the instrument panel
were added individually by punching them out from the kit’s decal sheet
using a Waldron punch and die set. The cockpit was painted RLM 66 using
Polly Scale acrylic. A thin wash of reddish-brown enamel was used to
flush out details in the cockpit, and SnJ polishing powder was used
sparingly to simulate worn surfaces on the floor panels. Silver-colored
pencil was also used to highlight detail in the cockpit.
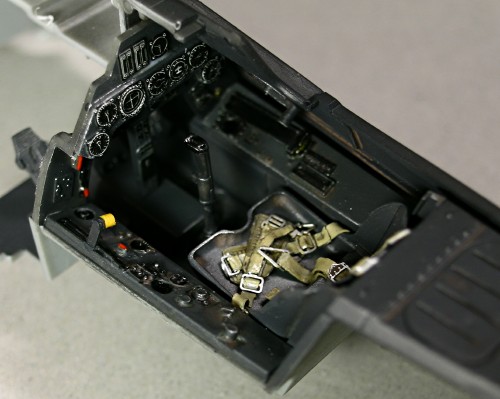
Note that the placement of the gun sight is incorrect in the kit
because it interrupts the padding that extends across the front of the
coaming above the instrument panel. I repositioned the gun sight further
forward and added a strip of styrene rod to fill the gap in the padding.
My earlier Hyperscale article on the Fw.190A-8 shows this correct in
detail (
http://hsfeatures.com/features04/fw190a832ir_1.htm ).
Although Hasegawa provides an option for dropped flaps, they are
engineered to be dropped at an incorrect angle for the Fw.190. The flaps
should not drop more than 60 degrees, although the kit has them dropping
at almost 90 degrees. I opted to leave mine dropped only slightly, as is
often seen for parked Fw.190s.
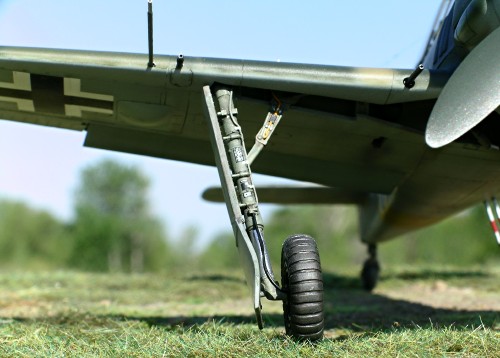
To each landing strut I added brake lines made from wire and thin,
flexible rubber. The oleos were covered with bare metal foil, and the
holes in the oleo scissors were drilled out. Note the treaded tires with
early style hubs from Eagle Editions.
Painting,
Markings & Groundwork
|
Painting
 The
actual colors of JG54 aircraft in field-applied two-tone green are the
topic of much debate (e.g., for one point of view, refer to
http://www.clubhyper.com/reference/jg54colorsmu_1.htm ). I will
make no attempt to address the issue here as my main goal was to produce
a model with a plausible color scheme given the reference material
available to me. The
actual colors of JG54 aircraft in field-applied two-tone green are the
topic of much debate (e.g., for one point of view, refer to
http://www.clubhyper.com/reference/jg54colorsmu_1.htm ). I will
make no attempt to address the issue here as my main goal was to produce
a model with a plausible color scheme given the reference material
available to me.
Painting began by preshading the panel lines and various areas of the
model in black. I find preshading a great way to add depth to a model.
The key to preshading, in my opinion, is subtlety. It should not be
obvious to the casual observer that the model was preshaded. Rather,
preshading should create subtle variations in the surface layer of paint
that help create the illusion that the aircraft’s surfaces are not
perfectly smooth or evenly worn. Same goes for postshading effects,
which I also employed on this model.
The yellow fuselage bands, wing tips, lower rudder, and lower cowl were
painted and masked with Tamiya tape until all other painting was
complete.
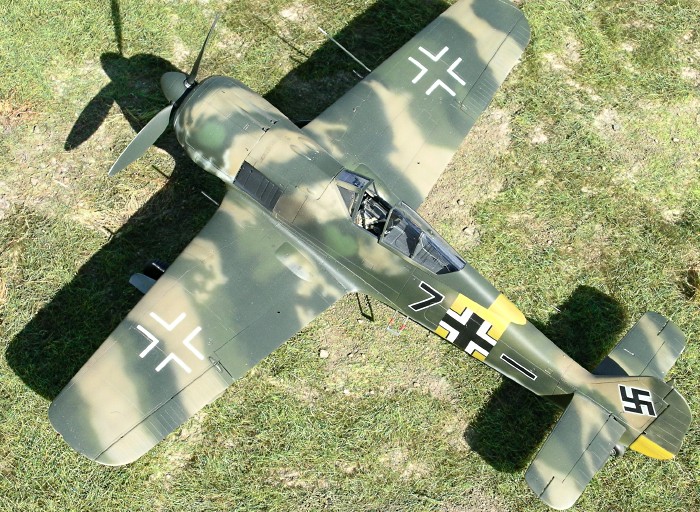
The underside of the model was painted with Polly Scale acrylic RLM 76.
The upper colors were my own mixtures of medium and dark green. The
medium green was made by mixing Polly Scale RLM 83 (dark green) with RLM
67 (olive green), whereas the darker green was made with RLM 70 (black
green) lightened with a touch of RLM 67. In both cases all I can say is
“mix to taste” as I forget the actual mixing ratios used. The sand color
was Polly Scale RLM 79 with some light brown added to remove the pinkish
hue. Clearly there is some artistic interpretation here, but that seems
perfectly reasonable to me given that the true colors on JG54 aircraft
remain one of history’s mysteries.
On the port side there are two lighter patches of green. These appear to
be field applied patches to conceal the green heart emblem and group
badge common on JG54 aircraft earlier in the war. It seems that as
fortunes changed on the Eastern Front, JG54 aircraft ditched their bold
ornamentation in favor of more effective camouflage.
The spinner and prop were painted RLM 70.
Markings
Once the paint was thoroughly dry, I sprayed a thin coat of Future
floor wax over the model to give it a glossy finish in preparation for
decals.
Most of the decals I used were from spare Eaglecals sheets, although
the “Black 7” and bar were from Data Decals. I used Microsol to help
snuggle the decals into the panel lines and rivets. Once the decals had
dried I applied a second coat of Future, followed a day later by a 50/50
mixture of Polly Scale clear satin and clear flat.
Groundwork
A wooden cutting board was used as the base for the model. Celluclay
was used to make the basic ground cover. The celluclay powder was mixed
into a paste with water and white glue, tinted with brown acrylic paint,
and then spread thinly over the cutting board. Note that the cutting
board had previously been treated with several coats of clear lacquer to
prevent warping while the celluclay dried.
While the celluclay was still wet I added pieces of Heki grass mat
(item # 1574 - Wild Grass Savanna), fine sand, and small bits of moss.
Heki products are now available for purchase in the United States at
“Scenic Express”.
Images were taken with a Nikon Coolpix 5400 digital camera. The "sharpen
edges" tool of Adobe Photoshop was used to restore some of the clarity
and crispness lost during image compression.
Click on the thumbnails
below to view larger images:
Focke-Wulf Fw 190
Modelling Manuals 20 |
|
|
|
|
US Price: $17.95
UK Price: £12.99
Publisher:
Osprey Publishing
Publish Date:
May 25, 2002
Details: 64 pages; ISBN: 1841762687 |
|
|
Model, Images and Text Copyright ©
2005 by Ian Robertson
Page Created 29 June, 2005
Last Updated 28 June, 2005
Back to HyperScale
Main Page
|
 Home
| What's New |
Features |
Gallery |
Reviews |
Reference |
Forum |
Search
Home
| What's New |
Features |
Gallery |
Reviews |
Reference |
Forum |
Search