|
Focke-Wulf
Fw 190C-0 (V13)
by
Floyd S. Werner Jr.
|
|
|
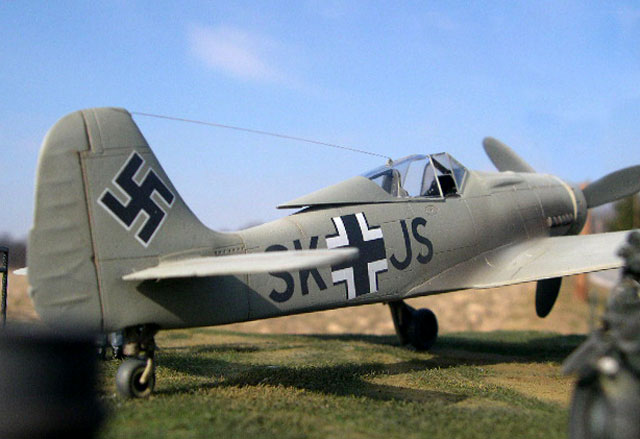
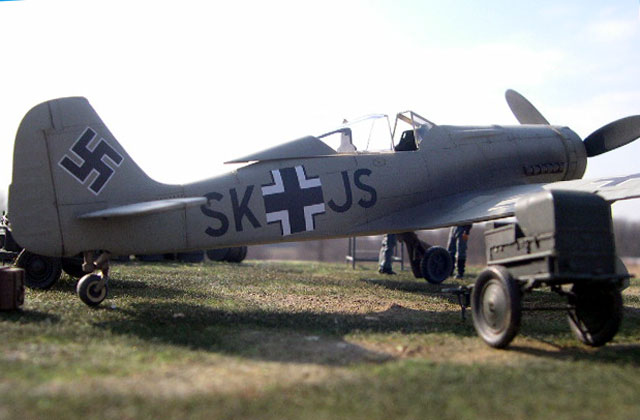
Focke-Wulf Fw 190C-0
(V13) |
R.V. Resin Kit
#4802

HyperScale is proudly supported by
Squadron.com
Finding historical information in English
on this prototype was difficult.
The Focke-Wulf Fw 190 was a great fighter but its ultimate performance
potential was limited by its non-supercharged engine. Above 20,000 feet
the aircraft was decidedly non-maneuverable and the engine performance
fell off rapidly. The Fw 190C was a projected high altitude aircraft.
To address the performance problem the Fw
190C-0 was re-engined with the DB603A inline engine. The V13 was the
first prototype designed for the high altitude mission.
Even though marginally successful, by
1944 the project had been cancelled due to technical problems and
opposition to use of the DB 603. The DB603 was needed for other
aircraft, such as the Me-210/410 and the Do-335.
R.V. Resin's
1/48 Scale Fw 190C-0 (V13)
|
R.V. Resin kit contains some beautiful
cast resin in a caramel color with some beautiful surface detail. A fret
of photo etch parts is included for the oil coolers, seatbelts, and
cockpit coaming. The landing gear is cast in white metal. A single
one-piece clear canopy is crystal clear. Decals for this particular
aircraft include all the national markings. The instructions are not
very helpful. There are parts included in the kit that are not shown on
the instructions.
The resin has a fine sheen of mold release agent on all the parts. There
are some bubbles and mold imperfections, but the beautiful rivets and
panel lines are absolutely exquisite.
Before I began, I washed the entire model
with a Dawn dish detergent and warm water to remove the mold release
agent. Once that was done it was time to test fit the major parts. I
flat sanded the fuselage halves and wing halves. This proved that the
major subassemblies fit very well, but when test fit together there was
going to be some filling. The wing to fuselage join was a little off and
the wings had no dihedral. These would be relatively easy to fixes
though.
Fuselage
The fuselage, once flat sanded, fit
beautifully.
I have a procedure that I do with all my
kits, resin or plastic, and that is to apply a bead of superglue to the
seam. I just find this as a way to save time in the construction. Think
about it, you are going to sand it anyhow. Why sand and then find a
pesky seam when you can eliminate it on the first sanding? Less sanding
means less detail lost and the seam will be perfectly filled the first
time.

I added the photo etched oil cooler to
the inlet. I had to deepen the mounting area with a couple of swipes of
an #11 blade. There is another oil cooler that is oval in shape but the
instructions don’t show you were it goes. I used it after the wings were
attached. Once cleaned up, a coat of RLM 66 was applied to the interior
and the cockpit tub.
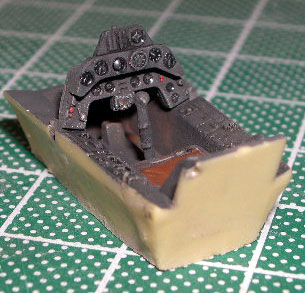 Cockpit Cockpit
Assembly of the cockpit tub was easy and
just like any other plastic kit. The seatbelts were bent to the seat and
then painted Polly-S Dirty White.
A coat of Model Master RLM 66 was applied
to the cockpit, followed by a wash of black and a dry brush of RLM 02.
Some detail was added with a silver
pencil. The instruments were given a drop of Krystal Klear.
The whole assembly was inserted through
the belly and secured with superglue.
Wings
The wing assembly begins with the landing
gear well. It is a two-part affair. The wheel wells sit into the lower
wing and are sandwiched with the top wing. It is essential that you
check the fit prior to gluing the well. Ensure that the well is centered
fore and aft, as well as, left and right. The wings fit beautifully and
glue together with no problem. I used my normal bead of superglue again.
General Assembly
Now that the two major subassemblies were
done it was time to join them. Here is where the first issue with the
kit came. The wings had no dihedral and the portion that fits under the
fuselage in the front and back was straight while the fuselage was
angled up. What to do? First thing I did was get a good join at the
front, apply superglue and let dry completely. Then I taped the back
portion so that it was fairly close. The wings roots were flush with the
fuselage so to get some dihedral I needed some room. I slowly and
carefully scraped the wing and fuselage, while still joined, from front
to back, ensuring that the amount of resin removed is equal, both front
to back, as well as, from each side. The wings were then bent carefully
and held in place with some tape.
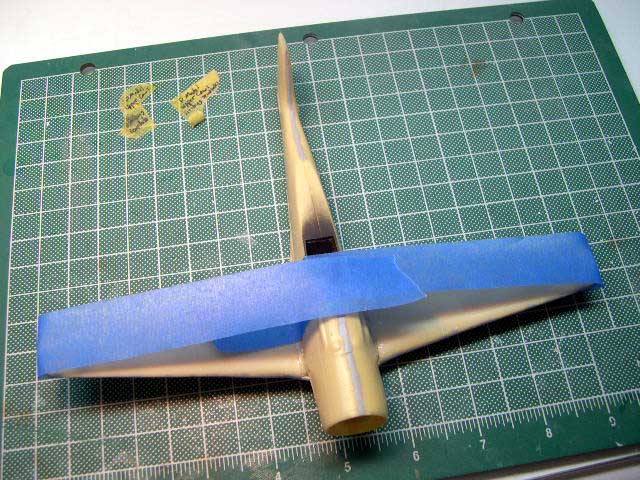
Once that was done now came the hard
part. I used an embossing heat gun (a hair dryer would work). Moving it
continuously and working from the center out. Let the heat build slowly
so that the resin doesn’t melt or crack. The heating will eventually set
the dihedral. Now that everything was bent correctly, it is time to glue
everything tight. The whole process took about 30 minutes. Nothing that
any modeler couldn’t do. A little filler at the front and in the back
and everything was fine.
OK, now we are starting to see the airplane take shape. The tail planes
are thin and have no mounting lugs. I drilled holes for hypodermic
needles and mounted the tail.
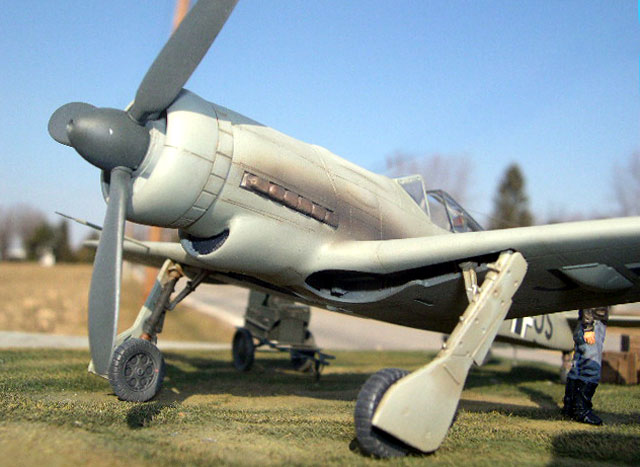
Flat sanding cleaned up the nose cooler. I cleaned up all the small
parts. I had to fill some holes in the exhaust stacks and the landing
gear doors. The model was now ready to paint. I rewashed the whole model
with Dawn dish washing liquid and a toothbrush. I let it dry and then I
used some Sylvan Resin-Prep. This ensured that all the oils were
removed. I attached the white metal landing gear using five-minute
epoxy. The epoxy allows you time to manoeuvre the landing gear to get it
aligned.
Primer
The model was given an initial coat of
Alclad Grey Primer. Mistakes (oh yes I make them all the time) were
cleaned up and some pinholes were filled with 3M Blue Acryl. The whole
model was sanded lightly and using a pin the rivets that I sanded off
were replaced. Then the aircraft was painted again with the primer. The
process was repeated three times. If done correctly the surface
imperfections I mentioned disappear but the rivet detail stays. Once
happy it was off to the paint booth.
Paint
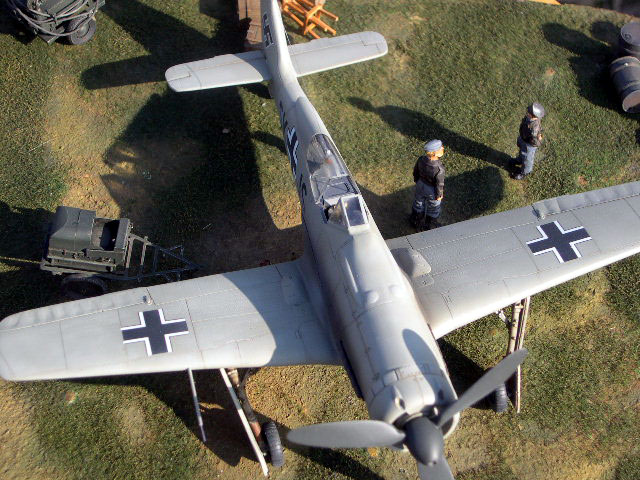
The V13 was not a flamboyant aircraft. It
was painted overall RLM 02. Using my Tamiya airbrush, I pre-shaded the
panel lines with RLM 66. For this project I decided to use Model Master
Enamel RLM 02. I like to use enamels on resin just in case the surface
prep wasn’t perfect. Enamels bite more than acrylic and doesn’t peel up
as easily. Once the paint was on I lightened the paint with some flat
white and thinned it some more. Then I selectively painted small spots
on the whole aircraft. Then I added some more white and painted the
fabric control surfaces. This breaks up the monotone color.
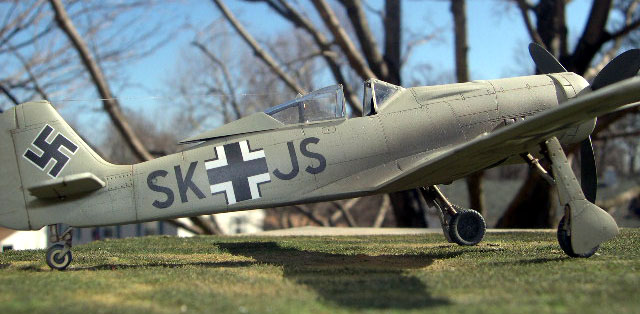
Decals
Now that everything was RLM 02 it was
time to decal. A coat of Future prepped the surface for decals. The
decals are ever so slightly out of register, but not to where it is
noticeable. They laid down well, but a word of caution. Once the decals
are placed they are done moving. HERE IS A TIP: Use some saliva instead
of water on the model. The saliva allows you to slide the decal a little
to position it. Once the decals were set in place I used some SolvaSet.
The decals were very thin and looked great once dry. I attached the
exhaust stacks after painting them with Model Master Burnt Metal
Metalizer. The stacks were weathered with Burnt Sienna and orange
pastels. Before you seal the nose section, add the oval radiator panel
on top of the wheel well. It seemed like a natural place to put it. The
instructions don’t show where it goes, but putting it here prevents you
from being able to see through the model. Attach the nose radiator after
painting it with Model Master Titanium then attach the nose to the
model. The wheels were added at this time. They had some bubbles but
they cleaned up easily. If you wanted to you could use True Detail
wheels.
The prop blades had some pin holes but a
little filler and they cleaned up nicely. The blades were pinned to the
spinner and the assembly was given a coat of Model Master Black Green.
This is the only “flair” to the camouflage.
Another coat of Future sealed everything. Allowed to dry overnight, a
coat of Model Master Acrylic Flat prepped the model for weathering. A
wash of Burnt Umber Artist Oil in the panel lines brings out the
definition. Once it was dry I applied a dry brush of white artist oils
over the entire surface of the kit, paying particular attention to the
fuselage spine and wings. Silver pencil was used sparingly on the wing
root and wing leading edge to simulate chipping.
The only two photos I could find of the V13 showed it after some testing
and the exhausts stains were quite noticeable so I wanted to simulate
this. I started out with highly thinned Tamiya Flat Earth beginning at
the exhaust stacks. As I moved aft I pulled the airbrush away from the
model. This gives the effect of thinning and expanding exhaust. Next
empty the airbrush but don’t clean it out. Add some Flat Black and more
thinner and repeat the process staying more towards the center of the
exhaust streak. Finally, add just a little bit of brown pastel
immediately aft of the exhausts and drag it back through the exhaust.
Now another coat of Flat seals all the pastels.
Before you can attach the canopy you have to bend the anti-glare panel.
This is actually fairly easy, but I had to think about how it would
mount. I came to the conclusion that the two pieces that are obviously
to be used for mounting would be bent so the panel sat on the edge of
the canopy sill and not down inside the cockpit. Once that was done a
coat of primer and flat black and it was almost time to celebrate.
The only thing left was the canopy. You only get one so, of course, I
screwed it up bad. I would have liked to have had a second canopy. The
clear parts are crystal clear and the plastic is thick. While trying to
remove the canopy I slipped and scribed a huge gash in the side panel.
Luckily, I wanted to pose the canopy open anyway and the Tamiya canopy
fit well. I cleaned up the kit front windscreen and as I anticipated
there was a large opening at the front. I used white glue and then some
putty to fair it in. Overall the look is very good. As I said just a
touch of glue will hold the Tamiya canopy in place. I’m sure I could
have gotten a replacement canopy from the importer or a Falcon set or
even the Squadron one. It is just a typical Fw 190 “flat” canopy. I used
Black Magic canopy masks and painted it all RLM 66 followed by RLM 02.
The canopy masks worked like a champ, even on the kit front canopy. I
touched up the paint around the canopy where I had to fill.
Some white glue and Tamiya clear red and green formed the wing tip
lights. The addition of an antenna and the model was complete.
As this was my first R.V. Resin kit, I
was overall impressed with the surface detail, even though some of it
had to vanish with the sanding and be replaced. All the “problems” I
encountered (poor instructions, bubbles, pin holes, warps, and surface
blemishes) are typical of all the resin kits I’ve ever built and are
easily fixed. Even with the problems the total time spent on building
this kit was no more than a “normal” plastic kit.
I recommend this kit to an experienced modeler or a plastic modeler
looking for a challenge. It is a relatively easy build but not a Tamiya
or Hasegawa but definitely buildable. This unique aircraft is not
available in any other scale or media that I’m aware of. It offers a
unique look to a classic fighter and even with the plain paint scheme it
looks quite nice.
As a bonus, if you need replacement parts the kit seems to be based on
the Tamiya offerings so if you screw up, like I did on the canopy, you
can just use the parts in the plastic kit.
I can only hope that when R.V. finishes the Fw 190 prototypes they will
tackle the Bf-109 prototypes. I’d be forced to buy the complete range of
those, but based on my experience with their Focke-Wulf series, I
purchased an R.V. Resin Ta-152C-0 V7. That should say something about
the quality of the kit.
References
and Acknoweledgements
|
-
Model Art #8-Focke-Wulf Fw 190D &
Ta-152
-
Focke-Wulf Ta-152- Der Weg zum
Hohenjager, Ditmar Hermann, Aviatic Verlag, 1998, ISBN 3-925505-44-X
(I think this is available in English now)
-
Focke-Wulf Jagdflugzeug, Peter Rodeike,
ISBN 3-923 457-44-8
Thanks goes to Dave Cooper, US importer
of R.V. Resin, for the review copy. The kit is USD$50.00 plus shipping
and handling, and can be ordered directly at
http://resin-plane-kits.com/
or by email at Airplane104@aol.com
.
Click on the thumbnails
below to view larger images:
Model, Images and Text Copyright ©
2003 by Floyd S. Werner Jr.
Page Created 20 March, 2004
Last Updated 20 March, 2004
Back to
HyperScale Main Page
|
 Home
| What's New |
Features |
Gallery |
Reviews |
Reference |
Forum |
Search
Home
| What's New |
Features |
Gallery |
Reviews |
Reference |
Forum |
Search