|
1) Rivet Detail
Having seen a number of
inspiring examples of home-made rivet detail on large scale models, I
decided to give it a whirl. Using the Squadron “Walk Around” reference
and the kit’s box art as guides, I used Hasegawa’s rivet scriber
(HSGTL11) and rivet gauge (HSGTL12) to create thousands of rivets on the
fuselage, tail and wings.
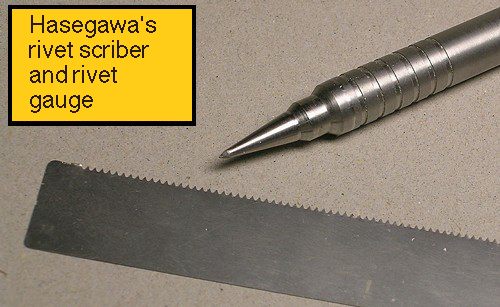
Tamiya tape was used to guide
the placement of the template on the model. Once the rivets were in
place, I gently polished the model’s surfaces with a Micromesh sanding
cloth. This was done to help mute the appearance of the rivets, since I
did not want my model to appear dimpled like a golf ball. Although the
rivets are difficult to discern in my photographs of the completed
model, they are visible when viewed up close and from certain angles.
2) Cockpit
I found the kit’s cockpit to be
quite acceptable, particularly given that much of it remains in shadow
on the completed model, even with the canopy open. For those inclined,
MDC and Eagle Editions offer resin replacement cockpits that are much
more richly detailed. I opted to replace the kit’s seat with a spare
seat from the Eagle Editions cockpit set. This minor addition greatly
enhanced the appearance of the cockpit, since the seat is the most
prominent part of the cockpit. Support rails for the seat were made
from Evergreen styrene. The cockpit was painted RLM66 using Polly Scale
acrylic. A wash of reddish-brown enamel was used to flush out details
in the cockpit, and SnJ polishing powder was used sparingly to simulate
worn surfaces on the floor panels. Silver-colored pencil was also used
to highlight detail in the cockpit.
The photograph below shows a
cockpit that I am currently working on for the Hasegawa 1/32 Fw190A-8.
I have included it here because it incorporates the same basic changes I
made to the Dora cockpit. The dials on the instrument panel were added
individually by punching them out from the kit’s decal sheet.
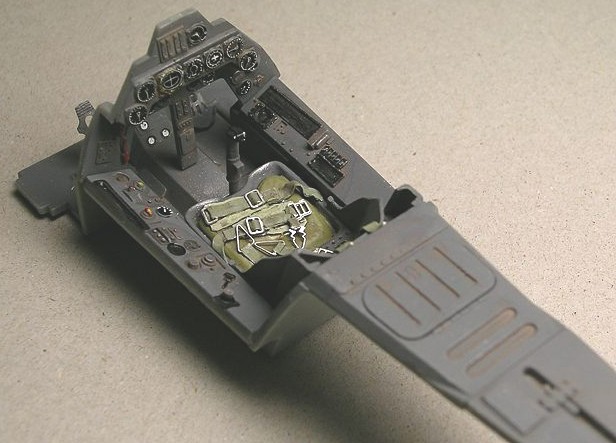
Note that the placement of the
gun sight on the model is incorrect because it interrupts the padding
that extends across the front of the coaming above the instrument
panel. I repositioned the gun sight further back and added a strip of
styrene rod to fill the gap in the padding. Both MDC and Eagle Parts
correct this mistake in their cockpit sets as well.
3) Gun Cowl Modification
The shape of the kit’s gun
cowling has been criticized for having too much “cleavage” between the
bulges. Eagle Editions makes a very nice resin correction set to solve
this inaccuracy; however, I opted to make the correction myself. The
steps I took are shown below.

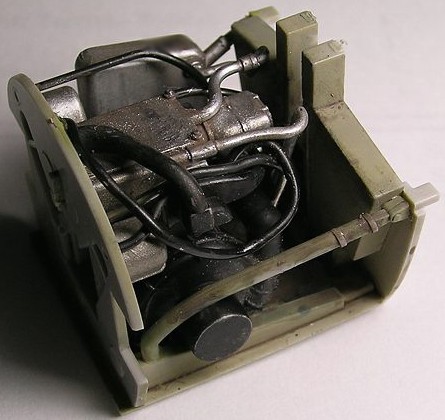
4) Wheel Wells
An important feature of the
Fw190D series is that the engine plumbing is visible inside the wheel
wells. This detail, which is missing from the 1/48 scale options of the
Dora, is represented by a simple yet effective assembly that plugs
directly into the fuselage prior to gluing the fuselage halves
together.
5) Dropped Flaps
Revell provides an option for
dropped flaps, which were common on parked Fw.190’s. However, the
locating tabs on the kit parts force the flaps to droop at an angle of
about 90 degrees, which is incorrect. At most the angle should be 60
degrees, so you will have to make the adjustment. I opted to drop the
flaps considerably less than the maximum.
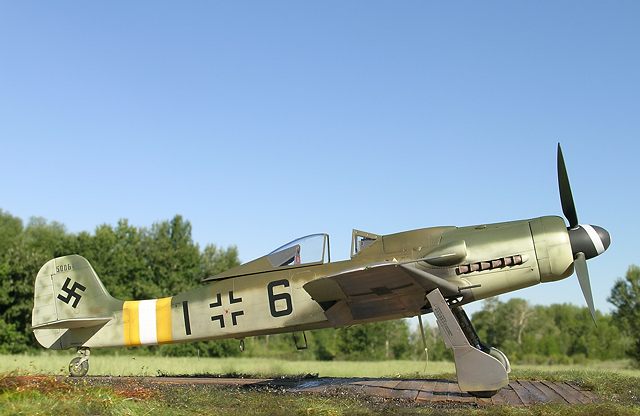
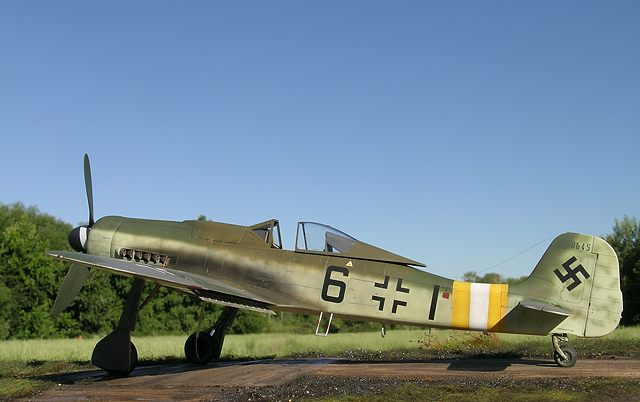
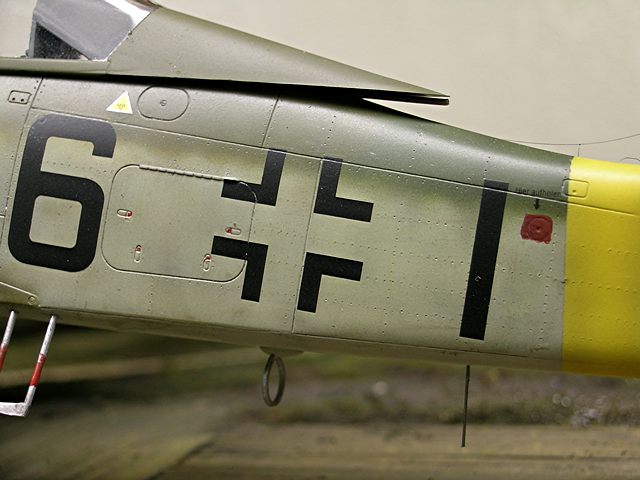
Painting began by preshading the panel lines in black.
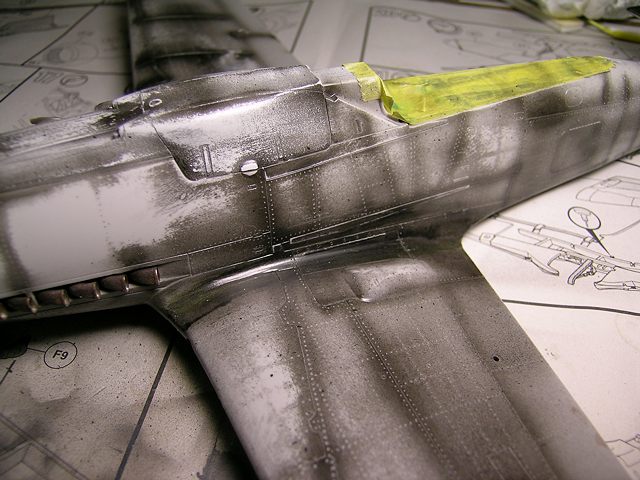
The
yellow and white fuselage bands were then painted and masked with Tamiya
tape until all other painting was complete.
 As
with most late war Doras, “Black 6” had an interesting and unorthodox
camouflage scheme. According to the EagleCals instructions, the upper
surfaces were a combination of RLM75 (gray-violet) and RLM83 (dark
green), with RLM81 (brown-violet) around the cockpit and wing roots.
The written description in the decal instructions indicate that both
wing roots were RLM81, whereas the diagram shows only the port wing root
in that color. I opted to follow the written instructions. I used
Polly Scale acrylics for the RLM75 and 83, and Aeromaster acrylic for
the RLM81. The camouflage was sprayed freehand with an Iwata HP-C
airbrush. As
with most late war Doras, “Black 6” had an interesting and unorthodox
camouflage scheme. According to the EagleCals instructions, the upper
surfaces were a combination of RLM75 (gray-violet) and RLM83 (dark
green), with RLM81 (brown-violet) around the cockpit and wing roots.
The written description in the decal instructions indicate that both
wing roots were RLM81, whereas the diagram shows only the port wing root
in that color. I opted to follow the written instructions. I used
Polly Scale acrylics for the RLM75 and 83, and Aeromaster acrylic for
the RLM81. The camouflage was sprayed freehand with an Iwata HP-C
airbrush.
The fuselage sides on this
aircraft were a greenish version of RLM76. This greenish color, which
is common on late war Fw.190D-9s, has been erroneously described as RLM
84 (a designation that never really existed). Based on the advice of
Jerry Crandall (of Eagle Editions) in a discussion thread on Plane
Talking, I used Tamiya’s Japanese Army Grey (XF-14) with a touch of
white to approximate the greenish RLM76 color. Light mottles of RLM83
were applied to the tail, some of which covered a portion of the work
number. Very thin washes of Model Master burnt umber + raw sienna were
brushed over the model’s upper surfaces to help diffuse the colors and
create a slightly weathered appearance. Exhaust stains were applied by
spraying highly thinned black paint.
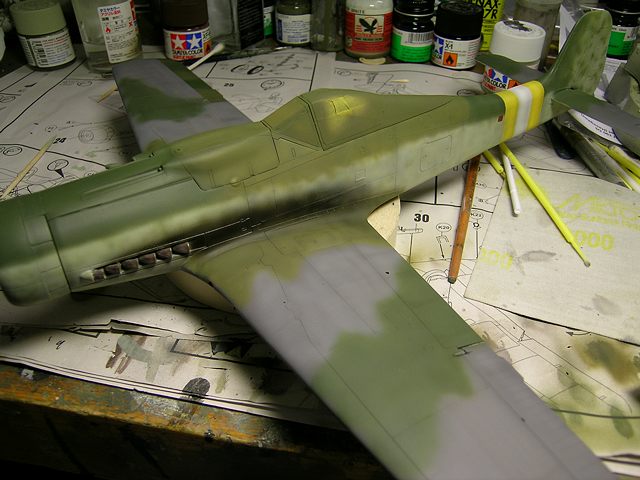
The underside of the wings were
predominantly natural metal, with the leading edge and gear doors
(provisionally) RLM75. I painted the ailerons in the greenish RLM76.
For the natural metal finish I used Alclad II metalizers over Tamiya
gray surface primer. The primer was polished smooth prior to applying
the metalizer. A number of shades of Alclad II (aluminum, semi-matte
aluminum, and polished aluminum) were used to create variability in the
natural metal finish.
I painted the interior of the
wheels wells, flaps, and landing gear covers RLM02 (interior gray).
However, in a recent article in Scale Aircraft Modeling magazine (April
2004), Michael Ullmann suggests that the interior surfaces of Doras
should be left in natural metal finish, except for the gear legs, wheel
rims, and other areas subject to corrosion. Rather than repaint the
areas that should have been natural metal, I decided to rub SnJ
polishing powder onto them with a cotton swab. The surfaces now appear
as weathered natural metal. The undercarriage legs were left RLM02, and
the wheel rims were painted black.
The tires were painted in
various shades of dark sandy-gray and scale black, followed by an
application of light brown on the sides to simulate a muddy, weathered
appearance.
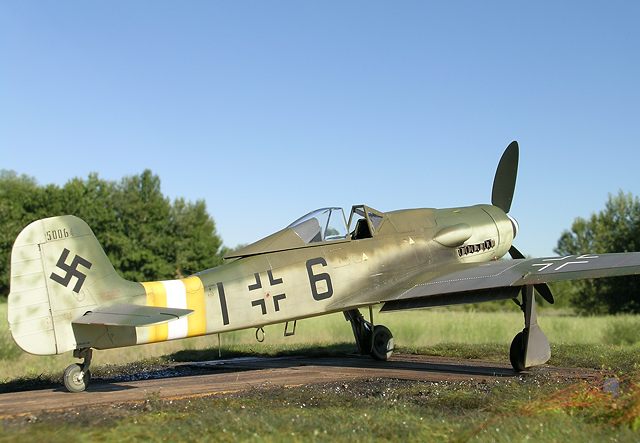
A coat of Future floor wax was
added to the model prior to decal application. The EagleCals decals
were of the highest quality, although I messed up the spinner’s spiral
and used the kit’s decal instead. In comparing the two decal sheets, it
is worth noting that Revell’s markings for “Black 6” differ
substantially from those on the EagleCals sheet. Specifically, Revell’s
black 6 and black vertical bar are 4mm shorter in height than those on
the EagleCals sheet (i.e., 20% shorter), and the fuselage crosses and
work numbers are noticeably larger. Given the detailed analysis of
markings provided with the EagleCals decal sheet, I feel more
comfortable with their interpretation.
Like the Hasegawa 1/32 Bf 109
series, Hasegawa/Revell’s 1/32 Fw190D-9 offers a large canvas on which
to practice and perfect those enigmatic and attractive Luftwaffe
camouflage schemes. The Revell Dora is superbly detailed, well
engineered, easy to build, relatively inexpensive, and a leap in quality
over those older 1/32 kits from the likes of Hasegawa, Revell, and
Matchbox. With so many decal options available from manufacturers like
EagleCals, Cutting Edge, and Aeromaster, Luftwaffe enthusiasts will have
their hands full.
Images were taken with a Nikon Coolpix 5400 digital camera. The "sharpen
edges" tool of Adobe Photoshop was used to restore some of the clarity
and crispness lost during image compression.
Click on the thumbnails
below to view larger images:
Focke-Wulf Fw 190
Modelling Manuals 20 |
|
|
|
|
US Price: $17.95
UK Price: £12.99
Publisher:
Osprey Publishing
Publish Date:
May 25, 2002
Details: 64 pages; ISBN: 1841762687 |
|
|
Model, Images and Text Copyright ©
2004 by Ian Robertson
Page Created 02 August, 2004
Last Updated 02 August, 2004
Back to HyperScale
Main Page
|
 Home
| What's New |
Features |
Gallery |
Reviews |
Reference |
Forum |
Search
Home
| What's New |
Features |
Gallery |
Reviews |
Reference |
Forum |
Search