|
Hasegawa's 1/32 scale
Focke-Wulf Fw
190D-9
by
Ian Robertson
|
 |
|
Focke-Wulf Fw
190D-9 |

Hasegawa's
1/32 scale Focke-Wulf Fw 190D-9
is available online from Squadron.com
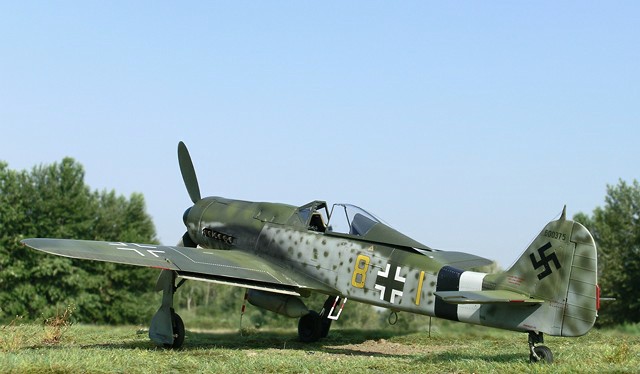
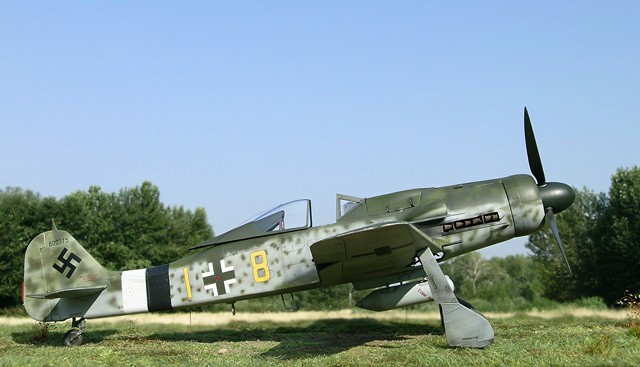
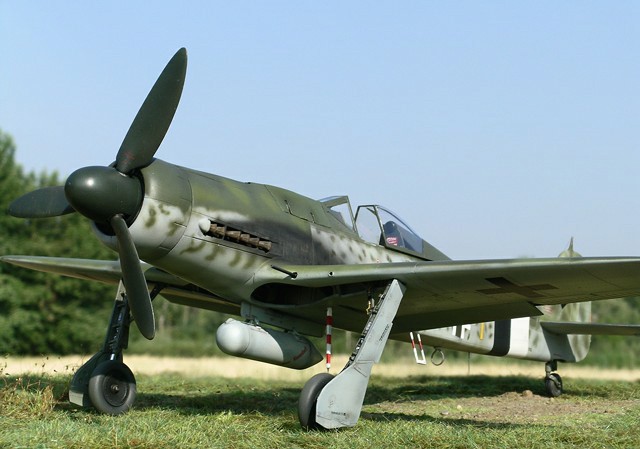
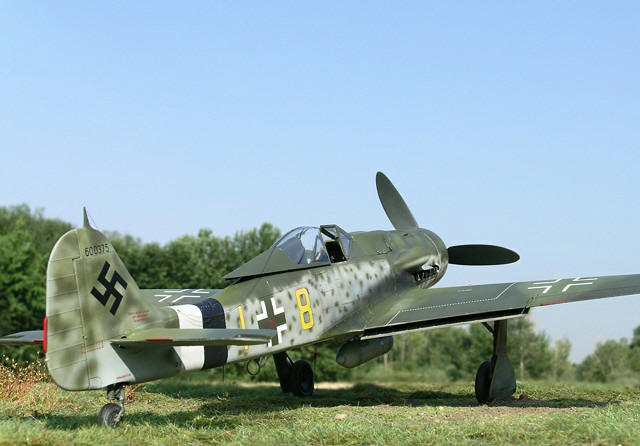
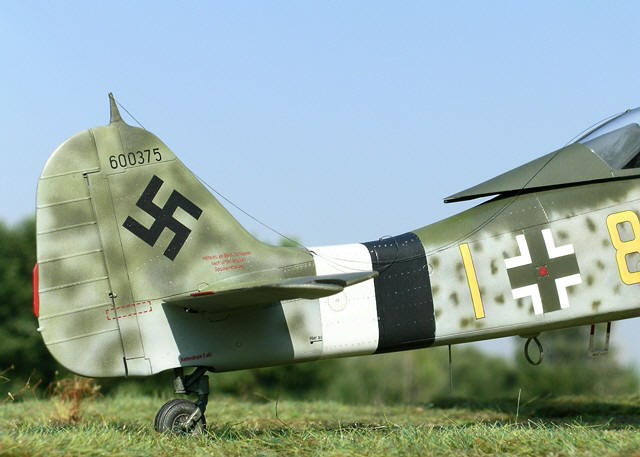
"Yellow 8" was a Focke-Wulf Fw.190D-9 (W.Nr. 600375) from JG26 found
abandoned at Celle, Germany in April 1945.
Two photographs of this aircraft appear on page 239 of Axel Urbanke's
book, "Green Hearts: First in Combat with the Dora". For those
interested, Urbanke's book provides a dramatic and sobering view into
the lives of Luftwaffe fighter pilots during the final stages of WWII
when defeat was certain. The text is supported by a large number of
photographs of pilots and their machines, as well as numerous color
profiles.
In conjunction with Urbanke's publication, Eagle Editions produced
decals for "Yellow 8" on EagleCals #61. The instructions are accompanied
by a color profile by Tom Tullis, as well as a reduced version of one of
the photographs in Urbanke's book.
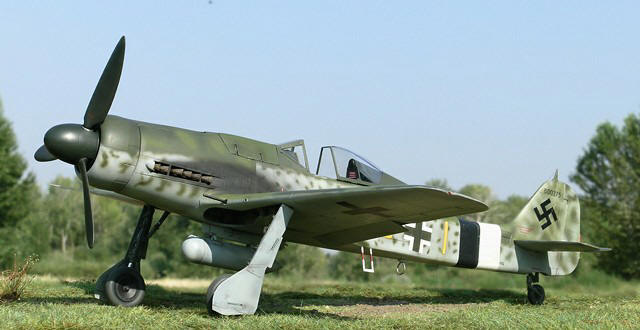
Here is my interpretation of "Yellow 8", using Hasegawa's new-tool 1/32
Fw.190D-9.
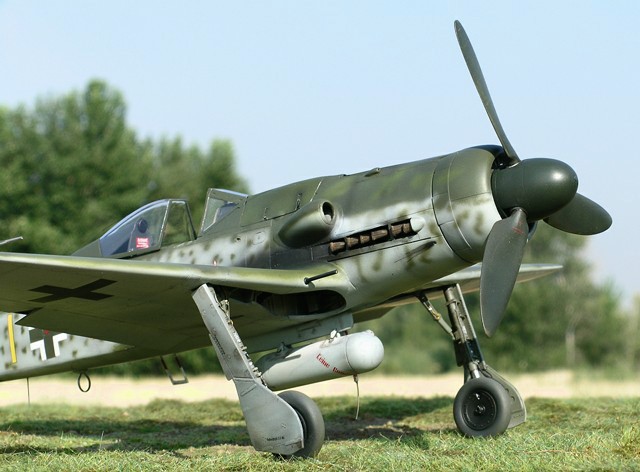
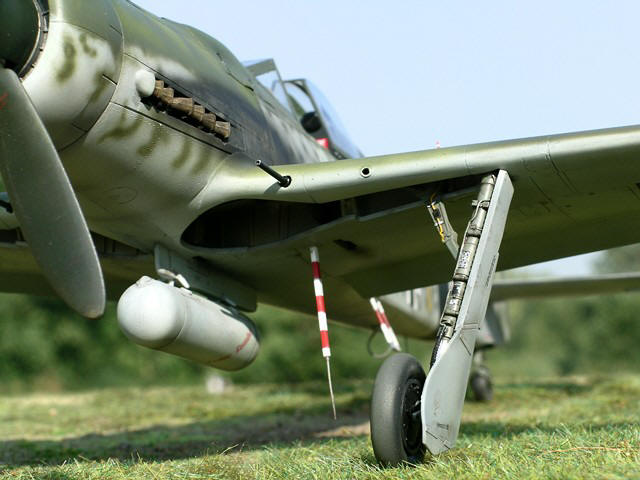
Accessories Used on the Model
-
MDC hollow resin exhausts
-
MDC main wheels and tail wheel
-
Eagle Editions resin gun cowl (Eagle
Parts #42-32).
-
Eagle Editions cockpit (Eagle Parts
#40-32)
-
A very well detailed alternative
to the kit cockpit. This set, which contains both resin and
photoetch, is intended for those with moderate to advanced
modeling skills. Some minor modifications to the kit are
required. The Eagle Editions website provides online color
instructions to enhance the instructions supplied with the
cockpit.
-
Rutman Products resin seat
-
The Eagle Editions replacement
cockpit comes with two beautifully designed resin seats, one
with seatbelts and one without. Because I used these seats on
two previous Fw.190 models, I opted to use the Rutman seat this
time. The seat is very good quality, with only minor cleanup
necessary. Cutting Edge also makes replacement seats for the
kit.
-
Rutman Products cigar-shaped 300
liter drop tank
Hasegawa's 1/32 Fw.190D-9 is a pleasure to build and has few
drawbacks.
For me the biggest challenge in construction occurs while fitting the
wings to the fuselage. The fit is very tight, with multiple pieces in
play simultaneously. Careful attention is needed to ensure proper
alignment of the wings to the fuselage. Having said that, all three 1/32
Fw.190s I have built have turned out fine in this respect.
Below I describe some other important steps in construction.
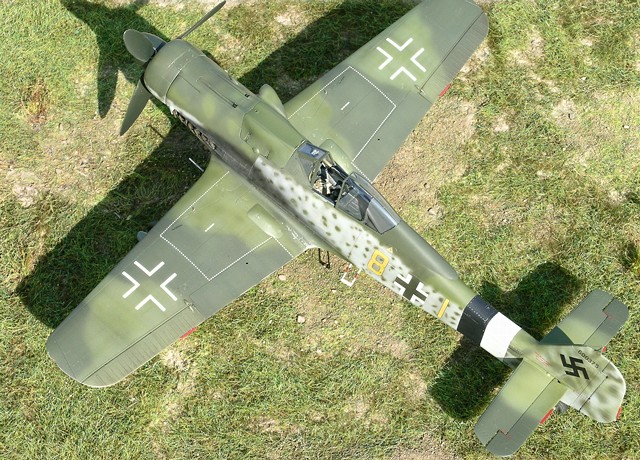
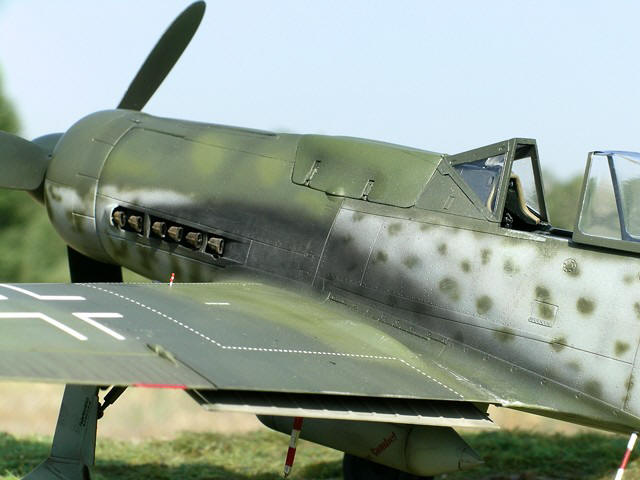
Rivet Detail
As I have described in previous articles on the 1/32 Fw.190D-9 and
A-8, I used Hasegawa's rivet-making tool and spacing template (available
at Hobby Link Japan) to create thousands of rivets on the fuselage, tail
and wings. Tamiya tape was used to guide the placement of the template
on the model. Once the rivets were in place, I gently polished the
model's surfaces with a Micromesh sanding cloth. This was done to help
keep the rivets subtle in appearance.
Cockpit
I replaced the kit cockpit with a highly detailed resin and etched
metal cockpit from Eagle Editions. To install the cockpit it is
necessary to remove the raised details on the interior of the kit's
fuselage halves. Some thinning of the interior fuselage sides is needed
to ensure the cockpit sits high enough within the fuselage to be flush
with the rear deck. Repeated test fitting will ensure good results.
I opted not to use the replacement coaming above the instrument panel.
Note, however, that the placement of the gun sight on the kit is
incorrect because it interrupts the padding that extends across the
front of the coaming. Therefore, I repositioned the gun sight further
forward and added a strip of styrene rod to fill the gap in the padding.
This modification is illustrated in my previous article on the
Fw.190A-8.
The cockpit was painted RLM66 using Polly Scale acrylic. A wash of
reddish-brown enamel was used to flush out details in the cockpit, and
SnJ polishing powder was used sparingly to simulate worn surfaces on the
floor panels. Silver-colored pencil was also used to highlight detail in
the cockpit. The dials on the instrument panel were added individually
by punching them out from the kit's decal sheet using a Waldron punch
and die set. A drop of Future was added into each dial once the decals
had dried.
Dropped flaps
Hasegawa provides an option for dropped flaps. However, the locating
tabs on the kit parts force the flaps to droop at an angle of about 90
degrees, which is incorrect. At most the angle should be 60 degrees, and
13 degrees was more typical for parked aircraft, so you will have to
make the necessary adjustment.
Repositioned elevators
I deflected the elevators upward. On Fw.190s this was done to lock
the tail wheel in place. When the elevators were dropped, the tail wheel
could move freely. The control stick was pulled back for consistency
with the position of the elevators.
Antenna wire
The antenna wire was made from stretched sprue and painted dark gray.
Note that there was no retractor mechanism for the antenna wire on
Fw.190s with a blown hood. Therefore, the wire sagged when the canopy
was open.
I began by painting my model with Tamiya gray surface primer. This
undercoat was needed in preparation for a coat of Alclad II aluminum
metalizer around the wing roots and fuselage sides near the cockpit.
Without a suitable primer, Alclad II will scar the plastic.
I painted the black and white fuselage bands and masked them with Tamiya
tape until all other painting was complete.
Camouflage
In starting this project I was drawn to the unique and striking
camouflage scheme of "Yellow 8" on EagleCals #61. The upper colors are
described in the instructions as RLM82/83, with RLM76 on the fuselage
sides and underside. The sides of the fuselage were mottled with RLM83
and perhaps RLM82.
To recreate these colors I used some home-brewed mixtures of acrylic
paint. I wanted the RLM83 (dark green) to have a brownish tinge, so I
used 3 parts Polly Scale "Pullman Green" (a generic dark green color
that I had on hand), 1 part Aeromaster RLM81 brown-violet, and 1 part
Testors RLM83. These paint brands are compatible to mix.
 RLM82
(light green) is a color I find to be poorly represented in the Polly
Scale range because it has been made excessively bright. To tone the
green down, I used 1 part Polly Scale RLM83 (which is really supposed to
represent RLM82), 2 parts Polly Scale "Pullman Green", and 2 parts Polly
Scale RLM67 dark olive green. While I cannot attest to the accuracy of
the mixture, it did produce a light green that I felt was reasonable for
RLM82. Moreover, it is similar in appearance to the recently released
White Ensign Models RLM82 enamel, although perhaps slightly more
yellowish. RLM82
(light green) is a color I find to be poorly represented in the Polly
Scale range because it has been made excessively bright. To tone the
green down, I used 1 part Polly Scale RLM83 (which is really supposed to
represent RLM82), 2 parts Polly Scale "Pullman Green", and 2 parts Polly
Scale RLM67 dark olive green. While I cannot attest to the accuracy of
the mixture, it did produce a light green that I felt was reasonable for
RLM82. Moreover, it is similar in appearance to the recently released
White Ensign Models RLM82 enamel, although perhaps slightly more
yellowish.
Polly Scale RLM76 was applied out of the bottle.
I painted the interior of the wheels wells, flaps, undercarriage, and
landing gear covers RLM02 (interior gray). The spinner and propeller
blades were painted RLM70 (black green).
Decals and Weathering
A coat of Future floor wax was added to the model at least 12 hours
prior to decal application. The EagleCals decals were of the highest
quality and went on without difficulty. However, I later ruined the
fuselage markings due to over-weathering. These markings had to be
stripped off and replaced.
The interior of the fuselage cross on "Yellow 8" was RLM83 rather than
black. Although EagleCals supplies a pair of decals already filled with
dark green, I opted to mask and paint the interior area of each cross
with RLM83 to maintain consistency with the rest of the RLM83 on my
model. I then used an appropriately-sized white-outline cross from
another EagleCals sheet and placed it over the area I had painted.
Once the decals had dried I added a second coat of Future floor wax.
This was followed one day later by a 50/50 mixture of Polly Scale clear
satin and clear flat acrylic.
Exhaust stains were applied by spraying highly thinned black paint.
Reference photos show that the exhaust stains on this aircraft were
prominent.
To simulate paint chips at the wing roots and near the cockpit entrance,
I used fine grain sandpaper to create surface abrasions and expose small
amounts of the Alclad II aluminum beneath.
Groundwork
A wooden cutting board was used as the base for the model. Celluclay
was used to make the basic ground cover. The celluclay powder was mixed
into a paste with water and white glue, tinted with brown acrylic paint,
and then spread thinly over the cutting board. Note that the cutting
board had previously been treated with several coats of clear lacquer to
prevent warping while the celluclay dried. While the celluclay was still
wet I added pieces of Heki grass mat (item # 1574 - Wild Grass Savanna),
fine sand, and small bits of moss. I purchased the Heki grass from a
mailorder company in the UK.
Images were taken with a Nikon Coolpix 5400 digital camera outside with
a natural background. The "sharpen edges" tool of Adobe Photoshop was
used to restore some of the clarity and crispness lost during image
compression.
Click on the thumbnails
below to view larger images:
Focke-Wulf Fw 190
Modelling Manuals 20 |
|
|
|
|
US Price: $17.95
UK Price: £12.99
Publisher:
Osprey Publishing
Publish Date:
May 25, 2002
Details: 64 pages; ISBN: 1841762687 |
|
|
Model, Images and Text Copyright ©
2004 by Ian Robertson
Page Created 21 September, 2004
Last Updated 21 September, 2004
Back to HyperScale
Main Page
|
 Home
| What's New |
Features |
Gallery |
Reviews |
Reference |
Forum |
Search
Home
| What's New |
Features |
Gallery |
Reviews |
Reference |
Forum |
Search