|
Fonderie Miniature's 1/48 scale
Handley Page Halifax
by Mick Evans
|
 |
|
Handley Page
Halifax |

Fonderie
Miniatures' 1/48 scale Halifax B.III is available online at
Squadron.com
Fonderie Miniature's Halifax In the Box
The Halifax was a crucial part of Bomber Command's
night bombing strategy in WWII, but it is often overshadowed by the
legendary Lancaster. It has been underrepresented in plastic too, with
only the ancient Airfix offering and the long unavailable Matchbox kits
in 1/72 scale (recently re-released by Modelcraft and also due in a
Revell box during 2006).
Finally we have an option to build the Halifax in 1/48 scale.
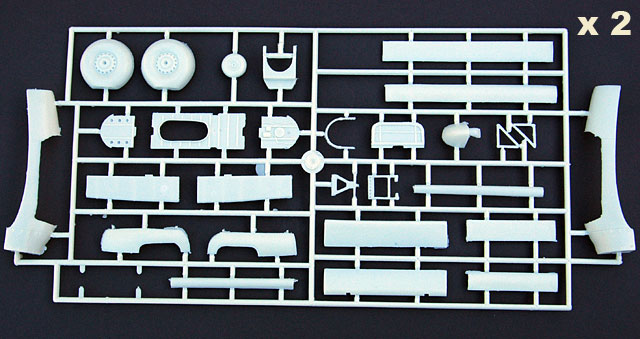
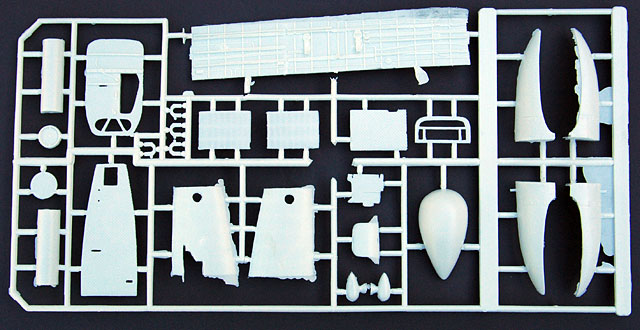
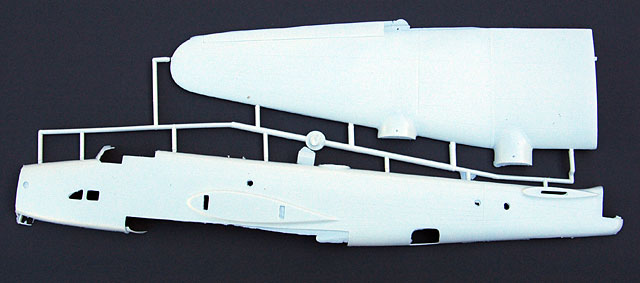
Fonderie Miniature's 1/48 scale Halifax B.III comprises 150 parts in
low-pressure injection moulded plastic, plus resin cockpit, engines,
intake scoops, "hedgehog" exhausts, and other details; and white-metal
landing gear legs, seats, gun barrels and other details. A small fret of
photo-etched parts is also supplied.
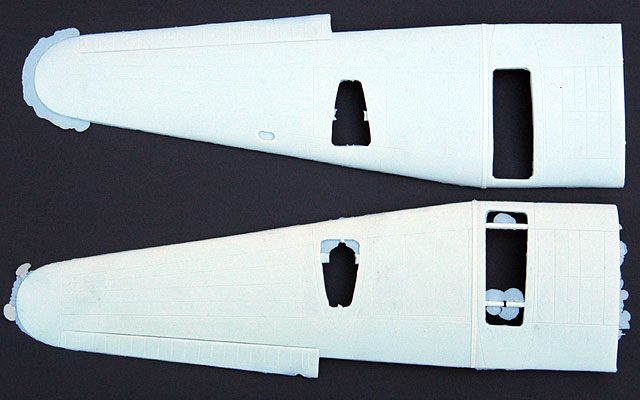
The white plastic parts appear to be the best FM
effort yet. Surface detail is by way of finely engraved panel lines and
raised fabric detail. Unlike earlier kits, the surface of the plastic is
quite smooth and the panel line detail is very consistent - impressive
on such a big model. Flash is present around most of the main plastic
parts, but it is quite fine and will be easy to remove before assembly.
There are also some prominently raised ejector pins to remove from the
interior of the larger parts, and a few sink marks - notably around the
forward fuselage - that will need to be filled and sanded.
Click the thumbnails below
to view larger images:
Resin detail is very good. I like the engines, the
cleverly cast, one piece rear turret interior and the hedgehog exhausts.
The very chunky white metal landing gear will ensure adequate strength
for this area of the model. Other white metal details include seats with
textured cushions, tail gear and machine gun barrels.
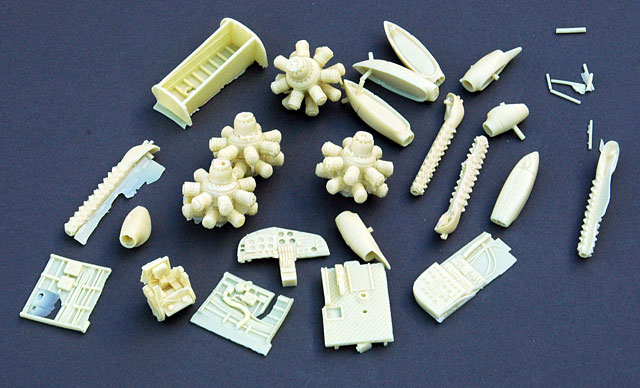
The canopy, nose and turrets are supplied as vacform parts.
Traditionally, FM's clear vacformed parts have been pebbly in texture,
but these parts are perfectly smooth with raised frame detail. Spares
are provided for all vacform parts - just as well because one of my nose
cones was damaged in transit. In fact, three rear turrets were supplied
in this sample!
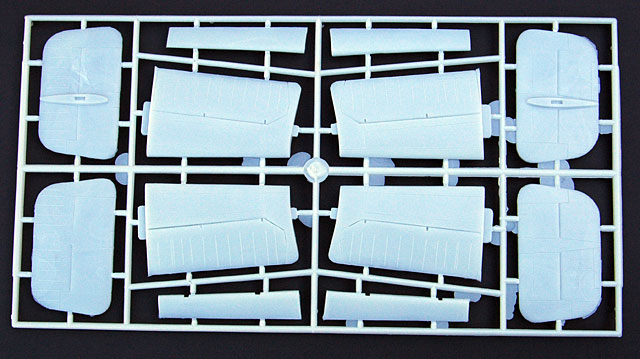
Engineering is good, with the wings reinforced by
two long spars. This ensures a secure connection and the correct
dihedral. The big tailplanes are secured with locating tabs too. Flaps
are provided separately so they may be depicted dropped if desired. All
other control surface are moulded in neutral positions.
Three interesting decal options are included, with nose art and
colourful tail markings..
Instructions are typical Fonderie Miniature fare - three folded black
and white A4 pages, with one sheet dedicated to construction, one sheet
to camouflage and the final sheet to background.
On opening the box the first thing that hit me was the overall size
of the model. This was going to be one of the biggest models that I had
built.
The build for the Halifax commenced with some very extensive cleanup of
all of the mating surfaces of every part, including the resin and metal
parts.
Construction started with the sanding of the fuselage halves until the
dimensions equaled the width of the transparencies for the cockpit. The
circular windows all required cleanup to make them circular and the nose
side windows had some major flash that was required to be removed.
Once this was complete the fuselage walls were thinned down to accept
the cockpit floor, bomb bay ceiling and bulkheads. This process requires
constant thinning and trial fitting until a snug fit is achieved.
It was at this point that I decided that the bomb bay supplied with the
kit needed to be trashed and a new one scratch built. This was quite a
simple process using the kit part as a master and adding the structure
and wiring details from plastic card and solder.
The cockpit, navigators area, and bombardiers area is quite a complex
area to build requiring a fair amount of cleanup work and painting. The
detail here is very good and requires little extra work or detail to be
added.
When the assembly of all of the internal detail is complete, the
fuselage assembly is a very easy assembly process. The fuselage halves
do not match each other in width so some gentle bending is required
until the two halves match up. A fair amount of filler was then required
to fair the fuselage seam before any further assemble was continued.
Some major reshaping was required to make the upper turret opening
circular instead of oval and fortunately I have a small tapered reamer
for this task. I kept reshaping until the metal mounting ring for the
upper turret fitted snuggly.
The wings then become the next big challenge. The halves need a huge
amount of sanding to achieve the correct thickness at the leading and
trailing edges. The wings also become a simple assembly process at this
point. The flap area of the wings has semi circular inserts to complete
the trailing edge of the wing. These are tricky to fit and require some
trimming and trial fitting to get them right. The same process was
repeated for the horizontal and vertical tail planes. Two spars are
supplied to carry the weight of the wings through the fuselage. The
spares form part of the kits sprue assembly and are very rough. These
are easily cleaned up on some coarse emery paper. These require
extensive trial fitting into the fuselage and wings to make sure the
wings fit correctly to the mating surfaces on the fuselage. The
horizontal tail and rudder were added after some cleanup of the mating
surfaces and very little filler was required.
The last major project was the engine nacelles. The assembly of the
nacelles is quite easy but the fit to wing is another story requiring
lots of filler and sanding. The front firewalls did not line up and
required lots of plastic card to act as a filler to achieve a flat
firewall. The wheel wells are assembled and inserted into the inboard
engine nacelle area before fitment of the nacelle to the wing. The
engine cowls were a nightmare. The mating surfaces need to be sanded
until the nacelles are round instead of egg shaped. Once again my trusty
reamer was used to get the openings circular. The cowling flaps were
then fitted and these need some persuasion to become circular and fit
the engine cowls.
The engines in my kit were one piece cast in resin. I have heard that
some kits have the crank case and cylinders and these I presume would
have individual metal cylinders for both rows and these would then fit
into the resin crankcase.
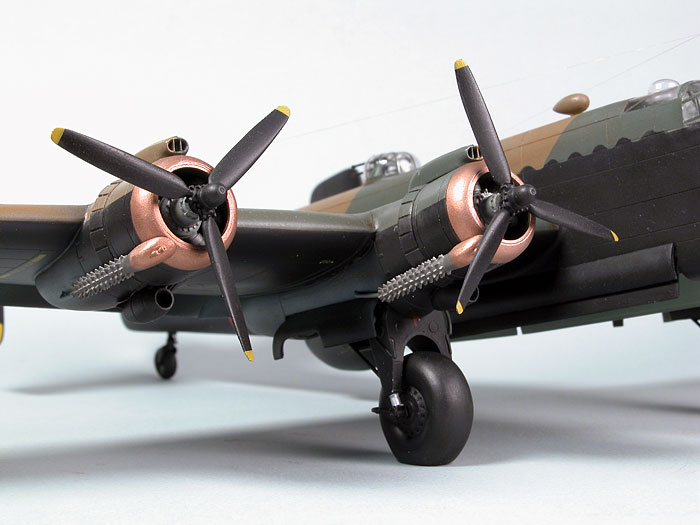
The engines require some cleanup before painting. They fit easily
into the engine cowls and provide a good base to mount the assembly onto
the nacelles.
The next major task was the transparencies. Firstly all parts were
dipped in Future. The transparencies were an easy fit with super glue.
The frames were all masked and any seams were filled and sanded. The
masking was left on until after the kit was completely painted. I spent
a lot of time blowing all of the sanding dust out of the fuselage, and a
final complete immersion in water ensured that when the masking was
removed no dust adhered to the inside of the transparencies due to
static caused by the tape removal.

The undercarriage, flaps, and propellers were then fitted with the last
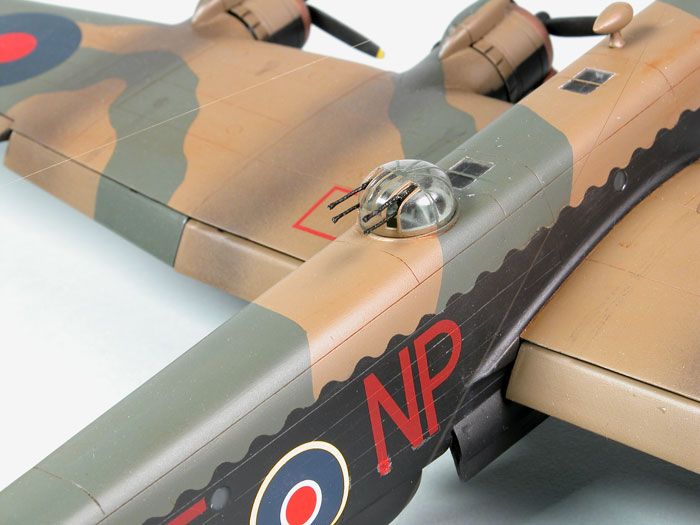
assembly being the mid-upper and tail gun turret. This was a
straightforward construction and paint.
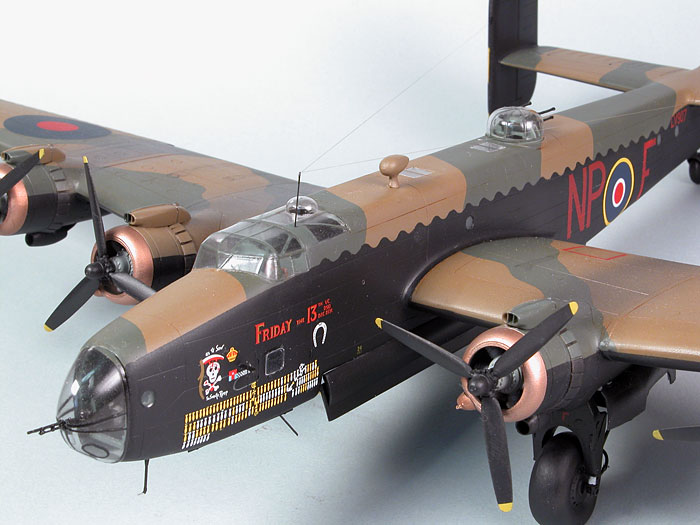
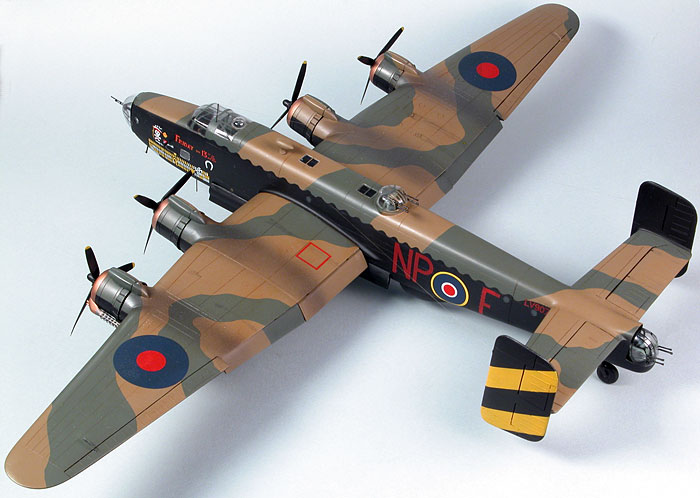
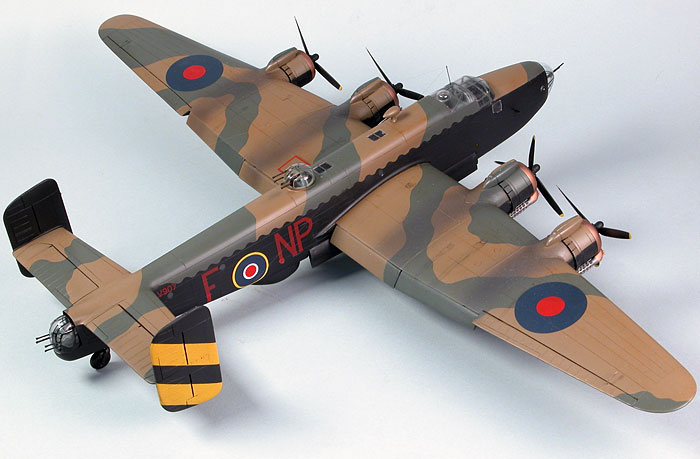
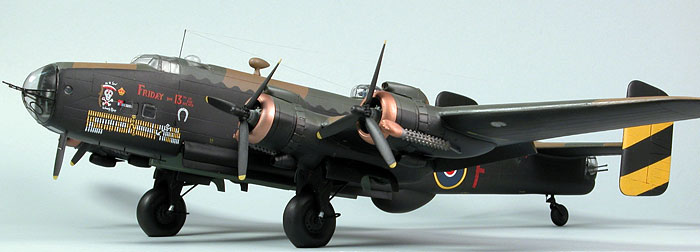
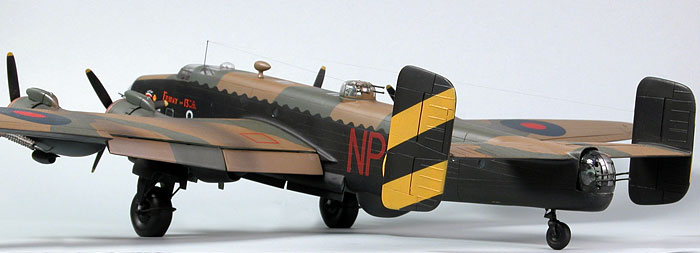
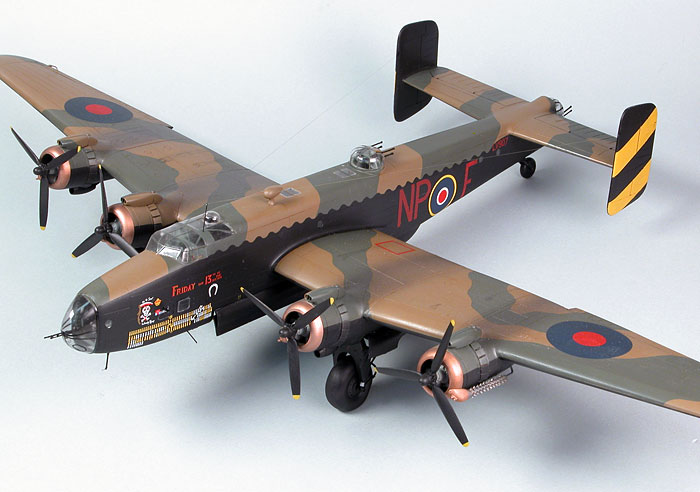
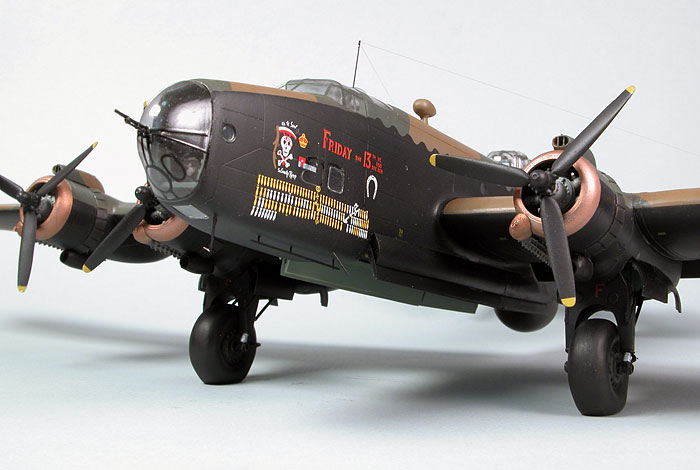
The kit was finished in Xtracolors for the standard RAF night bomber
scheme based on LV907, NP-F, a Halifax B MK III, called "Friday the
13th" which had flown with No 158 squadron RAF and had flown 128
operations while based at Lissett in 1944. The night bomber scheme of
Dark Earth and Dark Green upper surfaces and night Black under surfaces
was from the Xtra color range of paints.
The decals were very thin and snuggled down onto the paint very well
with some decal set. I had to overspray the yellow fin stripes as the
colour was very transparent. The kit was over sprayed with semi gloss
before the circular cabin windows were filled with Krystal Klear, as the
supplied transparencies were a bit average.
The end result was well worth the effort.
Highly recommended for very experienced modelers.
Thanks to Squadron for the review sample.
Click on the thumbnails
below to view larger images:
Model and Text Copyright © 2005 by
Mick Evans
Images and In-Box Text Copyright © 2005 by
Brett Green
Page Created 19 December, 2005
Last Updated
19 December, 2005
Back to
HyperScale Main Page
|
 Home
| What's New |
Features |
Gallery |
Reviews |
Reference |
Forum |
Search
Home
| What's New |
Features |
Gallery |
Reviews |
Reference |
Forum |
Search