|
Creating a 1/48 scale
Operation Telic Tank Buster
Harrier GR.7
by Jon Freeman
|
 |
|
Harrier GR.Mk.7 |

Hasegawa's 1/48 scale AV-8B Harrier II Plus is available online from Squadron
After much waiting and
anticipation by the modelling fraternity Hasegawa finally released their
first 1/48 scale rendition of the famous Harrier family, the AV-8B+ in
early 2004. Eventually judging by how Hasegawa have engineered this
first release the basic ‘vanilla’ USMC AV-8B, Italian AV-8B and the
Spanish Armada EAV-8B are to follow along with the two RAF sub-types the
GR5 and GR7.
It remains however to be seen
whether any of the twin-stick two seater Harriers will be attempted!
The Kit:
1/48 Hasegawa AV-8B+ Harrier II
The kit arrives in the now
familiar medium grey plastic parts and consists of sixty-two parts, nine
clear parts and four poly caps. The decal sheet is nicely printed and
has two USMC options, VMA-231, ‘Ace of Spades’, circa Nov 2001 &
VMA-223, ‘Bulldogs’.
The Conversion Set:
1/48 AMRAAM GR5/7 Conversion Set
The AMRAAM Line set has been
available for some time now and consists of approximately twenty-three
parts in White resin. All the detail on the castings is quite nice and
the parts have little if any moulding blocks etc.
The only difference between the
GR5 and GR7 within this set is the nose cone with all other parts being
generic for both types.
The Decal Sheet:
Model Alliance MA-48109 ‘Operation Telic Pt1’
Seeing as I was the decal
designer for the Model Alliance ‘Operation Telic Pts 1-3’ decal sheets I
shall refrain from making any comments about them as not to give an
un-biased/biased review of them…(I’ll let someone else do that!)
Let’s make it a proper
Harrier!
First things first I had to
‘de-Americanise’ the kit by consigning the seat parts X19, X20, X22,
X23, X3, M8 & N6 to the spares bank. I also removed control panel parts
F7 and X6. The rear tail cone parts and lumps and bumps (parts L1, L2,
M13, M11 & B2) were removed too.
Chaff-flare containers parts L3
& L4 and the rear ventral fin area part M3 were removed as were the
lateral strakes parts E3 and E4 and the four aerial part G2.
Gun pod parts N4, N3, N2, N5, M7
& M2 were removed too. The last parts to be omitted were the AN/AAQ-28
Litening II pod (parts M4, M5 N8 & N7).
Onto the build!
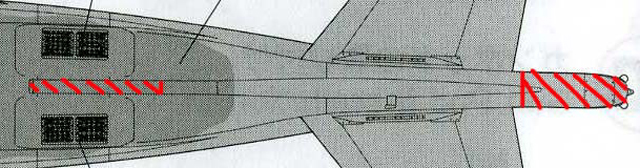
The AMRAAM set resin nose was
first grafted onto the Hasegawa forward fuselage by first making a
careful razor saw cut along the Red line and discarding the Red hatched
area (see illustrations below).
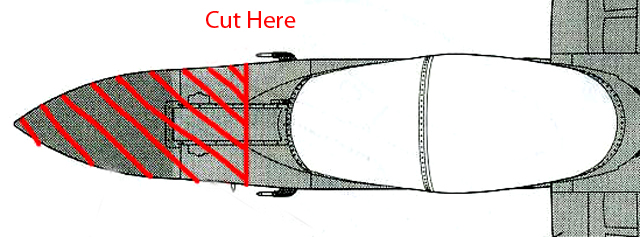
A piece of plasticard was
required as a spacer superglued onto the sawn edge because the AMRAAM
set is designed for the slightly wider nose Monogram Harrier kit and if
this area was just cemented together a noticeable step would occur. A
touch of Squadron Green Stuff was all that was needed to blend
everything in.
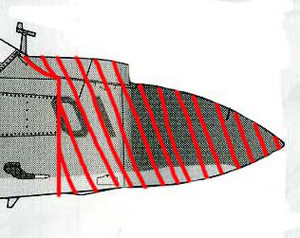
Next thing was to remove the
tail boom vertical fin intake and the necessary slots for the various
GR7 antennae by carefully razor sawing and cutting out the areas along
the panel line shown in the diagrams below:

The RAF GR7 Harriers have the
shorter length air intake at the base of the fin and therefore I
cemented the two halves together and shortened this part by 50%.
A problem occurred whilst I dry
fitted the AMRAAM resin tail boom to the kit. Due to the AMRAAM set
being designed for the earlier Revell/Monogram kit it appears that the
Revell/Monogram tail boom is slightly wider by 0.5mm than this new
Hasegawa kit. I therefore placed a plasticard spacer between the two
vertically split halves until the outer edges came into line with the
AMRAAM resin piece (see drawing)

Now that the major surgery is
finished the kit can be assembled in the normal manner by following the
kit instructions but also adding the AMRAAM resin cockpit control panel
(a little sanding was needed for it to fit flush inside the coaming) and
the AMRAAM ventral tail antennae (pushed into and superglued into their
pre-cut places earlier). Some areas of note/concern are the fit around
the rear turtle decking part B3 when they are offered up to the 100%
LERX parts J1 & J2 and the completed forward fuselage/cockpit and the
main fuselage halves with the intakes in place.
Some modellers have reported
that they didn’t have a problem in this area but I did and therefore I
can only assume that I fitted it slightly ‘out’, there again I had no
problems regarding a flush and level join fitting the one-piece upper
wing part D3 to the cemented rear fuselage halves and 100% LERX parts J1
& J2!, so it shows that we all find something different in all our
builds!
The only filler I utilised was
White Paper/Tippex/Correction Fluid on the join lines where the separate
wing tips joined and other small hairline gaps. The forward nose gear
affixed in place as per the instruction sheet makes the Harrier sit with
an over emphasised ‘nose-up’ attitude.
To alleviate this incorrect
‘sit’ I removed the location lug and but-joined the leg direct to the
underside using superglue! I added the two-piece AMRAAM in flight
refuelling probe and its housing, cemented the airbrakes shut,
superglued the AMRAAM chaff flare box in place along with the two Aden
Cannon pods, and the various intakes which arte situated on top of the
wing.
Another noticeable difference
between the AV-8B+ and the GR7 is that the AV-8B+ has three wing hard
points under each wing whereas the GR7 has four. A pair of these extra
AIM pylons are included in the AMRAAM set and were superglued in place
and had BOL Chaff/Flare rails attached which I modified from an Airfix
Tornado GR4 kit. I cemented the centreline hard point in place but I
left it empty.
Everything else is per the
instructions really although the windscreen & canopy had a raised line
running through the centre due to the moulding process and really
Hasegawa couldn’t have done the moulding any other way. This line
required sanding off by fine sanding sticks and gradually downgrading to
toothpaste for a smooth finish. The decal idea for the detonating chord
within the canopy glazing was a bit sloppy too as the clear varnish has
gone slightly opaque so maybe careful trimming as close to the cord will
bring better results?
For an ‘Operation Telic’ GR7 the
colours applied were the ‘Mod 95’ shades of BS381C:638 Dark Sea Grey
(FS36118) upper surfaces with BS381C:629 Dark Camouflage Grey (FS36237)
undersides. The roundels were BS381C:110 Roundel Blue & BS381C:538
Cherry (Roundel Red) with the Yellow coloured warning stencils being
BS381C:356 Pineapple.
The completed and masked off kit
was first given a overall couple of coats of Halfords Acrylic Grey
Plastic Primer and once dried the base Dark Camouflage Grey was applied
via my Aztek 470 Brush using Xtracolour X036 enamel paint and later on
after masking off certain areas Xtracolour X004 Dark Sea Grey was
airbrushed on following my official M.O.D GR7 Harrier General
Arrangement drawings as a guide.
The markings & stencils were
next applied utilising the Model Alliance MA-48111 ‘Operation Telic
Stencils’ and again placing them in their correct positions by following
my official M.O.D GR7 Harrier General Arrangement drawings as a guide.
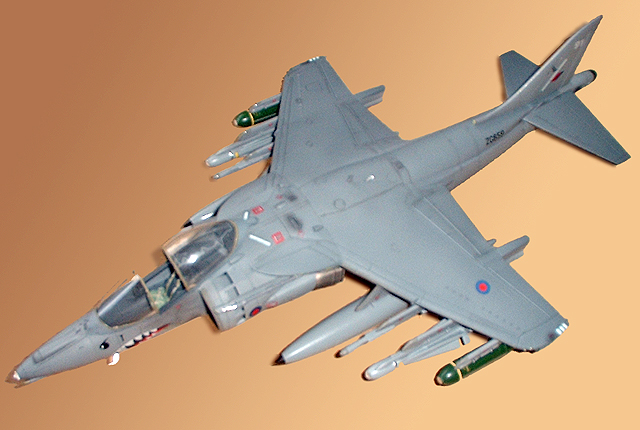
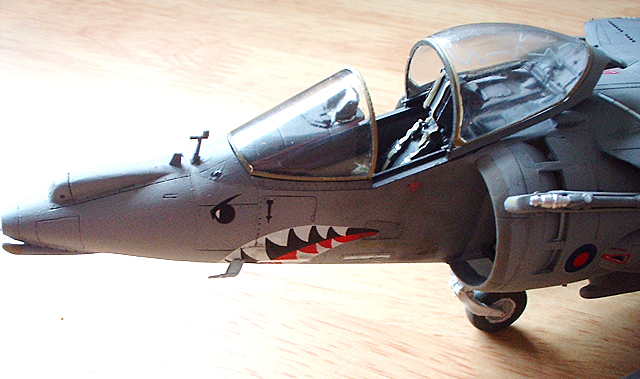
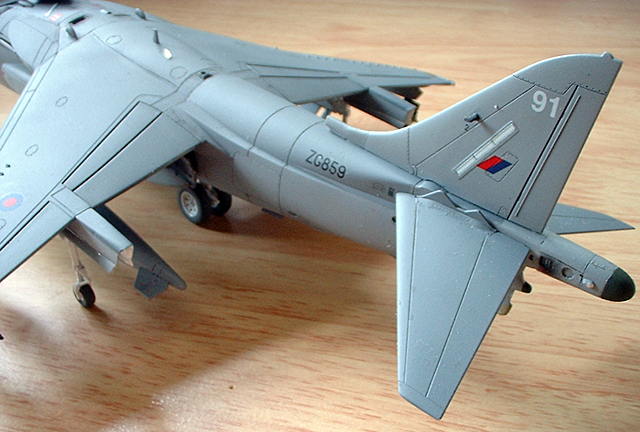
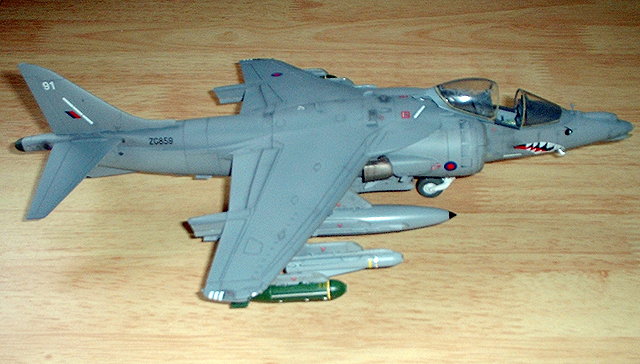
The Harrier I wanted to portray
was ZG859/91 with a great shark mouth and a single LGB silhouette
mission marking. SAC James Douthwaite applied this shark mouth design to
this Harrier and ZD408/37 at Ahmed al Jaber Air Base, Kuwait.
The decals went on with no
problems onto the already Glossy Xtracolour paints albeit the Dark Sea
Grey shade of the stencils printed by our printers is too dark and will
have to be over sprayed with the base underside colour Dark Camouflage
Grey to lighten them up and tone them down.
The only other problem as such
is that the sharkmouth was originally designed to fit the Monogram kit
nose and therefore is a tad too big for the Hasegawa nose so unless
you’re really looking at it against the real photo it isn’t really
apparent.
The panel lines had a wash of
Dark Grey ran into them and once dry two good coats of Humbrol Satin
Varnish sealed everything in nicely.
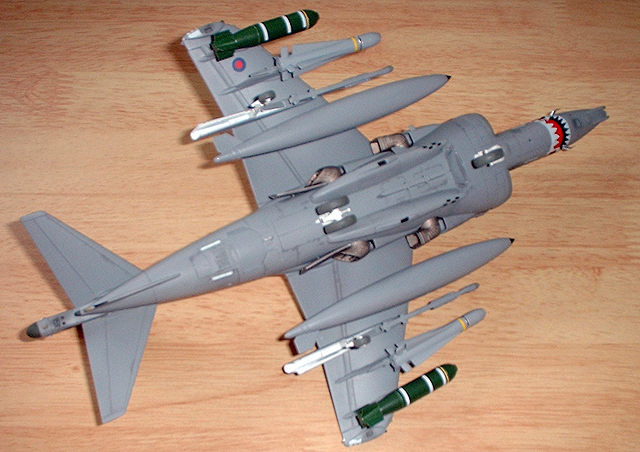
I decided to load the Harrier in
the Combat Air Support (CAS) role as per the photo at the bottom of page
33 in the On Target Special No.1 ‘Operation Telic’, RAF Jets in
Operation Iraqi Freedom book. It carries two (controversial) RBL 775
cluster bombs on each of the outer hardpoints with a pair of AGM-65
Mavericks on the next pylons on followed by two fuel tanks that come
standard in the kit on the innermost hardpoints.
Both the Mavericks came from an
old Monogram A-10 Thunderbolt II kit and the two cluster bombs came from
an old Italeri F-16A kit.
The last thing I did was to
apply Black pastels to areas around the cockpit footholds and exhaust
areas and show general wear and tear.
All in all is the Hasegawa
AV-8B+ kit worth buying? Yes! I’ve got another AV-8B+ and AMRAAM set to
have another crack at if I feel so inclined but due to work commitments
it may be a few years off yet!
Is the AMRAAM set worth buying?
Well yes for either the Hasegawa kit or more importantly the Monogram
AV-8B kit for which it was designed. By the way to do a 65% LERX GR7
Harrier the Monogram kit is best employed. For a 100% LERX fitted
machine either follow my line or wait until Hasegawa release the GR5/7
line of Harrier kits.
The Hasegawa 1:48 AV-8B+ Harrier
II Kit can be recommended apart from certain fit issues.
References
and Acknowledgements
|
-
On Target Special No.1 ‘Operation Telic’, RAF Jets in Operation
Iraqi Freedom, Andy Evans & Jon Freeman, The Aviation Workshop
Publications Ltd, 2003.
-
Harrier Inside & Out, Mark Attrill, Crowood Books, 2001
-
Harrier The Vertical Reality, Roy Braybrook, RAF Benevolent Fund
Enterprises, 1996
-
Various articles in publications from around the world.
Many thanks to:
Model, Images and Text Copyright ©
2004 by Jon Freeman
Page Created 17 May, 2004
Last Updated 17 May, 2004
Back to HyperScale
Main Page
|
 Home
| What's New |
Features |
Gallery |
Reviews |
Reference |
Forum |
Search
Home
| What's New |
Features |
Gallery |
Reviews |
Reference |
Forum |
Search