|
Hasegawa's 1/48 scale
Harrier GR.7
by
Piero De
Santis
|
 |
|
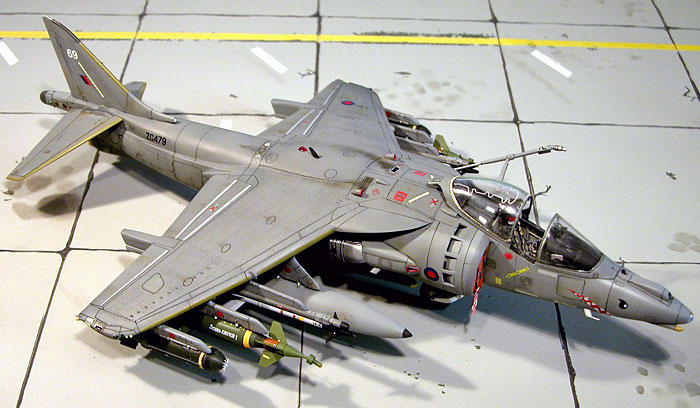
Harrier GR.7 |

Hasegawa's 1/48 scale Harrier
GR.7 is available online from Squadron.com
This time I decided to go with a
RAF Harrier GR.7 deployed in Kuwait , Ahmed al Jaber Air Base during
spring 2003 for “Operation Telic”, AKA “Iraq Freedom”: the British
forces were involved together with the USA and the Canadians.
The 30 RAF Harriers were pooled
from all the Harrier squadrons (1, 3, 4 and 20) under the IV(AC)
squadron.
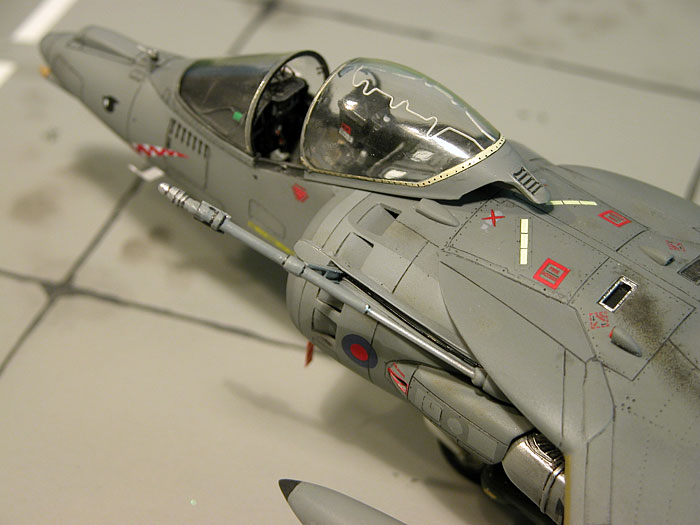
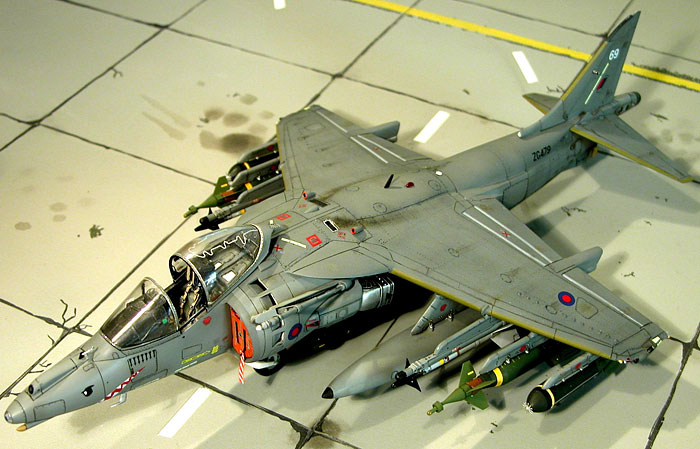
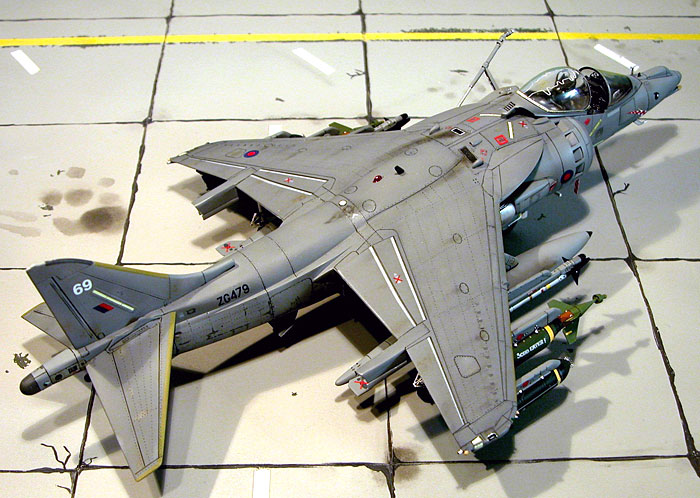
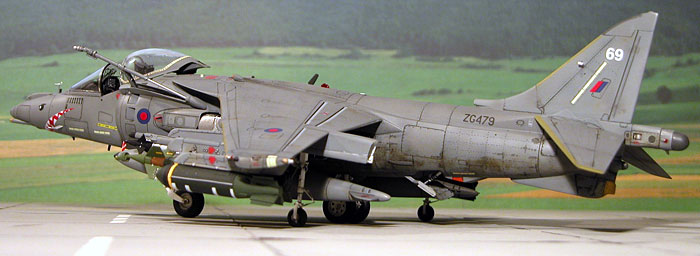
I chose ZG479/69 because I like
its shark mouth design and also because is a 100&LERX and TIALD capable.
Almost all the RAF Harrier
involved spotted black bomb silhouettes, including LGBs, Mavericks, CBUs
and iron bombs. The ZG479/69 spotted also a small black “Mig-29” marking
just under the port side of the cockpit: the reason is still unknown.
The RAF Harriers were tasked for
CAS (Close Air Support) and TST (Time-Sensitively-Target) missions.
The “Operation Telic” saw also
the very first time operational using of the Maverick missile from the
RAF airplanes: one of the targets was the mobile SCUD launchers.
Hasegawa's
Harriers in 1/48 scale
|
Last year there was a big news
from “Hasegawa”… a completely new line of Harrier II family kit in 1/48th
scale: after the initial excitement some “issue” came up with the kit,
as I try to explain following during the construction phases.
Aftermarket resin sets from
“Aires” were put on the market: a couple of very nice cockpit sets
(AV-8B+ and AV-8B) and a whell bay set too.
For undercarriage there is a
resin set from “Airwaves”.
“Eduard” put a double-sheet of
photo etched parts for the AV-8B+.
“Model Alliance” made some decal
sheets for the RAF Harrier, in particular 3 sheets dedicated to the
“Operation Telic” RAF airplanes. Some issue with those sheets will be
explained in the decal phase ahead.
Another Harrier in my
collection!
The
1/48 scale “Hasegawa” Harrier GR.7 kit has many parts in common with the
AV-8B+ kit, so many little details needs to be removed or added, as
listed below starting from the nose to the tail:
-
On
the starboard side, just ahead of the slime-light bars, there is a
hole that must be filled.
-
When attaching the nose cone to the cockpit section, do not leave
the joint line visible. There is no panel line on the real aircraft
on that place. I saw many Harrier models spotting evidently this
line.
-
Over the wing, on the rear there is a small square antenna. Remove
it and create a circular new one, It’s a GPS antenna.
-
Some size issue on the wing tip ECM/RWR bulges, check your
references.
-
On
the port side of the fuselage, just after the rear nozzle area,
there is a hole that must be filled.
-
On
each side of the fuselage, just after the rear nozzle area, a
strengthened plate must be added.
-
The
vertical tail duct is too thin e triangle shaped. I think the entire
vertical fin is too thin…
-
On
the botton tail fin, the under RWR squared bulge is too big, must be
reduced.
Now some information related to
the assembly sequences on “Hasegawa” instruction sheet:
Step 1:
Cockpit parts are not well detailed, better use an “Aires” cockpit resin
set… fit perfectly. You cannot use the resin seat, because is only for
no-RAF versions. I used a Martin Baker Mk.12 resin seat from “Amraam
Line”.
Step 2:
I throw away the “nozzles joints”. I attached first the two fuselage
parts and after the belly part.
Step 4-5:
I do not follow the sequence on the sheet… first I correct the “kinks”
on the upper wing past. This can be done quick and easy, just scribing a
deep straight line inside the upper wing part starting from the fence
placed on the middle of the wing chord and going to the external side of
the outrigger wheel bay. Than flex gently the external wing section
down. You need some good picture to find the correct angle… but I can
say that a little is enough. Many take a look only to the front of the
wing, but if you find good pictures taken from the back of the wing
you’ll see how much the “Hasegawa” wing is wrong. This job has to be
done for both the upper wing of course. Some super-glue will fix the
wing in the new shape.
Now take the under wing parts,
and do the same as for the upper wing part: to find the correct angle,
try dry fitting with the upper part.
With the wing parts now fixed,
glued only the under wing parts to the fuselage. Than when glue if
dried, attach the upper wing part. And the LERX? Yes, now build the LERX
and the fit it to the wing and the fuselage. In this way you can adjust
the fitting to the wing and to the fuselage. Remember, do not attach the
part B3 to the LERX… wait.
Now build the front nose
section, attaching the B3 piece only on the upper fan duct. Place the
fan vent inside the fuselage. Now attach the front section to the
fuselage.
I hope this work for your kit…
it work for mine.
I replaced the
In-flight-Refuelling-Probe kit part with the resin pieces from “Amraam
Line”… it can be placed open and for me has a better shape.
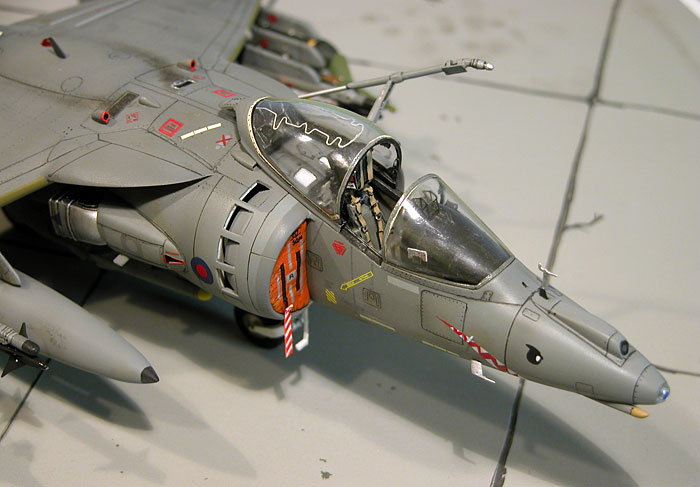
For all the Harriers, when the
canopy is open (as on my model) the inboard ladder is "down": I scratch
build it and placed under the right main air intake.
As I said before, ZG479/69 is
fitted with the 100% LERX… a copy of the Plus kit part replacing the 65%
LERX version provided in the kit.
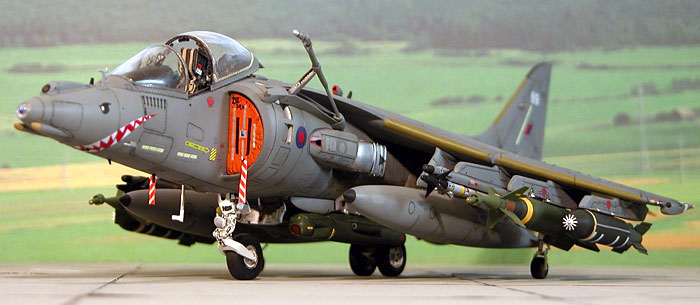
Painting
It is unbelievable how many
painting instruction sheets from “Hasegawa” are incorrect… the GR.7 kit
has one of these.
The correct two grey colours
are:
For the first time I decided to
use acrylic paints, so I got some of new “Xtracrylix” paints.
I’m very happy with this colour.
I used also other acrylic colours from “Gunze”. I add demineralised
water to thin the colour with a 50-50 ratio.
Some details were brush painted
using “Humbrol” enamels.
Pre-shading and post-shading
with black ink as usual for my models.
The GR.7s used is operational
environment are well weathered, specially under and rear the fuselage.
Decals
Decal kit are too thick and
colour of stencils is wrong, because it’s too light and match the Dark
Camouflage Grey.
I got the decal sheets for
“Operation Telic” by “Model Alliance”, very thin but they also have a
problem with the colour of the stencils: too dark.
I sprayed a cote of "Future" to
prepare the model for decaling: I tried the clear gloss from
“Xtracrylix” but I don’t like the result.
I placed the stencils first,
than I over sprayed them with a well thinned layer of Dark Camouflage
Grey to toned down the dark colour. I like the result. Than I put on the
shark mouth, the roundels and so on.
Those decal are very thin with
no silvering at all. Some has a little bit of off-registered white, be
careful.
"Microscale" Set/Sol were used
to apply decals.
Note: for war operation RAF
Harrier GR.7 do not carry squadron markings. On the real aircrafts,
squadron marking are made with decal as for our kits!
So they pilled off using hot
water and after this work it’s often visible a “shadow” of the markings
in place. I did the same on my model on the front nozzle fairings.
The model was finished with a
coat of "Future" and then flat clear from
“Gunze”.
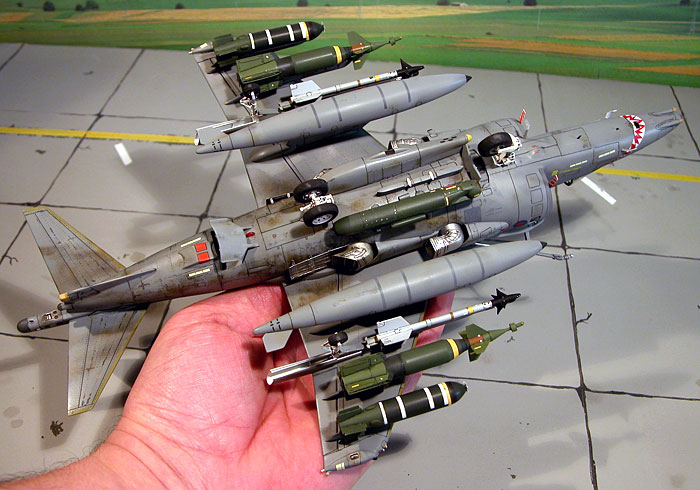
I chose to load my GR.7 with a
TIALD pod under the belly: the dedicated pylon is from the resin piece
by “Amraam Line”, as for the TIALD pod itself.
Decals were from spare.
The cluster bombs are from
Airfix, detailed with photo etched parts: to convert the standard BL755
in a RBL755, as it is on the real one, I added 4 radar sensors on 4 each
cluster.
BOL launcher and AIM-9M missiles
are from the kit, and the AIM-9M were finished with Twobobs stencils
for air-to-air missiles… very nice!.
The laser guided bombs,
CPU-123/b were resin pieces from “Amraam Line”. I added the “Scud Eater”
graffiti decal from “Gekko Graphics” to one of this.
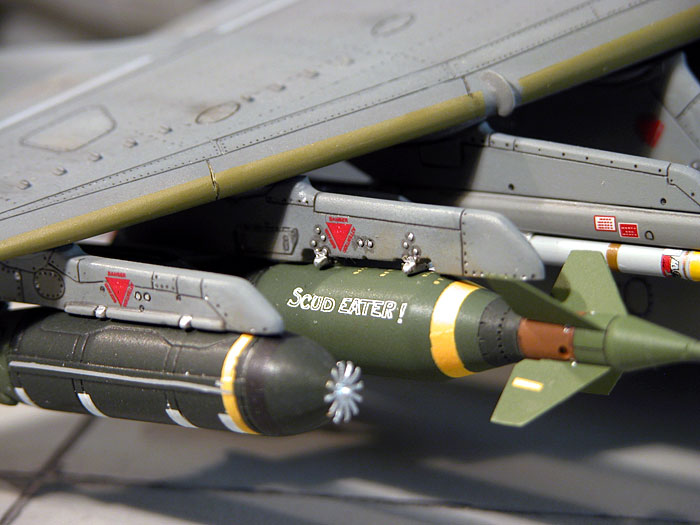
Weapons were painted using some
colours from “Gunze” range.
A couple of scratch build "FOD
guards" are placed inside the intakes, painted in high-viz orange with
silver&black decal stripes added. Remove before flight red&white tags
came from "Flightpath".
On the right side of the
instrument panel cover I added a claw with a “mission map” from “Verlinden”.
Undercarriage legs where resin
pieces from “Airwaves”… nice but I hope they will sustain the weight of
the model in the next years with all that resin on board!
Note: I tried to fit the Aires
wheel bays resin parts… but I cannot be able for the front bay… maybe
it’s my limit.
Books that can be recommended
for references are: "Aeroguide" N°26, "World Air Power Journal"
N°32,"Harrier - the Vertical Reality", "The Harrier Story", "Harrier-
Crowood series", "Lotniczych n.20 Harrier", “Harrier Inside and Out” by
Mark Attrill, “Modelling the Harrier I and II” by Osprey, many aviation
magazines issues from "Air Force Monthly" and "Aircraft Illustrated".
Three specifics books for
“Operation Telic/Gulf War II” aircrafts are:
-
“On
Target Special N.1 – Operation Telic” by Andy Evans and Jon Freeman.
-
“Gulf War II” by Jamie Hunter.
-
“Air War Iraq” by Tim Ripley.
Specific information, support
and references on the "Harrier Special Interest Group" website
http://harrier.hyperlinx.cz/.
Special thanks go to “Alfie”
Bass for his precious information and material.
CIAO!
Piero
Click the thumbnails below
to view larger images:
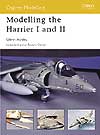
Modelling the Harrier I
and II
Osprey Modelling 1 |
|
|
|
|
Author: Glenn Ashley
US Price: $17.95
UK Price: £12.99
Publisher:
Osprey Publishing
Publish Date: September 25, 2003
Details: 80 pages; ISBN: 184176647X
|
|
|
Model and Images Copyright 2005 by
Piero De Santis
Page Created 24 February, 2005
Last Updated 25 February, 2005
Back to
HyperScale Main Page
|
 Home
| What's New |
Features |
Gallery |
Reviews |
Reference |
Forum |
Search
Home
| What's New |
Features |
Gallery |
Reviews |
Reference |
Forum |
Search