|
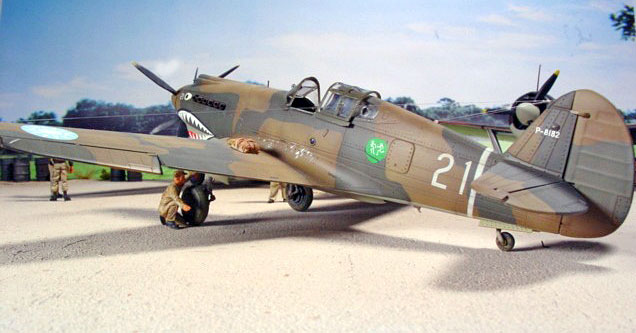
Trumpeter's 1/48 scale
Curtiss Hawk 81
(P-40B)
by
Floyd S. Werner Jr.
|
 |
|
Curtiss Hawk 81 |

Trumpeter's 1/48 scale P-40B is available online from
Squadron.com
Do you remember growing up and seeing John Wayne in “The Flying Tigers”?
I do.
I remember a cheesy movie with airplanes with shark mouths. Ever since
then I remember the P-40 as being THE airplane of World War II. I know
you were thinking 109s, but even that great airplane is pale in the eyes
of an eight year old. When you’re young, shark teeth are cool. Come to
think of it shark teeth are cool. It was cool enough to put on my Cobra
in Desert Storm. The P-40B, in particular the Flying Tigers, was one of
the things of my youth. I’ve always wanted to build one that looked like
what my mind’s eye saw. Feeling that my skills had advanced enough to
tackle the job I just needed a good kit.
I’ve been waiting for years for a modern tooled accurate P-40B/C. For
years the Monogram kit was the only thing available, but I didn’t like
the raised panel lines or the basic nature of the kit. I did go as far
as to partially scribe a Monogram kit. There was a glimmer of hope when
Hobbycraft released their P-40, I liked the inaccurate recessed panel
lines but the shallow lower wing bulge and the wrong wing angle of
incidence made it a disappointment for me. In my opinion, the Monogram
kit was still the kit to have.
When Trumpeter announced that they
would be releasing a new tooled P-40B I was ecstatic. I even stated that
I would drop whatever I was in the middle of and start this kit. Heck I
was so sure that it would be nice that I ordered two to build. Soon
after that the Internet chatter started. There were complaints that it
has rivets all over the place, the radio access panel and panel under
the tail are raised, the prop is in a course pitch, the cockpit is too
shallow, the horizontal tail is too small, the fabric surfaces were
overdone, the kit was a step backwards and may not even be buildable let
alone presentable. Well I’m not one to shy away from controversy, so
when my kits arrived at the Region II Convention, I just happen to be
finished with a kit. I promptly looked the kit over and fell in love.
True the cockpit is way too shallow and the seat is funny looking, but
armed with the Cutting Edge cockpit (designed for the Hobbycraft kit) I
was ready to go hunting sharks.
I don’t like to start a project without knowing what the end result is
supposed to be. So the first step was deciding which markings I wanted.
This proved to be difficult as there are a lot of neat P-40Bs. Initially
I was going to do an AVG and a desert air force bird, but the more
research I did the more I thought I would do two AVG birds. I always
wanted one with a Flying Tiger emblem and it had to have the Hell’s
Angel emblem. I settled on Chuck Older’s 68. I know, I know….Every
modeler that ever modeled the P-40B built this aircraft, but I didn’t
have one in my collection. The other bird would be from another
squadron, but which one. My friend, Rafe Morrissey has always liked
Pappy Boyington and as I’m a big fan of Rafe’s work and Pappy Boyington
(Remember “Baa Baa Black sheep”?). I thought Pappy’s bird would be a
neat addition as we plan on a group build with Pappy’s Corsairs. Besides
I hadn’t seen Pappy’s P-40 done. So armed with photos, decals and kits
it was off to the work bench.
The cover art for the Trumpeter kit is
a pretty rendition of a Desert Air Force Tomahawk with an almost
invisible pilot. Upon opening the kit, you have two large light grey
plastic sprues that have a noticeable mold release agent on them making
them feel greasy. A small fret of photo etch is included with a gun
sight, oil cooler and some rectangular pieces. A sprue of clear plastic,
which is noticeably thin, is also included. The decal sheet has markings
for two aircraft, the desert air force and a boring US Army Olive Drab
over Neutral Grey prewar paint scheme. The decals are nice but there was
nothing on it that I was going to use. The instructions were printed on
eight big and very useful pages. Heck the pictures are almost 1:1 scale.
First step: WASH THE MODEL IN WARM SOAPY WATER! There is a noticeable
film of mold release that you will definitely want to get rid of.
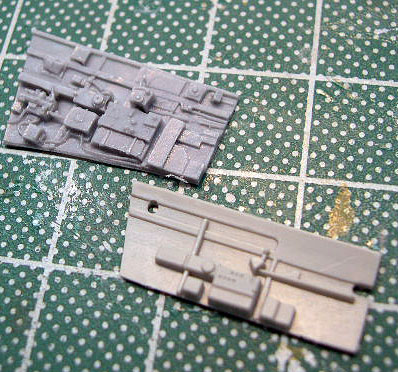
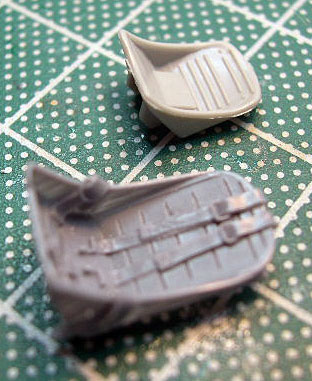
The Cutting Edge Cockpit- CEC48067
Construction starts in the cockpit,
especially since I was going to have to modify the Cutting Edge set for
the new kit. The Cutting Edge set is a gem with great detail everywhere.
The difference in the kit cockpit size and the Cutting Edge set is
readily apparent, especially in the seat.
I thought the whole process was going to be painful, but thankfully it
was relatively easy. The side walls, front panel, floor and seat require
no modification. Only the rear and front bulkheads require modification.
The back of the cockpit area is unique on the Trumpeter kit in that it
includes the area behind the glass. What I ended up doing was cutting
the top of the kit aft bulkhead off and mating this with the Cutting
Edge lower part. This was easy but if I had to do it again I might leave
the kit part or modify it slightly at the bottom to fit the Cutting Edge
set. Any of the three ways will produce a good result. The fit of the
aftermarket set was fabulous. The front bulkhead had to be sanded
slightly to fit but not a lot. Don’t forget to offset the stick for the
dropped elevators and ailerons. One thing that will become apparent is
that the upper guns will interfere with the cockpit set so you have to
decide whether you want to keep them, modify them or replace them. I
eventually replaced them with tubing as they are not visible.
|
 |
Click on the thumbnails
below
to view larger images:
|
With the cockpit built up I painted the interior Gunze Sanyo Interior
Green and Model Master Interior black. My research showed that the
cockpit areas were painted an interior green and other areas not in the
cockpit were Yellow Zinc Chromate. The cockpit was washed with Burnt
umber artist oils and dry brushed with Tamiya Yellow Green XF-4. Some
silver pencil and some acrylic colors and the cockpit was ready to go
into the fuselage. The whole process with both cockpits took less than
two hours. The cockpit was superglued in place and it was time to bring
the fuselage halves together.
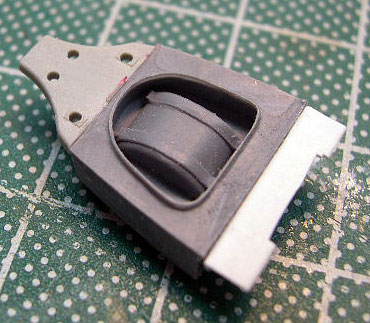
The Fuselage
Before joining the halves paint the
interior of the tail wheel area with Tamiya Yellow Green. Fuselage fit
was exceptional. I always fill all of my seams whether they need it or
not with superglue and accelerator and this time was no different. It is
important that you do not cement the back decking to the top of the
fuselage. This area is fine with the little gap that exists. It is
suppose to be there.
Don’t forget to add the tail wheel strut which I painted Floquil Old
Silver. I left the tire off until later. If you follow the instructions
you can assemble the exhausts. I praise Trumpeter here. The exhausts are
split in half and when put together there is a seam as there should be
but more importantly the opening is open. Very nice touch. I painted my
exhausts with Model Master Burnt Metal and highlighted with pastels to
get the discoloration I was after. I added my exhausts after the camo
painting.
Now you have to add the front two parts of the fuselage. Another very
nice touch as the panels are cut on the panel line. It is just a matter
of gluing in place. If you elect to keep the guns you have to put them
in at this time. To save time you only have to clean up the tips of the
guns as this is all that would be seen.
Wings and Tail Assembly
The tail unit is really neat in that
the horizontal stabilizer is a two piece affair as is the elevator. This
is nice because Trumpeter has molded in the ability to lower the
elevator. I recommend that you leave the elevator off at this time to
facilitate attaching the horizontal stabilizer. My right one required a
bead of Mr Surfacer 1000 to fill a small gap. With both sides built, I
moved onto the wings.
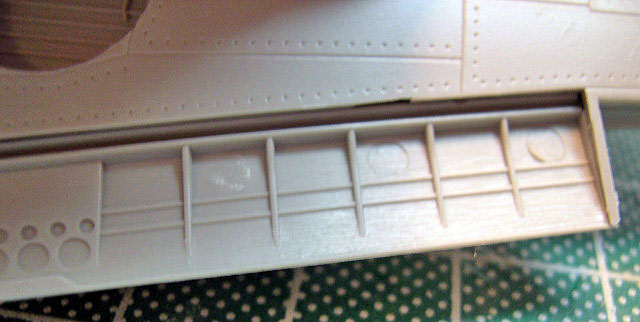
The first problem I encountered was some mold release marks in the flap
area of the wing and the flaps themselves. They were easily filled with
putty and sanded smooth.
Once that was done the wings were
started. You start with the wheel well area. This is a nice affair with
the wheel well built up from four parts. As you are gluing make sure the
side that faces the outside is aligned with the opening as it is
possible to have the parts off center and this will create a problem. A
quick coat of Tamiya Yellow Green and a quick wash and it was off to the
guns. The wing guns have to be installed now as there is no way to
attach them later. Thinking back on it, I might have sliced the barrels
off of the breaches. Then attach the breaches in the wings. Adding the
gun barrels later, after cleanup and painting. This way you do not have
to worry about the gun barrels. As it was I did not have a problem with
the gun barrels and fortunately they did not break or bend. The wings
are glued up and again no fit problems anywhere.
Once this is done, you have to add the first pieces of photo etch. The
two rectangular pieces fit over a piece that forms a part of the flaps
and this is attached to the lower wing. I did notice that the detail on
the lowered flap was a little light and inconsistent. I sanded the
molded detail off, except for the fore-aft bumps, and added lengths of
stretched sprue to replace the detail I sanded off. The fix looked
better than new. A coat of Tamiya Yellow Green in the flap area added
some nice color. I thought I would like to do a flap up to see if it
could be done. All you have to do is bend the little mounting tab and
glue the flap in place.
It is now time to join everything together. The wing to fuselage fit was
nearly perfect. A small bead of Mr Surfacer and the wings to fuselage
was done. Adding the oil cooler intake is next but before you do that a
HINT: Add a blanking plate to the back of the oil cooler panel to
prevent see through. It is easier to do it now as opposed to when I did
it after the kit was together and I discovered the see through. So the
construction should go photo-etch oil cooler and blanking plate behind
it. The coolers were painted Model Master Magnesium and the blanking
plate flat black. The oil cooler exhaust flap are molded closed and is
added next. I would have preferred these flaps to be opened but that
would have required some kind of detail in the engine area. It doesn’t
look bad but it could have been even nicer. Aftermarket guys are you
listening?
The ailerons are like the elevators in that they are two pieces each.
The mounting tabs would have you attached with both ailerons down. This
is incorrect. You must either align them with the wings or do like I did
and slightly bend the one set of mounting lugs. It sounds bad but it
really was a non-issue.
Flying Tiger P-40s were originally ordered by the British so the offset
pitot tube was different than the one provided in the kit. Funny but the
desert air force should have had this tube as well. I thought of raiding
my old Monogram kit but that pitot tube is very big and out of round.
Building the British one was a simple scratch building exercise of two
pieces of tubing and a .010x .030 styrene strip. Add super glue and
attach to the wing. You will have to fill a little bit because the
original hole in the wing is oval shaped and the tubing is round,
hopefully.
The wings are finished off with the bulges added to the leading edge of
the wing. Fit here was good with just a hint of putty. I think this had
more to do with my technique than the fit of the part.
Other stuff
The wheels, landing gear can be built
up any time. The wheels have been criticized for being too complicated,
but when built up they look great. Each wheel is a five piece affair.
Pay attention to the sequence and you won’t have a problem. Remember the
back part of the tire has three pieces and the front two. I added some
brake lines to the gear from wire.
The much maligned propeller was a simple to clean up and the mounting of
it was very easy and quite convincing, much better than the Monogram or
Hobbycraft. Yes I thought of putting those props on, but the course
pitch is not a big issue on the finished kit.
Build up the five piece rudder and attach to the model. I could not
think of a way to offset the rudder because of the limitations of the
cockpit set and the control horn at the top of the rudder. My rudder is
inline with the fuselage and it looks great.
Another bath and it was time to paint.
The models were primed with a spray
can of Tamiya white primer (Fine). Once everything was cleaned up which
delightfully wasn’t much. I did have to put some rivets back on. This
was easily done with a #80 drill bit which was just twisted once or
twice. They looked just like the kit provided rivets.
It was time to preshade the model. I used Model Master RLM 66 because I
needed to paint something German on another model. I then had the
hardest decision to make. What was the underside color? There is
compelling data that states the bottom color should be a sky color and
still others that contested it should be a light grey. I finally decided
not to decide. I used a color that was unique in its properties and went
with it. I did not look back and I’m very happy with the results: Tamiya
Deck Tan (XF-55). This color is not quite sky but is a very warm color.
When it was dried I oversprayed the bottom with a very thinned coat of
Model Master Light Grey. I liked the results. It depends on the lighting
as to which color is predominant. Once that was done it was time to mask
it off and paint the upper surfaces. Just like the bottom there is a lot
of discussion on the top colors, what were the Dupont equivalent colors
to the RAF stock? Again I made a decision and selected Model Master
Enamel Dark Earth (ANA 617) (Stock # 2054). It looked great but it
needed something else. I added a lot of yellow and white to tone it down
and give it a weathered look. Once I was satisfied with what I had it
was time to mask it.
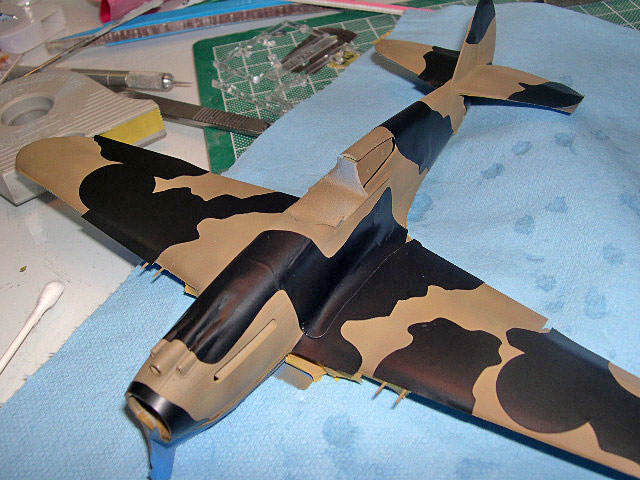
Cutting Edge Black Magic P-40 Camouflage Masks CEBM48556
These masks are very easy to use but
make sure you follow the instructions and remove a large amount to the
stickiness by using your hands. Put them in your hand and peal them off
a few times. Every piece has a special alignment point, it may be the
wing root or the trailing edge of the elevator. If you are careful they
fit perfectly. If not the remaining sheet can work as a mask cutter for
the opposite color.
For touch ups I use Tamiya Tape and cut it out. Place it over the darker
color and touch up.
These masks are great. The one thing that painting a camouflage scheme,
especially one as intricate as the British P-40 pattern, is the time it
takes to get everything cut and then there comes the inevitable touch
up. That whole process could take hours but the Black Magic makes it
easy, quick and, more importantly, accurate. Once the masks are in
place, I painted the Dupont Dark Green with Gunze Sangyo Aqueous (H73)
Dark Green. This was lightened up with white and resprayed. I did this a
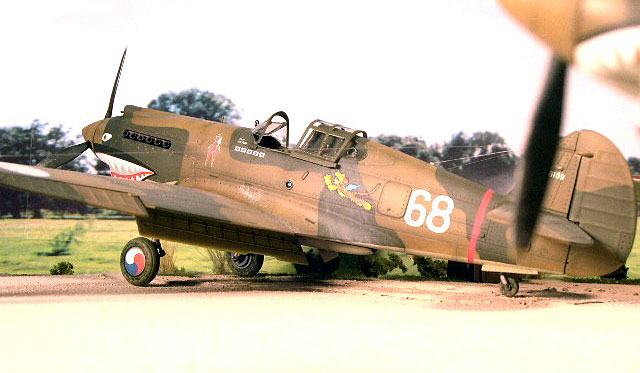
few times to get the wear and the splotchy colors I was after. “68” had
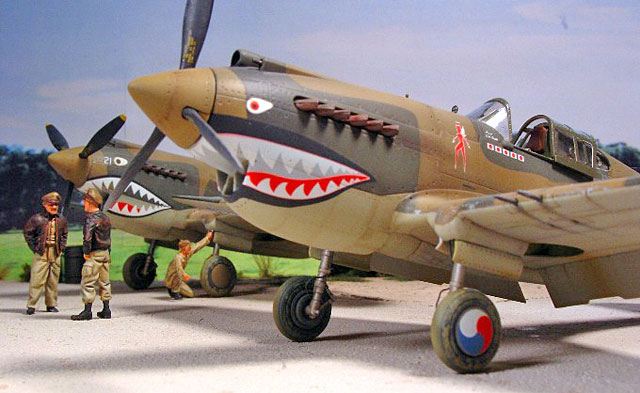
a darker area on the nose so a few drops of black and I touched up this
area. Boyington’s “21” had a repainted area under the cockpit and on the
tail that I painted with straight color after applying additional masks
to replicate the pattern. These are not included as they are
non-standard, but are easily fabricated with the extra Black Magic.
Once everything was in order it was time to remove the masks. Of course
there were some touch up required but again the whole process was
expedited with the masks. The tail bands were masked with Tamiya tape
and sprayed the correct colors. A coat from a can of Tamiya Clear and
the models were ready for the decals.
Decals
About this time I noticed that the two
aircraft I wanted to model were on the rear cover of the Eagle Editions
book on the AVG so I had large drawings to work with. The actual
aircraft numbers and shark mouths were from two different sheets. “68”
came from the Aeromaster sheet (SP 48-07) on the AVG that I bought years
ago. “21” was from the 1st Pursuit Squadron sheet (EC#30) from Eagle
Editions. At this stage in modeling most decals react well with setting
solutions and all the decals that I used were no exception. I used the
Chinese Nationalist emblem on the top of the wings from the Cutting Edge
P-40 sheet (CED48117) which looked like they had the correct amount of
fading that I was after and the lower emblems were from the EagleCal
sheet. The Aeromaster sheet has very large national emblems, check your
aircraft.
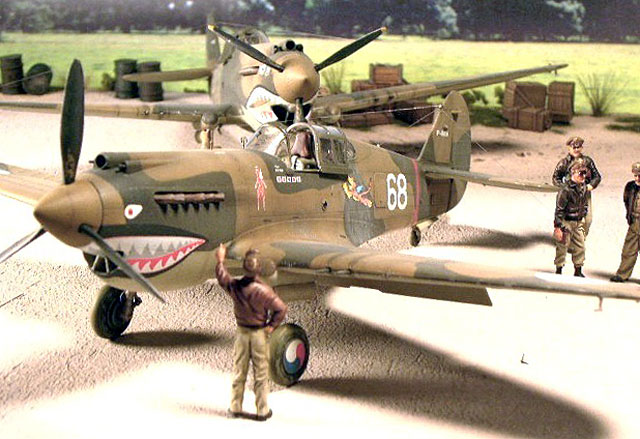
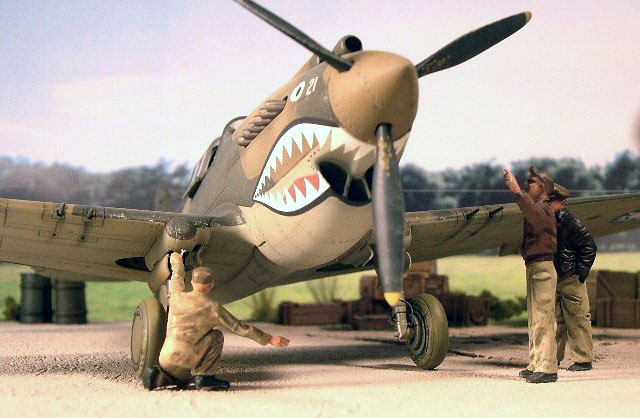
“68”-Strangely this aircraft, which may be the most photographed AVG
P-40, is only available on the Aeromaster sheet as far as I know. I used
the shark mouth from the sheet because it had a slightly different mouth
interior. It fit well but was a little small. It worked but I had to cut
the decal to form it around the oil cooler intake. It isn’t perfect as
far as teeth lining up but it is very convincing and I’m happy with the
results. This sheet was designed for the Monogram kit so that may
explain the smaller size. If you were to ask me can you use this sheet,
I would say you bet but be careful. If the shark mouth didn’t have a
colored interior then I don’t see any problems. Prior to applying the
actual flying tiger decal I brush painted some Tamiya Smoke where the
decal would go. Because it is a gloss color it isn’t a problem. Remember
the flying tigers were actually lacquered onto the airframe and when
they tore off they were replaced with a brand new one. I did not like
the flying tiger from the Aeromaster sheet as I thought it was too
yellow and ended up using the emblem from the Cutting Edge sheet which
is more orange. The serial number is from the EagleCal sheet. I cobbled
it together from various aircraft. The Aeromaster numbers were too big
and too bold, not to mention the wrong font.
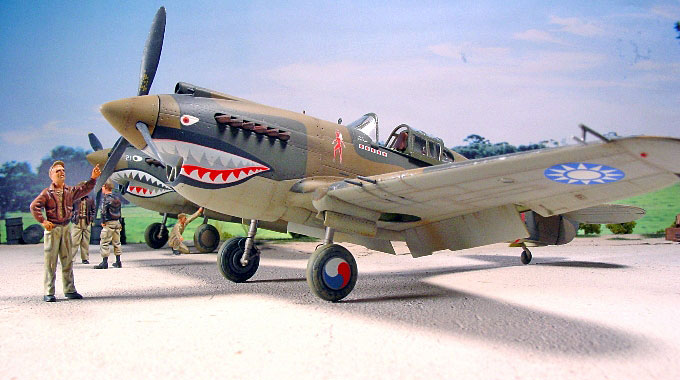
“21”-Boyington’s airplane is available on the EagleCal sheet. The shark
mouth is open so I did not have the problem I did with the Aeromaster
teeth. The color of the 21 is open to speculation, it may have been
gray, or faded white. EagleCal gives you both. I chose the grey and I
liked the results a lot. For some reason EagleCal has the wrong tail
number on the decal sheet. In Tom Tullis’ book the serial number is
clearly seen and reproduced. Judy Crandall stated that it was just
overlooked and will be corrected if they reproduce the sheets. As it
stands you can make the correct number from the aircraft on the sheet.
Needless to say the shark mouths either made or broke these kits. I
think they made the models. A coat of Tamiya clear and a subsequent coat
of Model Master Flat Clear and the aircraft was ready for weathering.
Weathering
The initial step was a heavily thinned
and light coat of Tamiya Buff over the entire model but only straight
down so that the spine and the wing tips received the lightening
treatment, artificial sunlight bleaching. Next came chipping the paint
with a silver pencil and a worn out brush with Model Master Aluminum. I
thought I had over done it, but that proved to be wrong after the flat
coats. Following the chipping, a wash of Burnt Umber artist oils was
applied to the panel lines and yes even the rivets. Guess what? The
rivets really added to the look of the model. If they weren’t there the
model would still look nice but I did like the rivets. I wouldn’t go out
of my way to put them all over a model but if they were there no big
deal.
Flying Tigers operated out of muddy strips so I dabbed a little Floquil
mud on the sidewalls and then airbrushed mud stains on the wheels and
airframe. Next I used pastels on the exhausts and gun tubes. Everything
was sealed with another coat of flat clear. The final bit of weathering
was the fuel spill on the side of 68. It is quite noticeable on the
photos. I scraped some white and light grey pastels into a cup and mixed
in some water. Using a broad brush I “flowed” the streaks down the side.
I was very happy with the results. This wasn’t sealed for fear of
loosing the effect.
Finishing the little things
Masking the canopy is no big problem,
except the clear parts are thin and VERY fragile. You can not slice them
off and sawing them will be tricky. I use a heated blade and still
managed to fracture an armored glass panel. While masking I even cracked
a rear window. Thankfully a friend came to my rescue and I was able to
replace them. Cutting Edge has a set of masks available now that should
work well. I used Tamiya tape to mask mine. They turned out fine except
that I have an issue with the way the armored glass is attached. When
viewed from the front after painting the panel looks fine but from the
side there is a noticeable difference in the refraction of light. I know
of no way to prevent this other than not painting the support structure
on the inside.
The prop was painted with Model Master RLM04 and Flat Black. However, on
doing my research not all of the tiger’s airplanes had yellow tips. 68
happens to be one of them. There is a color photo of the airplane in the
background with the pilots seated off to the side and it is apparent
that the yellow is not there and it wasn’t worn off. I couldn’t tell on
Boyington’s so I add it.
Don’t forget the hypodermic needle gun barrels over the engine and
painting the position lights.
Now it becomes apparent why you don’t glue the interior to the top of
the fuselage. The rear windows fit very nicely in the opening. I used
some Tamiya tape with most of the tackiness removed on the aft side of
the rear windows to hold it even with the fuselage. Then using a thin
paint brush, take some Future and let capillary action seal the windows.
The front canopy and the sliding section were attached with Elmer’s
White Glue. The photo-etch gun sight and bead sight are added in front
of the cockpit. Add the little painted clear blue lenses under the
cockpit opening and the antennas and you’re done.
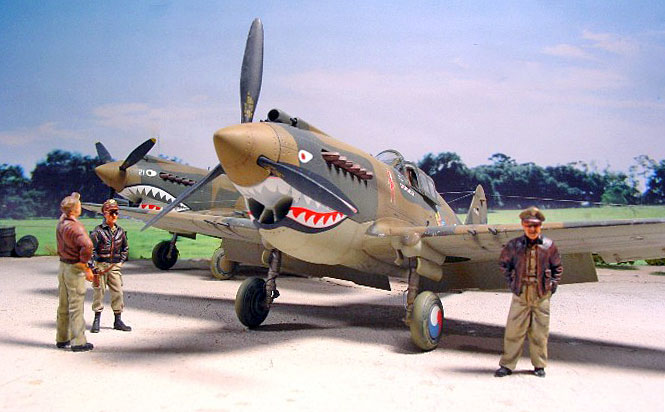
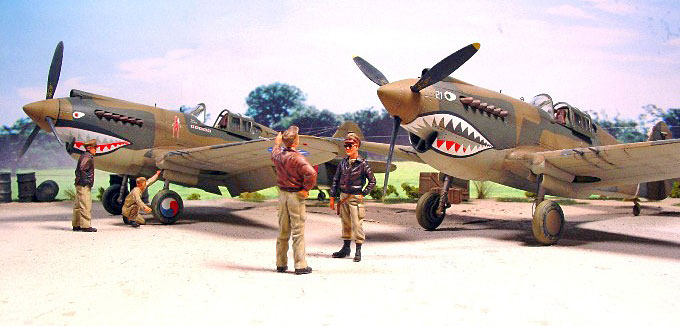
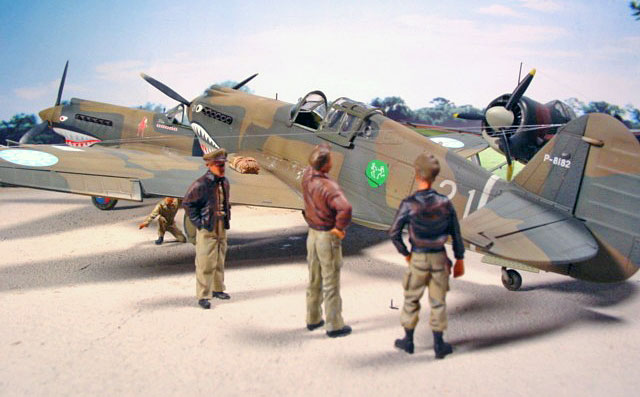
Figures
Many people ask about the figures in
my dioramas so I’ll include a section on them. The pilot with the
glasses is a Verlinden figure from the USAAF pilot set. Assembly was
very easy and the finished result is great. I realy love Verlinden’s
figures. The pilot with his hands in his pockets and the pilot walking
are from Warrior (now Wingz) Flying Tigers pilot set. There is no
assembly required, just some cleanup. They are nice but a little on the
fat side. I would have liked more definition in the face but they
painted up nicely. The figure pointing is from the Monogram kits of the
1970s, B-17 and/or B-26. The mechanic on his knees is from an unknown
source, but it may be Renwal. That figure was supplied by Rafe
Morrissey.
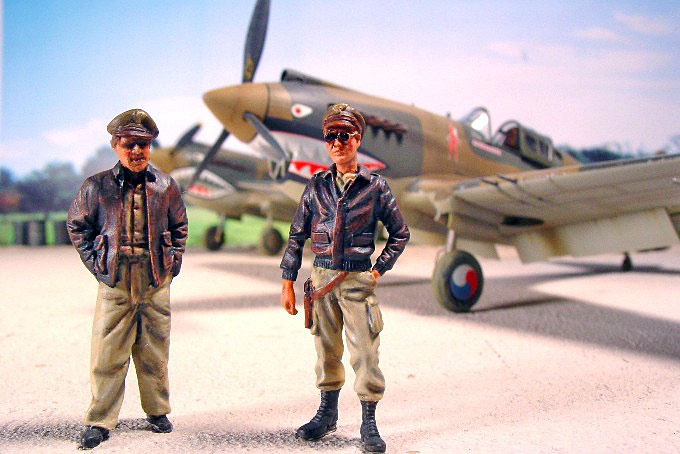
The leather jackets were painted semi-gloss black and then highlighted
with Burnt Sienna artist oils. The lighter colored jacket was painted
Model Master Acrylic Leather and then shadowed with Burnt Umber. Both
resulted in very realistic jackets. The pants and coveralls were painted
with Tamiya Buff and detail painted with a little Burnt Umber mixed with
the Tamiya.
I think my wait was justified and I
absolutely love the end results. These models look exactly like the
vision in my mind’s eye. The fit of the kit was very good, much better
than I expected.
The cockpit does have to be replaced. Cutting Edge announced a new
cockpit designed for this kit so that should address the few problems I
had, but the older one can be used with some work. The few sink holes
and the light flap details were easily fixed and if you elect to have
them up then they are a non issue.
I thought the rivets were nice and once painted over are really hardly
noticeable as was the fabric control surfaces. In fact, I went back in
to try to get the control surface detail highlighted. As for the raised
radio panel and the panel under the tail, you could sand and rescribe
them but they don’t look too bad left alone. I agree Trumpeter should
have made them just as scribed panels, but they don’t detract from the
end product. Let’s face it boys and girls this model is very buildable
and looks great. I totally enjoyed these models. The Trumpeter kit is
the best available P-40B/C kit on the market. Even the Monogram and the
Hobbycraft kits have to have the cockpits replaced. The detail is nicely
done and the panel lines look correct to me. Definitely more correct
than the other two kits. This kit has lots going for it, positionable
control surfaces and great detail with little work. I will be buying
another one for a 2nd Squadron aircraft, maybe a desert air force and a
Pearl Harbor defender. Oh hell, you get the idea, I loved this kit.
As for the aftermarket stuff, the Cutting Edge cockpit is great and can
be modified to fit the kit. I will use the set designed for the
Trumpeter kit next time. The Black Magic Masks are essential as far as
I’m concerned. They are beautiful and simplify the painting process
immensely. All the decals that I used were fabulous. The EagleCals were
very nice and with the accompanying book, sold separately, are some of
the best decals for the Flying Tigers. Remember the tail number on
Boyington’s plane though. The old Aeromaster special sheet was very nice
and the book that came with it offers lots of tips, if you can still
find it. The Cutting Edge decals were beautiful.
Buy this kit and build it. It builds up quickly and looks great. Here
are my two examples and they look every bit of like the P-40B. I’m about
as happy as I can be with them. But if you take anything from this
article, remember, modeling is fun.
Aftermarket
-
Cutting Edge P-40 Super detailed cockpit-CEC48067-Highly Recommended
-
Black
Magic Camouflage masks-CEBM48556-Highly Recommended
-
Aeromaster decals-American Volunteer Group SP48-07-Highly
Recommended
-
EagleCal decals-EC#30-Highly Recommended
-
Cutting Edge decals-P-40s-CED48117-Highly Recommended
References:
American Volunteer Group Colours and
Markings: Osprey Aircraft of the Aces-41, Terrill Clements, Osprey
Publishing, 2001, ISBN 1-84176-224-5
Tigers Over China: The Aircraft of the A.V.G.- EagleFiles #4, Thomas
Tullis, Eagle Editions, 2001, ISBN 0-9660706-7-4
P-40 Warhawk- Detail and Scale Vol. 61, Bert Kinzey, Squadron/Signal
Publications, 1999, ISBN 1-888974-14-1
Warbirds-American Legends of World War II, Jeffrey Ethell, Lowe & B.
Hould Publishers, 2003, ISBN 0-681-19898-2 (Reprint of P-38 in color,
P-40 in color and P-51 in color combined into one book)
Walk Around P-40 Warhawk- Walk Around Number 8, Lou Drendel,
Squadron/Signal Publications, 1996, ISBN 0-89747-361-2
The Pictorial History of the Flying Tigers, Larry M. Pistole,
Publisher’s Press, 1981, No ISBN
P-40 Warhawk-Wrath of the Warhawk, Flight Journal Special Issue, Summer
2004
With Chennault in China-A Flying Tiger’s Diary, Robert M. Smith,
Schiffer Publishing, 1997, ISBN 0-7643-0287-6
Flying Tiger: A Crew Chief’s Story, Frank S. Losonsky & Terry M.
Losonsky, Schiffer Publishing, ISBN 0-7643-0045-8
Click on the thumbnails
below to view larger images:
World War 2 US Army
Fighter Modeling
Modelling Masterclass |
|
|
|
|
Authors: Jerry Scutts, Brett Green
US Price: $29.95
UK Price: £19.99
Publisher:
Osprey Publishing
Publish Date:
September 25, 2003
Details: 128 pages; ISBN: 1841760617 |
|
|
Model, Images and Text Copyright ©
2005 by Floyd S. Werner Jr.
Page Created 01 January, 2005
Last Updated 01 January, 2005
Back to
HyperScale Main Page
|
 Home
| What's New |
Features |
Gallery |
Reviews |
Reference |
Forum |
Search
Home
| What's New |
Features |
Gallery |
Reviews |
Reference |
Forum |
Search