|
Horten Ho 229A
by Toby Nelson
|
 |
|
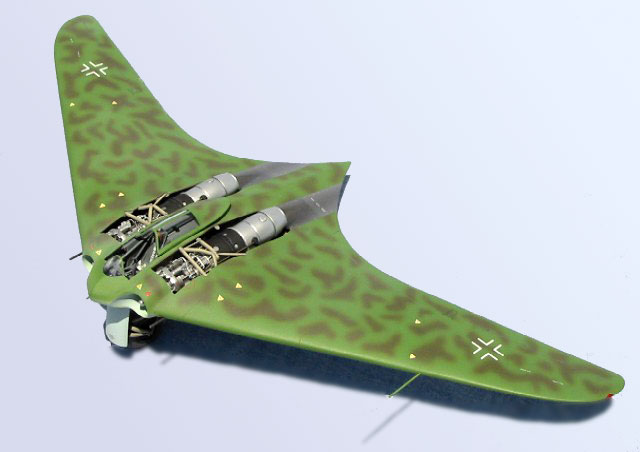
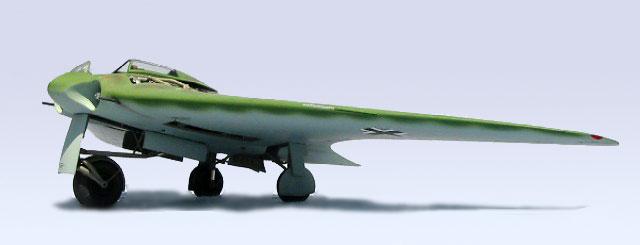
Horten Ho 229A |

Dragon's
1/48 scale Horten Ho 229B Night Fighter is available online from Squadron
The flying wing is one of the recurring themes in aviation history.
The appeal is greater lift and reduced drag. Work on developing flying
wings progressed on both sides of the Atlantic during World War II. In
America, Jack Northrop developed a series of flying wings culminating in
the B-35/B-49 bomber. In Germany, Reimar and Walter Horten worked along
similar lines.
By 1945, the Hortens had gone through several flying wing gliders and
Gotha received a contract to produce a turbojet-powered version of
Hortens' design. This used the Jumo 004 engine that was in production
and used on the Me 262. Due to its mixed heritage, this airplane has
been documented as the Horten IX, Ho 229, or Go 229.
The first Ho 229 was a glider. The second was the world's first
turbojet-powered flying wing. The first flight of the Ho 229 V2 was on
February 2, 1945. On the third flight on February 18, the starboard
engine failed and the airplane crashed, killing test pilot Erwin Ziller.
The US Army captured the Gotha factory on April 14, 1945 and found the
nearly-complete Ho 229 V3, along with several other prototypes in
various stages of construction. The V3 was brought back to the America
where plans were made to make the V3 flyable; post war funding cuts
curtailed those plans, however. The V3 was given to the National Air and
Space Museum, where to this day it is rotting away (literally) at Silver
Hill, Maryland. Hopefully with the opening of the Udvar-Hazy annex, the
Ho 229 will finally be restored and put on display.
It's worth noting that in many ways the Ho 229 was the worlds first
stealth airplane. The airplane was constructed of plywood over a tubular
steel structure, and was to be coated with a mixture of charcoal and
glue as a radar-absorbent coating. In many ways the Horten flying wings
were closer to the B-2 stealth bomber of today than it's Northrop
cousins.
A Pointless Story that will Interest No One...
A year ago in my Aerodynamics class we had a group project to design
an airplane with the highest lift-to-drag ratio to test in the wind
tunnel. The obvious choice was a flying wing--I pointed out the Ho 229
design to my friends, and we used that as the "inspiration" for our
design (in the same way that the Soviets used our Space Shuttle as the
"inspiration" for theirs). We coated our balsa wood model with epoxy and
sanded and polished the surface (with the epoxy still not quite
cured--we were under a deadline). Despite our sterling efforts, we only
got second out of four groups. When we got our paper back, our professor
wrote a snide comment in the margin about "picking other people's
shapes...without performing trade studies is not design!"
Dragon's 1/48 Ho 229
Dragon's 1/48 Ho 229 was first released in 1992. It includes full
engine and gun bay detail, photo etched parts, and the option to include
several access panels open. Unfortunately, the molds haven't held up
well and the kit as available today has a large amount of flash and sink
marks over several parts (although nothing as bas as, say, the ICM
Spitfire Mk IX).
The instructions are vague in the placement of some parts, and the
sequence of assembly called for is a joke. I was able to develop an
assembly sequence that was much easier (a little bit of "process
engineering" there).
Assembly
I started assembly by gluing the top wing parts together and the
bottom wing parts together. The instructions have you assemble the
center and outer wing sections as three subassemblies and then assemble
them together--I cannot imagine an worse way to get huge steps between
the wing parts than to follow the instructions. The fit was good, but I
still had to fill the slight gaps with Mr. Surfacer and rescribe the
panel lines.
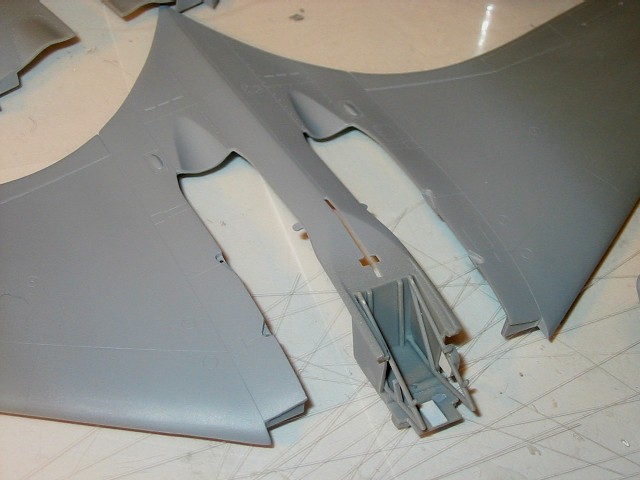
I then filled the major sink marks on the wing parts, cockpit floor,
and engine inlet area with Milliput followed by Mr. Surfacer to smooth
things out.
 The
cockpit was a little sparse, but pretty good nonetheless. The
cockpit was a little sparse, but pretty good nonetheless.
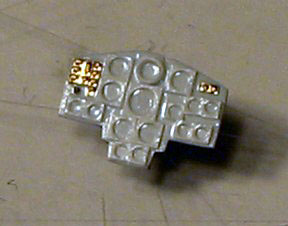
The instrument panel was lacking in detail and I had a really nice
picture of the real thing, so I scratchbuilt a new one out of sheet
styrene and some photo etched parts. I made new bezels with a Waldron
punch set and an Xacto knife. I glued the bezels and switch panels on
with Future floor wax.
After the Future was fully dry I painted the panel with Polly Scale
RLM 66, then hand painted the bezels black. Another coat of Future and I
punched out instrument decals from my spare decal box and applied them.
A coat of Polly Scale clear flat and I put a drop of Future in each
instrument.
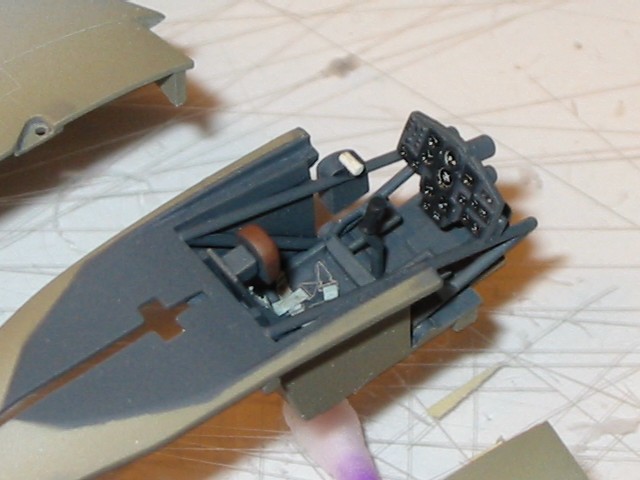
I replaced the rudder pedals with some photo etched ones. The kit
includes photo etched seat belt buckles; I made the belts from aluminum
foil and carefully threaded them through the buckles, nearly going blind
in the process.
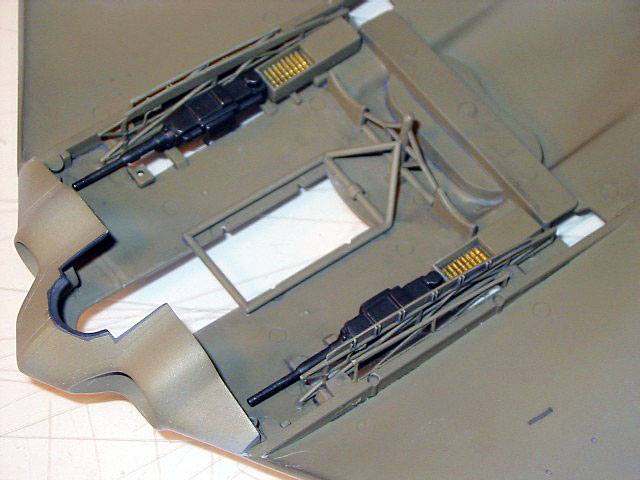
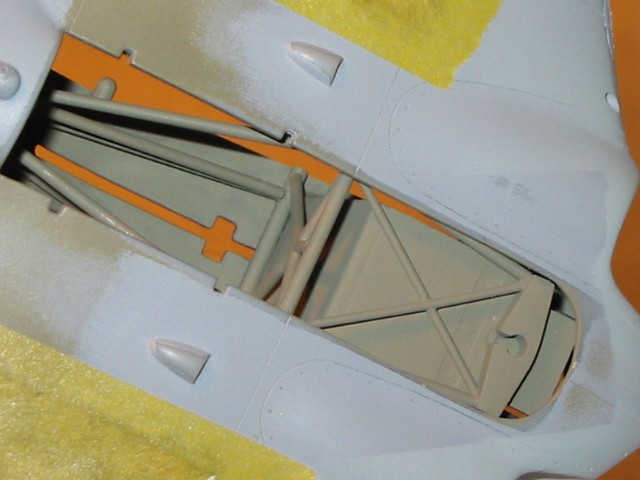
On the inside lower wing I added some framework and installed the guns,
which were a real bear to get the mold lines cleaned up. I glued the
nose/inlet part to the lower wing, filled the seam on the bottom, and
rescribed the panel lines.
The instructions call for an odd usage of RLM 66 and RLM 02 on the
inside surfaces. I simplified everything by painting the cockpit RLM 66
and everything else RLM 02.
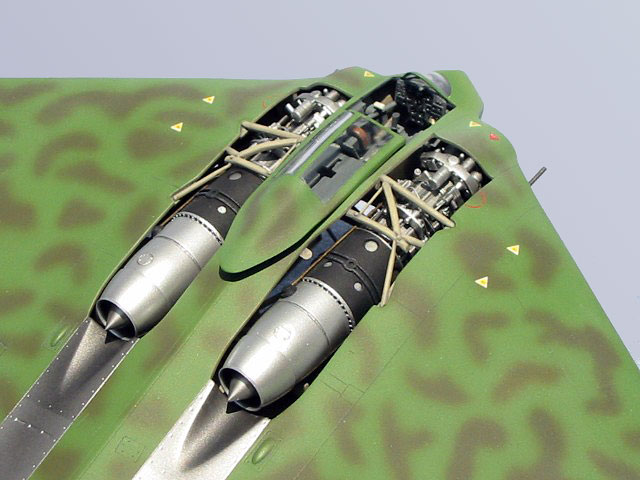
I found out that you could install the engines after assembling the
wing, so I waited until after painting and decaling to install them.
This made masking a lot easier.
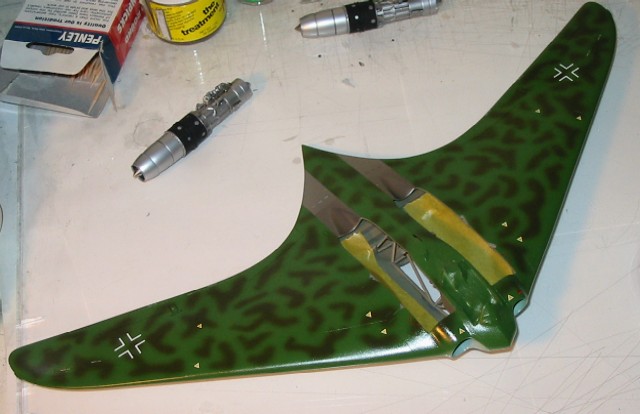
I glued the top wing to the bottom. This required quite a bit of pulling
and prodding to get everything to line up properly. The spot between the
engine openings and cockpit is a very weak spot, offering only about
1/16 in. gluing area with the nose. After the seam split here several
times I finally Dremeled out a little trough perpendicular to the seam
and glued in a short section of brass wire, filling in the trough with
CA.
I used some clear green and red resin from Cutting Edge for the wing tip
lights. The seams were smoothed out, panel lines rescribed, and Mr.
Surfacer sprayed on as primer. I also installed some styrene rod in the
nose wheel well to detail it.
I glued the windshield on with liquid cement and filled the large
seam with Milliput and Mr. Surfacer. I then sanded the windshield down
with a buffing sanding stick and polished it with Blue Magic metal
polish. The final touch was buffing the windshield with The Treatment
model wax; this really makes canopies shine, and is a lot less messy
than dipping it in Future. Incidentally, the windshield was a real pain
to get on and get faired in; it took me three tries with different
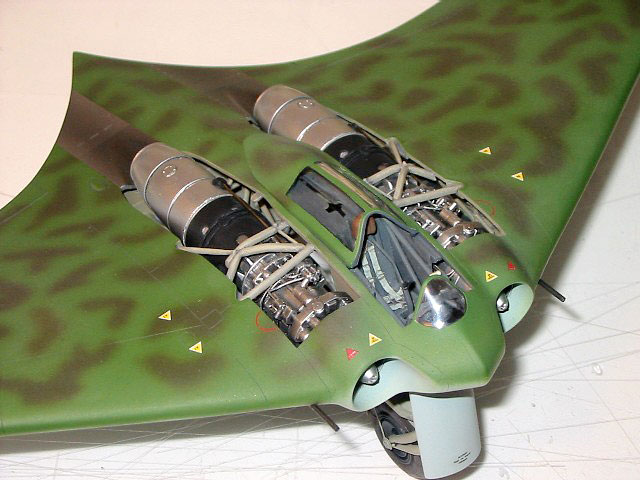
adhesives and fillers. [Photo "Airframe"]
Engines
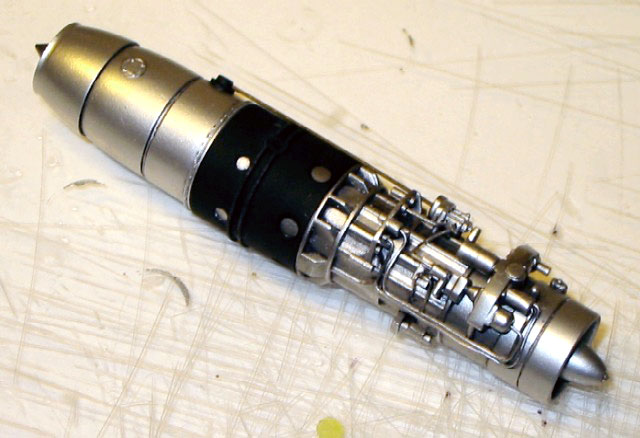
The kit's engines are pretty well detailed; I contemplated getting
some Aires engines, but the cost ($27 for one) put me off. I did use the
Aires Jumo 004 exhausts, so I could avoid worrying about the seam on the
inside of the exhaust. They kit perfectly on the kit's engines.
After I glued the main engine parts together I filled and sanded the
seams and airbrushed a thick coat of Future on them. I then airbrushed
Alclad on the engines. Everyone has their favorite base coat for Alclad;
Future works for me (and so far it hasn't cracked like that $@!*&!!
Tamiya gloss black). I sprayed different shades of dark aluminum and
white aluminum on different parts of the engines.
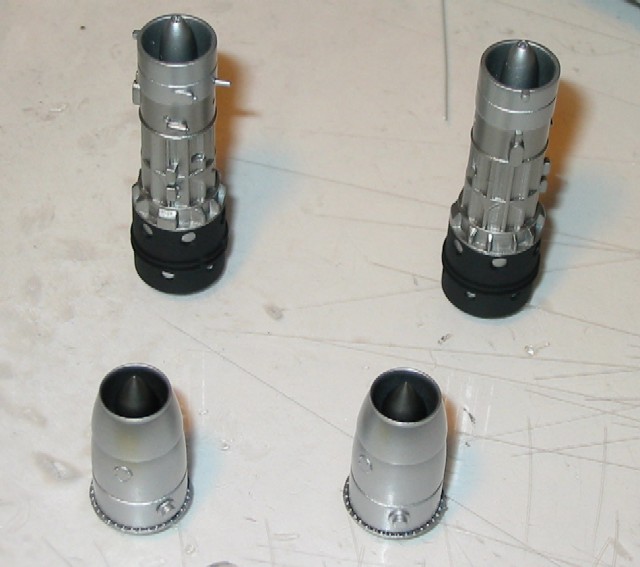
I then assembled the engine parts together. I drilled out little
holes where the wires and plumbing would go. I used 0.015 in. dia.
solder for the wires and plumbing on the engines. This stuff is
awesome--it's really soft, so it's easy to bend and doesn't want to
spring back like most wire. I bent the solder into the rough shape I
wanted with tweezers, then snapped it into the pre-drilled holes. Some
final adjustments with tweezers, and a drop of Future at the joints
holds everything in place. The solder is a metallic color so you don't
have to paint it.

I finished the engines with a wash of Paynes Gray oil paint and dry
brushed with Testors chrome silver paint.
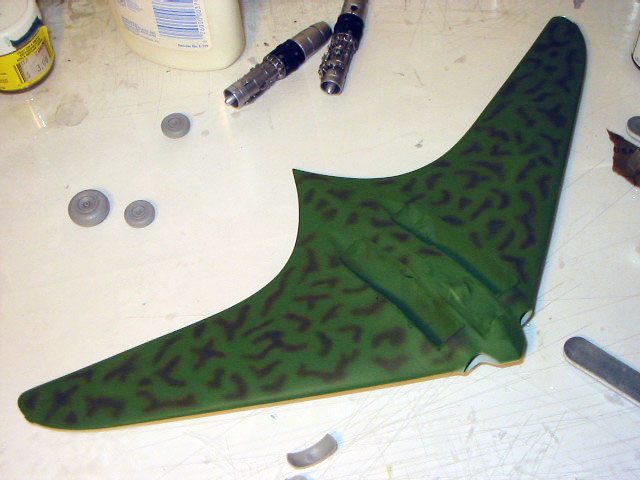
I masked off the windshield and all openings with Tamiya tape sealed
with white glue. I started by spraying RLM 66 on the windshield frame. I
sprayed RLM 76 light blue on the underside, then RLM 83 light green on
the top with splotches of RLM 82 dark green. Since this is a
hypothetical scheme I had a lot of leeway in the paint scheme. I based
it on a late war Me 262 scheme.
All paints were Polly Scale sprayed at 15-18 psi through my Vega 2000
airbrush. The paints were thinned with isopropyl alcohol until they were
the consistency of skim milk. The hardest part about painting was the
light green scallops wrapped around the leading edge. Also, my CO2 tank
ran out halfway through painting at the beginning of the Fourth of July
weekend, so I had to wait a couple of days before I could get the tank
refilled.
After painting I airbrushed several light coats of Future floor wax,
sprayed 12-15 psi. The Future was left to dry for three days (we just
had the second-wettest June on record here in Houston, so the humidity
was hovering well over 90% most days). I put an extra-thick layer of
Future around the exhausts, and when that was dry I masked the exhausts
off and sprayed it with Alclad.
I then applied the decals. The kit's decals were rather thick and
slightly yellowed, so I used aftermarket Me 262 decals for the main
markings (I used the kit's decals for a couple of the stencils, and they
worked alright). There is some uncertainty as to where the swastika
would go; I saw one model where the modeler placed it on the side of the
engine "pods" (access panels), so that seemed good to me.
Another coat of Future, and I applied a Paynes Gray oil wash to the
panel lines, wiping the excess off with a paper towel soaked with
turpentine. I applied a final coat of Polly Scale clear flat. This is
the same technique that I used to paint all the parts of the model, such
as the cockpit, wheel wells, landing gear, etc. It's time consuming and
a lot of work, but the results are well worth it.
I removed the masking and did some final touch up. A rather large chip
of paint came up around the cockpit (d'oh!), so I sanded down the area
and reapplied the paint, Future, and flat coat.
I also re-masked off the exhausts and airbrushed some Testor's Metalizer
for exhaust stains.
While the various coats of Future were drying on the airframe, I
worked on the landing gear. The nose gear is an especially complex
affair, and I pinned a couple of the joints for added strength.
I attached the landing gear to the airframe. When I placed the model on
the table one wing was about 1/16 in. higher than another. No big deal;
when I flatted the tires with an iron and sandpaper, I just flattened
one wheel a little more than the others, and the wing was level.
After I attached the landing gear and gear doors I did a little touch
up, and sprayed some flat coat over all the joints.
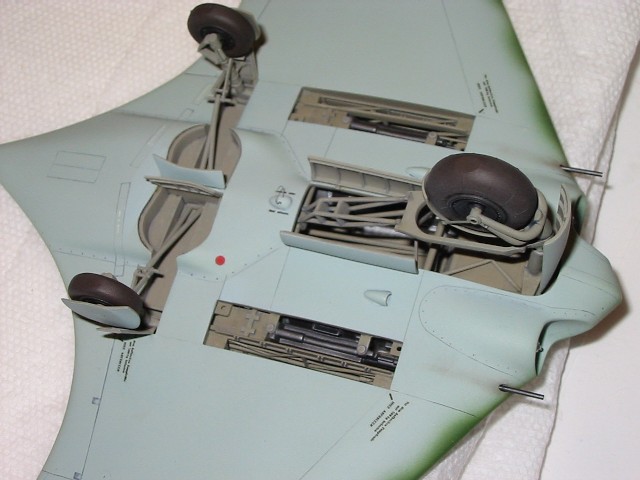
I glued the engines in with 5 minute epoxy. I had to Dremel one of
the machine guns and put a little strip styrene on the port engine mount
to get the port engine to line up with the starboard one. I glued in the
engine mounts on the top of the engines; they required a couple of
styrene shims to get them to fit properly, and the usual touch up paint.
The gun barrels in the kit were a peculiar square shape; I dumped them
and replaced them with some steel tubing I had.
I glued the canopy on with white glue; I left out the gunsight since the
kit's sight was pretty big and bulky and I was getting lazy.
Last item was the pitot tube. The kit's one had some huge sprue
attachment points, so I used a piece of brass wire that I tapered by
chucking it in the trusty Dremel tool and sanding it down.
This was one of the models I've always wanted to do, and I was really
happy with the results. There were some hair-raising problems, and some
times when it seemed that it was taking forever (maybe that was due to
the lazy summer weather more than the model), but I finished the model
in seven weeks.
The Dragon kit is nice because it provides a lot of detail out of the
box, but it offers wonderful opportunities for detailing. I didn't go
all out super detailing everything, but I added a good amount with the
instrument panel, nose wheel well, and some with the engines.
The model is on display at Hobby Island in Houston, Texas.
Dabrowski, Hans-Peter. Flying Wings of the Horten Brothers.
Schiffer Publishing, Atglen, PA, 1995.
Click the thumbnails below to view larger images:
Model, Images and Text Copyright © 2004
by Toby Nelson
Page Created 02 September, 2004
Last Updated
04 September, 2004
Back to
HyperScale Main Page
|
 Home
| What's New |
Features |
Gallery |
Reviews |
Reference |
Forum |
Search
Home
| What's New |
Features |
Gallery |
Reviews |
Reference |
Forum |
Search