|
Junkers Ju 87G-2 Stuka
by Brett Green
|
|
|
Junkers Ju 87G-2
Stuka
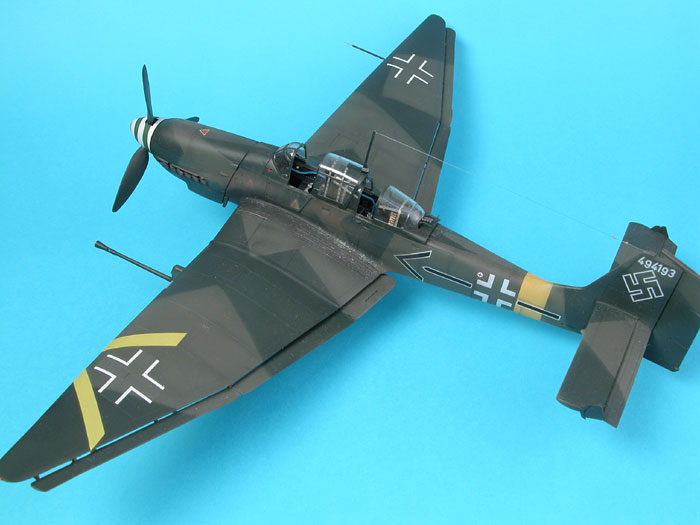
Major Hans-Ulrich Rudel, Kommodore SG2, Russia, Summer 1944 |

Hasegawa's 1/48
scale Ju 87G-2 is available online from Squadron.com
I am very grateful to
Mike Good for his assistance and encouragement with this project. Mike
mastered the "tank-buster" gun pods for Jaguar and sent a pre-production
moulding for use on the model. He also supplied the Hasegwawa kit before
it was available in Australia. Thanks again Mike!
The Junkers Ju 87 Stuka entered the Second World War with a fearsome
reputation as a "terror bomber". Its ugly angular lines, screaming dive
and capability for pinpoint precision bombing made the Stuka a
terrifying icon of the early Blitzkrieg campaigns.
During the Battle of Britain, however, unescorted Stukas on
long-range bombing missions were shot down almost at will by Spitfires
and Hurricanes. The reputation of the Stuka was severely damaged.
Nevertheless, the Stuka continued to be used effectively in other
theatres and roles until the last days of the war – troop support in
North Africa, night bomber in Italy, and tank killer on the Eastern
Front.
The most successful Stuka pilot was Hans-Ulrich Rudel. Rudel had
already completed 1,000 Stuka missions before developing the tactics for
"Panzerjagdkommando Weiss", the embryonic tank-killer Stuka unit.
Despite being shot down on at a number of occasions and sustaining
frequent injuries (including the loss of a leg), Rudel’s tally included
a total of 519 tanks and one Soviet battleship! He ended the war as
Germany’s most decorated pilot and the sole recipient of Germany's
highest military honour - the "Golden Oak Leaf with Sword and Diamonds to
the Knight's Cross of the Iron Cross."
|
H a s e g a w a '
s J u 8 7 G - 2 |
Hasegawa’s 1/48 scale Stuka shares the fuselage and wheel sprues
with the earlier Ju 87B kits, but little else.
The lines of the aircraft are well captured and the very prominent
glasshouse canopy is impressively clear and thin.
The surface of the kit is detailed with crisply engraved panel lines.
Personally, I think the engraved detail on this kit is too subtle.
Photos of the real thing show that this was a lumpy, rough aircraft –
lots of overlapping and raised panels.
Cockpit detail is okay, but does not fully represent a number of key
features of the later Stuka.
The wings are slightly disappointing in a number of respects. The
ailerons and flaps on the real aircraft were attached to the wing with a
series of hinged mounts. Hasegawa have represented these complex mounts
with solid slabs of styrene - the ailerons/flaps are moulded as part of
the lower wing. Although this simplifies construction and provides the
strongest possible engineering, it looks far from realistic.
The wing tips seem to have been added as an afterthought. There is a
noticeable step that requires sanding, filling and rescribing. No big
deal, but surprising for Hasegawa.
Overall, though, this is an excellent kit that represents the final
variant of the Stuka well.
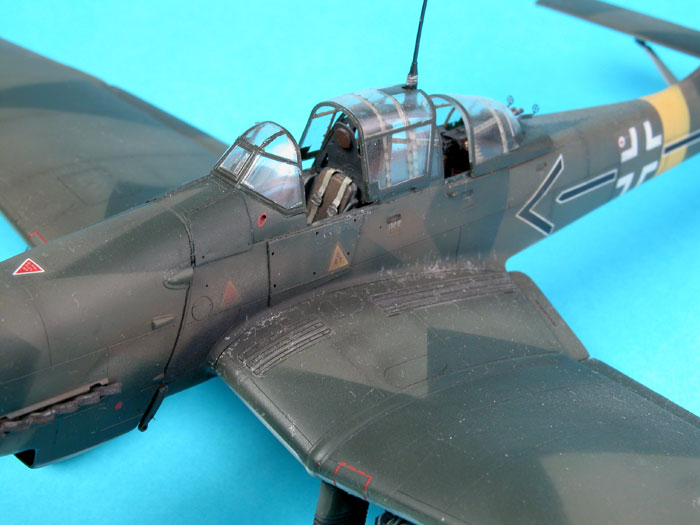
Cockpit and Fuselage
 Construction
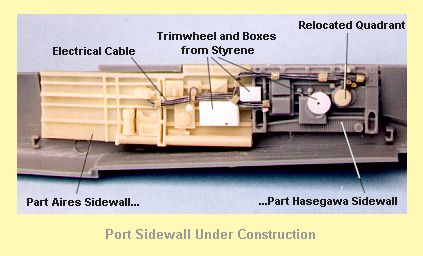
starts in the cockpit. I decided to adapt the Aires Ju 87B cockpit
detail set, adding details for the later aircraft as required. This was
not as simple as it first appeared. The fit of the main Aires resin
parts was very poor – so bad that I actually substituted the kit floor
and part of one sidewall rather than try to correct the resin parts. Construction
starts in the cockpit. I decided to adapt the Aires Ju 87B cockpit
detail set, adding details for the later aircraft as required. This was
not as simple as it first appeared. The fit of the main Aires resin
parts was very poor – so bad that I actually substituted the kit floor
and part of one sidewall rather than try to correct the resin parts.
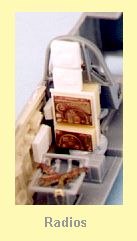
Close examination of the Aero Detail book on the Ju 87D/G revealed
that many cockpit details were missing or incorrectly placed. These
included sidewall features, quadrants, radio gear, IFF boxes, cabling
and the very visible pilots armoured headrest. These details were
scratchbuilt from styrene strip, scrap and strands of fine electrical
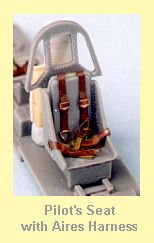
wire. The kit pilot’s seat was detailed with the Aires harness and added
to the cockpit.
 Latch
handles were added to the fuselage sides using fine brass wire. Latch
handles were added to the fuselage sides using fine brass wire.
Before joining the fuselage halves, I carefully cut off the kit
rudder and thinned down the plastic to a sharp edge where the fuselage
meets the rudder. A 10 thou thickness of plasticard was used as a spacer
between the top of the fin halves to ensure that the rudder mated
accurately with the fuselage during final assembly.
 The nose was
assembled per the instructions. The nose halves (parts N3 and N4) do not
have locating pins, so be careful with alignment. The lower cowl intake
(part N7) was a poor fit. The nose was
assembled per the instructions. The nose halves (parts N3 and N4) do not
have locating pins, so be careful with alignment. The lower cowl intake
(part N7) was a poor fit.
When the nose assembly was dry, it was fitted to the mid-fuselage.
Fit was okay, but I emphasised the panel line between at the firewall
with a few swipes of my big Olfa scriber.
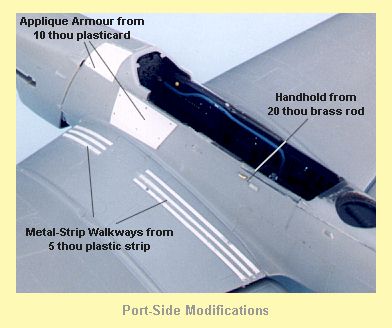
Hasegawa has missed a number of prominent appliqué armoured panels
placed around the outside of the cockpit. Templates were made up from
drawings in the Aero Detail book, and the panels were cut from 10 thou
plastic card. Holes were drilled to represent the locating points.
These extra panels give the Stuka a slightly more chunky and
purposeful appearance.
Wings
 Now it was
time for surgery to the wings. I opened the holes in the lower wing from
the inside to ensure I didn’t forget later. I then cut off the
ailerons/flaps by snipping off each moulded mount and cleaning up with a
new hobby knife blade. Now it was
time for surgery to the wings. I opened the holes in the lower wing from
the inside to ensure I didn’t forget later. I then cut off the
ailerons/flaps by snipping off each moulded mount and cleaning up with a
new hobby knife blade.
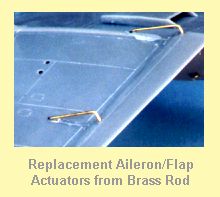
I cut eight lengths of 20 thou brass rod and drilled locating holes
in the top of the aileron/flap parts and the corresponding spot at the
lower trailing edge of the lower wing. The brass was bent to an
appropriate angle and glued into the aileron/flap parts using two-part
epoxy for maximum strength. The long ends of the brass rod were fed into
the holes in the lower wing, and the angle of each brass mount was
adjusted before securing with epoxy.
This exercise was less time consuming than I had expected, and it
certainly makes a big difference to the overall appearance of the model.
 The wing
walk strakes on the upper wings are a hangover from the earlier Ju 87B
kits. They are not the correct style for most Ju 87D/G models. I sliced
off the raised walk strakes with a sharp hobby knife, and replaced them
with three strips of 5 thou styrene on each upper wing half. The wing
walk strakes on the upper wings are a hangover from the earlier Ju 87B
kits. They are not the correct style for most Ju 87D/G models. I sliced
off the raised walk strakes with a sharp hobby knife, and replaced them
with three strips of 5 thou styrene on each upper wing half.
A small railway lens was superglued to a sort length of sprue. This
assembly was glued to the lower wing behind the clear landing light
cover.
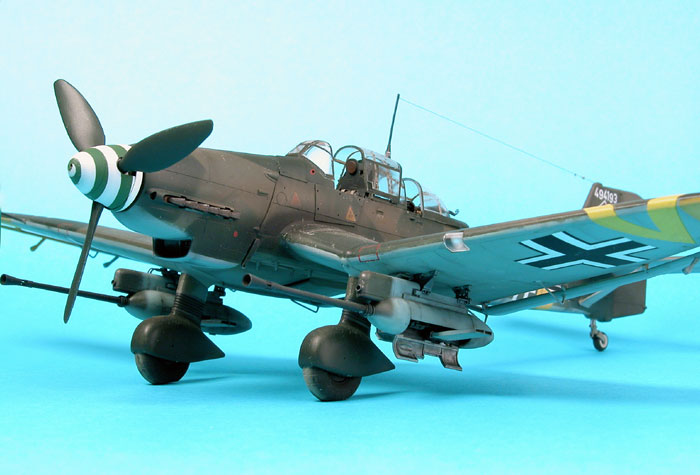
Dry-fitting proved that the spatted landing gear (parts Q1 and Q2)
was a nice, tight fit with the gear mounts (parts N1 and N2); but the
mounts were quite loose in the lower wing. I decided to glue the mounts
into the lower wing, but to leave off the spatted landing gear until
after painting.
Tail Surfaces
Feeling in need of more punishment, I decided to drop the elevators.
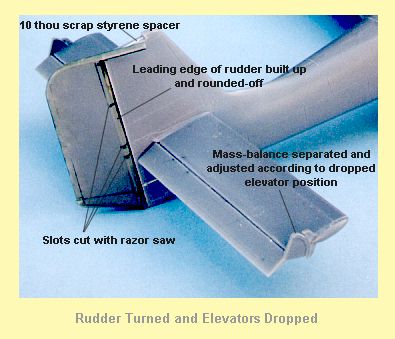 I carefully
cut off the elevators from parts A3 and B1 by repeated light scoring
with a sharp knife. I then slightly rounded off the leading edge with a
nail file. The two parts labeled E7 are the elevator mass balances.
These balances were hinged along a curved line and moved with the
elevator, so I cut each part in the appropriate place and assembled the
parts. I carefully
cut off the elevators from parts A3 and B1 by repeated light scoring
with a sharp knife. I then slightly rounded off the leading edge with a
nail file. The two parts labeled E7 are the elevator mass balances.
These balances were hinged along a curved line and moved with the
elevator, so I cut each part in the appropriate place and assembled the
parts.
I now glued the rudder halved together, using a thin spacer card at
the leading join. I added another strip of styrene to the leading join
and sanded it to a round profile. A couple of slots were cut into the
leading edge of the rudder with a fine razor saw.
When these sub-assemblies were dry they were secured to the fuselage.
|
J a g u a r ' s
G u n P o d s |
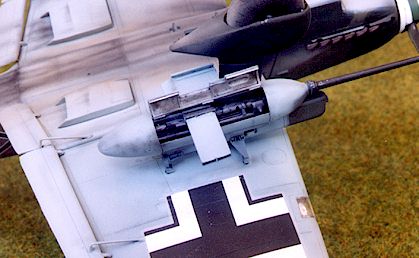 Mike
Good sent me a couple of early shots of the forthcoming Jaguar Ju 87G
37mm gun pods, so here was a perfect chance to use them! Mike
Good sent me a couple of early shots of the forthcoming Jaguar Ju 87G
37mm gun pods, so here was a perfect chance to use them!
The resin set supplies one gun pod moulded shut, and one with
internal breech detail. Detail parts include ammo chutes with separate
doors, clip chutes, valve junction and detailed muzzle brakes. The set
requires the use of the Hasegawa mounting brackets and kit barrels.
My samples were moulded perfectly, with easy parts removal and
beautifully crisp detail. Assembly is very straightforward (even without
instructions) and the completed gun pod mates up well to the kit
mounting brackets.
These pods are a definite improvement on the somewhat oversimplified
Hasegawa parts.
The Jaguar gun pods do not include the complex plumbing that
characterises the cannon mechanism. I opened up a number of holes in the
resin mounting rail, valve junction and the bottom of the kit wing with
a no. 75 drill bit in a pin vice. I added the piping from a combination
of fusewire (for the thick pipes) and single-strand electrical wire (for
the narrow pipes). Although this task was fiddly and time consuming, it
does make an appreciable difference to the assembled gun pods.
I also drilled out the cooling hole above the pod, and used a no. 70
drill to open up the muzzle brake from the back, later widening the hole
with a no. 61 drill. I then delicately opened up the slots in the muzzle
brake using a new knife blade. Extreme care is required for this
operation. I destroyed two muzzle brakes – fortunately Mike had
anticipated this and supplied spares!
|
F i n i s h i n
g T o u c h e s |
In Step 11, the kit instructions suggest that two footsteps are
installed (parts E10) but, in fact, only the starboard part should be
fitted.
A number of the canopy frames are actually inside the perspex. I
achieved this effect by spraying a couple of spare strips of True
Details "Fast Frames" in RLM 02 Grey, and applying them to the inside of
the canopy parts. I used a soapy water mix to help reposition the strips
during application. The internal frames were riveted to the outside of
the perspex canopy. I painted small dots of dark green on the outside of
the canopy to represent these rivets.
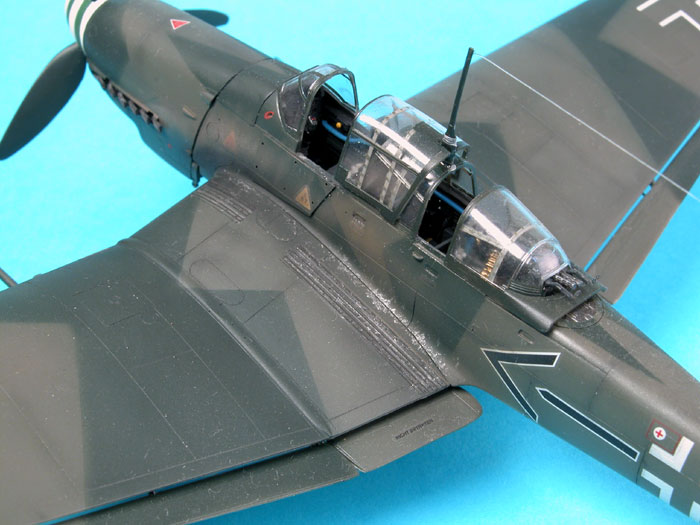
Although the pilot’s sliding canopy section is very thin and crystal
clear, it is not thin enough to "slide" correctly over the middle canopy
section – it sits high above the canopy rails when depicted open. The
only fix for this is to use a vac-form canopy as a replacement.
I combined a Cavalier 7.9mm MG81Z "zwilling" machine gun
with the kit gunsight. After much research, I concluded that when the
rear canopy is slid open, the machine gun remains in place but the mount
and sights move with the glass.
With the inclusion of a brass rod and wire pitot tube, the kit was
complete.
|
P a i n t i n g
a n d D e c a l s |
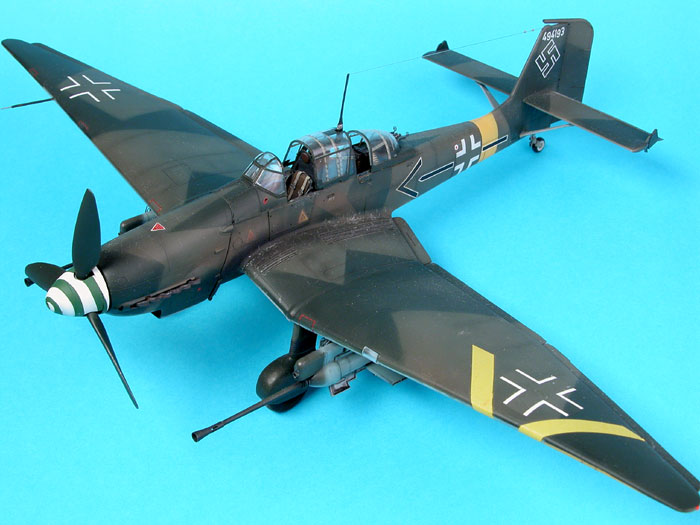
Rudel’s Kommandeur chevron and distinctive theatre markings enliven
the rather dull 70/71 green scheme of the Stuka. A couple of my
references suggest that this aircraft wore a Bright Green (RLM 25)
spinner with a white spiral. I decided to add this feature for further
interest.
I first "pre-shaded" using black paint along panel lines in my usual
manner, then sprayed yellow for the chevron and lower wing markings. The
yellow was masked and the hard-edged camouflage pattern sprayed with the
aid of paper masks.
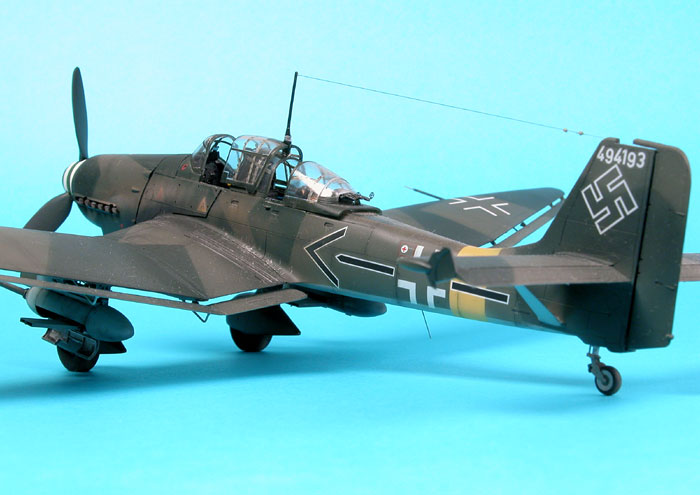
Gunze paints were used for all colours.
Kit decals were used. They looked a little thick on the backing
paper, but looked fine on the model after a coat of Gunze Flat Clear.
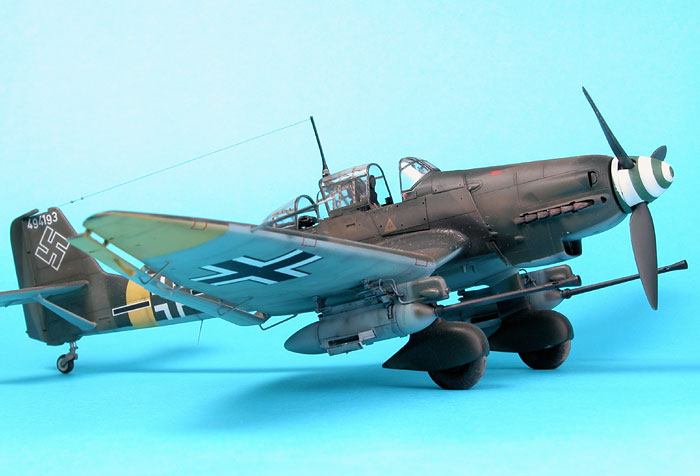
Exhaust stain was added with a base layer of black followed by a
chalky light grey mix streaked back over the fuselage. A silver artist’s
pencil created the chipped walkway effect. Finally, panel lines were
filled with a thin wash of Tamiya Semi-Gloss Black.
Hasegawa has given us a kit that will look good straight from the
box, but will really shine with a little extra work.
Jaguar’s Stuka gun pods, mastered by Mike Good, are a worthwhile
addition the model.
With the Night Attack Ju 87D-8 now available, the biggest problem is
deciding which Stuka to build next!
|
A d d i t i o n a
l I m a g e s |
Click the thumbnails
below to view larger images:
Model, Text and Photographs Copyright ©
1999 & 2004 by Brett Green
Page Created 19 April, 1999
Last Updated 26 March, 2004
Back to
HyperScale Main Page
|
 Home
| What's New |
Features |
Gallery |
Reviews |
Reference |
Forum |
Search
Home
| What's New |
Features |
Gallery |
Reviews |
Reference |
Forum |
Search