The G-6
was, together with the G-1 and C-6, the major contributor to the German
night fighter force in the last year of WWII.
When
Wolfgang Falck started the night fighting force it was not long before
the Ju 88C was introduced and it served until the end of the war, but
the heavier armament and armoring had a detrimental effect on the
low-speed handling qualities of the overburdened Ju 88C series, so in
1943 it became apparent that the development of a specialized Ju 88
night-fighter was now necessary.
The Ju 88B
was developed as an improved bomber with better crew facilities, this
variant soon was given the designation Ju 188E, and the idea was to
replace the Ju 88C with a night fighter based on the 188E. This
Hubertus Program eventually emerged as the Ju 388J in 1944, but in
parallel the Ju 88G had been developed from a Ju 88R with the tail from
a 188 and it flew for the first time in 1943 and with some minor changes
the Ju 88G-1 started replacing the C in the beginning of 1944. The G-1
was powered by the BMW801G but soon the G-6 with Jumo 213E was
introduced as the and became the most numerous G-variant.
The
armament consisted of four fixed forward firing MG 151 20 mm cannons in
a ventral pod with 200 rounds each and one flexible 13 mm MG 131 machine
gun at the rear cockpit with 500 rounds. Optional Schräge Musik
installation in upper fuselage with two MG 151 20 mm cannons with 200
rounds.
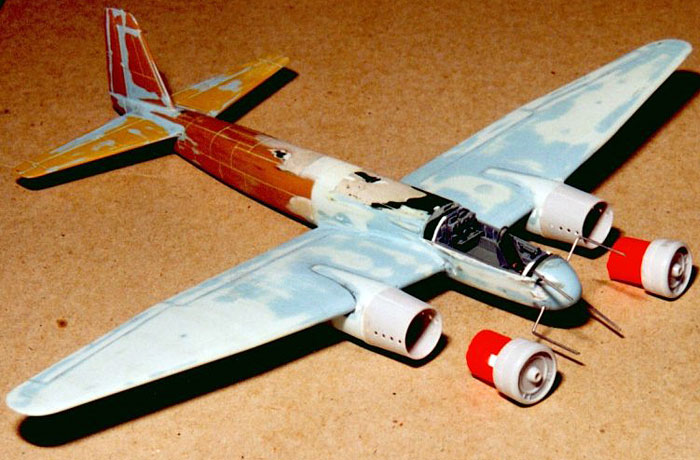
First Attempt
I returned
to the
plastic modeling society in 1978 after buying William Green’s
Warplanes of the third Reich, and after the first 109:s and 190:s I
became interested in the Ju 88. I discovered it was possible to combine
the Matchbox Ju 188 and the Revell Ju
88C-6c to a late war Ju 88G. I mated the two
kits behind the main wing, the Revell providing the forward fuselage and
wing and the Matchbox the rear fuselage, fin and stabilizers. The
G-6 was finished as the famous 4R+UR in a very blue color with gray
stains and crude Hirschgeweih aerials.
Three 1/72 Ju 88 kits
In 1993, after raising two children and building a house in 1/1 with
almost no time for my kits for over ten years I decided now was the for
my second return to building and not only collecting kits!
All my kits and finished models were stowed away, but I found the G-6
and after reading a review of the new Dragon Ju88 G-6 in 1/48 the idea
of a major modification project came to my mind.
Both kits are of course very old, and not really up to the millenium
standard! The Revell Ju 88 is way too low in profile in the cockpit area
but the wings are fairly good and the Matchbox 188 of course has a few
trenches, but this combination of Ju 88 kits actually looked all right!
With this I don’t mean I was satisfied with my building skills fifteen
years ago, only that the model had potential!
The
engines had to be changed to Jumos, which I took from a recently
purchased Italeri Ju 188 kit.
Click the
thumbnails below to view
Fuselage and Cockpit
All old
paint and all panel lines were removed by careful wet paper sanding. The
airframe was covered with Milliput and sanded again to a completely
smooth finish. New panel lines were scribed with a sturdy needle tool.
This technique did not remove any plastic like a P-cutter, it only made
a groove in the plastic, and required sanding down of the excess plastic
pressed up to the surface, and that had to be done over and over again!
A few years later I bought my first real panel line scriber, what a
difference!
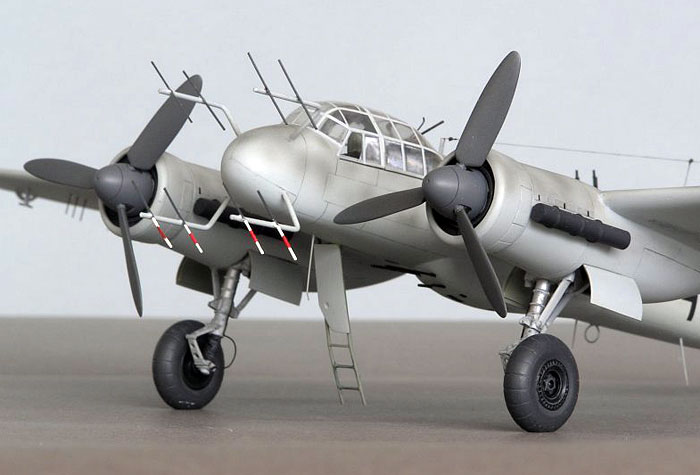
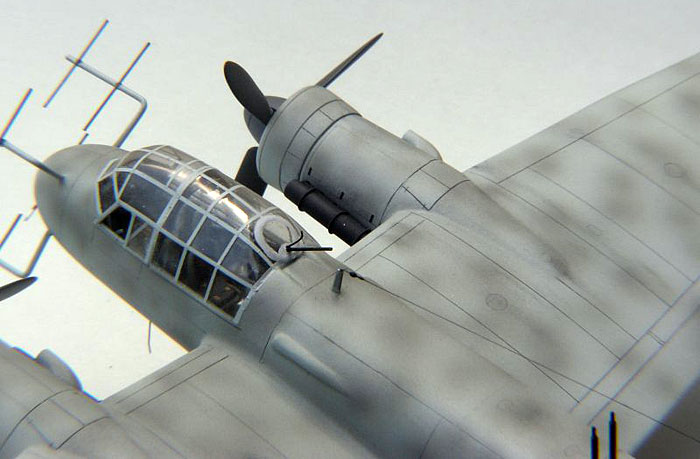
The
weapons pod on the fuselage underside was made from layers of plastic
card built from a few bad photos and an old SMI drawing.
The access
hatch is in brass plate and the ladder was fabricated from strue; no
photo etchings in those days!
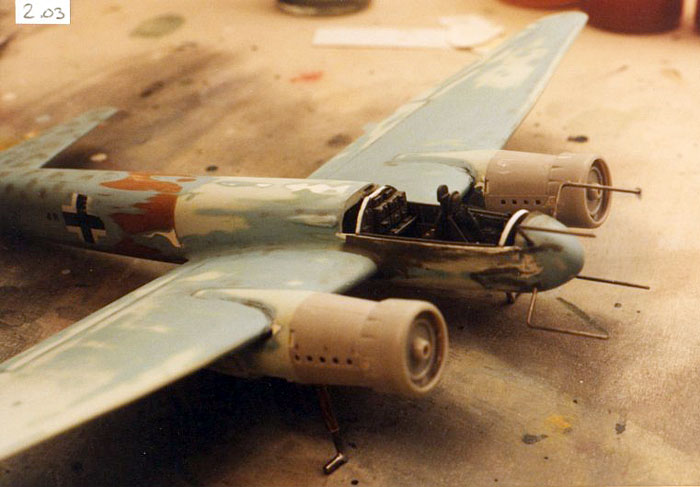
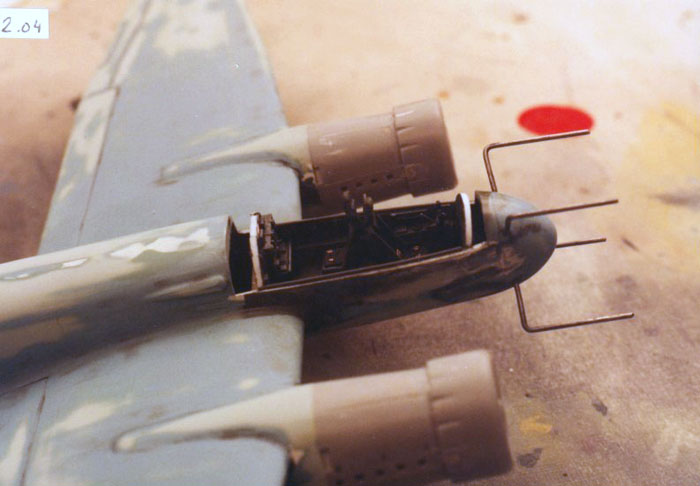
The
original simplified cockpit was removed and new floor and rear bulkhead
with instruments were built from plastic card. Seats, instrument panel
and everything else was scratch built. The interior was painted dark
gray and dry brushed, and the seats received seat belts from lead foil
and Reheat photo etched brass buckles.
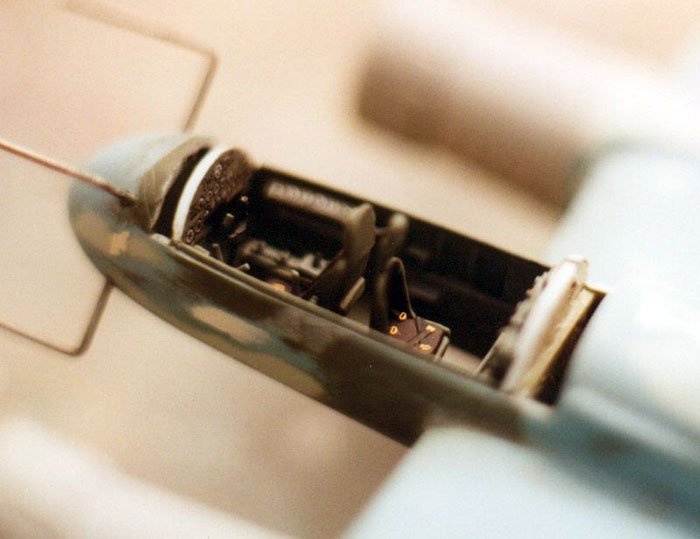
I had
bought the Falcon Clear Vax canopy which was trimmed down to fit the
fuselage, but I had no idea as how to fix it to the fuselage! This was a
tedious work, but finally I had solution! The rear end would be blended
to the fuselage with putty, and for the sides I made a recess the canopy
fit quite well into, and for the front I also would apply some putty.
The canopy
was cut in two halves where the real canopy is split vertically, and the
curved beam that the canopy is built up around was fabricated from
plastic card and was glued to the front canopy half with CA glue. Yes, I
was not aware of the effect CA has to clear parts, but I became aware of
it quite soon! I was able to remove most of the white residue by
polishing the canopy. On the front canopy half I also cut out the
pilot’s small left side window he usually keeps open.
The two
halves were glued to the fuselage with epoxy glue, and the joint with
the fuselage all around the canopy turned out to be acceptable.
Wings and Engines
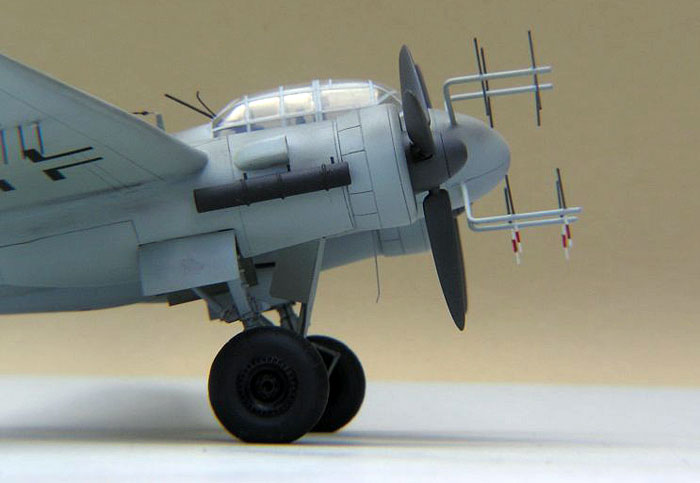
After
thinning of the trailing edges the panel lines were scribed and the
wheel well front ends were prepared for the new engines. The Italeri
engines had to be modified considerably to fit the Revell wing. The
cowling flaps
were too
large in diameter and very crude in detail. The front of the engines
were sawed off and turned on my “hand drill lathe” to the right shape.
The cowling on the Jumo engine was not symmetric on upper and lower side
on the real engine and had to be cut and angled to get a correct look.
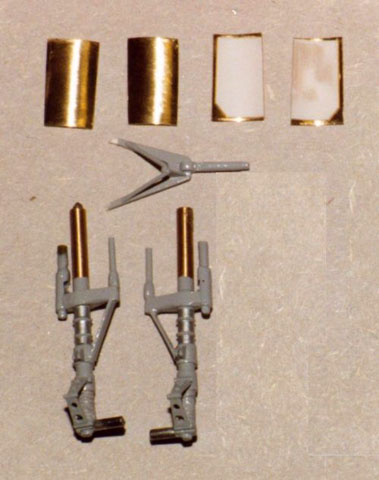
The
propeller shaft bearing was strengthened with a brass tube, and for
exhaust flame dampers I also used brass
tubes.
None of
the different kit propellers looked like the G-6’s, so first I tried to
use the Italeri propeller blades, but I was not pleased with the result.
I had heard of resin casting, so why not try it!
Together
with a friend I bought the rubber for the die and the polyurethane
resin. First he tried and then it was my turn. I made one master
propeller blade from two Revell blades and gave it an extra twist for
the right look, and used an empty match box to pour the rubber into. I
lowered the propeller blade into the rubber and secured it. The mould
turned out quite good, of course there were small holes in the rubber as
I had no vacuum chamber or any other way to get rid of the gas bubbles,
but the cast propeller blades were to my liking after polishing and
painting. I made new sets of wheels when I really got going!
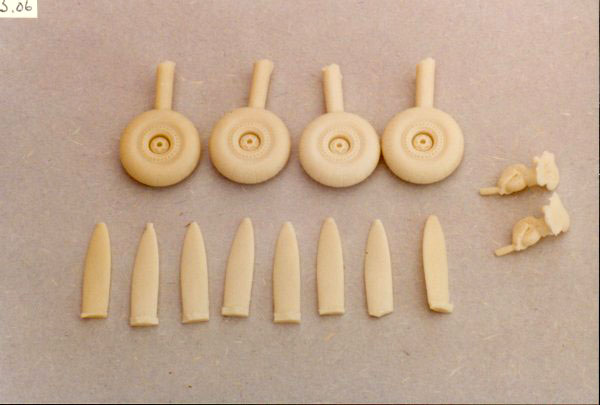
Finally I
attached thin piano wire to connect the blade to the center piece. I
modified Italeri spinners with brass tubes to take the new propeller
blades.
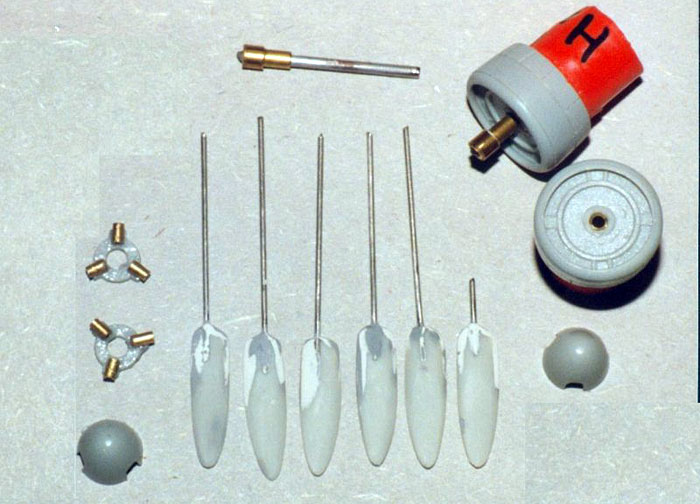
The main
landing gear was made from 1/16” piano wire and some brass tube, and it
was soldered together, not glued! The rubber protection for the oleos is
actually made from ordinary masking tape! The oleo legs are in 0,25 mm
plastic card, and oil pipes were made from thin copper wire.
The wheel well doors were made from 0,2 mm brass plate and were
lined on the inside with thin plastic card.
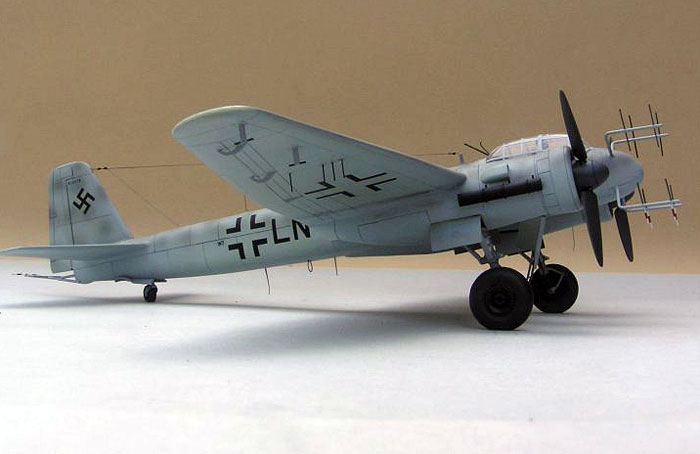
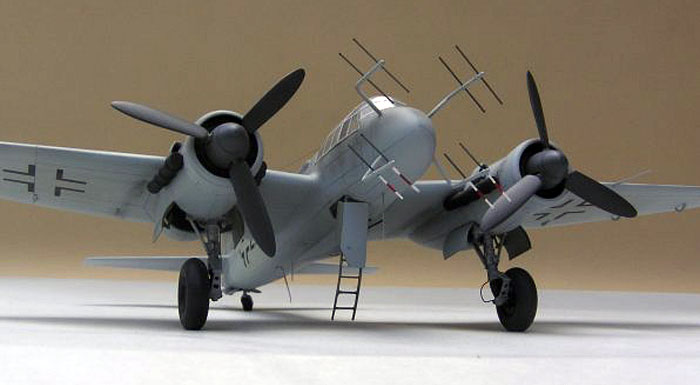
Many
photos were used to get the right “attitude” for the G-6 standing on its
depressed, scratch built landing gear, but now I think the main gear is
leaning a little too much forward!
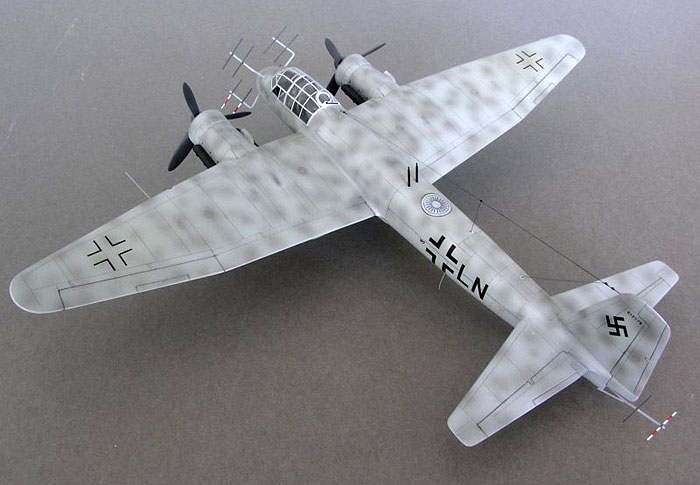
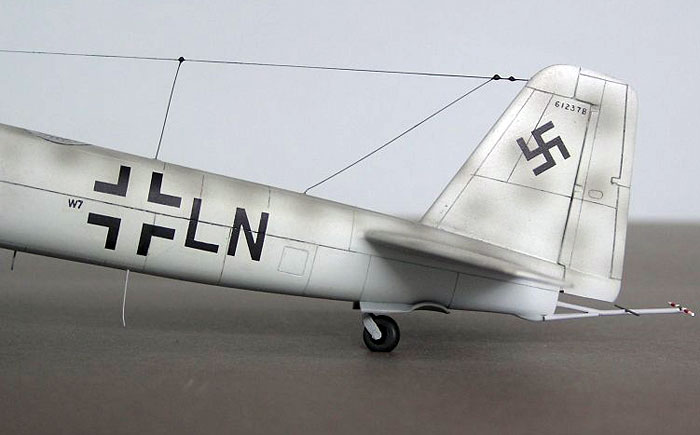
There is a
picture in the old Airfix magazine guide 23 of W7+LN (NJG 100) said to
be a G-7a! This was to be my model!
From
Hannant’s I got som Xtracolor paint jars which I mixed to RLM76
according to a paint chip from the old “O-nine galley” of T. Hitchcock ,
and painted the G-6 with my old Badger 200, purchased in 1974. My
compressor was from an old refrigerator, and the reducing valve I had
found on a Fischer control valve on the scrap heap at work! Blobs in RLM
75 were painted on the upper surfaces with all the skill I had after a
few hours of spray gun painting!
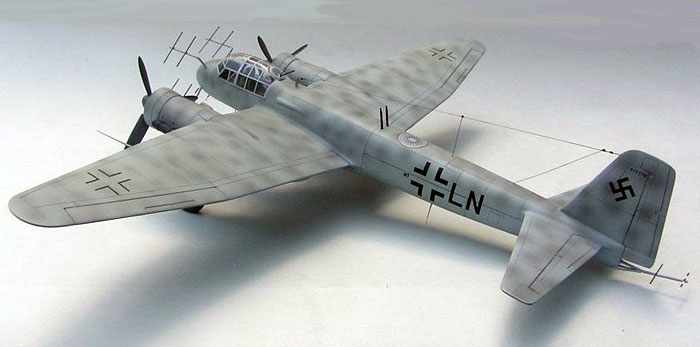
Decals are
mostly Microscale, the code letters were Letraset on a paper blown to
the right size on a Xerox, the antenna to the Peilgerät 6 was
drawn by me and reduced in size on the Xerox, then both were copied to a
clear film sheet. Now I clearly see the antenna is far too large, but my
reference library was very small at the time (!).
I used
gloss and matte acrylic varnish to get the final cotes, and according to
my present opinion I did use too much matte. The canopy framing is from
decal film strips that was painted together with the airframe.
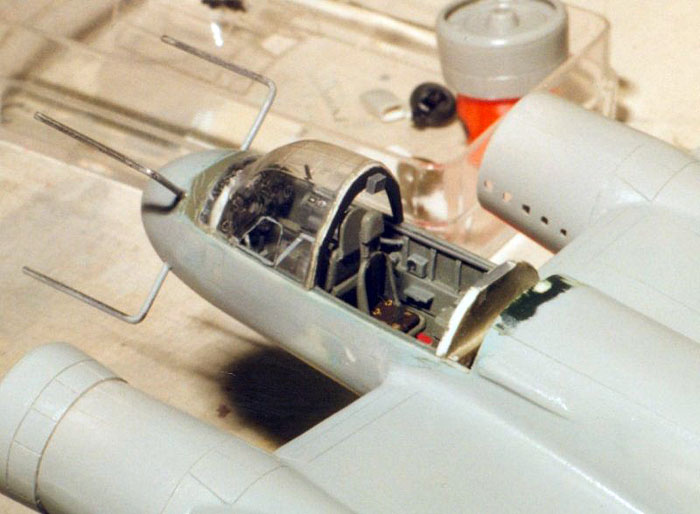
The only
details kept from the old Revell model were the piano wire poles for the
antennas. They were in the right area and with some minor bending looked
all right. They were bent to point slightly downwards in profile and
secured with CA glue and thin stretched sprue antennas of the later,
canted style, SN-2 completed the arrangement, the lower half of the
bottom antennas were painted with red and white stripes as was the tail
SN-2 antenna.
The rest
of the antennas were also made from strue, the right wing lower side
have two FuG 101 radio altimeter antennas and FuG 217 tail warning whip
antennas. The lower fuselage have the whip antenna FuG 16ZY (VHF radio),
the FuG 25 IFF antenna, the FuG 16Y loop antenna and the FuG 10p
trailing antenna for HF radio. The barrels for the belly pod were also
made from brass tube.

On the
upper fuselage is the wire that holds the FuG 10p HF radio and FuG 16
VHF radio antennas. Thin strue was used for the radio antenna wire from
the small mast to the fin. Also on upper fuselage is the Schräge
Musik installation of two MG 151 made from brass tube.
This model
has virtually no weathering at all, because at that time I did not find
that necessary! I think I brushed on a little pastel chalk powder some
time later, but to be honest, some models do look good in clean
condition!
The old Scale Models International had an interesting article of the Ju
88 in August 1993 which coincided perfectly with my project! There were
good drawings (ASP Plans Service) of all details needed, e.g. panel
lines. The only other reference I had at this time was William Greene’s
Warplanes of the Third Reich which did not say the G-7 had pointed wing
tips like the 188, so for many years I stated this was a G-7! I know
better now, or do I? I still regard this book the ultimate reference for
the Luftwaffe, even though some facts are probably wrong.
Comments
This
project was started way back in 1976, continued in 1993-94, when the
model won its class at the IPMS Open in Sweden, and it ended in 2003
when I made some repair work and went to Scale Modelworld where this old
lady won the converted class!
My old G-6
is now retired and sits gracefully on its glass shelf where I can watch
it every day. I think she is worth this rest after 27 years and some
plastic surgery!
Click the
thumbnails below to view images full-sized.
Click the "Back" arrow on your browser to return to this page.
German Night Fighter Aces
of World War 2
Aircraft of the Aces 20 |
|
|
|
|
Author: Jerry Scutts
Illustrator: John Weal
US Price: $19.95
UK Price: £12.99
Publisher:
Osprey Publishing
Publish Date:
June 5, 1998
Details: 96 pages; ISBN: 1855327147 |
|
|
 Home
| What's New |
Features |
Gallery |
Reviews |
Reference |
Forum |
Search
Home
| What's New |
Features |
Gallery |
Reviews |
Reference |
Forum |
Search