|
Hasegawa's
brand new 1/32 scale
Nakajima Ki-84 Frank
by
Jay Laverty
|
 |
|
Nakajima Ki-84 Hayate
Frank |

Hasegawa's 1/32
scale Ki-84 is available online from
Squadron.com
The Usual
Hasegawa Fayre...
|
Being a fan of Japanese aircraft designs I was thrilled to put it
mildly when I heard we were to expect a Frank in 1/32 scale from
Hasegawa. Having built their recently released 1/32 scale Fw 190D-9, I
knew we could expect some nice tooling, good fit and an easy build.
As usual, Hasegawa doesn't disappoint.
I have to say thanks here to my friend Toru Seki for sending my Frank
over when it was first released in Japan, even though it took me a few
months to get it built it was nice to have it so soon.
This model would be very acceptable to the box jockey and will build
into a suberb model straight from the box, however for the detailer,
this model forms an excellent basis from which to work.
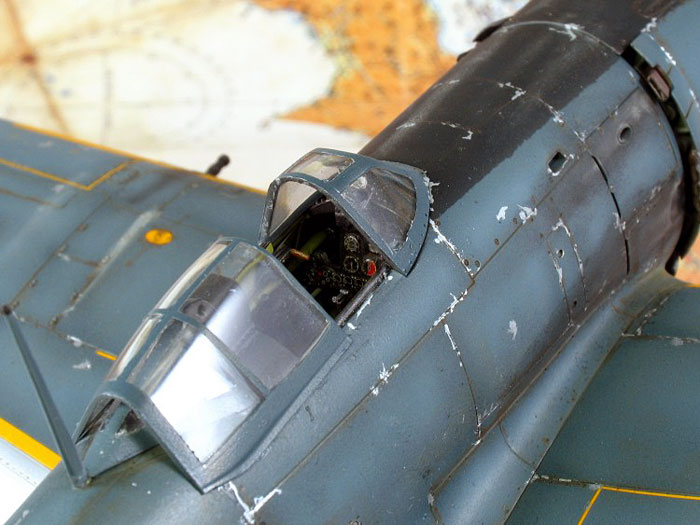
The cockpit does have a couple of 1970's-style throwbacks in the form
of moulded on detail but this I can live with. As I intended only to do
a small amount of additional detailing on this model I merely painted it
and weathered it for effect.
The cockpit received only minor additions in the form of some wiring
using fuse wire and plastic rod.
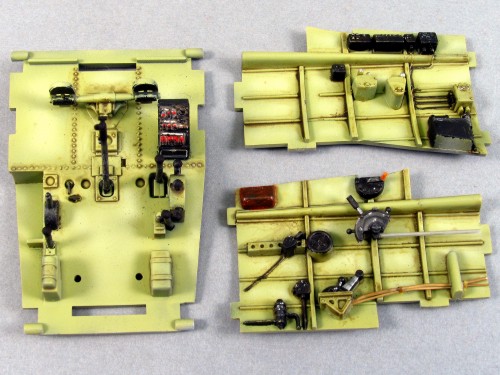
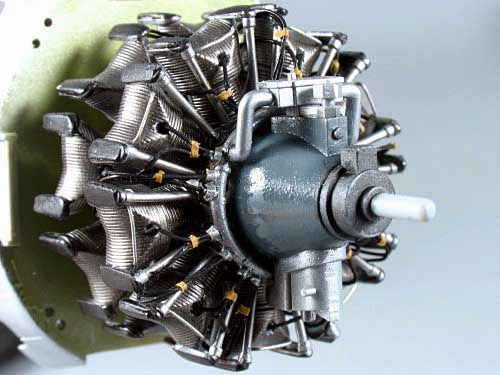
The engine is where I spent the majority of my time on this model and I
hope it was time well wasted!
I used fuse wire held in place with a combination of superglue and
tamiya tape to detail the wiring looms, and found that this was all that
was necessary. it sounds easy but it took several days, and a few tins
of Boddingtons to complete.
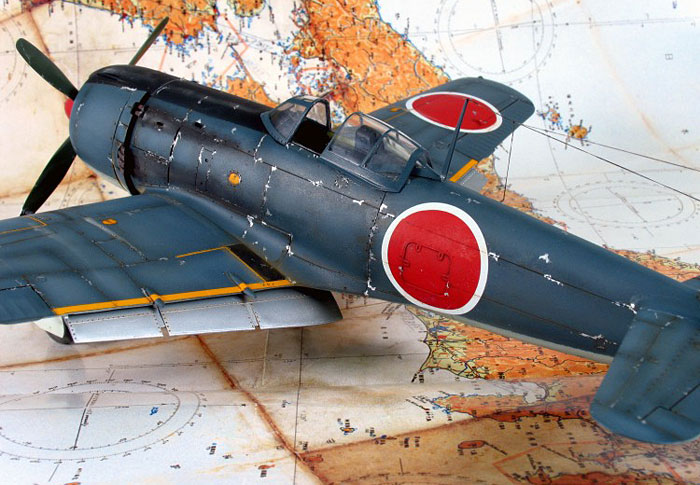
The only issue with accuracy on this kit is the fact that Hasegawa chose
to have the flaps dropped, which in reality was a very rare occurrence,
as the plane was never left on the field with them dropped. I had
contemplated doing the necessary work to fit them into place, as it
would mean some surgery to the interior edge of the flaps and some
carving of the slots that they fit into. But I though that they look
much cooler dropped and decided to throw historical accuracy out the
window in a concession to my personal taste and laziness.
I'll bet that this isn't the first time that has happened in this
hobby and it wont be that last I'm sure.
Don't ask me to explain why, but I subscribe to this strange passion
that I have to build something aside from the three options provided in
any kit I do. Bloody modellers - never satisfied.
This particular scheme caught my eye whilst I was perusing the Gakken
dook on the Ki-84 and I knew that this was the one (of course this was
after I had completely messed up the planned All metal version in an
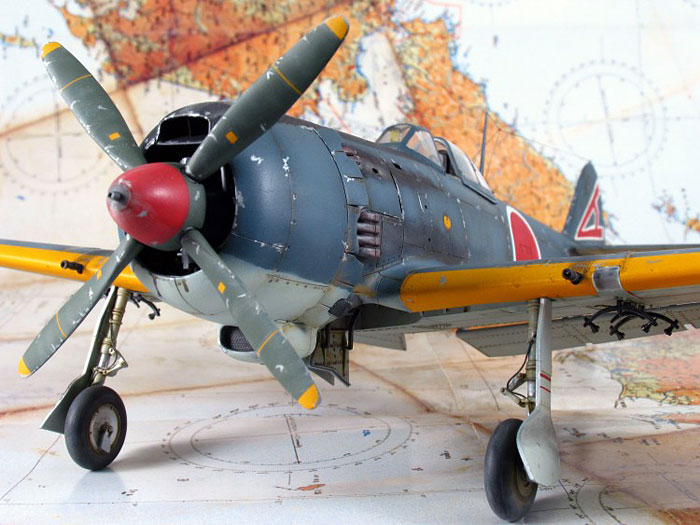
Alclad misadventure!).
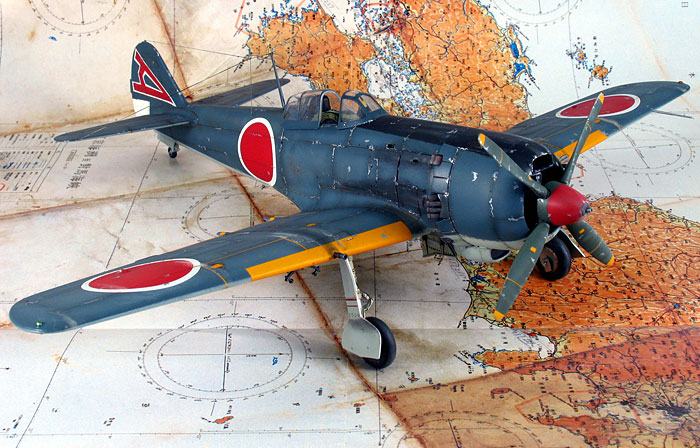
I mixed up some Xtracolor Gloss Sea Blue, Violet Grey ( RLM colour )
and Intermediate Blue until I found a colour that I was satisfied
matched the books colour chips ( and yes, I know how unreliable printed
chips are but hey, what are you gonna do, It's not like I've got a Frank
out back I can check for accuracy ) and proceded to spray the scheme,
using a shading technique to achieve the weathered effect. Dont ask me
ratios of amounts as I generally pour it into the cup and hope for the
best.
I used Gunze's decal setting soloution for the first time and was
impressed. Even if the entire range have those hokey "Mr. Whatever"
titles, it still works a charm. Worthy of mention here is MDC who had my
Mr. Setter and Mr.Softer (my vote for most reservoir dogs named
modelling product on earth ) on my doorstep two days after I called
them. Nice one Margret and Bob!
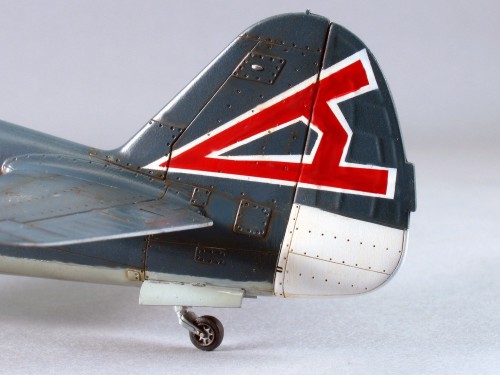
The tail markings were the only real challenge to doing a different
scheme from the box as this required some masking and clever placement
of leftover decal from the sheet. It took an evening to do but the
effort was well worth it as I am pleased with the result.
That finished it was time to add the Raw Umber oil wash and matte the
entire model down.
Once the matte varnish had dried I attached the aerial using lycra
thread, and did a bit of chipping using Model Master Chrome which my
friend Tom Winter flies over for me from the states. And he brings a few
hundred people as well just to make sure the plane isnt empty of course.
Finally, the CMK weathering pigments were applied. I do these last as
if I did them sooner I would end up with my fingerprints all over the
place.
In summary, I would say this model is a superb offering from
Hasegawa. If it isn't sold out where you are I would heartily recommend
buying one even if you have only a passing interest in Japanese
aircraft.
I hope you feel I have done the model some justice, as I certainly
enjoyed building it and plan on building about three more!
Click
the thumbnails below to view larger images:
Model, Images and Text Copyright ©
2005 by Jay Laverty
Page Created 15 March, 2005
Last Updated
15 March, 2005
Back to
HyperScale Main Page |
 Home
| What's New |
Features |
Gallery |
Reviews |
Reference |
Forum |
Search
Home
| What's New |
Features |
Gallery |
Reviews |
Reference |
Forum |
Search