|
Hasegawa's new 1/72 scale
Avro Lancaster
B.Mk.III
by
Alan Roffey
|
 |
|
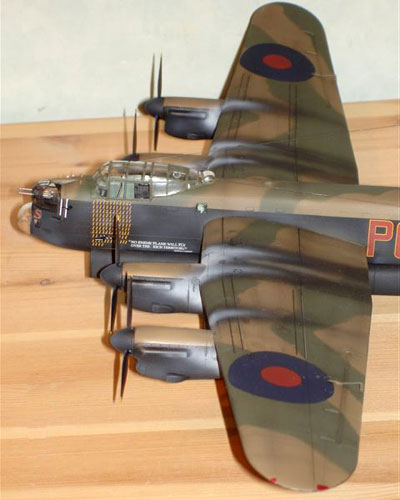
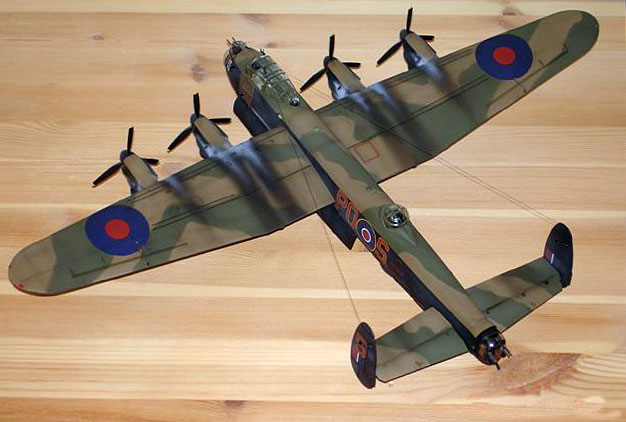
Lancaster B.Mk.III |

HyperScale is proudly supported by Squadron.com
This is the first
Lancaster I have made since I was a boy. That`s some time ago. The
options until this Hasegawa kit came along were not for me. The Tamiya
1/48 is too big to keep anywhere, and the 1/72 Airfix and Revell kits
are too old for my liking. I like the Lanc, but I`m no expert on it, so
thanks go to my mate Chris for his advice on some of the details.
What gave me even more inspiration than usual to build this kit, was
that three friends and myself crawled all over the inside of the real
thing at Coningsby, UK, home of the BBMF. This was an amazing
opportunity, and it made us realise how difficult it must have been for
the crews. All four of us had a little difficulty in negotiating the
main spar, and we were not wearing any flying equipment. As for sitting
in the rear turret; well, I wouldn`t have fancied that job.
I digress. Back to the kit. Make no mistake, this is a big project. I
made the parts count 278, the instructions consist of 16 sections, doing
the payload is a job in itself, and it was a bit of a monster to spray.
Although a very good kit the cockpit is, frankly, very basic. However,
I`ve never really been a `cockpit modeller`, so this didn`t bother me on
a kit of this scale with a closed canopy. The same can be said for other
interior areas, such as the bomb aiming platform, which I don`t recall
being much like the kit`s rendition. I only did a bit of dry brushing
with Aeromaster Sky and Rub `n` Buff, and used the kit transfers for
instrument panels. Some care was needed. I almost got the cockpit floor
the wrong way up. Hasegawa tell you to paint the yellow disc on the
pilot`s head armour facing forward, but I`m sure I`ve seen photos with
it facing to the rear.
The fit of the fuselage halves was good, and dry fitting the wings
showed a similar story. I`ve read articles about how this kit can be
painted, transferred and weathered in sub assemblies before putting the
whole thing together. Well, while there are some advantages to this,
such as handling, this sort of approach isn`t for me, so I stuck the
wings on, and the tail, even before I`d put the engine nacelles on them.
However, I did of course leave the turrets off to prevent damage.
I nearly always make at
least one fundamental error in a kit through simple carelessness or not
following instructions. It must be something to do with age and/or
eyesight. On this one it was getting part D3 the wrong way up in one of
the undercarriage bays, but the correct way up in the other. This part I
presume is something to do with the undercart activation system, but it
doesn`t really show with the undercarriage in place.
It was about this time I noticed something I`d never noticed on the Lanc
before; the way the outboard nacelles slant inwards slightly at the
bottom when viewed head on, unless Hasegawa have it wrong, or it`s an
optical illusion?
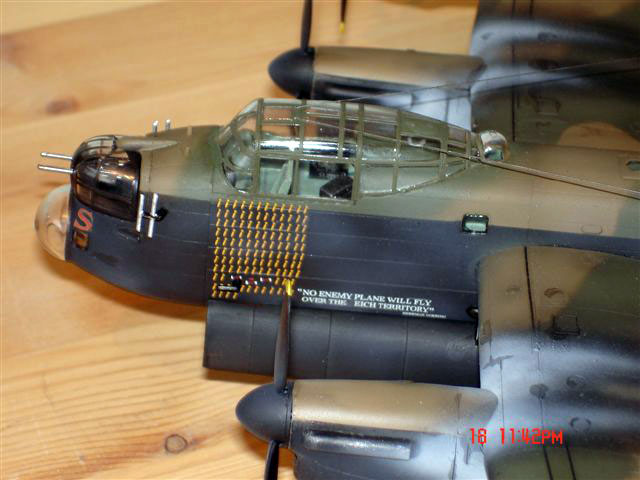
Anyway, I decided to depict an aircraft with those pesky small windows
along the fuselage painted out, as per the wonderful box artwork, but
they still had to be installed of course. It`s not at all clear to me
why these were included in the real aircraft in the first place. What
purpose did they serve? Anyway, with hindsight, it would have been a lot
easier to affix these prior to attaching the wings!
Paint
I elected to spray the
upper surfaces first, as this would make masking easier between the
black and the upper colours. I`ve always thought RAF Dark Earth was
inappropriately named, as it isn`t really dark at all, is it? Anyway,
this went on first as it`s lighter than RAF Dark Green (which was
appropriately named). I usually pre-shade, but I didn`t on this model as
you cannot pre-shade black, and I wanted to try something different on
the upper surfaces, more of which later. After marking out the
camouflage pattern with a pencil, I started to spray the green free
hand, but didn`t like the look of it, so stopped and masked off with
children`s play dough to give a much sharper (and more authentic)
demarcation. In the photos you maybe able to spot on the nose of the
aircraft where I didn`t redo the free hand bits. This is because I class
myself as sometimes being a bit of lazy model maker. Time is a premium.
Then masked off for the black on the undersides, and the main paint job
was complete. It sounds easy when you read it like that in articles, but
it seemed to take for ever. It`s a lot of aircraft to spray. My
instrument of camouflaging was a Badger 150.
I don`t think a lot of modellers do this, but what I like to do next is
put the undercarriage on. It`s just a habit I`ve got into over the
years. The instructions were not too clear on the location points for
this, but I figured it out, although a lot of dexterity was required.
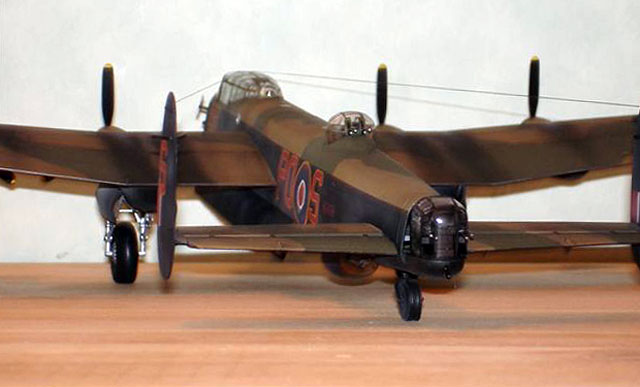
Something else I hadn`t noticed before is how the undercarriage legs
lean backwards slightly at the bottom. Not very observant am I. One sad
thing about this kit is that the tail wheel looks like it came out of
the Tamiya 1/48 box, it`s so obviously over scaled. I don`t understand
how they got this wrong.
Decals
Now some Humbrol gloss
coat for the transfers (the fact that I say transfers instead of decals
is an age thing), which I only spray where the transfers are going to be
placed. Another strange habit of mine. Not being a Lancaster expert, I
made a hash of the red lines on the underside, putting them in the wrong
place. I should have consulted my friend first. Apart from that, they
went on well with Micro Sol.
I`ve read a few articles
where people have complained about Hasegawa transfers, saying they are
too thick, but I`ve always found them the best, and commendably thin.
However, they did leave the letter `R` out of the word `Reich`. Oh dear!
I`m afraid this was slightly beyond my hand painting skills to correct,
so I had to leave it. Never mind.
Weathering
As the black could not be
pre-shaded, I post faded the panels with Aeromaster matt varnish with
two or three drops of Aeromaster Dirty White. This breaks up the
blandness of the underside and the fuselage sides.
On the upper surfaces I sprayed along panel lines with quite a thin mix
of black and brown artists oils thinned with lighter fuel. Why lighter
fuel? Well it was just something I read in an article, and I`ll try
anything once. I wasn`t entirely satisfied with the effect, and felt
that perhaps a wash all over by hand brush may have been better. Perhaps
next time. I then varnished with a mix of Polyscale satin and matt, but
felt this looked a bit too shiny for a Lanc, so went over again with
Humbrol matt coat, but lightly to leave an eggshell effect instead of
flat matt.
The exhaust staining is Humbrol matt black streaked over the wings, with
Aeromaster US light gull grey on top of this near the exhausts. This
colour seemed a good match with colour photos in Roger Freeman`s `RAF of
the Second World War in Colour`. It was also sprayed on the nacelle
sides.
Oil staining with thinned Tamiya semi gloss black was applied around the
engine areas, and a little Rub `n` Buff Pewter colour was added for
paint wear.
I didn`t chip the prop blades as looking at many photographs from three
books did not produce any examples of Lancaster propellers in such a
condition.
Removing canopy masks always gives me a sense of satisfaction, and it
was no exception on this kit, the Eduard masks doing the job very well.
In forcing the forward bomb door actuating arms in place, I dislodged
the bomb aimers platform. This was very difficult to relocate through
the opening for the front turret, and after affixing said turret, the
part came off again, so I`m afraid I gave up on it!
The bomb load on a Lanc makes you realise that, although we love these
aircraft for many reasons, it was a machine capable of much death and
destruction. 18 250 pounders and a Cookie; that`s a lot of explosive.
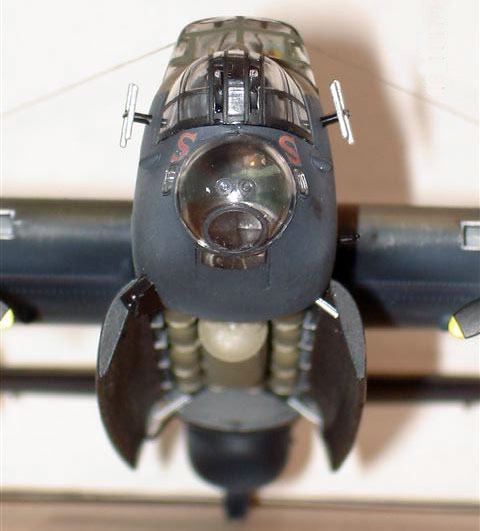
The bomb doors fitted OK,
but I wondered from looking at photos if they are a bit too far open.
As this model is 1/72, I wanted to use .05 `rig line` for the aerials,
but frankly my eyesight could not cope with this. I simply could not see
it clearly enough to put into the drilled location holes. Therefore, I
had to resort to .15 instead. I painted it Citadel Colour Boltgun Metal.
I used to use enamel paint for this, but found that over time, it shrank
the wire and snapped aerials off!
One problem I always get from handling is finger acid wearing off paint
from wing trailing edges. I found wearing a surgical glove
unsatisfactory as it affects my sense of touch. Painting over the
affected areas is not appropriate as the colours look different because
of the weathering process. Therefore, I rub the edges with graphite
powder.
I thoroughly enjoyed making this model. I am hoping
Hasegawa/Tamiya/Trumpeter will continue the theme with a Stirling or
Halifax.
Click the thumbnails below to view larger
images:
Images and Text Copyright ©
2006 by Alan Roffey
Page Created 23 March, 2006
Last Updated
22 March, 2006
Back to
HyperScale Main Page |
 Home
| What's New |
Features |
Gallery |
Reviews |
Reference |
Forum |
Search
Home
| What's New |
Features |
Gallery |
Reviews |
Reference |
Forum |
Search