|
Hasegawa's 1/72 scale
SAR Lancaster
Mk.10 SR
by
Scott Bregi
|
 |
|
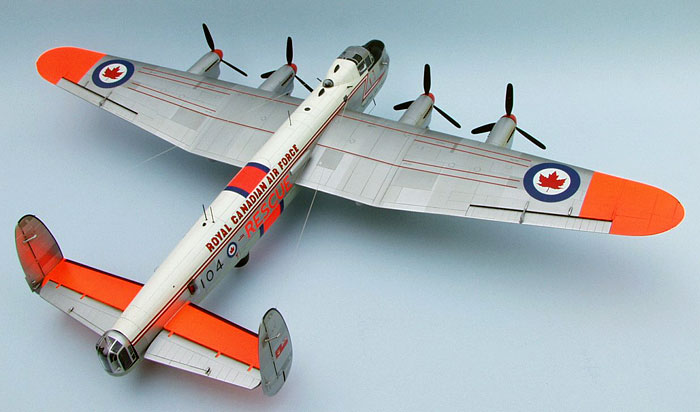
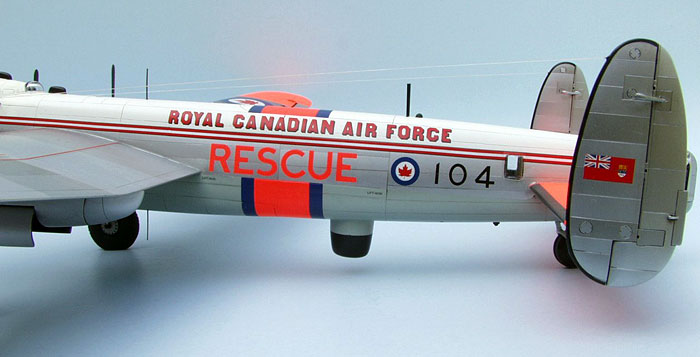
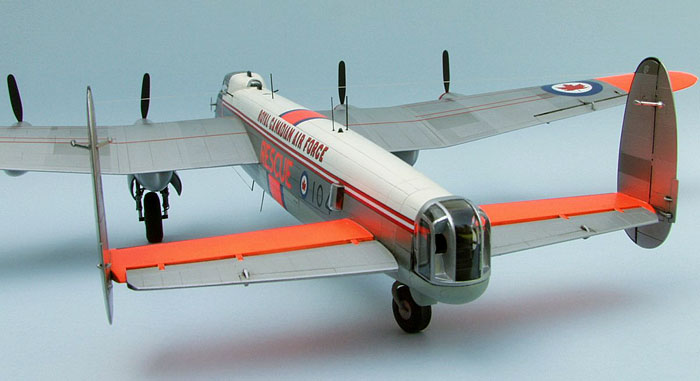
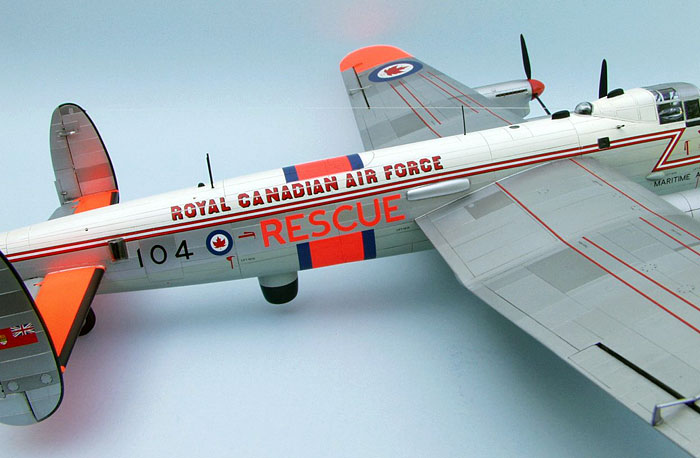
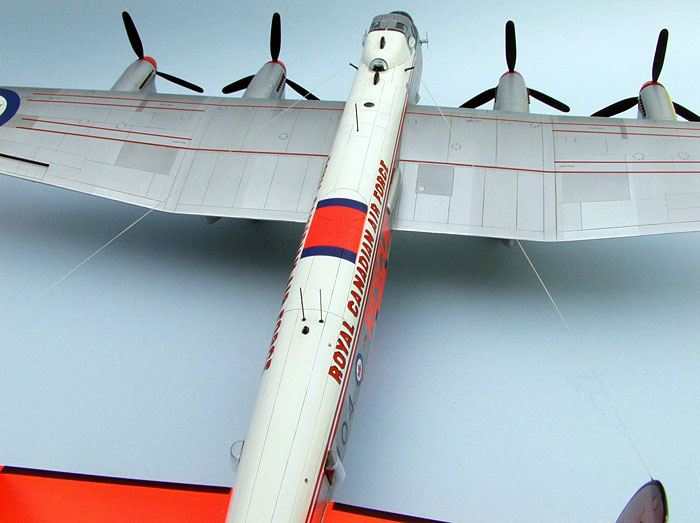
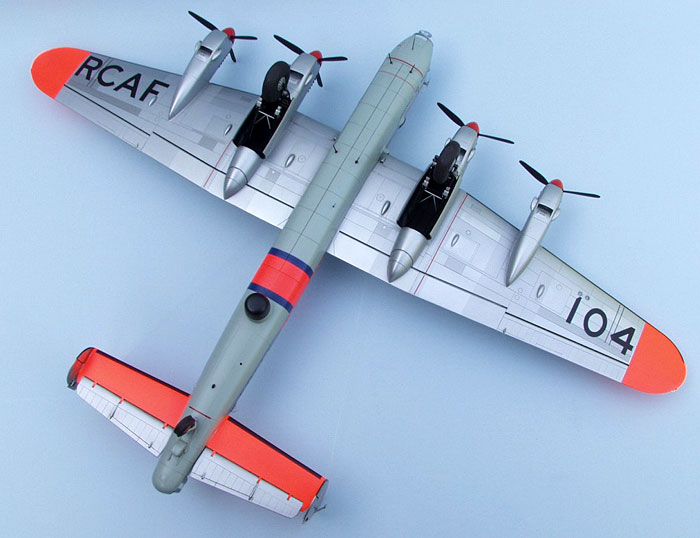
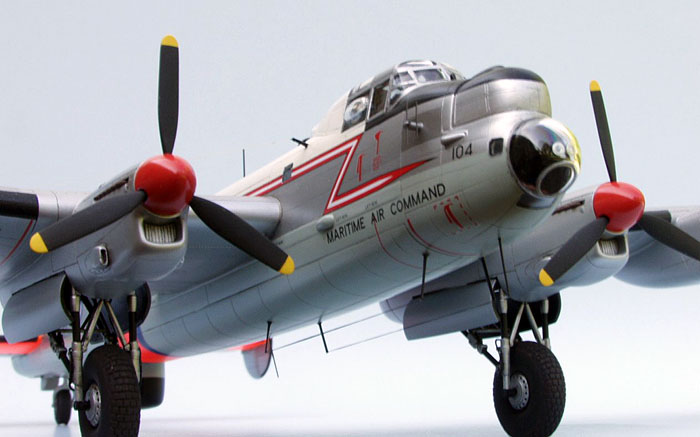
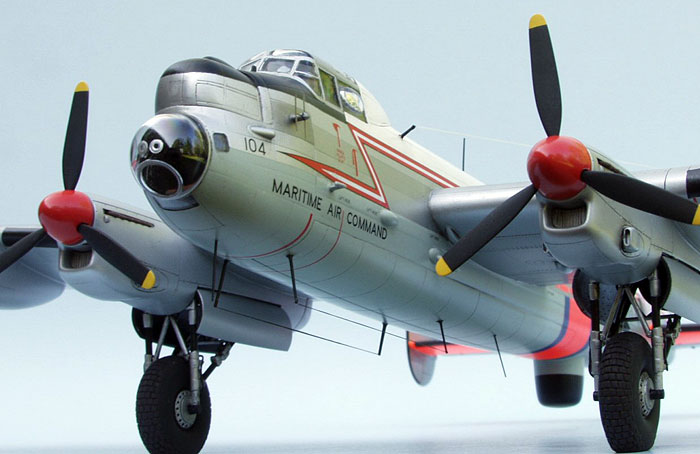
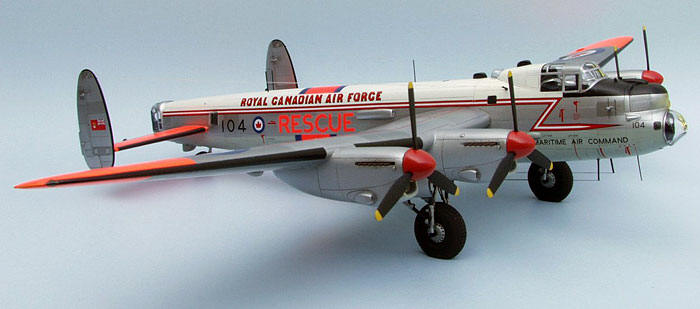
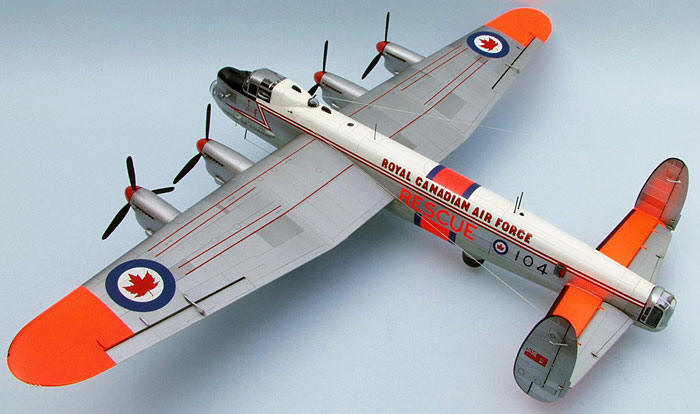
Royal Canadian Air Force
Search and Rescue (SAR)
Lancaster Mk 10 SR
“FM104” |

HyperScale is proudly supported by Squadron.com
Hasegawa 1/72nd scale Avro
Lancaster B Mk II Special Edition conversion with Leading edge Decals
and resin parts.
Here is my first foray into the “Heavies” as I normally build single and
twin engine fighters and such. I first started this project as an Out of
the box project but after perusing the internet I came across some
pictures of a very colorful Lancaster sporting the vivid colors of the
Search and Rescue arm of the RCAF. I couldn’t pass it up! All those drab
green/brown over black schemes just didn’t catch my eye. After a little
bit of internet research I soon found out that the plane in the pictures
is still with us. You can follow the restoration process at FM104’s home
page at:
http://www.lancasterfm104.com/history.html
History
FM104 was built at Malton,
Ontario in April 1945. She was based at RCAF Stations Greenwood, Nova
Scotia and Torbay, Newfoundland. FM 104 at retirement was a Mark 10 SR
(for Search and Rescue).

Lancaster FM 104 was
finally struck off charge on 10 Feb. 1964 when she was sold to the RCAF
Assn, Toronto region, so she can take part in the Official Retirement of
the Lancaster celebration at Canadian Forces Base, Downsview on April 9
1964. For the next 35 yrs FM104 resided at a memorial park mounted on a
plinth (or pedestal for us colonials!) near the CNE (Canadian National
Exhibition) grounds.
Luckily she is currently
undergoing restoration and will be on permanent loan to the museum for
indoor display. FM104 is being restored to its original wartime colors,
as it left the factory at Malton in 1945.
As I had stated earlier I
had planned this as an Out of the Box build. But then I heard Leading
Edge (LE) was re-releasing their earlier decal sheet to coincide with
Hasegawa’s release of the Lancaster. While waiting for them to release
the set I saw that Hasegawa was releasing the kit as a special edition
with the Leading edge decals and resin bit provided in the box I was
elated! I also added the beautiful Eduard pre-painted zoom photo etch
sets to fill out the cockpit. In order to do a post war Lanc you have to
give it new treads! All post war Lancs had the treaded tires not the
smoothies that were installed during the war. So the nicely cast Belcher
Bits resin wheels where a welcome addition.
The build was fairly straight fwd with no real glitches noted during
assembly. Most of the problems I had stemmed from the fact that this was
my first large model I have done in 20 some odd years and found that it
was a bit wieldy during the handling process. I kept banging the wings
on the lamp above my desk and in the paint booth during the finishing
stages. I actually placed rubber tubing around the outside of my paint
booth to prevent nicking up the paint job.
A fair about of scratchbuilding was done concerning antenna masts and
boy there are quite a few and small details not included in the LE set
like the rear camera track. Luckily the Hasegawa kit contains all the
turret blanking plates in the kit so this sped up the assembly process.
The biggest problem I had was installing and blending in all the windows
as FM104 only had the small windows aft of the nose and below and aft of
the navigation dome. I made a master for the two sonobouy operators’
windows and stretch formed new windows from Squadron Thermaform®.
The kit was finished as
per the kits direction with the addition of the cockpit details from the
Eduard PE set. All the windows were cemented in place with superglue and
puttied over with Tamiya Basic putty. After setting for two weeks I
block sanded the areas flush with the fuselage and slopped on a coat of
Gunze Mr. Surfacer 500. After cleaning up all seams I then primed the
model with Mr. Surfacer 1000 and repaired all panel lines. After this
was done I had put the model down to set so everything can cure for 1-2
months. Even after this lengthy period of time the windows all had
shrunk necessitating another round of putty and Surfacer.
All the sensor and antenna masts were made using stretched sprue and
added to the model just prior to the final paint job. The radar antenna
aerials on the sides of the fuselage were made from an Eduard 1/72nd
scale Mosquito boarding ladder and added after the model was finished.
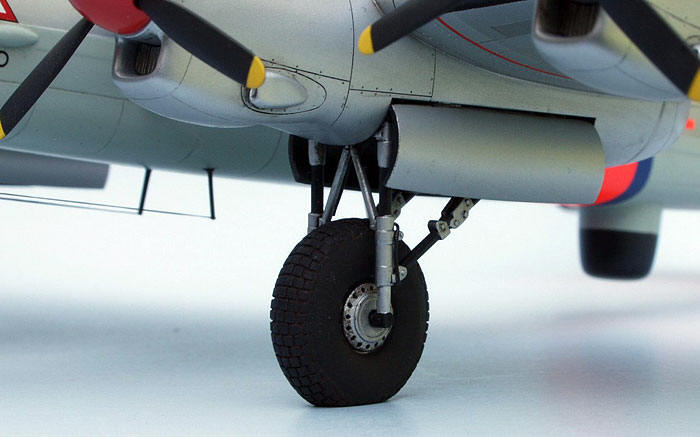
Brake lines were added
using .015 lead fly tying wire. Antenna wires were fashioned using
material used for making stretchable waist bands.
The model was finished
with a combination of lacquers, enamels and acrylics. The entire model
was given an overall coat of Alclad II aluminum. I used a copy of the
original painting instructions to paint and mark my model as the LE
instructions have a few inaccuracies in them. This is mainly in
measurements in placing the markings. Thanks Clive!
 I
then masked off the bottom of the fuselage along the stiffener plate and
sprayed Testor’s Model master aircraft Gray enamel and set aside to cure
overnight. I then masked off the wingtips, horizontal tail and upper
fuselage and primed with Testor’s flat white lacquer. I
then masked off the bottom of the fuselage along the stiffener plate and
sprayed Testor’s Model master aircraft Gray enamel and set aside to cure
overnight. I then masked off the wingtips, horizontal tail and upper
fuselage and primed with Testor’s flat white lacquer.
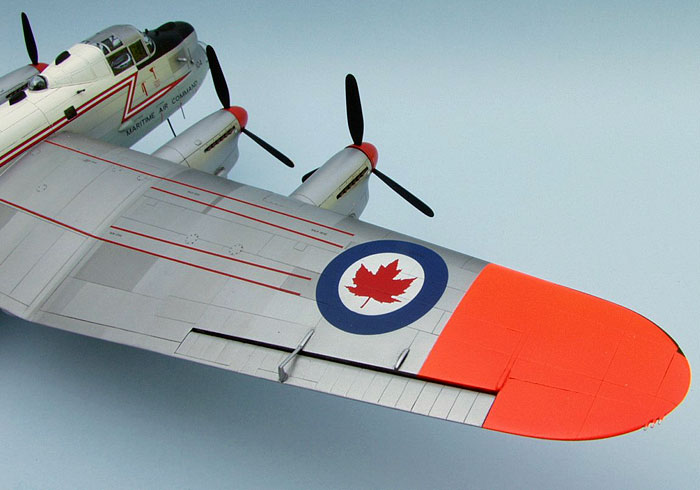
Next, I pained the upper
fuselage Model Master Classic white (gloss) and the wing tips and tail
surfaces Model Master florescent red enamel. This was then set aside to
cure for a week.
I then painted the areas
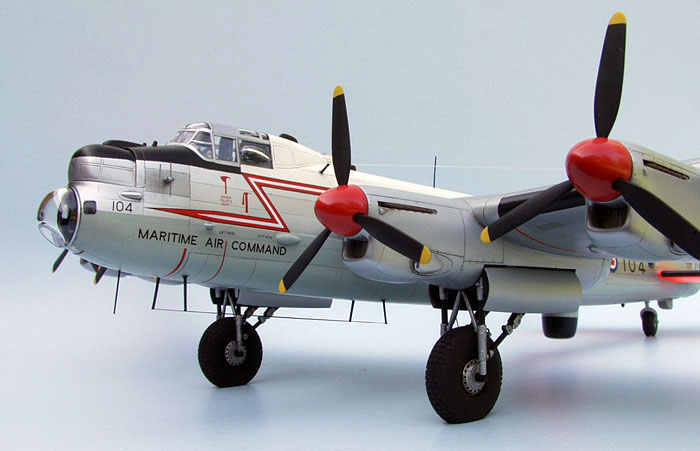
around the engine nacelles a custom mix color to replicate the silver
aluminum paint that was used on the RCAF Lancasters.
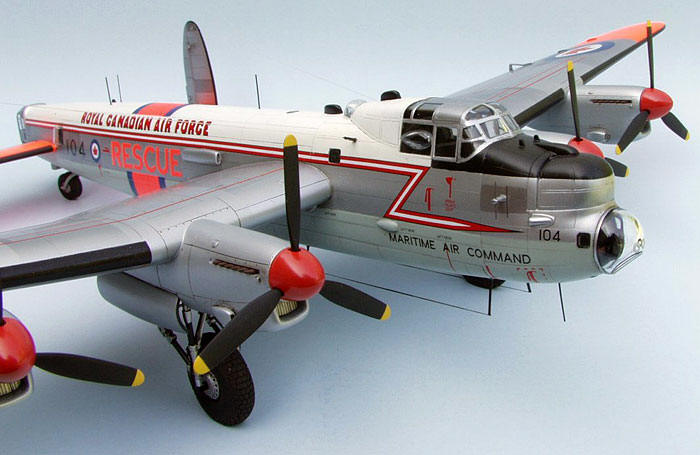
The remaining surfaces
were given a differentiating panel effect using 7 shades of Alclad II
lacquers masked off using Tamiya tape. Surprisingly the Day-Glo red
matched the decals almost perfectly so I did not have to overspray them
in order to get them to match.
The model was gloss coated using Future and decaled as per LE
directions. It took copious amounts of Solvaset to get the decals to
hunker down on the model. Otherwise the decals went on quite nicely.
After the decals dried I then over coated the model using Testor’s Semi
gloss lacquer. Panel lines were highlighted using artist oils thinned
with Turpenoid. I kept weathering to a minimum as these acft were kept
in a high state of cleanliness by their crews.
Well there you have it.
Another fine addition to my collection! I would like to give a great
word of thanks to Clive Reddin. Who is an integral part FM104’s
restoration team. His insight and immense knowledge of FM104 was a great
help in the completion of this project. I only wish I lived closer to
Toronto so I could drop in and say hello and see the real McCoy!
-
Squadron/Signal
Lancaster In action
-
Modelers Datafile
No. 4, The Avro Lancaster, Manchester and Lincoln
Click the thumbnails below to view larger
images:
Images and Text Copyright ©
2006 by Scott Bregi
Page Created 12 July, 2006
Last Updated
21 February, 2007
Back to
HyperScale Main Page |
 Home
| What's New |
Features |
Gallery |
Reviews |
Reference |
Forum |
Search
Home
| What's New |
Features |
Gallery |
Reviews |
Reference |
Forum |
Search