|
Hasegawa's 1/48 scale
Macchi C. 205
'Veltro'
by Werner Scheibling
|
 |
|
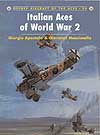
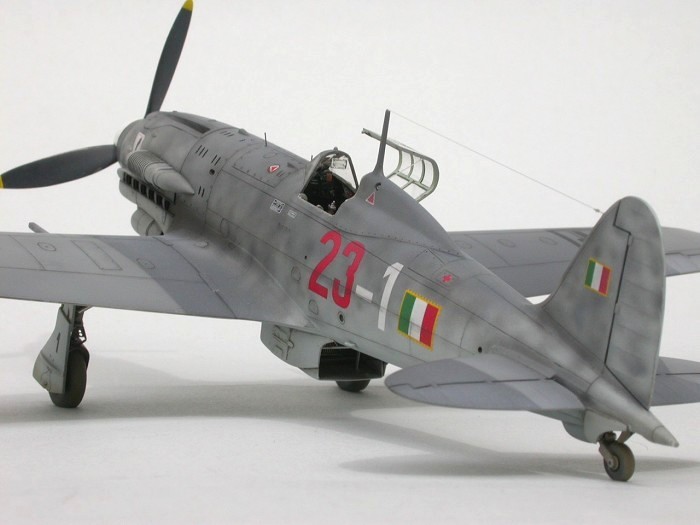
Macchi C.205
Veltro Serie III, M.M.92302
Red 23, 1o Gruppo Caccia, 1a Squadriglia ('Asso Di Bastoni'
/ Ace of Clubs),
Aeronautica Nazionale Repubblicana (ANR),
March 1944, Campoformido (Udine), North-Eastern Italy |

Hasegawa's 1/48 scale Macchi C.205 is available online from
Squadron.com
As with most of my models, the
construction of this Macchi C.205 Veltro ('greyhound') was
inspired by an excellent reference book. In this case I'm talking about
Ferdinando D'Amico's and Gabriele Valentini's congenial work 'Camouflage
and Markings of the Aeronautica Nazionale Repubblicana 1943-1945'. As
the history of the short-lived ANR more or less coincided )with
AerMacchi's finest piston-engined fighter, wide sections of this
meticulously researched book are devoted to the Veltro.
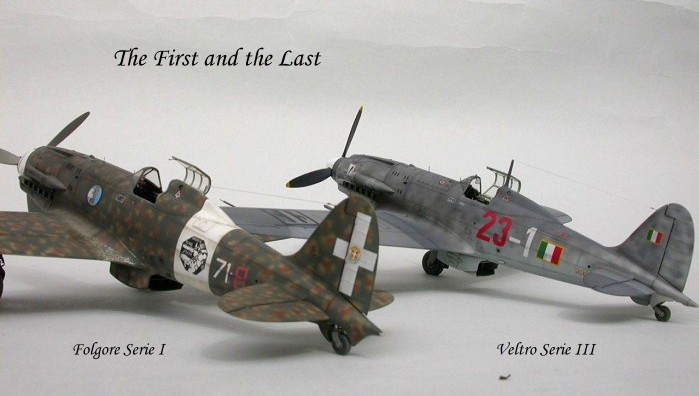
Three and a half years ago I
built a C.202 Folgore, Serie I (see
http://www.features02.kitparade.com/c202ws_1.htm here on
Hyperscale), which represents one of the first AerMacchi fighters
with the famous Daimler-Benz inline engine.
This late Serie III
Veltro here concludes the lineage of fighters Ingegnere
Mario Castoldi designed for the Italian Air Force during World War
II.
A very complex and
aerodynamically refined machine, the C.205 was more or less unsuited for
wartime mass production.
But look at it from any angle
and the Veltro will show off its beautiful lines, inherited from
Castoldi's unique Schneider-Cup racers back in the 1930s.
The Kit
First, I have to confess, that I
'lost' all my in-build photos, including the ones of the cockpit
interior (apart from one). As a technically minded friend of mine puts
it, "The computer problem always sits in front of the screen".
To illustrate all the (IMHO)
necessary alterations and modifications on the way towards a realistic
Veltro, photos of the finished model, where I marked all the
detail work with appropriate comments, will have to do.
I picked up this very nice
Hasegawa kit for a pittance in a closing down sale. Apparently nobody
ever wanted to buy this 'special edition' which included decals for two
'Co-belligerent Air Force' machines - you know, the ones with the
red-white-green roundels. The bargain price made it easy to spend a
little more money on a beautiful (but unfortunately not always
authentic) Sky Models decal sheet.
A lot of what I commented on in
my Folgore feature article also applies to most of the numerous
Veltro kits, Hasegawa has released so far. In order to cover the
whole Folgore / Veltro lineage using as few different moulds as
possible, Hasegawa has produced a somewhat strange hybrid, which is
never completely right when it comes to shape and situation of the
various access panels and hatches. The Veltro's retractable tail
wheel made a new fuselage mould necessary. This, however, is
unfortunately plagued with a seam line, which runs all around the rear
part of the fuselage. Apparently Hasegawa used a copy of the Folgore
fuselage mould, grafted a Veltro tail onto it – and ended up with
an unpleasant ridge that the modeller has to carefully sand off.
The weakest points of the kit
are the spartan cockpit interior, the undersized and unusable exhaust
stacks and the clumsy undercarriage legs, which are additionally riddled
with ejector pin marks. These items cry out for replacements. In my case
I went for Jaguar's unrivalled resin cockpit set for the C.202
Folgore. Designed by Roy Sutherland of Cooper Details, this set is
(in my opinion) still the nicest piece of resin that you can get for
your Hasegawa kit. With a little extra work it is easily transformed
into an authentic cockpit for the C. 205 Veltro. And you get the
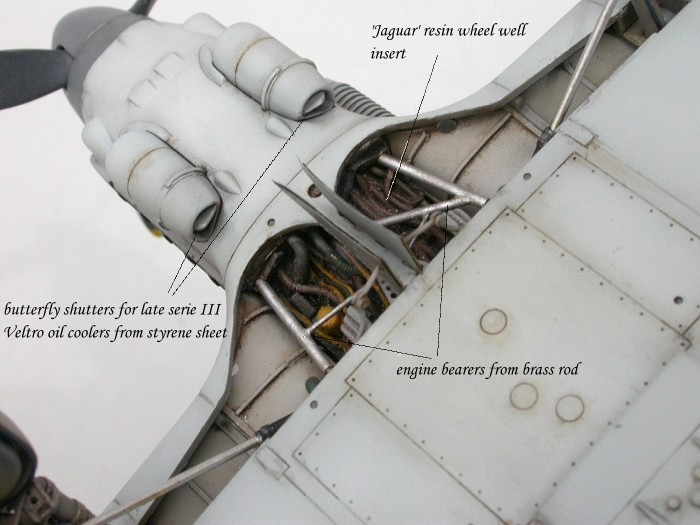
vital, busy-looking wheel well insert along with it.
I decided the exhaust question
in favour of Ultracast's resin set for the Bf 109 F-K, primarily because
it happened to be on offer on an internet auction site for little money.
When comparing Ultracast's resin product with Moskit's metal set, I
found that both are virtually identical in shape and size and resemble
the original as closely as possible. I can really recommend these two
products for any 1/48 scale model with a DB 605 engine. If you don't
mind the paint work, you should go for the Ultracast set, as it costs
markedly less than the Moskit product. The resin casting is, as the name
suggests, perfect in detail and finish.
The undercarriage legs have to
be filled and sanded or replaced by scratch built items. I went for the
second option.
But ending this section with a
negative undertone would be unfair towards the kit. It is nearly perfect
in shape and dimensions and shows off some of the finest surface detail
you can get with a quarter scale kit - just look at these cowl
fasteners.
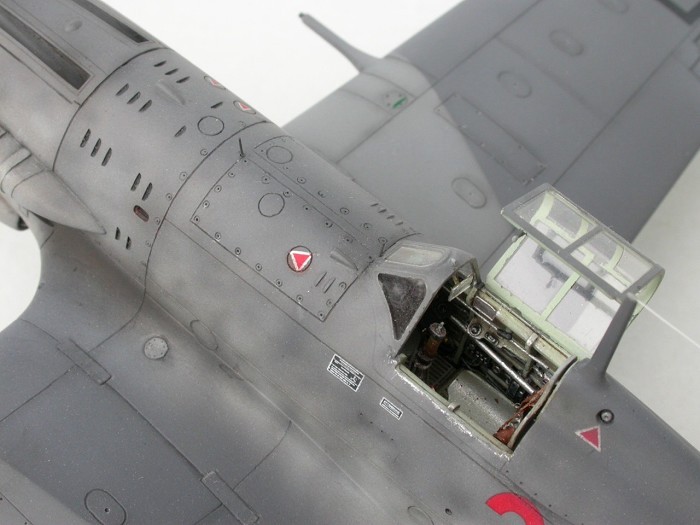
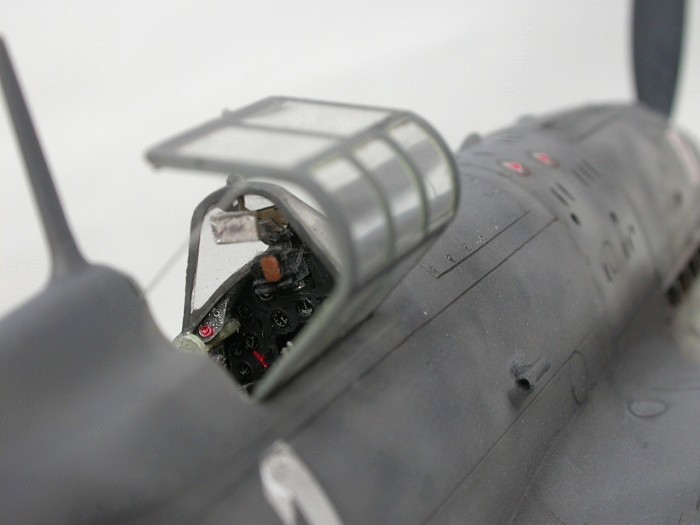
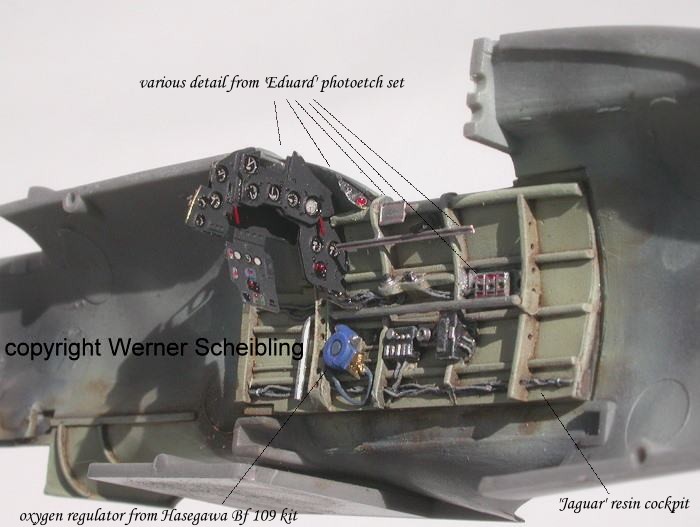
Cockpit
Construction
started with the Cockpit, as you would expect.
Jaguar's resin set lovingly reproduces the Folgore cockpit that
just bristles with mechanical detail.
To turn this little model of its
own into a Veltro cockpit, it is necessary to replace the
bottle-like oxygen regulator with a German 'Dräger' unit. Happily, I
found this part in my spares box, a leftover from a Hasegawa Bf 109 G
kit.
Serie III Veltros
were equipped with a control column that sported a more ergonomic hand
grip, very similar to those found in contemporary German fighters. I
scratch built the whole stick from various shapes of styrene profile
including a photo-etch brake lever and pneumatic leads made from thin
copper wire. The authentic instrument panel with the large Serie III
centre section is from Eduard's lovely PE set dedicated to the Veltro,
as are various other tiny items for the cockpit walls.
Add the typical Italian
leather-and-chain seat harness (RCR photo-etch) and a late series San
Giorgio reflector sight ('Quickboosts' Revi C12D – you can't tell
the difference in 1/48) - and you're done.
Fuselage
Thinning down the exhaust
shrouds in both fuselage halves and opening up the cooling vent at the
front of the shrouds is nice warming-up work for the scratch building
still to come (check the wing chapter). Much to my surprise the
Ultracast exhaust stacks fitted as if they were engineered for this kit.
The stacks were carefully sandwiched between the thinned down shrouds
and secured from the inside with two part epoxy. What a difference to
the original parts!
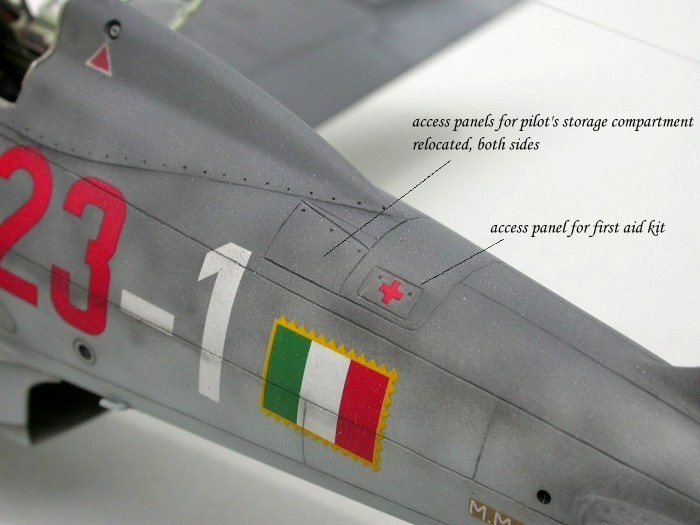
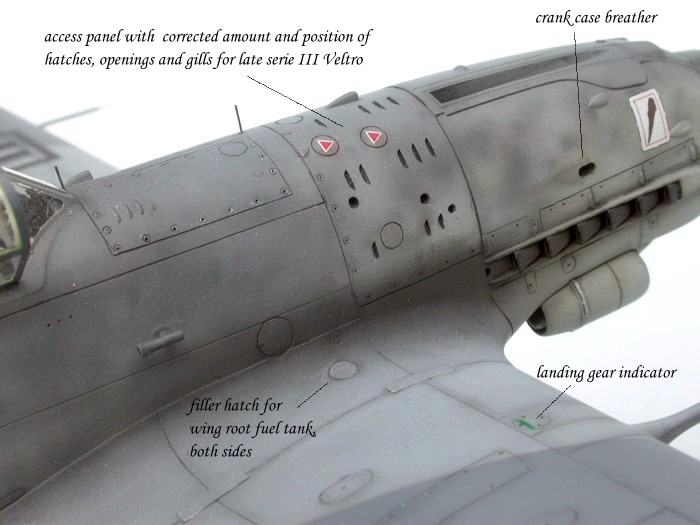
The next step involved careful
study of all available Veltro photos to define the number and
place of all the various gills, teardrop blisters, access and filler
hatches. The most conspicuous modifications are the storage compartment
hatches on both sides of the rear fuselage which were situated further
back on Serie III Veltros, and a new extra panel for the first
aid kit. The right hand side cowling needs a new oblong crank case
breather vent, which has to be carefully drilled out. Quite a few more
alterations concerning gills, openings, hatches and tear drop blisters
have to be made – if you check out my detail photos and compare them to
your Hasegawa kit, you'll see what I mean.
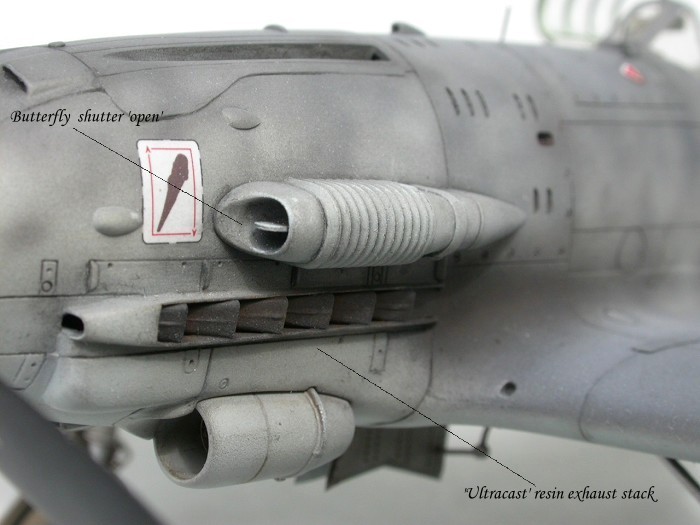
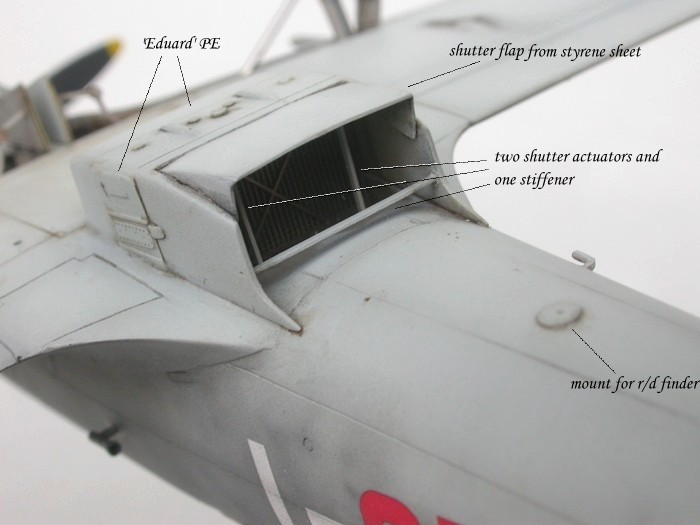
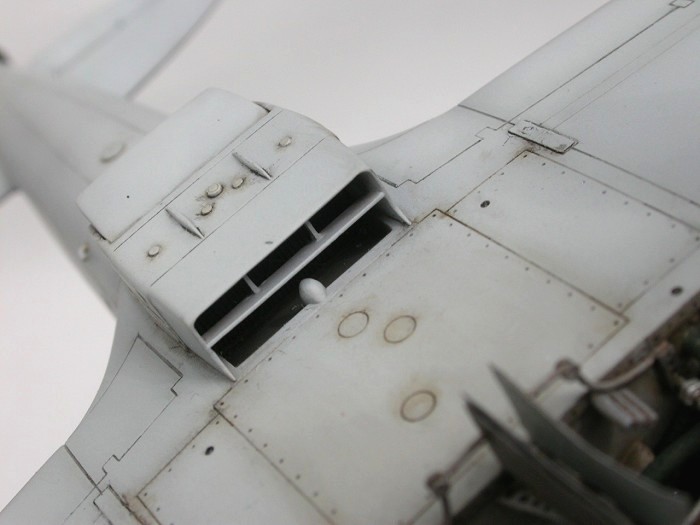
The compressor air intake came
next. Its rather crude opening needs some serious widening and
reshaping. I punched out a disc of very thin styrene sheet to represent
the butterfly shutter valve (in the open position), that would close the
air intake during take-off.
A similar set of butterfly
shutters needs to be added to the outlet of the tubular oil coolers (Serie
III Veltros only).
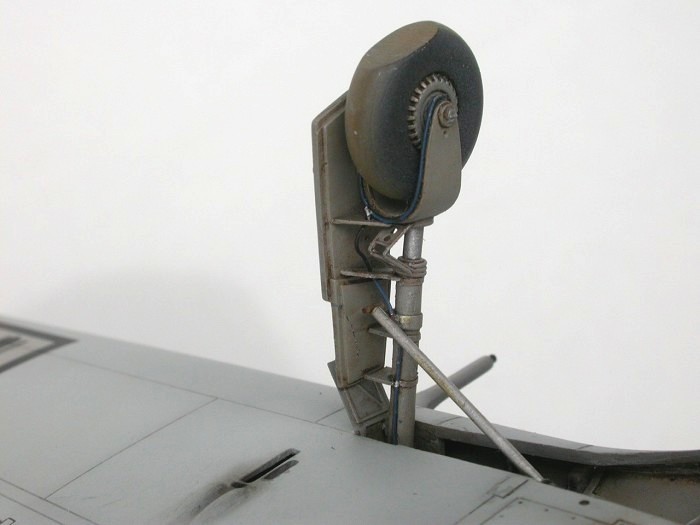
Finally, I hollowed out the tail
wheel housing as far as possible and created a new tail wheel strut from
brass. This strut would later fit into a repositioned hole to give the
tail wheel its proper sit in the fuselage. New thin tail wheel doors
were crash-moulded by using the original parts as masters.
Wings
The first look tells you that
all the Veltro-typical inspection hatches on the top wing halves
seem to be there However, when you take a closer look you notice that
apart from the main access doors for the wing cannons nearly everything
else is wrong. Serie III Veltros were equipped with two German
Mauser MG 151/20 automatic cannons that just about fitted into the wings
but protruded far out of the wing leading edge. Ammunition magazines and
the cannons' electrical circuits were serviced via four inspection
hatches which were oval in shape. Eduard produces a set of very
useful photo-etch stencils that I used to re-engrave these hatches after
I had filled in the old ones.
Both wing roots are lacking one
round filler hatch for the wing root fuel tanks. I made these from a
disc of very thin styrene sheet.
Now that my wing tops looked
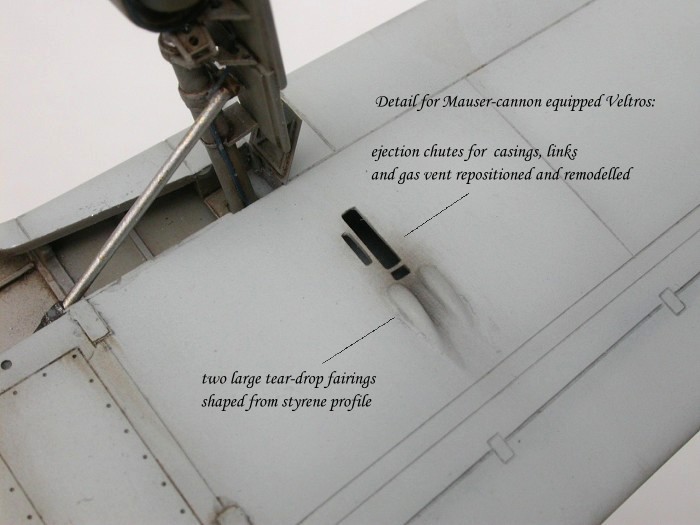
good, I tackled the undersides. This is where Hasegawa really slipped
up. Tear drop fairings are most likely the worst shapes to create from
scratch and the Hasegawa Veltro needs four of these. In reality
these fairings provided space for the lower cannon mounts and are a must
for all Mauser cannon equipped Veltros. I started with four equal
lengths of round styrene profile that I crudely shaped with a scalpel
into something that resembled a tear drop blister. These were glued to
the lower wing surface and left to harden thoroughly. The final shape
was achieved during hours of meticulous sanding with fine sand paper –
no other secrets involved (except for a cat watching you closely).
One more obstacle had to be
overcome. The ejection chutes that Hasegawa moulded into its lower wing
are supposed to be appropriate for machine gun equipped Folgores
and early Serie I Veltros. They're totally wrong for Mauser
cannon equipped Veltros. I cut out the new outer shape according
to the scale plans in the Aero Detail book and created the separations
into three individual chutes (casings, links and gas vent) with styrene
profile. I'm always amazed by what can be done with a simple pointy
scalpel blade (and a packet of plasters).
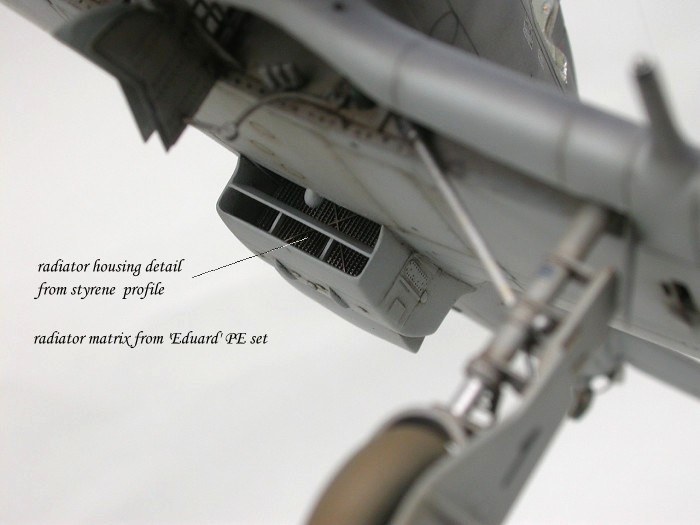
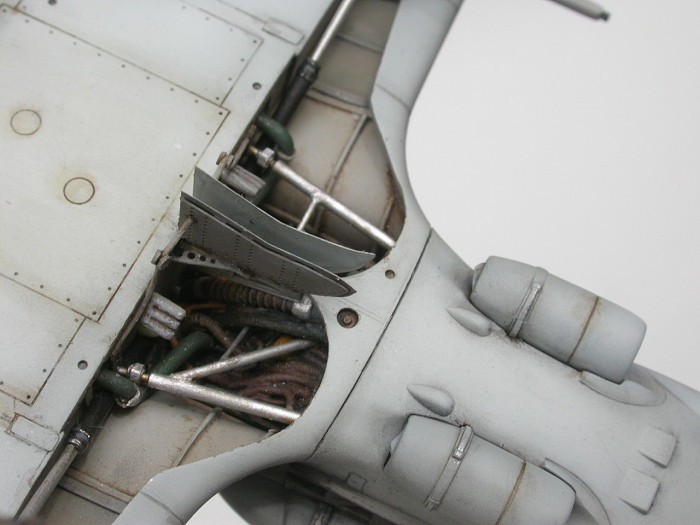
The radiator housing needed
extensive additional detailing which I have pointed out in the comments
on the photos.
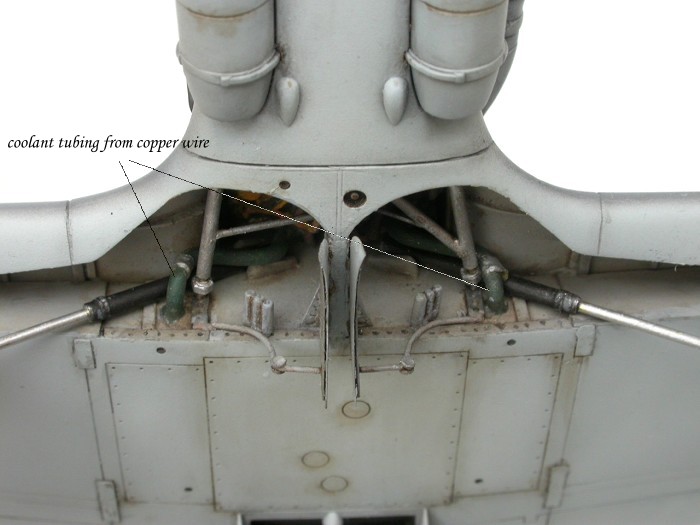
Jaguar's resin set includes an
insert that creates a very authentic illusion of the messy engine
plumbing that can be seen through the open wheel well. I decided to
further refine this section by creating engine bearers from brass wire
and tubing. Shaping the coolant tubes (green colour coding) from copper
wire was a tricky operation, but well worth the hassle.
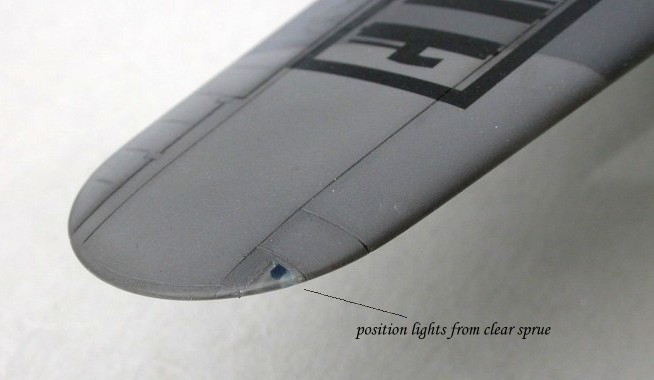
Wing tip position lights made
from clear sprue finished off the major wing assembly.
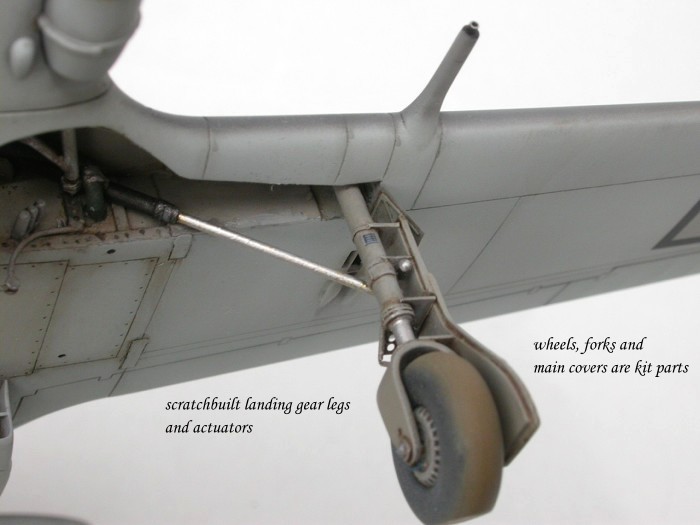
Undercarriage
As with my Folgore, I
created new undercarriage legs from various widths of styrene and brass
tubing. The original parts suffer from several deep ejector pin marks
and clumsy, out-of-scale connectors to which the landing gear covers
should be glued. See comments on my photos. The torque links are Eduard
parts and the tubing for the pneumatic brakes was bent into shape from
fine copper wire. The only original parts are the wheels, the wheel
forks and the main gear covers. Both landing gear covers need a little
tear drop fairing to make them really 'Veltro'. I used two tiny
parts from CMK's resin position light set, which offers tear drop shapes
in two different sizes.
According to D'Amico / Valentini,
M.M. 92302 was the last Veltro of Serie III built in the
Aeronautica Macchi plant at Varese, Northern Italy. At that time
AerMacchi was under the strict control of the German Armed
Forces, which occupied the whole of Northern Italy after Maresciallo
Badoglio's bungled Armistice of 8 September 1943.
M.M.92302 left the plant in the
then standard tropical camouflage of Verde Oliva Scuro 2 (dark olive
green 2) smoke rings over a Nocciola Chiaro 4 (light hazel
4) base. The under surfaces were finished in Grigio Azzurro
Chiaro 1 (light blue grey 1).
The aeroplane, which later in
its career was to become Red 23 of prima squadriglia, was repainted in
the field, when the Germans ordered the ANR to paint its fighters in
German style camouflage. So from early March 1944 onwards M.M. 92302,
like all other ANR Veltros, sported a new outfit consisting of
RLM 74/75/76 greys. The lower wing national insignias were apparently
masked over as whole, before RLM 76 Lichtblau was applied.
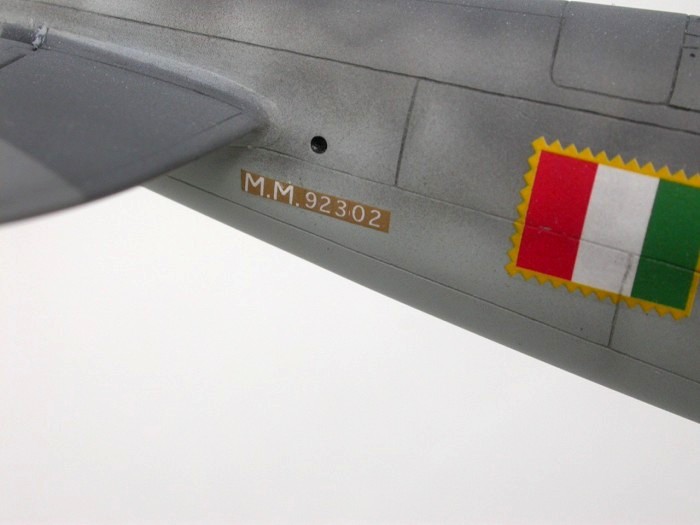
Contemporary b/w photos show the Grigio Azzurro Chiaro 1 inside
the black square as noticeably darker than the surrounding RLM 76. The
Matricola Militare serial number was equally masked over as whole
before repainting, which is why it presents itself in white characters
on a light brown background.
Sometime after 1 April 1944 all
ANR Veltros had to be repainted with a white fuselage band and a
yellow lower cowling, matching German fighters in this theatre of war.
This fuselage band and the yellow lower cowling disappeared again in
mid-June 1944.
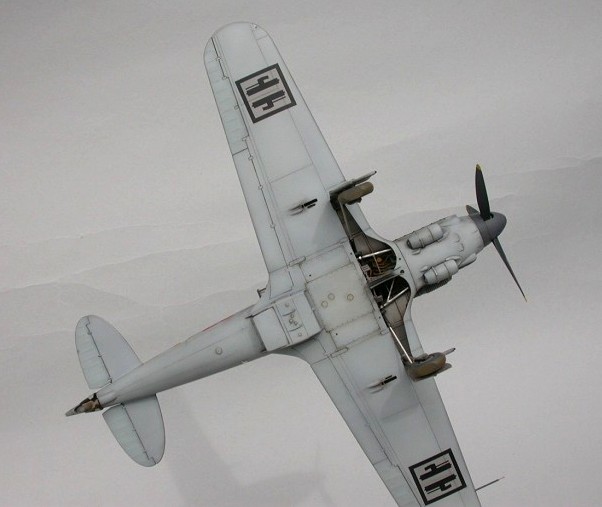
I chose to finish my model in
the way Red 23 looked in March 1944, just after the 'German' camouflage
had been applied. Therefore, the finish had to be rather clean, with
only little weathering and hardly any paint chipping. A certain degree
of exhaust staining can be seen on a well known photograph, but not as
bad as with other ANR Veltros.
I used Vallejo acrylics
throughout, which are a joy to work with. The finish is so smooth, that
it is unnecessary to glosscoat the model before application of decals. I
polished the paint thoroughly with a piece of old towel, which brought
up a lovely satin sheen.
Sky Models decals didn't show a
hint of silvering, but had to be treated with heavy-duty AeroSol
softener to settle down into the delicate surface detail.
The wing fasces had to be stolen
from Sky Models Fiat G.55 sheet, to be really correct in design.
We all seem to have our own
proven formula of weathering ingredients. Mine is black, dark grey and
burnt umber pastel dust (depending on the base colour), this I carefully
apply to all the panel lines with a fine brush. I wipe off the excess
with a piece of damp tissue. Panel lines that would have been subjected
to leaking fluids are treated with oil paints diluted in White Spirit. I
prefer this gentle method, even though it is very much more time
consuming, to the well-known wash-and-wipe approach.
The final finish was achieved
with Vallejo flat clear acrylic.
-
Hasegawa 1/48
'Macchi C. 205 Veltro Italian Air Force', # JT 124
(or any C. 205 issue by
Hasegawa)
-
Jaguar 1/48 resin
detail set for Macchi C. 202, # 64801
-
Ultracast 1/48 resin
exhaust set 'Messerschmitt Bf 109 F-K', # 48078
-
Eduard 1/48
photoetch set 'MC-205 Veltro', # 48369
-
Eduard 1/48 Express
Mask 'MC 202 Folgore', # XF119
-
Sky Models 1/48
decal sheet, 'Macchi MC 205', # 48-020
Bibliography
-
Aero Detail #15, 'Macchi C. 200/202/205' by
Carmine Di Napoli and Raffaele Mancini, published August 1995 by Dai
Nippon Kaiga Co. Ltd., Tokyo
ISBN: 4-499-22651-1
-
'Macchi MC 205 Veltro' by Maurizio Di Terlizzi,
first published by IBN-Istituto Bibliographico Napoleone, Rome, 1997
ISBN: 88-86815-55-7
-
'Camouflage and
Markings of the Aeronautica Nazionale Repubblicana 1943 -1945. A
Photographic Analysis through Speculation and Research' by
Ferdinando D'Amico and Gabriele Valentini. First published by
Classic Publications / Ian Allen Publishing Ltd., Hersham, Surrey,
England, 2005
ISBN: 1-903223-29-6
-
'Regia Aeronautica
Vol.2. A Pictorial History of the Aeronautica Nazionale Repubblicana
and the Italian Co-Belligerent Air Force 1943-1945' by Ferdinando
D'Amico and Gabriele Valentini, first published by Squadron/Signal
Publications, Inc., Carrollton, Texas, USA, 1986
ISBN: 0-89747-185-7
-
'Macchi C. 202 in
Action', by Roberto Gentilli and Luigi Gorena, Squadron/Signal
Publications, Aircraft no. 41, Carrolton, Texas, USA, 1980
ISBN: 0-89747-100-8
Even though the title
doesn't mention it, this volume contains a fair bit of information and
photography on the 'Veltro'.
-
'The Macchi C. 205 V
Veltro' by Richard Caruana,
Scale Aviation Modeller International Vol. 8, Iss. 8,
August 2002
-
'Macchi MC 205 V
Veltro', an article in Italian with beautiful technical drawings by
Aldo Curti on the official website of the 'Museo Della Scienza e
Della Tecnologia Leonardo Da Vinci', Milano, Italy
go to:
http://www.museoscienza.org/aereo/mc205.html
Click the thumbnails below to view larger
images:
Italian Aces of World War
2
Aircraft of the Aces 34 |
|
|
|
|
Author: Giorgio Apostolo
Illustrator: Richard Caruana
US Price: $19.95
UK Price: £12.99
Publisher:
Osprey Publishing
Publish Date:
November 25, 2000
Details: 96 pages; ISBN: 1841760781 |
|
|
Model, Images and Text Copyright ©
2006 by Werner Scheibling
Page Created 15 June, 2006
Last Updated
21 February, 2007
Back to
HyperScale Main Page
|
 Home
| What's New |
Features |
Gallery |
Reviews |
Reference |
Forum |
Search
Home
| What's New |
Features |
Gallery |
Reviews |
Reference |
Forum |
Search