|
Monogram's
1/48 scale
Messerschmitt Me 262 A-1a
by Ingo Degenhardt
 |
|
Messerschmitt Me 262 A-1a |
images
by Lutz Degenhardt

Revell-Monogram's
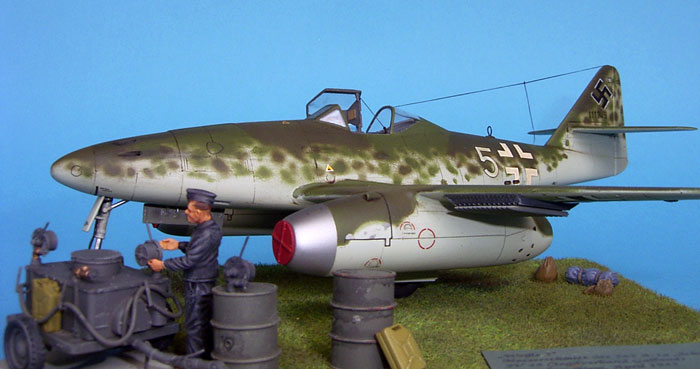
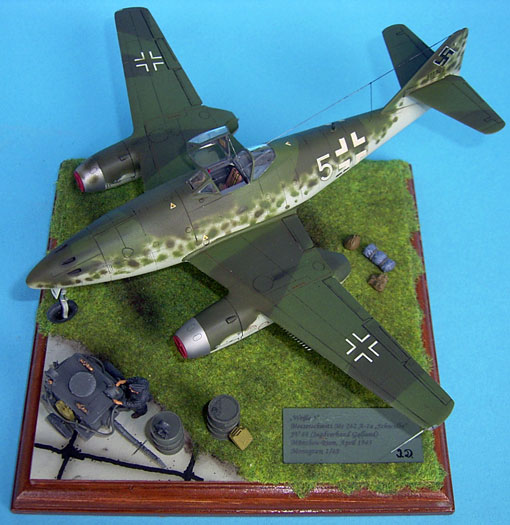
1/48 scale Messerschmitt Me 262 A-1a
is available online from
Squadron
This is the second of three Me 262 I built in a row after the Me 262
B-1a/U1. This time it’s the old Monogram kit with a few fit issues,
raised panel lines and rather sparse cockpit and wheel well detail but
with correct outlines and the brake pipes already moulded to the gear
legs.
I rescribed all the panel lines before assembly. As
expected, a lot of sanding became necessary which would have done damage
beyond repair to any raised detail.
Some parts were replaced with leftovers from other
kits – such as the closed gun bay doors which come from the Tamiya kit
and fit as well as the Monogram part does. The cockpit rear cover hales
from the Dragon kit; it is contained there for their single-seat
version. It took some work to make it fit but is worth the effort as it
is much more detailed than it’s Monogram counterpart. Engine intake
covers are Tamiya and fit perfectly without any glue.
Detailing was done by adding the canopy-holding string, antenna wire and
drilling out the camera port in the nose. The pitot probe was replaced
by two syringe needles of different sizes.
As on all three of my 262’s I did not use any
aftermarket or scratchbuilt items to show the wing leading edge spoilers
in their usual extended position on the ground.
Painting
The camouflage scheme was painted with Xtracolor’s
RAL 76 for the undersides and RAL 82/83 for the upper splinter and
mottle camouflage.
I first sprayed the undersides and nearly all of
the fuselage in RAL 76 and when dry, masked it off using Tamiya tape for
the wing/fuselage joint and blu-tack for the dividing line approximately
half the way up the fuselage side.
Next was the 82/83 splinter scheme, masked with Tamiya tape again. After
that all the tape and blu-tack was removed from the fuselage and I
sprayed on the mottling free-handed.

However the very first thing painted on this model
were the engine intake parts using Alclad Dark Aluminium. These of
course were masked all the time during the following painting. Some
mottling was done later on the right nacelle. These natural metal
nacelle parts indicate replacement engines on both wings. These seemed
to come with the intake panels already attached and as some pictures
show either no or only some very ‘quick & dirty’ painting was done after
installation.
Last paint job before commencing to the decals were
the wing and fuselage Balkenkreuze in flat white. I cut spraying masks
from adhesive foil using the decals as a guide.
Decals
These come from Monogram and various other sources
from my decal collection and are for the “Weisse 5” of Jagdverband 44
(aka Jagdverband Galland) when operating from Munich-Riem in early 1945.
I left off the yellow triangles for fuel and oil
specifications on the NM intakes as I do not think they would be
stenciled on when no one cared about the camouflage for these parts.
With a little effort the old Monogram kit still
makes a very good model with correct outlines. Detailing is a bit rough
and of course it is no match for a state-of-the-art kit such as Tamiya.
But it was a lot cheaper.
Notes:
The following literature (besides the www.) was
used for the building of this model:
-
Waffenarsenal No. 90, Band 2 “Me262 – Das
Vielzweckflugzeug”
-
Me 262 „Stormbird rising“ by Hugh Morgan
-
“Me 262 Sturmvogel “ by Dennis R. Jenkins
The Diorama plate was originally intended for an
abandoned 1/72 armour scene and therefore may appear a little small for
the Me262 but as I do not plan to build anything much smaller than this
used it anyway, because it is too nice to be wasted. It was made by Bodo
Degenhardt and adds a touch of family business to the diorama.
Click on the thumbnails
below to view larger images:
Model and Text Copyright © 2006 by
Ingo Degenhardt
Images Copyright © 2006 by Lutz Degenhardt
Page Created 05 September, 2006
Last Updated
21 February, 2007
Back to
HyperScale Main Page
|
Home
| What's New |
Features |
Gallery |
Reviews |
Reference |
Forum |
Search